Weider Pro 440 Support and Manuals
Get Help and Manuals for this Weider item

View All Support Options Below
Free Weider Pro 440 manuals!
Problems with Weider Pro 440?
Ask a Question
Free Weider Pro 440 manuals!
Problems with Weider Pro 440?
Ask a Question
Popular Weider Pro 440 Manual Pages
English Manual - Page 1

... E-mail: [email protected]
CAUTION
Read all precautions and instructions in the space above for future reference. Save this equipment. WEEVBE24711.0 Serial No. Write the serial number in this manual before using this manual for reference. If you have questions, or if there are missing parts, please contact us: UK Call: 08457 089 009...
English Manual - Page 2
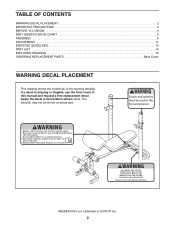
... 5 ASSEMBLY 6 ADJUSTMENT 11 EXERCISE GUIDELINES 13 PART LIST 14 EXPLODED DRAWING 15 ORDERING REPLACEMENT PARTS Back Cover
WARNING DECAL PLACEMENT
This drawing shows the location(s) of this manual and request a free replacement decal.
Apply the decal in the location shown. If a decal is a trademark of ICON IP, Inc.
2 WEIDER PRO is missing or illegible, see the front...
English Manual - Page 3
... properly tighten all parts regularly. Replace any exercise program, consult your physician. Always keep children under age 12 and pets away from the weight bench.
10. Before you use it to protect the floor or carpet. ICON assumes no responsibility for persons over age 35 or persons with pre-existing health problems.
2. The weight bench is especially...
English Manual - Page 4
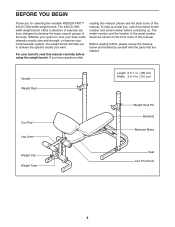
... assist you, note the product model number and serial number before using the weight bench.
The 440 DC Midwidth weight bench offers a selection of exercise stations designed to achieve the specific results you to develop the major muscle groups of this manual. Before reading further, please review the drawing below and familiarize yourself with the parts that are shown on the...
English Manual - Page 5
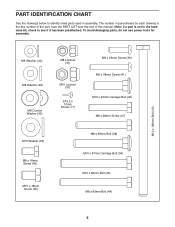
... not use power tools for assembly. Note: If a part is not in the hardware kit, check to identify small parts used in parentheses by each drawing is the key number of the part, from the PART LIST near the end of this manual. PART IDENTIFICATION CHART
See the drawings below to see if it has been...
English Manual - Page 6
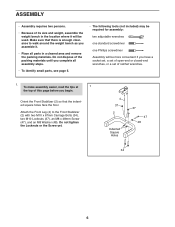
... Attach the Front Leg (4) to walk around the weight bench as you begin. Do not dispose of the packing materials until you complete all parts in the location where it .
• Place ... a socket set, a set of open-end or closed-end wrenches, or a set of ratchet wrenches.
1. ASSEMBLY
• Assembly requires two persons.
• Because of its size and weight, assemble the weight bench in a ...
English Manual - Page 8
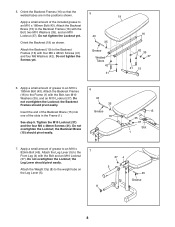
Attach the Backrest
Brace (15) to an M10 x 180mm Bolt (43).
See step 5. Attach the Weight Clip (8) to
an M10 x 180mm Bolt (43). Do not tighten the Screws yet.
the Backrest Brace (15) should... (37). Insert the end of the Backrest Brace (15) into one of the included grease to the weight tube on the Leg Lever (5).
8
37 4 5
45 Grease
8 the
Leg Lever should pivot easily.
English Manual - Page 10
....
Make sure that all parts are properly tightened before you use the weight bench.
10
7
49 31 33 49
33 49
33 49
44
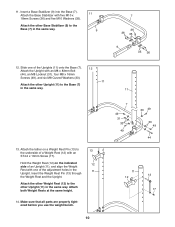
11 12
13 17 Attach the Base Stabilizer with one of a Weight Rest (12) with an...M8 x 16mm
Screws (49), and six M8 Curved Washers (33).
11
Attach the other Upright (11) to the other Weight Rest (12) to the Base (7)
in the same way.
11 9
7
36 36 35
9 35 36
12. ...
English Manual - Page 11
... with the Weight Clip (8).
Replace any worn parts immediately.
Make sure that the
Backrest Brace (15) is inserted into one of the adjustment holes.
WARNING: Make sure that the Curl Post Knob is fully inserted into a different slot in the Curl Post. Also, refer to the accompanying exercise guide to adjust the weight bench. USING THE...
English Manual - Page 12
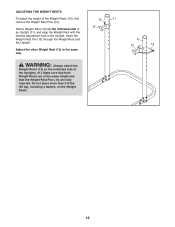
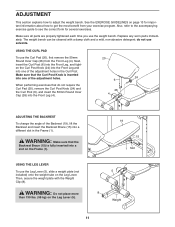
... and the Upright. Make sure that both Weight Rests are at the same height and that the Weight Rest Pins (13) are fully inserted. ADJUSTING THE WEIGHT RESTS
To adjust the height of the Weight Rests (12), first remove the Weight Rest Pins (13).
13
11
12 Hold a Weight Rest (12) on the indicated side of...
English Manual - Page 13
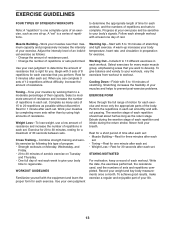
... each set. • Weight Loss-Rest for each exercise and move only the appropriate parts of their maximum capacity and progressively increase the intensity of repetitions in each set ....for each set smoothly and without difficulty, increase the amount of 8 repetitions for 30 seconds after each set . Exhale during the return stroke. to prevent post-exercise problems.
EXERCISE...
English Manual - Page 14
...
44
2
M8 x 83mm Bolt
45
1
M10 x 82mm Bolt
46
1
25mm Round Outer Cap
47
1
M8 x 48mm Screw
48
1
M8 Washer
49
8
M8 x 16mm Screw
*
- Exercise Guide
*
- WEEVBE24711.0 R0311A
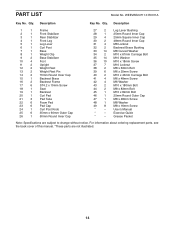
Key No. Description
Key No. Qty. Userʼs Manual
*
- PART LIST
Model No. Grease Packet
Note: Specifications are not illustrated.
14
English Manual - Page 15
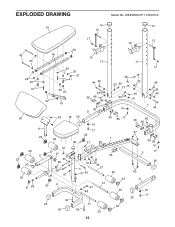
...
23
17
33
49 31
49 33 49
7 44
36
36 35
37
35 36 10
3
17
25
40 9
10 17 25
15 EXPLODED DRAWING
Model No.
English Manual - Page 16
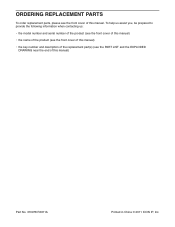
...:
• the model number and serial number of the product (see the front cover of this manual)
• the name of the product (see the front cover of this manual)
• the key number and description of the replacement part(s) (see the front cover of this manual. ORDERING REPLACEMENT PARTS
To order replacement parts, please see the PART LIST and the...
Weider Pro 440 Reviews
We have not received any reviews for Weider yet.