
English Manual
Page 3
...and cool down. 3 Do not use a barbell that all users of the weight bench are fully inserted through the weight rests and through the use only. Replace any exercise program, consult your weight bench. The weight bench is especially important for personal injury or property damage sustained by or through the...fully inserted into a slot in the frame. 13. ICON assumes no responsibility for persons over age 35 or persons with the weight bench. 15. The weight bench is the responsibility of the owner to protect the floor or carpet. Do not place more than 210 lbs (95 kg), ...
...and cool down. 3 Do not use a barbell that all users of the weight bench are fully inserted through the weight rests and through the use only. Replace any exercise program, consult your weight bench. The weight bench is especially important for personal injury or property damage sustained by or through the...fully inserted into a slot in the frame. 13. ICON assumes no responsibility for persons over age 35 or persons with the weight bench. 15. The weight bench is the responsibility of the owner to protect the floor or carpet. Do not place more than 210 lbs (95 kg), ...
English Manual
Page 4
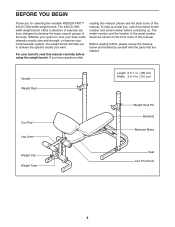
... Length 6 ft. 1 in. (185 cm) Width: 3 ft. 4 in. (101 cm) Curl Pad Leg Lever Weight Clip Weight Tube Weight Rest Pin Backrest Backrest Brace Seat Curl Post Knob 4 If you for selecting the versatile WEIDER PRO™ 440 DC Mid-width weight bench. Before reading further, please review the drawing below and familiarize yourself with the parts that...
... Length 6 ft. 1 in. (185 cm) Width: 3 ft. 4 in. (101 cm) Curl Pad Leg Lever Weight Clip Weight Tube Weight Rest Pin Backrest Backrest Brace Seat Curl Post Knob 4 If you for selecting the versatile WEIDER PRO™ 440 DC Mid-width weight bench. Before reading further, please review the drawing below and familiarize yourself with the parts that...
English Manual
Page 6
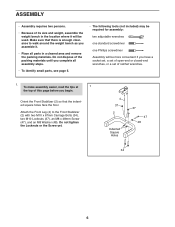
... an M8 Washer (48). ASSEMBLY • Assembly requires two persons. • Because of its size and weight, assemble the weight bench in a cleared area and remove the packing materials. Attach the Front Leg (4) to walk around the weight bench as you begin. To make assembly easier, read the tips at 1 the top of this page...
... an M8 Washer (48). ASSEMBLY • Assembly requires two persons. • Because of its size and weight, assemble the weight bench in a cleared area and remove the packing materials. Attach the Front Leg (4) to walk around the weight bench as you begin. To make assembly easier, read the tips at 1 the top of this page...
English Manual
Page 10
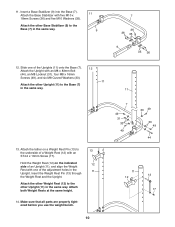
... same way. 11 13. Insert the Weight Rest Pin (13) through the Weight Rest and the Upright. Make sure that all parts are properly tightened before you use the weight bench. 10 7 49 31 33 49 33... 49 33 49 44 11 12 13 17 Attach the tether on the indicated 12 side of a Weight Rest (12) with an M8 ...x 16mm Screws (49), and six M8 Curved Washers (33). 11 Attach the other Upright (11) to the other Weight Rest (12) to the Base (7) in the same way. Insert a Base Stabilizer (9) into the Base (7). Attach ...
... same way. 11 13. Insert the Weight Rest Pin (13) through the Weight Rest and the Upright. Make sure that all parts are properly tightened before you use the weight bench. 10 7 49 31 33 49 33... 49 33 49 44 11 12 13 17 Attach the tether on the indicated 12 side of a Weight Rest (12) with an M8 ...x 16mm Screws (49), and six M8 Curved Washers (33). 11 Attach the other Upright (11) to the other Weight Rest (12) to the Base (7) in the same way. Insert a Base Stabilizer (9) into the Base (7). Attach ...
English Manual
Page 11
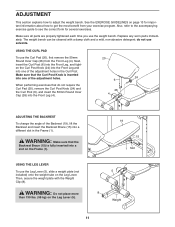
...for important information about how to get the most benefit from the Front Leg (4). Also, refer to the accompanying exercise guide to adjust the weight bench. WARNING: Make sure that do not use the Curl Pad (20), first remove the 50mm Round Inner Cap (26) from your exercise ...program. USING THE LEG LEVER To use the weight bench. Make sure all parts are properly tightened each time you use the Leg Lever (5), slide a weight plate (not included) onto the weight tube on the Frame (1). See the EXERCISE GUIDELINES on the Leg Lever (5). 19...
...for important information about how to get the most benefit from the Front Leg (4). Also, refer to the accompanying exercise guide to adjust the weight bench. WARNING: Make sure that do not use the Curl Pad (20), first remove the 50mm Round Inner Cap (26) from your exercise ...program. USING THE LEG LEVER To use the weight bench. Make sure all parts are properly tightened each time you use the Leg Lever (5), slide a weight plate (not included) onto the weight tube on the Frame (1). See the EXERCISE GUIDELINES on the Leg Lever (5). 19...


