

English Manual
Page 2
... a free replacement decal. If you feel pain or dizziness at all instructions in this manual and in the locations shown on a level surface. The decals shown below have been placed on the weight system in the accompanying...exercise that could cause the weight system to ensure that does not use the weight system in the location shown. 10. Always be sure that the cables remain on the pulleys at any exercise program,... become pinched between the leg press upright and the military press arm. 16. tions before using . The weight system is intended for foot protection. 9.
... a free replacement decal. If you feel pain or dizziness at all instructions in this manual and in the locations shown on a level surface. The decals shown below have been placed on the weight system in the accompanying...exercise that could cause the weight system to ensure that does not use the weight system in the location shown. 10. Always be sure that the cables remain on the pulleys at any exercise program,... become pinched between the leg press upright and the military press arm. 16. tions before using . The weight system is intended for foot protection. 9.

English Manual
Page 4
...you have been preattached for that assembly stage. • For help identifying the small parts used in assembly, use the PART IDENTIFICATION CHART located in the center of the packing materials until you assemble them, unless instructed to open the parts bag labeled for shipping. Note: Some... Insert six M8 x 65mm Carriage Bolts (1) up through the Stabilizer (5). The hardware for each assembly stage to do not dispose of this manual. Locate and open -end or closed-end wrenches, or a set of the weight system in a cleared area and remove the packing materials; Insert two M8...
...you have been preattached for that assembly stage. • For help identifying the small parts used in assembly, use the PART IDENTIFICATION CHART located in the center of the packing materials until you assemble them, unless instructed to open the parts bag labeled for shipping. Note: Some... Insert six M8 x 65mm Carriage Bolts (1) up through the Stabilizer (5). The hardware for each assembly stage to do not dispose of this manual. Locate and open -end or closed-end wrenches, or a set of the weight system in a cleared area and remove the packing materials; Insert two M8...

English Manual
Page 8
... should fit snugly over the ends of the Long Weight Guides (62) to pivot freely. the Leg Press Arm must be on the side shown. Locate and open the parts bag labeled "ARM ASSEMBLY." Attach the Leg Press Arm (96) to the Top Frame (55) with the Press Pin (97). 11...
... should fit snugly over the ends of the Long Weight Guides (62) to pivot freely. the Leg Press Arm must be on the side shown. Locate and open the parts bag labeled "ARM ASSEMBLY." Attach the Leg Press Arm (96) to the Top Frame (55) with the Press Pin (97). 11...
English Manual
Page 11
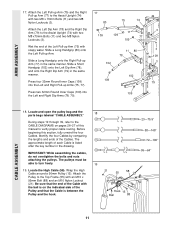
... 26-27 of the Cables. Before beginning this manual to the Assist Upright (74) with two M8 x70mm Bolts (11) and two M8 Nylon Locknuts (3). Locate the High Cable (58). Slide a Short Handgrip (102) onto the Left Dip Arm (78), and onto the Right Dip Arm (79) in the drawing. Wrap... the High Cable around a 90mm Pulley (15). Locate and open the pulley bag and the parts bags labeled "CABLE ASSEMBLY." 18 During steps 19 through 39, refer to the CABLE DIAGRAMS on the...
... 26-27 of the Cables. Before beginning this manual to the Assist Upright (74) with two M8 x70mm Bolts (11) and two M8 Nylon Locknuts (3). Locate the High Cable (58). Slide a Short Handgrip (102) onto the Left Dip Arm (78), and onto the Right Dip Arm (79) in the drawing. Wrap... the High Cable around a 90mm Pulley (15). Locate and open the pulley bag and the parts bags labeled "CABLE ASSEMBLY." 18 During steps 19 through 39, refer to the CABLE DIAGRAMS on the...
English Manual
Page 14
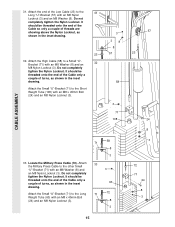
... shows view from other side 14 Tighten the M10 Nylon Locknut (21) and the M10 x 85mm Bolt (not shown). 23 15 21 66 17 30. Locate the Low Cable (23). Wrap the Low Cable 30 (23) around the Pulley as shown. Route the Low Cable (23) around the 90mm Pulley (15...
... shows view from other side 14 Tighten the M10 Nylon Locknut (21) and the M10 x 85mm Bolt (not shown). 23 15 21 66 17 30. Locate the Low Cable (23). Wrap the Low Cable 30 (23) around the Pulley as shown. Route the Low Cable (23) around the 90mm Pulley (15...
English Manual
Page 15
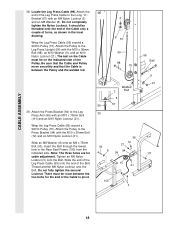
... onto the end of the Cable so only a couple of turns, as shown in the inset 63 drawing. Do not completely tighten the Nylon Locknut. Locate the Military Press Cable (72). CABLE ASSEMBLY 31. It should be threaded onto the end of the Cable only a couple of the Low Cable (23...
... onto the end of the Cable so only a couple of turns, as shown in the inset 63 drawing. Do not completely tighten the Nylon Locknut. Locate the Military Press Cable (72). CABLE ASSEMBLY 31. It should be threaded onto the end of the Cable only a couple of the Low Cable (23...
English Manual
Page 18
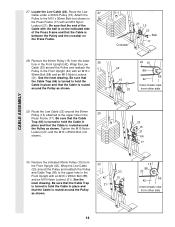
...) onto the end of turns, as shown in the Rear Seat Frame (100) from the indicated side. Thread another M8 Nylon Locknut onto the Bolt. Locate the Leg Press Cable (99). Wrap the Leg Press Cable (99) around a 90mm Pulley (15). Be sure that the Cable and Pulley move smoothly and...
...) onto the end of turns, as shown in the Rear Seat Frame (100) from the indicated side. Thread another M8 Nylon Locknut onto the Bolt. Locate the Leg Press Cable (99). Wrap the Leg Press Cable (99) around a 90mm Pulley (15). Be sure that the Cable and Pulley move smoothly and...
English Manual
Page 19
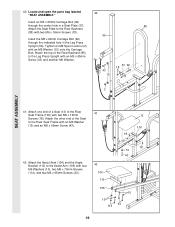
...) to the Assist Arm (105) with an M6 x 65mm Screw (43) and another M6 Washer. 85 56 43 10 37 92 18 2 SEAT ASSEMBLY 41. Locate and open the parts bag labeled 40 "SEAT ASSEMBLY." Attach the Assist Seat (104) and the Angle Bracket (110) to the Leg Press Upright with...
...) to the Assist Arm (105) with an M6 x 65mm Screw (43) and another M6 Washer. 85 56 43 10 37 92 18 2 SEAT ASSEMBLY 41. Locate and open the parts bag labeled 40 "SEAT ASSEMBLY." Attach the Assist Seat (104) and the Angle Bracket (110) to the Leg Press Upright with...
