
English Manual
Page 1
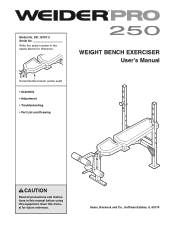
Write the serial number in this manual before using this manual for reference. Save this equipment. Sears, Roebuck and Co., Hoffman Estates, IL 60179 WEIGHT BENCH EXERCISER User's Manual Serial Number Decal (under seat) • Assembly • Adjustment • Troubleshooting • Part List and Drawing CAUTION Read all precautions and instructions in the space above for future reference. Model No. 831.15707.0 Serial No.
Write the serial number in this manual before using this manual for reference. Save this equipment. Sears, Roebuck and Co., Hoffman Estates, IL 60179 WEIGHT BENCH EXERCISER User's Manual Serial Number Decal (under seat) • Assembly • Adjustment • Troubleshooting • Part List and Drawing CAUTION Read all precautions and instructions in the space above for future reference. Model No. 831.15707.0 Serial No.
English Manual
Page 2
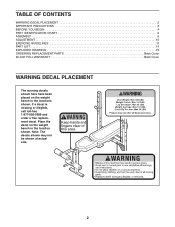
... this area. 2 If a decal is missing or illegible, call toll-free 1-877-992-5999 and order a free replacement decal. Place the decal on the weight bench in the location shown. TABLE OF CONTENTS WARNING DECAL PLACEMENT 2 IMPORTANT PRECAUTIONS 3 BEFORE YOU BEGIN 4 PART IDENTIFICATION CHART 5 ASSEMBLY 6 ADJUSTMENT 10 EXERCISE GUIDELINES 11 PART... ORDERING REPLACEMENT PARTS Back Cover 90-DAY FULL WARRANTY Back Cover WARNING DECAL PLACEMENT The warning decals shown here have been placed on the weight bench in the locations shown.
... this area. 2 If a decal is missing or illegible, call toll-free 1-877-992-5999 and order a free replacement decal. Place the decal on the weight bench in the location shown. TABLE OF CONTENTS WARNING DECAL PLACEMENT 2 IMPORTANT PRECAUTIONS 3 BEFORE YOU BEGIN 4 PART IDENTIFICATION CHART 5 ASSEMBLY 6 ADJUSTMENT 10 EXERCISE GUIDELINES 11 PART... ORDERING REPLACEMENT PARTS Back Cover 90-DAY FULL WARRANTY Back Cover WARNING DECAL PLACEMENT The warning decals shown here have been placed on the weight bench in the locations shown.
English Manual
Page 3
...weight of 300 pounds (136 kg) and a maximum total weight of serious injury, read the following important precau- Do not use the weight bench in an inclined position, make sure that all users of all instructions before using the backrest in any commercial, rental, or institutional setting. ...Do not use of your barbell when you are using . If you cannot complete a repetition. 7. When you are using the weight bench. 1. The weight bench is longer than 50 pounds (23 kg) on the weight rests. Always wear athletic shoes for personal injury or property damage sustained ...
...weight of 300 pounds (136 kg) and a maximum total weight of serious injury, read the following important precau- Do not use the weight bench in an inclined position, make sure that all users of all instructions before using the backrest in any commercial, rental, or institutional setting. ...Do not use of your barbell when you are using . If you cannot complete a repetition. 7. When you are using the weight bench. 1. The weight bench is longer than 50 pounds (23 kg) on the weight rests. Always wear athletic shoes for personal injury or property damage sustained ...
English Manual
Page 4
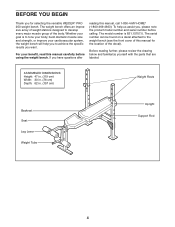
... below and familiarize yourself with the parts that are labeled. The model number is to the weight bench (see the front cover of this manual for selecting the versatile WEIDER® PRO 250 weight bench. Whether your benefit, read this manual, call 1-800-4-MY-HOME® (1-800-469-4663).... To help you to develop every major muscle group of the decal). The weight bench offers an impressive array of weight stations...
... below and familiarize yourself with the parts that are labeled. The model number is to the weight bench (see the front cover of this manual for selecting the versatile WEIDER® PRO 250 weight bench. Whether your benefit, read this manual, call 1-800-4-MY-HOME® (1-800-469-4663).... To help you to develop every major muscle group of the decal). The weight bench offers an impressive array of weight stations...
English Manual
Page 5
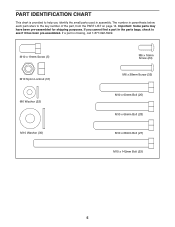
PART IDENTIFICATION CHART This chart is missing, call 1-877-992-5999. The number in parenthesis below each part refers to help you cannot find a part in assembly. If you identify the small parts used in the parts bags, check to see if it has been pre-assembled. If a part is provided to the key number of the part, from the PART LIST on page 14. M10 x 19mm Screw (5) M10 Nylon Locknut (31) M6 Washer (22) M10 Washer (30) M6 x 16mm Screw (24) M6 x 38mm Screw (32) M10 x 60mm Bolt (25) M10 x 66mm Bolt (28) M10 x 68mm Bolt (27) M10 x 142mm Bolt (23) 5 Important: Some parts may ...
PART IDENTIFICATION CHART This chart is missing, call 1-877-992-5999. The number in parenthesis below each part refers to help you cannot find a part in assembly. If you identify the small parts used in the parts bags, check to see if it has been pre-assembled. If a part is provided to the key number of the part, from the PART LIST on page 14. M10 x 19mm Screw (5) M10 Nylon Locknut (31) M6 Washer (22) M10 Washer (30) M6 x 16mm Screw (24) M6 x 38mm Screw (32) M10 x 60mm Bolt (25) M10 x 66mm Bolt (28) M10 x 68mm Bolt (27) M10 x 142mm Bolt (23) 5 Important: Some parts may ...
English Manual
Page 6
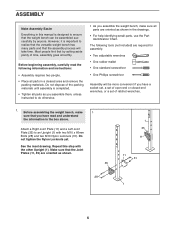
... the inset drawing. Repeat this manual is completed. • Tighten all parts as you assemble them, unless instructed to ensure that the weight bench can be more convenient if you have read the following tools (not included) are required for assembly: • Two adjustable wrenches • One...(11, 35) are oriented as shown in the drawings. • For help identifying small parts, use the Part Identification Chart. Before assembling the weight bench, make sure all parts in a cleared area and remove the packing materials. Attach a Right Joint Plate (11) and a Left Joint Plate (35)...
... the inset drawing. Repeat this manual is completed. • Tighten all parts as you assemble them, unless instructed to ensure that the weight bench can be more convenient if you have read the following tools (not included) are required for assembly: • Two adjustable wrenches • One...(11, 35) are oriented as shown in the drawings. • For help identifying small parts, use the Part Identification Chart. Before assembling the weight bench, make sure all parts in a cleared area and remove the packing materials. Attach a Right Joint Plate (11) and a Left Joint Plate (35)...
English Manual
Page 7
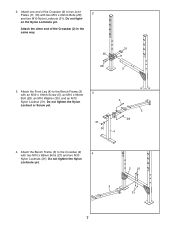
... Bolts (28) and two M10 Nylon Locknuts (31). Do not tighten the Nylon Locknuts yet. 3 2 27 31 7 en the Nylon Locknuts yet. Attach the Bench Frame (3) to the Bench Frame (3) 3 with two M10 x 68mm Bolts (27) and two M10 Nylon Locknuts (31). Attach the Front Leg (4) to the Crossbar (2) 4 with an M10...
... Bolts (28) and two M10 Nylon Locknuts (31). Do not tighten the Nylon Locknuts yet. 3 2 27 31 7 en the Nylon Locknuts yet. Attach the Bench Frame (3) to the Bench Frame (3) 3 with two M10 x 68mm Bolts (27) and two M10 Nylon Locknuts (31). Attach the Front Leg (4) to the Crossbar (2) 4 with an M10...
English Manual
Page 8
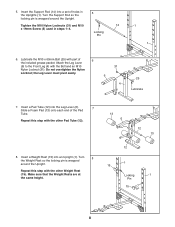
Do not overtighten the Nylon Locknut; Turn the Support Rod so the locking pin is wrapped around the Upright. Locking Pin 1 1 6. Lubricate the M10 x 60mm Bolt (25) with the Bolt and an M10 Nylon Locknut (31). Attach the Leg Lever (6) to the Front Leg (4) with part of 6 the included grease packet. Insert a Weight Rest (15) into the Leg Lever (6). 7 Slide a Foam Pad (13) onto each end of holes in steps 1-4. Repeat this step with the other Pad Tube (12). 8. the Leg Lever must pivot easily. 31 6 4 25 Lubricate 7. Repeat this step with the other Weight Rest...
Do not overtighten the Nylon Locknut; Turn the Support Rod so the locking pin is wrapped around the Upright. Locking Pin 1 1 6. Lubricate the M10 x 60mm Bolt (25) with the Bolt and an M10 Nylon Locknut (31). Attach the Leg Lever (6) to the Front Leg (4) with part of 6 the included grease packet. Insert a Weight Rest (15) into the Leg Lever (6). 7 Slide a Foam Pad (13) onto each end of holes in steps 1-4. Repeat this step with the other Pad Tube (12). 8. the Leg Lever must pivot easily. 31 6 4 25 Lubricate 7. Repeat this step with the other Weight Rest...
English Manual
Page 9
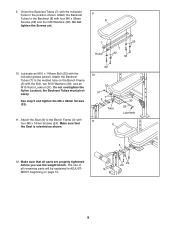
... tube on page 10. 3 24 24 9 Do not overtighten the Nylon Locknut; The use of all parts are properly tightened before you use the weight bench. Lubricate an M10 x 142mm Bolt (23) with the Bolt, two M10 Washers (30), and an M10 Nylon Locknut (31). See step 9 and tighten the .... the Backrest Tubes must pivot easily. Make sure that all remaining parts will be explained in the position shown. 9. Attach the Backrest Tubes to the Bench Frame (3) with four M6 x 38mm Screws (32) and four M6 Washers (22). Attach the Seat (9) to the Backrest (8) with 11 four M6 x 16mm Screws (24...
... tube on page 10. 3 24 24 9 Do not overtighten the Nylon Locknut; The use of all parts are properly tightened before you use the weight bench. Lubricate an M10 x 142mm Bolt (23) with the Bolt, two M10 Washers (30), and an M10 Nylon Locknut (31). See step 9 and tighten the .... the Backrest Tubes must pivot easily. Make sure that all remaining parts will be explained in the position shown. 9. Attach the Backrest Tubes to the Bench Frame (3) with four M6 x 38mm Screws (32) and four M6 Washers (22). Attach the Seat (9) to the Backrest (8) with 11 four M6 x 16mm Screws (24...
English Manual
Page 10
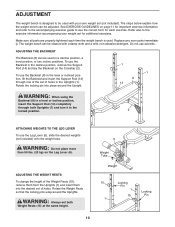
...1 Locking 15 Pin 1 See EXERCISE GUIDELINES on the Leg Lever (6). Rotate the locking pin into the desired set for each time the weight bench is designed to the locked position. 2 ATTACHING WEIGHTS TO THE LEG LEVER To use the Leg Lever (6), slide the desired weights (not included)... onto the weight tube. WARNING: Always set (not included). The weight bench can be cleaned with your weight set of holes in a decline position, a level position, or two incline positions. WARNING: Do not place more...
...1 Locking 15 Pin 1 See EXERCISE GUIDELINES on the Leg Lever (6). Rotate the locking pin into the desired set for each time the weight bench is designed to the locked position. 2 ATTACHING WEIGHTS TO THE LEG LEVER To use the Leg Lever (6), slide the desired weights (not included)... onto the weight tube. WARNING: Always set (not included). The weight bench can be cleaned with your weight set of holes in a decline position, a level position, or two incline positions. WARNING: Do not place more...
English Manual
Page 11
A "set . Avoid overdoing it . Rest for 3 minutes after each set " is a series of repetitions.) Determining the appropriate length of time for each workout, and the number of repetitions or sets to complete, is an essential part of an effective exercise program. Warming up prepares your body for 1 minute after each set . Rest for more strenuous exercise by increasing circulation, raising your body temperature and delivering more sets rather than by using high amounts of resistance. Select exercises for each set . Each workout should be sensitive to your body's signals. ...
A "set . Avoid overdoing it . Rest for 3 minutes after each set " is a series of repetitions.) Determining the appropriate length of time for each workout, and the number of repetitions or sets to complete, is an essential part of an effective exercise program. Warming up prepares your body for 1 minute after each set . Rest for more strenuous exercise by increasing circulation, raising your body temperature and delivering more sets rather than by using high amounts of resistance. Select exercises for each set . Each workout should be sensitive to your body's signals. ...
English Manual
Page 12
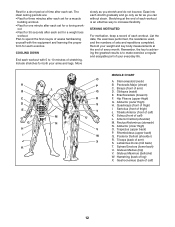
Move slowly as you stretch and do not bounce. STAYING MOTIVATED For motivation, keep a record of each workout with the equipment and learning the proper form for both your arms and legs. Record your weight and key body measurements at the end of each set for a toning work- Remember, the key to achieving the greatest results is an effective way to increase flexibility. Sternomastoid (neck) B. Pectoralis Major (chest) C. Quadriceps (front of every month. Anterior Deltoid (shoulder) M. Latissimus Dorsi (mid back) T. out. • Rest for 30 seconds after each set for a ...
Move slowly as you stretch and do not bounce. STAYING MOTIVATED For motivation, keep a record of each workout with the equipment and learning the proper form for both your arms and legs. Record your weight and key body measurements at the end of each set for a toning work- Remember, the key to achieving the greatest results is an effective way to increase flexibility. Sternomastoid (neck) B. Pectoralis Major (chest) C. Quadriceps (front of every month. Anterior Deltoid (shoulder) M. Latissimus Dorsi (mid back) T. out. • Rest for 30 seconds after each set for a ...
English Manual
Page 14
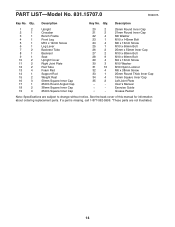
PART LIST-Model No. 831.15707.0 R0407A Key No. Grease Packet Note: Specifications are not illustrated. 14 Exercise Guide * - Description 1 2 Upright 2 1 Crossbar 3 1 Bench Frame 4 1 Front Leg 5 1 M10 x 19mm Screw 6 1 Leg Lever 7 2 Backrest Tube 8 1 Backrest 9 1 Seat 10 2 Upright Cover 11 2 Right Joint Plate 12 2 Pad Tube 13 4 Foam Pad ...
PART LIST-Model No. 831.15707.0 R0407A Key No. Grease Packet Note: Specifications are not illustrated. 14 Exercise Guide * - Description 1 2 Upright 2 1 Crossbar 3 1 Bench Frame 4 1 Front Leg 5 1 M10 x 19mm Screw 6 1 Leg Lever 7 2 Backrest Tube 8 1 Backrest 9 1 Seat 10 2 Upright Cover 11 2 Right Joint Plate 12 2 Pad Tube 13 4 Foam Pad ...

English Manual
Page 15
EXPLODED DRAWING-Model No. 831.15707.0 R0407A 16 21 14 29 20 15 10 29 8 21 31 30 7 19 22 19 7 22 30 23 32 1 32 31 16 35 11 31 2 35 9 28 29 27 11 28 20 15 10 3 31 16 31 5 24 34 24 13 6 31 30 28 25 4 17 13 26 26 18 33 18 12 13 29 1 12 13 34 15
EXPLODED DRAWING-Model No. 831.15707.0 R0407A 16 21 14 29 20 15 10 29 8 21 31 30 7 19 22 19 7 22 30 23 32 1 32 31 16 35 11 31 2 35 9 28 29 27 11 28 20 15 10 3 31 16 31 5 24 34 24 13 6 31 30 28 25 4 17 13 26 26 18 33 18 12 13 29 1 12 13 34 15
English Manual
Page 16
..., accessories, and user's manuals that you may also have other rights which vary from state to state. This warranty does not apply when the WEIGHT BENCH EXERCISER is used commercially or for the location of your nearest Sears Parts & Repair Center. 1-800-488-1222 Call anytime, day or night (U.S.A. Sears,... ® Marca Registrada / TM Marca de Fábrica / SM Marca de Servicio de Sears Brands, LLC 90-DAY FULL WARRANTY If this Sears WEIGHT BENCH EXERCISER fails due to a defect in items like garage door openers and water heaters. 1-800-4-MY-HOME® (1-800-469-4663) Call anytime, day or...
..., accessories, and user's manuals that you may also have other rights which vary from state to state. This warranty does not apply when the WEIGHT BENCH EXERCISER is used commercially or for the location of your nearest Sears Parts & Repair Center. 1-800-488-1222 Call anytime, day or night (U.S.A. Sears,... ® Marca Registrada / TM Marca de Fábrica / SM Marca de Servicio de Sears Brands, LLC 90-DAY FULL WARRANTY If this Sears WEIGHT BENCH EXERCISER fails due to a defect in items like garage door openers and water heaters. 1-800-4-MY-HOME® (1-800-469-4663) Call anytime, day or...