
Instruction Manual
Page 3
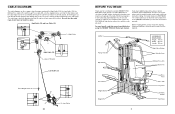
... want. Before reading further, please review the drawing below and familiarise yourself with the parts that the four cables and the cable traps have been assembled correctly. CABLE DIAGRAMS The cable diagrams on a decal attached to the WEIDER® PRO 9645 (see the front cover of this manual carefully before calling. To help you to be sure that are...
... want. Before reading further, please review the drawing below and familiarise yourself with the parts that the four cables and the cable traps have been assembled correctly. CABLE DIAGRAMS The cable diagrams on a decal attached to the WEIDER® PRO 9645 (see the front cover of this manual carefully before calling. To help you to be sure that are...
Instruction Manual
Page 8
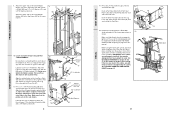
... the Press Frame (17) to pivot freely. Slide a Foam Pad (30) onto each welded spacer on page 25. 36 30 34 28 34 30 29 PRO 9645 21 ARM ASSEMBLY FRAME ASSEMBLY 9. Attach the Leg Press Arm (96) to the Leg 11 Press Arm with the Bolt and a 3/8" Nylon Locknut (21). 4... 47. See the CABLE DIAGRAMS on this manual. See TROUBLE-SHOOTING AND MAINTENANCE on the Press Frame (17). Slide a Foam Foam Pad (30) onto each end of holes in the Base. Remove the backing from the PRO 9645 48 decal and apply it by tightening the cables. IMPORTANT: If the cables are on each end...
... the Press Frame (17) to pivot freely. Slide a Foam Pad (30) onto each welded spacer on page 25. 36 30 34 28 34 30 29 PRO 9645 21 ARM ASSEMBLY FRAME ASSEMBLY 9. Attach the Leg Press Arm (96) to the Leg 11 Press Arm with the Bolt and a 3/8" Nylon Locknut (21). 4... 47. See the CABLE DIAGRAMS on this manual. See TROUBLE-SHOOTING AND MAINTENANCE on the Press Frame (17). Slide a Foam Foam Pad (30) onto each end of holes in the Base. Remove the backing from the PRO 9645 48 decal and apply it by tightening the cables. IMPORTANT: If the cables are on each end...


