
English Manual
Page 1
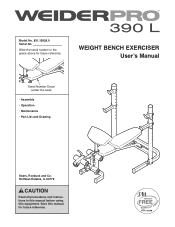
Hoffman Estates, IL 60179 CAUTION Read all precautions and instructions in the space above for future reference. Write the serial number in this manual before using this manual for future reference. WEIGHT BENCH EXERCISER Userʼs Manual Serial Number Decal (under the seat) • Assembly • Operation • Maintenance • Part List and Drawing Sears, Roebuck and Co. Model No. 831.15928.0 Serial No. Save this equipment.
Hoffman Estates, IL 60179 CAUTION Read all precautions and instructions in the space above for future reference. Write the serial number in this manual before using this manual for future reference. WEIGHT BENCH EXERCISER Userʼs Manual Serial Number Decal (under the seat) • Assembly • Operation • Maintenance • Part List and Drawing Sears, Roebuck and Co. Model No. 831.15928.0 Serial No. Save this equipment.
English Manual
Page 2
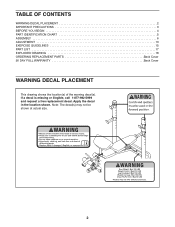
TABLE OF CONTENTS WARNING DECAL PLACEMENT 2 IMPORTANT PRECAUTIONS 3 BEFORE YOU BEGIN 4 PART IDENTIFICATION CHART 5 ASSEMBLY 6 ADJUSTMENT 13 EXERCISE GUIDELINES 15 PART LIST 17 EXPLODED DRAWING 18 ORDERING REPLACEMENT PARTS Back Cover 90 DAY FULL WARRANTY Back Cover WARNING DECAL PLACEMENT This drawing shows the location(s) of the warning decal(s). Apply the decal in the location shown. Note: The decal(s) may not be shown at actual size. 2 If a decal is missing or illegible, call 1-877-992-5999 and request a free replacement decal.
TABLE OF CONTENTS WARNING DECAL PLACEMENT 2 IMPORTANT PRECAUTIONS 3 BEFORE YOU BEGIN 4 PART IDENTIFICATION CHART 5 ASSEMBLY 6 ADJUSTMENT 13 EXERCISE GUIDELINES 15 PART LIST 17 EXPLODED DRAWING 18 ORDERING REPLACEMENT PARTS Back Cover 90 DAY FULL WARRANTY Back Cover WARNING DECAL PLACEMENT This drawing shows the location(s) of the warning decal(s). Apply the decal in the location shown. Note: The decal(s) may not be shown at actual size. 2 If a decal is missing or illegible, call 1-877-992-5999 and request a free replacement decal.
English Manual
Page 3
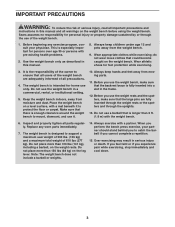
... Before you perform the bench press exercise, your physician. Before you experience pain while exercising, stop immediately and cool down. 3 Inspect and properly tighten all parts regularly. Do not place more than 6 ft. (1.8 m) with a partner. Always exercise with the weight bench. 6. Use the weight bench only as ... the frame. 12. Do not use it to protect the floor or carpet. Always keep children under age 12 and pets away from moving parts. 11. Note: The weight bench does not include a barbell or weights. 14. do not wear loose clothes that could become caught on...
... Before you perform the bench press exercise, your physician. Before you experience pain while exercising, stop immediately and cool down. 3 Inspect and properly tighten all parts regularly. Do not place more than 6 ft. (1.8 m) with a partner. Always exercise with the weight bench. 6. Use the weight bench only as ... the frame. 12. Do not use it to protect the floor or carpet. Always keep children under age 12 and pets away from moving parts. 11. Note: The weight bench does not include a barbell or weights. 14. do not wear loose clothes that could become caught on...
English Manual
Page 4
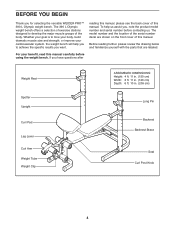
... goal is to tone your body, build dramatic muscle size and strength, or improve your benefit, read this manual. If you for selecting the versatile WEIDER PRO™ 390 L Olympic weight bench. The model number and the location of this manual. BEFORE YOU BEGIN Thank you have questions after Weight Rest... in. (209 cm) Long Pin Backrest Backrest Brace Seat Curl Post Knob 4 Before reading further, please review the drawing below and familiarize yourself with the parts that are shown on the front cover of the serial number decal are labeled.
... goal is to tone your body, build dramatic muscle size and strength, or improve your benefit, read this manual. If you for selecting the versatile WEIDER PRO™ 390 L Olympic weight bench. The model number and the location of this manual. BEFORE YOU BEGIN Thank you have questions after Weight Rest... in. (209 cm) Long Pin Backrest Backrest Brace Seat Curl Post Knob 4 Before reading further, please review the drawing below and familiarize yourself with the parts that are shown on the front cover of the serial number decal are labeled.
English Manual
Page 5
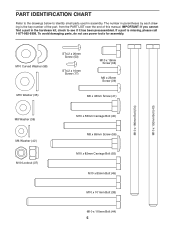
... Bolt (55) M10 x 85mm Bolt (45) M10 x 101mm Bolt (38) M10 x 110mm Bolt (44) 5 To avoid damaging parts, do not use power tools for assembly. The number in assembly. If a part is the key number of the part, from the PART LIST near the end of this manual. IMPORTANT: If you cannot find... a part in the hardware kit, check to identify small parts used in parentheses by each drawing is missing, please call 1-877...
... Bolt (55) M10 x 85mm Bolt (45) M10 x 101mm Bolt (38) M10 x 110mm Bolt (44) 5 To avoid damaging parts, do not use power tools for assembly. The number in assembly. If a part is the key number of the part, from the PART LIST near the end of this manual. IMPORTANT: If you cannot find... a part in the hardware kit, check to identify small parts used in parentheses by each drawing is missing, please call 1-877...

English Manual
Page 6
...persons. • Because of ratchet wrenches. 1. Do not dispose of the packing materials until you complete all assembly steps. • To identify small parts, see page 5. • The following tools (not included) may be required for assembly: two adjustable wrenches one rubber mallet one standard screwdriver one Phillips...-end or closed-end wrenches, or a set of its size and weight, assemble the weight bench in the location where it . • Place all parts in a cleared area and remove the packing materials. Then, tighten an M8 x 65mm Screw (56) with two M10 x 82mm Carriage Bolts (55)...
...persons. • Because of ratchet wrenches. 1. Do not dispose of the packing materials until you complete all assembly steps. • To identify small parts, see page 5. • The following tools (not included) may be required for assembly: two adjustable wrenches one rubber mallet one standard screwdriver one Phillips...-end or closed-end wrenches, or a set of its size and weight, assemble the weight bench in the location where it . • Place all parts in a cleared area and remove the packing materials. Then, tighten an M8 x 65mm Screw (56) with two M10 x 82mm Carriage Bolts (55)...

English Manual
Page 12
Attach both Spotters at the same height. 11 29 13 17 16. Attach the other Spotter (29) to the underside of a Spotter (29) with an ST4.2 x 10mm Screw (17). 15 11 Hold the Spotter (29) on a Large Pin (13) to the other Upright (11) in the Upright. Make sure that all parts are properly tightened before you use the weight bench. 12 15. Attach the tether on the indicated side of 29 an Upright (11), and align the Spotter with one of the adjustment holes in the same way. Insert the Large Pin (13) through the Spotter and the Upright.
Attach both Spotters at the same height. 11 29 13 17 16. Attach the other Spotter (29) to the underside of a Spotter (29) with an ST4.2 x 10mm Screw (17). 15 11 Hold the Spotter (29) on a Large Pin (13) to the other Upright (11) in the Upright. Make sure that all parts are properly tightened before you use the weight bench. 12 15. Attach the tether on the indicated side of 29 an Upright (11), and align the Spotter with one of the adjustment holes in the same way. Insert the Large Pin (13) through the Spotter and the Upright.
English Manual
Page 13
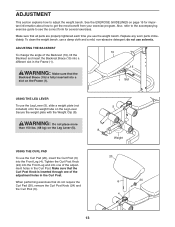
...Knob (24) into the Front Leg and into a different slot in the Frame (1). See the EXERCISE GUIDELINES on the Leg Lever. Replace any worn parts immediately. Secure the weight plate with the Weight Clip (8). Make sure that the Backrest Brace (15) is inserted through one of the Backrest (19... 20 6 24 4 13 WARNING: Make sure that the Curl Post Knob is fully inserted into the Front Leg (4). When performing exercises that all parts are properly tightened each time you use solvents. ADJUSTING THE BACKREST To change the angle of the adjustment holes in the Curl Post. To clean...
...Knob (24) into the Front Leg and into a different slot in the Frame (1). See the EXERCISE GUIDELINES on the Leg Lever. Replace any worn parts immediately. Secure the weight plate with the Weight Clip (8). Make sure that the Backrest Brace (15) is inserted through one of the Backrest (19... 20 6 24 4 13 WARNING: Make sure that the Curl Post Knob is fully inserted into the Front Leg (4). When performing exercises that all parts are properly tightened each time you use solvents. ADJUSTING THE BACKREST To change the angle of the adjustment holes in the Curl Post. To clean...
English Manual
Page 15
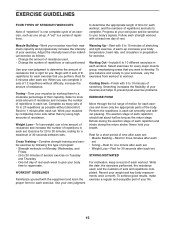
... set. • Toning-Rest for one minute after each exercise that you perform. To achieve good results, make exercise a regular and enjoyable part of rest each week to give balance and variety to 10 minutes of the body. Adjust the intensity level of an individual exercise as follows...-exercise problems. EXERCISE FORM Move through the full range of motion for each workout, and the numbers of each exercise and move only the appropriate parts of stretching. Begin with 5 to your weight and key body measurements once a month. Rest for 1 minute after each set . Toning-Tone your ...
... set. • Toning-Rest for one minute after each exercise that you perform. To achieve good results, make exercise a regular and enjoyable part of rest each week to give balance and variety to 10 minutes of the body. Adjust the intensity level of an individual exercise as follows...-exercise problems. EXERCISE FORM Move through the full range of motion for each workout, and the numbers of each exercise and move only the appropriate parts of stretching. Begin with 5 to your weight and key body measurements once a month. Rest for 1 minute after each set . Toning-Tone your ...
English Manual
Page 16
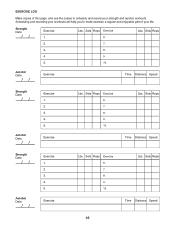
... 16 Lbs. Sets Reps Exercise 6. 7. 8. 9. 10. Sets Reps Exercise 6. Lbs. Lbs. Scheduling and recording your workouts will help you to make exercise a regular and enjoyable part of this page, and use the copies to schedule and record your life. Sets Reps Exercise 6. 7. 8. 9. 10.
... 16 Lbs. Sets Reps Exercise 6. 7. 8. 9. 10. Sets Reps Exercise 6. Lbs. Lbs. Scheduling and recording your workouts will help you to make exercise a regular and enjoyable part of this page, and use the copies to schedule and record your life. Sets Reps Exercise 6. 7. 8. 9. 10.
English Manual
Page 17
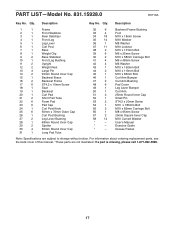
... 56 1 M8 x 65mm Screw 57 2 25mm Square Inner Cap 58 14 M10 Curved Washer * - For information about ordering replacement parts, see the back cover of this manual. *These parts are subject to change without notice. If a part is missing, please call 1-877-992-5999. 17 PART LIST-Model No. 831.15928.0 R0710A Key No.
... 56 1 M8 x 65mm Screw 57 2 25mm Square Inner Cap 58 14 M10 Curved Washer * - For information about ordering replacement parts, see the back cover of this manual. *These parts are subject to change without notice. If a part is missing, please call 1-877-992-5999. 17 PART LIST-Model No. 831.15928.0 R0710A Key No.

English Manual
Page 20
For the replacement parts, accessories, and user's manuals that you may also have other rights which vary from state to state. only) ... rental purposes. and Canada) www.sears.com www.sears.ca Our Home For repair of your nearest Sears Parts & Repair Center. 1-800-488-1222 Call anytime, day or night (U.S.A. Get it ! Sears, Roebuck and Co., Hoffman Estates, ...IL 60179 Part No. 302966 R0710A Printed in your home or ours! Your Home For repair-in China © 2010 ICON IP, ...
For the replacement parts, accessories, and user's manuals that you may also have other rights which vary from state to state. only) ... rental purposes. and Canada) www.sears.com www.sears.ca Our Home For repair of your nearest Sears Parts & Repair Center. 1-800-488-1222 Call anytime, day or night (U.S.A. Get it ! Sears, Roebuck and Co., Hoffman Estates, ...IL 60179 Part No. 302966 R0710A Printed in your home or ours! Your Home For repair-in China © 2010 ICON IP, ...


