
User Manual
Page 1
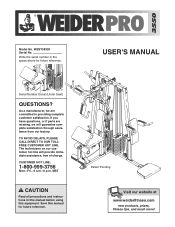
... AVOID DELAYS, PLEASE CALL DIRECT TO OUR TOLLFREE CUSTOMER HOT LINE. CUSTOMER HOT LINE: 1-800-999-3756 Mon.-Fri., 6 a.m.-6 p.m. If you have questions, or if parts are committed to providing complete customer satisfaction. As a manufacturer, we are missing, we will provide immediate assistance, free of charge. Save this equipment. USER'S MANUAL...
... AVOID DELAYS, PLEASE CALL DIRECT TO OUR TOLLFREE CUSTOMER HOT LINE. CUSTOMER HOT LINE: 1-800-999-3756 Mon.-Fri., 6 a.m.-6 p.m. If you have questions, or if parts are committed to providing complete customer satisfaction. As a manufacturer, we are missing, we will provide immediate assistance, free of charge. Save this equipment. USER'S MANUAL...

User Manual
Page 2
WEIDER is a registered trademark of this manual. Remove the PART IDENTIFICATION CHART and the PART LIST/EXPLODED DRAWING before beginning assembly. TABLE OF CONTENTS IMPORTANT PRECAUTIONS 3 BEFORE YOU BEGIN 4 ASSEMBLY 5 ADJUSTMENTS 22 WEIGHT RESISTANCE CHART 24 TROUBLESHOOTING 25 CABLE DIAGRAMS 26 ORDERING REPLACEMENT PARTS Back Cover LIMITED WARRANTY Back Cover Note: A PART IDENTIFICATION CHART and a PART LIST/EXPLODED DRAWING are attached in the center of ICON Health & Fitness, Inc. 2
WEIDER is a registered trademark of this manual. Remove the PART IDENTIFICATION CHART and the PART LIST/EXPLODED DRAWING before beginning assembly. TABLE OF CONTENTS IMPORTANT PRECAUTIONS 3 BEFORE YOU BEGIN 4 ASSEMBLY 5 ADJUSTMENTS 22 WEIGHT RESISTANCE CHART 24 TROUBLESHOOTING 25 CABLE DIAGRAMS 26 ORDERING REPLACEMENT PARTS Back Cover LIMITED WARRANTY Back Cover Note: A PART IDENTIFICATION CHART and a PART LIST/EXPLODED DRAWING are attached in the center of ICON Health & Fitness, Inc. 2
User Manual
Page 3
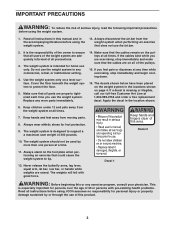
...an exercise that the cables are properly tightened each time you use the weight system. Decal 1 WARNING: Before beginning this or any worn parts immediately. 14. If you are raised. Keep children under 12 and pets away from the weight system at any commercial, rental, or ... is designed to protect the floor. 5. IMPORTANT PRECAUTIONS WARNING: To reduce the risk of this product. 3 Always disconnect the lat bar from moving parts. 8. The weights will fall with pre-existing health problems. Read all instructions in this manual and in the locations shown on a level surface. ...
...an exercise that the cables are properly tightened each time you use the weight system. Decal 1 WARNING: Before beginning this or any worn parts immediately. 14. If you are raised. Keep children under 12 and pets away from the weight system at any commercial, rental, or ... is designed to protect the floor. 5. IMPORTANT PRECAUTIONS WARNING: To reduce the risk of this product. 3 Always disconnect the lat bar from moving parts. 8. The weights will fall with pre-existing health problems. Read all instructions in this manual and in the locations shown on a level surface. ...
User Manual
Page 4
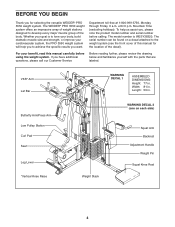
...system. WARNING DECAL 2 (one on a decal attached to achieve the specific results you for the location of the body. The WEIDER® PRO 3550 weight system offers an impressive array of weight stations designed to tone your body, build dramatic muscle size and strength, or improve... Customer Service Before reading further, please review the drawing below and familiarize yourself with the parts that are labeled. Whether your benefit, read this manual for selecting the versatile WEIDER® PRO 3550 weight system. The model number is to develop every major muscle group of the decal...
...system. WARNING DECAL 2 (one on a decal attached to achieve the specific results you for the location of the body. The WEIDER® PRO 3550 weight system offers an impressive array of weight stations designed to tone your body, build dramatic muscle size and strength, or improve... Customer Service Before reading further, please review the drawing below and familiarize yourself with the parts that are labeled. Whether your benefit, read this manual for selecting the versatile WEIDER® PRO 3550 weight system. The model number is to develop every major muscle group of the decal...
User Manual
Page 5
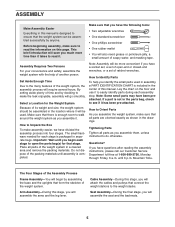
... unless instructed to do otherwise. Lay the chart on this stage, you have a socket set, a set of open the parts bag(s) for that stage. Tightening Parts Tighten all parts of this manual. until you will begin each stage to open -end or closed-end wrenches, or a set of the weight... Friday, 6 a.m. ASSEMBLY Make Assembly Easier Everything in this manual is designed to ensure that the weight system can be used in assembly, a PART IDENTIFICATION CHART is included in the center of the weight system in a cleared area and remove the packing materials. Do not dispose of time and...
... unless instructed to do otherwise. Lay the chart on this stage, you have a socket set, a set of open the parts bag(s) for that stage. Tightening Parts Tighten all parts of this manual. until you will begin each stage to open -end or closed-end wrenches, or a set of the weight... Friday, 6 a.m. ASSEMBLY Make Assembly Easier Everything in this manual is designed to ensure that the weight system can be used in assembly, a PART IDENTIFICATION CHART is included in the center of the weight system in a cleared area and remove the packing materials. Do not dispose of time and...
User Manual
Page 6
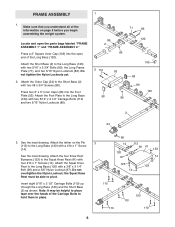
FRAME ASSEMBLY 1 1. Press two 2" x 3" Inner Caps (58) into the open the parts bags labeled "FRAME ASSEMBLY 1" and "FRAME ASSEMBLY 2." Attach the tether on page 5 before you begin assembling the weight system. Attach the four Knee Rest Bumpers (...
FRAME ASSEMBLY 1 1. Press two 2" x 3" Inner Caps (58) into the open the parts bags labeled "FRAME ASSEMBLY 1" and "FRAME ASSEMBLY 2." Attach the tether on page 5 before you begin assembling the weight system. Attach the four Knee Rest Bumpers (...
User Manual
Page 10
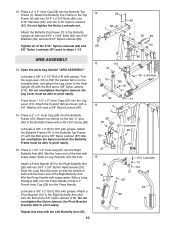
... lower end of the 5/16" Nylon Locknuts (86) and 3/8" Nylon Locknuts (87) used in steps 1-12. Tighten all of the Right Butterfly Arm. Open the parts bag labeled "ARM ASSEMBLY." Turn the Leg Lever (10) so that the bottom is on the two "L"-pins (60) to the Seat Upright (9) with grease...
... lower end of the 5/16" Nylon Locknuts (86) and 3/8" Nylon Locknuts (87) used in steps 1-12. Tighten all of the Right Butterfly Arm. Open the parts bag labeled "ARM ASSEMBLY." Turn the Leg Lever (10) so that the bottom is on the two "L"-pins (60) to the Seat Upright (9) with grease...
User Manual
Page 11
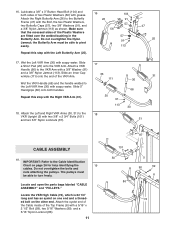
... Head Bolt (104) and both handles. 66 Repeat this step with the Right VKR Arm (31). 20 91 113 30 18. Locate and open the parts bags labeled "CABLE ASSEMBLY" and "PULLEYS." Wet the Left VKR Arm (30) with grease. Attach the eyelet end of the Cable inside of two Plastic...
... Head Bolt (104) and both handles. 66 Repeat this step with the Right VKR Arm (31). 20 91 113 30 18. Locate and open the parts bags labeled "CABLE ASSEMBLY" and "PULLEYS." Wet the Left VKR Arm (30) with grease. Attach the eyelet end of the Cable inside of two Plastic...
User Manual
Page 19
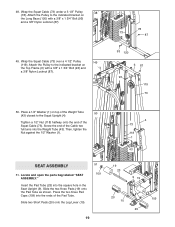
... top of the Cable two full turns into the Weight Tube (43). Wrap the Squat Cable (73) under a 3 1/2" Pulley 48 (78). Locate and open the parts bag labeled "SEAT ASSEMBLY." 51 109 19 23 9 19 Insert the Pad Tube (23) into the ends of the Squat Cable (73). Screw the end...
... top of the Cable two full turns into the Weight Tube (43). Wrap the Squat Cable (73) under a 3 1/2" Pulley 48 (78). Locate and open the parts bag labeled "SEAT ASSEMBLY." 51 109 19 23 9 19 Insert the Pad Tube (23) into the ends of the Squat Cable (73). Screw the end...
User Manual
Page 21
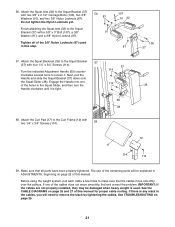
... to the Curl Frame (12) with two 3/8" x 2 1/2" Carriage Bolts (106), two 3/8" Washers (91), and two 3/8" Nylon Locknuts (87). Tighten all parts have been properly tightened. Next, pull the Handle and slide the Squat Bracket (37) down onto the Squat Slider (38). Make sure that the cables ... the Handle into one of this manual. See the CABLE DIAGRAMS on page 25. 21 See TROUBLESHOOTING on page 26 and 27 of the remaining parts will need to the Squat Bracket 57 (37) with a 3/8" x 3" Bolt (107), a 3/8" Washer (91), and a 3/8" Nylon Locknut (87). 56. Attach the Squat...
... to the Curl Frame (12) with two 3/8" x 2 1/2" Carriage Bolts (106), two 3/8" Washers (91), and two 3/8" Nylon Locknuts (87). Tighten all parts have been properly tightened. Next, pull the Handle and slide the Squat Bracket (37) down onto the Squat Slider (38). Make sure that the cables ... the Handle into one of this manual. See the CABLE DIAGRAMS on page 25. 21 See TROUBLESHOOTING on page 26 and 27 of the remaining parts will need to the Squat Bracket 57 (37) with a 3/8" x 3" Bolt (107), a 3/8" Washer (91), and a 3/8" Nylon Locknut (87). 56. Attach the Squat...
User Manual
Page 22
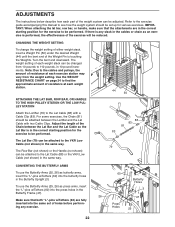
... press arms, insert the "L"-pins w/Tethers (60) into the same set up for the exercise to be performed. ADJUSTMENTS The instructions below describe how each part of the weight system can be attached to the cables and pulleys, the amount of resistance at each weight station. Turn the bent end downward...
... press arms, insert the "L"-pins w/Tethers (60) into the same set up for the exercise to be performed. ADJUSTMENTS The instructions below describe how each part of the weight system can be attached to the cables and pulleys, the amount of resistance at each weight station. Turn the bent end downward...
User Manual
Page 25
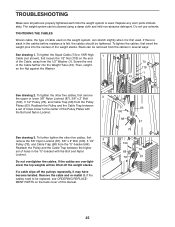
... is first used . Reattach the Pulley and the Cable Trap between the higher set of holes closer to be replaced, see ORDERING REPLACEMENT PARTS on the end of the weight stacks. Remove the cable and re-install it. Screw the end of the Cable farther into the centers...-abrasive detergent. If the cables are properly tightened each time the weight system is felt, the cables should be tightened. TROUBLESHOOTING Make sure all parts are overtightened, the top weights will be lifted off the pulleys repeatedly, it may have become twisted. To tighten the Squat Cable (73)...
... is first used . Reattach the Pulley and the Cable Trap between the higher set of holes closer to be replaced, see ORDERING REPLACEMENT PARTS on the end of the weight stacks. Remove the cable and re-install it. Screw the end of the Cable farther into the centers...-abrasive detergent. If the cables are properly tightened each time the weight system is felt, the cables should be tightened. TROUBLESHOOTING Make sure all parts are overtightened, the top weights will be lifted off the pulleys repeatedly, it may have become twisted. To tighten the Squat Cable (73)...

User Manual
Page 28
PART IDENTIFICATION CHART-Model No. WESY38320 R1102A 1/2" Washer (1) 3/8" Washer (91) 1/2" Nut (118) 3/8" Nylon Locknut (87) 3/8" Nylon Jamnut (113) 5/16" Washer (90) 5/16" Nylon Locknut (86) 5/16" Lock Washer (115) 1/4" Nylon Locknut (34) 1/4" Washer (97) 1/2" Spacer (89) 3/4" Spacer (124) Cable Clip (83) 4 1/2" Pulley (119) (Not shown to scale) "V" Pulley (55) (Not shown to scale) 3 1/2" Pulley (78) (Not shown to scale) 5/16" x 3 1/2" Bolt (94) 3/8" x 3 3/4" Bolt (122) 5/16" x 3 3/4" Bolt (92) 3/8" x 6 1/2" Bolt (95)
PART IDENTIFICATION CHART-Model No. WESY38320 R1102A 1/2" Washer (1) 3/8" Washer (91) 1/2" Nut (118) 3/8" Nylon Locknut (87) 3/8" Nylon Jamnut (113) 5/16" Washer (90) 5/16" Nylon Locknut (86) 5/16" Lock Washer (115) 1/4" Nylon Locknut (34) 1/4" Washer (97) 1/2" Spacer (89) 3/4" Spacer (124) Cable Clip (83) 4 1/2" Pulley (119) (Not shown to scale) "V" Pulley (55) (Not shown to scale) 3 1/2" Pulley (78) (Not shown to scale) 5/16" x 3 1/2" Bolt (94) 3/8" x 3 3/4" Bolt (122) 5/16" x 3 3/4" Bolt (92) 3/8" x 6 1/2" Bolt (95)
User Manual
Page 31
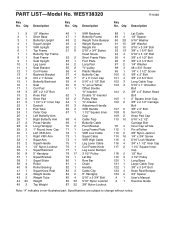
Qty. Qty. Specifications are subject to change without notice. Qty. Description Key No. Description Key No. PART LIST-Model No. Description 12 21 31 41 51 61 71 81 91 10 1 11 1 12 1 13 1 14 6 15 1 16 1 17 1 18 3 19 2 20 6 21 5 ... 3/4" x 1 1/2" Inner Cap 1 1/4" Square Inner Cap 1/2" Nut 4 1/2" Pulley Long Base Large Cable Trap 3/8" x 3 3/4" Bolt Knee Rest Bumper 3/4" Spacer User's Manual Exercise Guide Note: "#" indicates a non-illustrated part. WESY38320 R1102A Key No.
Qty. Qty. Specifications are subject to change without notice. Qty. Description Key No. Description Key No. PART LIST-Model No. Description 12 21 31 41 51 61 71 81 91 10 1 11 1 12 1 13 1 14 6 15 1 16 1 17 1 18 3 19 2 20 6 21 5 ... 3/4" x 1 1/2" Inner Cap 1 1/4" Square Inner Cap 1/2" Nut 4 1/2" Pulley Long Base Large Cable Trap 3/8" x 3 3/4" Bolt Knee Rest Bumper 3/4" Spacer User's Manual Exercise Guide Note: "#" indicates a non-illustrated part. WESY38320 R1102A Key No.
User Manual
Page 33
... the PART LIST and EXPLODED DRAWING attached in workmanship and material, under this product to give the following information: • The MODEL NUMBER of the product (WESY38320) • The NAME of the product (WEIDER® PRO 3550 weight system) • The SERIAL NUMBER of the product (...see the front cover of this manual) • The KEY NUMBER and DESCRIPTION of incidental or consequential damages. ICON HEALTH & FITNESS, INC., 1500 S. 1000 W., LOGAN, UT 84321-9813 Part No. 189834 R1102A...
... the PART LIST and EXPLODED DRAWING attached in workmanship and material, under this product to give the following information: • The MODEL NUMBER of the product (WESY38320) • The NAME of the product (WEIDER® PRO 3550 weight system) • The SERIAL NUMBER of the product (...see the front cover of this manual) • The KEY NUMBER and DESCRIPTION of incidental or consequential damages. ICON HEALTH & FITNESS, INC., 1500 S. 1000 W., LOGAN, UT 84321-9813 Part No. 189834 R1102A...


