

English Manual
Page 3
...from moving parts. 8. IMPORTANT PRECAUTIONS WARNING: To reduce the risk of serious injury, read the following important precautions before using the weight bench. Always exercise with the same amount of weight on the lat tower. 10. Make sure all instructions in this product. 3 Read all... parts are performing bench press exercises, your barbell when you feel pain or dizziness while exercising, stop immediately and begin cooling down. Do not place more that 110...
...from moving parts. 8. IMPORTANT PRECAUTIONS WARNING: To reduce the risk of serious injury, read the following important precautions before using the weight bench. Always exercise with the same amount of weight on the lat tower. 10. Make sure all instructions in this product. 3 Read all... parts are performing bench press exercises, your barbell when you feel pain or dizziness while exercising, stop immediately and begin cooling down. Do not place more that 110...

English Manual
Page 6
... and understand the informa- 1 tion in the drawings. • For help identifying small parts, use the PART IDENTIFICATION CHART on page 5. Before assembling the weight bench, make sure all parts as you assemble them, unless instructed to ensure that you have read the following tools (not included) are required for Yourself... Nylon Locknuts (25). Assembly will go smoothly. However, it is completed. • Tighten all parts are oriented as shown in the box above. 1 25 24 Press a 50mm Square Inner Cap (24) into the Left 2 Base Frame (3).
... and understand the informa- 1 tion in the drawings. • For help identifying small parts, use the PART IDENTIFICATION CHART on page 5. Before assembling the weight bench, make sure all parts as you assemble them, unless instructed to ensure that you have read the following tools (not included) are required for Yourself... Nylon Locknuts (25). Assembly will go smoothly. However, it is completed. • Tighten all parts are oriented as shown in the box above. 1 25 24 Press a 50mm Square Inner Cap (24) into the Left 2 Base Frame (3).
English Manual
Page 7
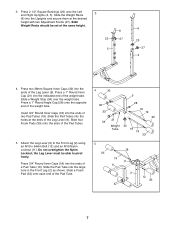
...and an M10 Nylon Locknut (11). Slide four Foam Pads (33) onto the ends of the weight tube. Press 3/4" Round Inner Caps (18) into the large hole in the Front Leg (2) as shown. Slide the Pad... weight tube. the Leg Lever must be set at the same height. 6 23 27 5 6 23 27 4 4. Press two 38mm Square Inner Caps (32) into the Uprights and secure them at the ends of the Pad Tube. 4 33...19 33 5 33 18 19 11 9 2 12 33 7 Do not overtighten the Nylon Locknut; 3. Press a 1" Round Angle Cap (28) onto the opposite end of the Pad Tubes. 5. Slide a Foam Pad (33) onto ...
...and an M10 Nylon Locknut (11). Slide four Foam Pads (33) onto the ends of the weight tube. Press 3/4" Round Inner Caps (18) into the large hole in the Front Leg (2) as shown. Slide the Pad... weight tube. the Leg Lever must be set at the same height. 6 23 27 5 6 23 27 4 4. Press two 38mm Square Inner Caps (32) into the Uprights and secure them at the ends of the Pad Tube. 4 33...19 33 5 33 18 19 11 9 2 12 33 7 Do not overtighten the Nylon Locknut; 3. Press a 1" Round Angle Cap (28) onto the opposite end of the Pad Tubes. 5. Slide a Foam Pad (33) onto ...
English Manual
Page 8
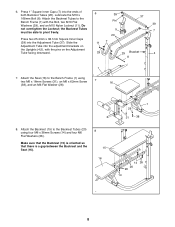
... ends of both Backrest Tubes (20). Attach the Backrest (15) to the Bench Frame (1) using four M6 x 38mm Screws (14) and four M6 Flat Washers (26). Do not overtighten the Locknut; Press 1" Square Inner Caps (7) into the adjustment brackets on the Adjustment Tube facing downward.... 29 29 Bracket 4 8 1 7. Lubricate the M10 x 6 39 168mm Bolt (8). the Backrest Tubes 5 must be able to the Bench Frame (1) with the pins on the ...
... ends of both Backrest Tubes (20). Attach the Backrest (15) to the Bench Frame (1) using four M6 x 38mm Screws (14) and four M6 Flat Washers (26). Do not overtighten the Locknut; Press 1" Square Inner Caps (7) into the adjustment brackets on the Adjustment Tube facing downward.... 29 29 Bracket 4 8 1 7. Lubricate the M10 x 6 39 168mm Bolt (8). the Backrest Tubes 5 must be able to the Bench Frame (1) with the pins on the ...

English Manual
Page 9
... Cap (21) into the top 10 of the Weight Carriage (43). Press a 45mm Square Inner Cap (50) into the weight 9 tube of the Lat Tower (42). Do not overtighten the Nylon Locknut; Slot 47 11 34 21 ... indicated direction. 10. Slide a Weight Stop (34), and a Weight Clip (45) onto the weight tube. Slide the Weight Carriage (43) onto the Lat Tower (42). Press a 2 1/2" Square Bushing (44) onto each end of the Cable (47) without the ball to the Cable Clip (49) and place it with the Short Adjustment...
... Cap (21) into the top 10 of the Weight Carriage (43). Press a 45mm Square Inner Cap (50) into the weight 9 tube of the Lat Tower (42). Do not overtighten the Nylon Locknut; Slot 47 11 34 21 ... indicated direction. 10. Slide a Weight Stop (34), and a Weight Clip (45) onto the weight tube. Slide the Weight Carriage (43) onto the Lat Tower (42). Press a 2 1/2" Square Bushing (44) onto each end of the Cable (47) without the ball to the Cable Clip (49) and place it with the Short Adjustment...


