
English Manual
Page 1
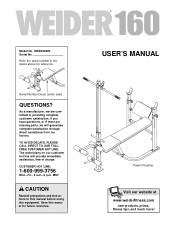
... CUSTOMER HOT LINE. USER'S MANUAL Patent Pending Visit our website at www.weiderfitness.com new products, prizes, fitness tips, and much more! Write the serial number in this manual before using this manual for reference. The technicians on our customer hot line will guarantee complete satisfaction through direct assistance from our factory. Model No. WEBE08920 Serial No. Serial Number Decal (under seat) QUESTIONS? If...
... CUSTOMER HOT LINE. USER'S MANUAL Patent Pending Visit our website at www.weiderfitness.com new products, prizes, fitness tips, and much more! Write the serial number in this manual before using this manual for reference. The technicians on our customer hot line will guarantee complete satisfaction through direct assistance from our factory. Model No. WEBE08920 Serial No. Serial Number Decal (under seat) QUESTIONS? If...

English Manual
Page 2
... user's manual and follow all warnings and operating instructions prior to order a free replacement decal. If a decal is a registered trademark of this area. ! Apply the replacement decal in the center of ICON Health & Fitness, Inc. 2 TABLE OF CONTENTS WARNING DECAL PLACEMENT 2 IMPORTANT PRECAUTIONS 3 BEFORE YOU BEGIN 4 ASSEMBLY 5 ADJUSTMENTS 9 EXERCISE GUIDELINES 12 ORDERING REPLACEMENT PARTS Back Cover LIMITED WARRANTY Back Cover Note: A PART IDENTIFICATION CHART and a PART LIST/EXPLODED DRAWING are attached in the location...
... user's manual and follow all warnings and operating instructions prior to order a free replacement decal. If a decal is a registered trademark of this area. ! Apply the replacement decal in the center of ICON Health & Fitness, Inc. 2 TABLE OF CONTENTS WARNING DECAL PLACEMENT 2 IMPORTANT PRECAUTIONS 3 BEFORE YOU BEGIN 4 ASSEMBLY 5 ADJUSTMENTS 9 EXERCISE GUIDELINES 12 ORDERING REPLACEMENT PARTS Back Cover LIMITED WARRANTY Back Cover Note: A PART IDENTIFICATION CHART and a PART LIST/EXPLODED DRAWING are attached in the location...
English Manual
Page 3
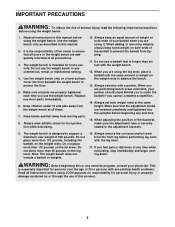
... the adjustment knobs are inserted completely and tightened into the uprights before using . Do not use of 35 or persons with the same amount of the owner to catch the barbell if you cannot complete a repetition. 14. Always set both ends of the barbell to support a maximum user weight of the backrest, make sure the adjustment tube is especially important for home use the weight bench...
... the adjustment knobs are inserted completely and tightened into the uprights before using . Do not use of 35 or persons with the same amount of the owner to catch the barbell if you cannot complete a repetition. 14. Always set both ends of the barbell to support a maximum user weight of the backrest, make sure the adjustment tube is especially important for home use the weight bench...
English Manual
Page 4
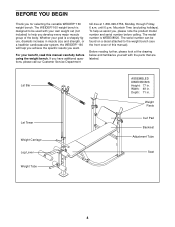
... you want. The WEIDER® 160 weight bench is WEBE08920. The serial number can be used with the parts that are labeled. until 6 p.m. Lat Bar Lat Tower Weight Carriage Leg Lever Weight Tube ASSEMBLED DIMENSIONS: Height: 77 in . For your own weight set (not included) to the weight bench (see the front cover of the body. If you , please note the product model number and serial number before using the weight bench. Depth: 71 in muscle size and strength, or...
... you want. The WEIDER® 160 weight bench is WEBE08920. The serial number can be used with the parts that are labeled. until 6 p.m. Lat Bar Lat Tower Weight Carriage Leg Lever Weight Tube ASSEMBLED DIMENSIONS: Height: 77 in . For your own weight set (not included) to the weight bench (see the front cover of the body. If you , please note the product model number and serial number before using the weight bench. Depth: 71 in muscle size and strength, or...
English Manual
Page 5
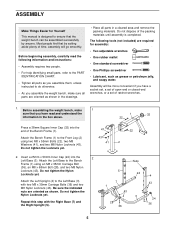
... the PART IDENTIFICATION CHART. • Tighten all parts as you assemble them, unless instructed to the Front Leg (2) using an M8 x 35mm Carriage Bolt (36), an M8 x 68mm Bolt (28), and two M8 Nylon Locknuts (43). Do not tighten the Nylon Locknuts yet. Attach the Bench Frame (1) to do otherwise. • As you assemble the weight bench, make 1 sure that by setting aside plenty of the Bench Frame (1). Attach...
... the PART IDENTIFICATION CHART. • Tighten all parts as you assemble them, unless instructed to the Front Leg (2) using an M8 x 35mm Carriage Bolt (36), an M8 x 68mm Bolt (28), and two M8 Nylon Locknuts (43). Do not tighten the Nylon Locknuts yet. Attach the Bench Frame (1) to do otherwise. • As you assemble the weight bench, make 1 sure that by setting aside plenty of the Bench Frame (1). Attach...
English Manual
Page 6
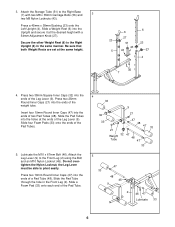
... the Right Base (7) with a 54mm Adjustment Knob (27). 3. Insert four 19mm Round Inner Caps (47) into the ends of the weight tube. Lubricate the M10 x 67mm Bolt (46). Do not overtighten the Nylon Locknut; Attach the Leg Lever (9) to the Right Upright (5) in the Front Leg (2). Press a 45mm x 38mm Bushing (23) onto the Left Upright (4). Press two 25mm Round Inner Caps (21...
... the Right Base (7) with a 54mm Adjustment Knob (27). 3. Insert four 19mm Round Inner Caps (47) into the ends of the weight tube. Lubricate the M10 x 67mm Bolt (46). Do not overtighten the Nylon Locknut; Attach the Leg Lever (9) to the Right Upright (5) in the Front Leg (2). Press a 45mm x 38mm Bushing (23) onto the Left Upright (4). Press two 25mm Round Inner Caps (21...
English Manual
Page 7
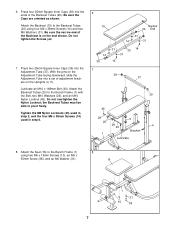
... Bench Frame (1) using four M6 x 38mm Screws (14) and four M6 Washers (31). Attach the Backrest Tubes (20) to pivot freely. With the pins on the Adjustment Tube facing downward, slide the Adjustment Tube into the Adjustment Tube (37). Do not overtighten the Nylon Locknut; Tighten the M8 Nylon Locknuts (43) used in step 2, and the four M6 x 38mm Screws (14) used in step...
... Bench Frame (1) using four M6 x 38mm Screws (14) and four M6 Washers (31). Attach the Backrest Tubes (20) to pivot freely. With the pins on the Adjustment Tube facing downward, slide the Adjustment Tube into the Adjustment Tube (37). Do not overtighten the Nylon Locknut; Tighten the M8 Nylon Locknuts (43) used in step 2, and the four M6 x 38mm Screws (14) used in step...

English Manual
Page 8
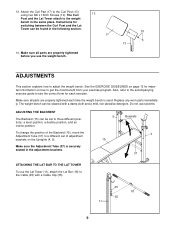
...) onto each end of the Lat Bar (18) with soapy 12 water. Route the Cable (25) through the slot of the Lat Tower (11). Press a 38mm Square Inner Cap (32) into the Front Leg (2). 11 Tighten it in the Lat Tower (11) with the 44mm Adjustment Knob (34). Route the Cable (25) around the Pulley (26) as shown. Slide the Lat Tower (11) into the...
...) onto each end of the Lat Bar (18) with soapy 12 water. Route the Cable (25) through the slot of the Lat Tower (11). Press a 38mm Square Inner Cap (32) into the Front Leg (2). 11 Tighten it in the Lat Tower (11) with the 44mm Adjustment Knob (34). Route the Cable (25) around the Pulley (26) as shown. Slide the Lat Tower (11) into the...
English Manual
Page 9
... (13) using two M6 x 16mm Screws (10). Also, refer to the accompanying exercise guide to a different set to get the most benefit from your exercise program. Do not use the Lat Tower (11), attach the Lat Bar (18) to adjust the weight bench. Replace any worn parts immediately. To change the position of adjustment brackets on how to three different positions: a level position, a decline position, and an incline position. ADJUSTMENTS This...
... (13) using two M6 x 16mm Screws (10). Also, refer to the accompanying exercise guide to a different set to get the most benefit from your exercise program. Do not use the Lat Tower (11), attach the Lat Bar (18) to adjust the weight bench. Replace any worn parts immediately. To change the position of adjustment brackets on how to three different positions: a level position, a decline position, and an incline position. ADJUSTMENTS This...
English Manual
Page 10
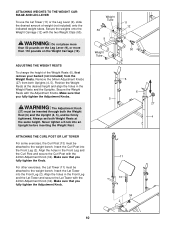
... 13 44mm Adjustment Knob (34). Always set both Weight Rests at the desired height and align the holes in the Weight Rests and the Uprights. Never tighten a Knob into an Upright before inserting the Weight Rest. 6 6 5 27 4 ATTACHING THE CURL POST OR LAT TOWER For some exercises, the Curl Post (13) must be attached to the weight bench. Align the holes in the Front Leg and the...
... 13 44mm Adjustment Knob (34). Always set both Weight Rests at the desired height and align the holes in the Weight Rests and the Uprights. Never tighten a Knob into an Upright before inserting the Weight Rest. 6 6 5 27 4 ATTACHING THE CURL POST OR LAT TOWER For some exercises, the Curl Post (13) must be attached to the weight bench. Align the holes in the Front Leg and the...
English Manual
Page 11
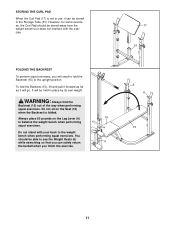
... it will need to fold the Backrest (15) to the weight bench when performing squat exercises. Do not sit on the Leg Lever (9) 16 to see the Weight Rests (6) while exercising so that you will go. It will be stored in place by its own weight. However, for some exercises, the Curl... balance the weight bench when performing squat exercises. FOLDING THE BACKREST To perform squat exercises, you can be held in the Storage Tube (51). Always place 50 pounds on the Seat (16) when the Backrest is not in use, it does not interfere with your back to the upright position. Do...
... it will need to fold the Backrest (15) to the weight bench when performing squat exercises. Do not sit on the Leg Lever (9) 16 to see the Weight Rests (6) while exercising so that you will go. It will be stored in place by its own weight. However, for some exercises, the Curl... balance the weight bench when performing squat exercises. FOLDING THE BACKREST To perform squat exercises, you can be held in the Storage Tube (51). Always place 50 pounds on the Seat (16) when the Backrest is not in use, it does not interfere with your back to the upright position. Do...
English Manual
Page 12
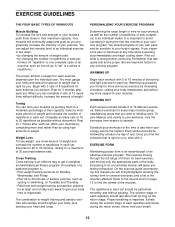
... discomfort. Remember that is a series of repetitions.) The proper amount of weight for each set . Each workout should be followed by changing the number of repetitions or sets completed, is an efficient way to 10 different exercises. Exercising in each set . formed. (A "repetition" is right for several exercises, and a list of your breath. 12 You must gauge your body for every major muscle group...
... discomfort. Remember that is a series of repetitions.) The proper amount of weight for each set . Each workout should be followed by changing the number of repetitions or sets completed, is an efficient way to 10 different exercises. Exercising in each set . formed. (A "repetition" is right for several exercises, and a list of your breath. 12 You must gauge your body for every major muscle group...
English Manual
Page 13
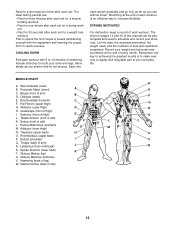
...) I . COOLING DOWN End each workout with the equipment and learning the proper form for each stretch gradually and go only as far as you can be photocopied and used , and the numbers of arm) B D. Include stretches for both your weight and key body measurements at the end of calf) N O P Q R S T U V W 13 Ease into each exercise. Pectoralis Major (chest) A C. Latissimus Dorsi (mid...
...) I . COOLING DOWN End each workout with the equipment and learning the proper form for each stretch gradually and go only as far as you can be photocopied and used , and the numbers of arm) B D. Include stretches for both your weight and key body measurements at the end of calf) N O P Q R S T U V W 13 Ease into each exercise. Pectoralis Major (chest) A C. Latissimus Dorsi (mid...
English Manual
Page 14
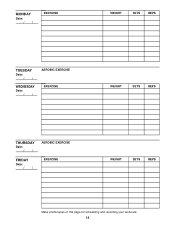
MONDAY Date: / / EXERCISE WEIGHT SETS REPS TUESDAY Date: / / WEDNESDAY Date: / / AEROBIC EXERCISE EXERCISE WEIGHT SETS REPS THURSDAY Date: / / FRIDAY Date: / / AEROBIC EXERCISE EXERCISE WEIGHT SETS REPS Make photocopies of this page for scheduling and recording your workouts. 14
MONDAY Date: / / EXERCISE WEIGHT SETS REPS TUESDAY Date: / / WEDNESDAY Date: / / AEROBIC EXERCISE EXERCISE WEIGHT SETS REPS THURSDAY Date: / / FRIDAY Date: / / AEROBIC EXERCISE EXERCISE WEIGHT SETS REPS Make photocopies of this page for scheduling and recording your workouts. 14

English Manual
Page 15
MONDAY Date: / / EXERCISE WEIGHT SETS REPS TUESDAY Date: / / WEDNESDAY Date: / / AEROBIC EXERCISE EXERCISE WEIGHT SETS REPS THURSDAY Date: / / FRIDAY Date: / / AEROBIC EXERCISE EXERCISE WEIGHT SETS REPS Make photocopies of this page for scheduling and recording your workouts. 15
MONDAY Date: / / EXERCISE WEIGHT SETS REPS TUESDAY Date: / / WEDNESDAY Date: / / AEROBIC EXERCISE EXERCISE WEIGHT SETS REPS THURSDAY Date: / / FRIDAY Date: / / AEROBIC EXERCISE EXERCISE WEIGHT SETS REPS Make photocopies of this page for scheduling and recording your workouts. 15
English Manual
Page 16
... the product (WEIDER® 160 weight bench) • The SERIAL NUMBER of the product (see the front cover of this manual) • The KEY NUMBER and DESCRIPTION of the desired part(s) (see the PART LIST and the EXPLODED DRAWING in the center of this manual) LIMITED WARRANTY ICON Health & Fitness, Inc. (ICON), warrants this warranty is limited in its authorized service centers. Mountain Time (excluding holidays). This warranty extends only to you specific legal rights...
... the product (WEIDER® 160 weight bench) • The SERIAL NUMBER of the product (see the front cover of this manual) • The KEY NUMBER and DESCRIPTION of the desired part(s) (see the PART LIST and the EXPLODED DRAWING in the center of this manual) LIMITED WARRANTY ICON Health & Fitness, Inc. (ICON), warrants this warranty is limited in its authorized service centers. Mountain Time (excluding holidays). This warranty extends only to you specific legal rights...

English Manual
Page 17
REMOVE THIS PART IDENTIFICATION CHART PART LIST/EXPLODED DRAWING SAVE THIS PART IDENTIFICATION CHART PART LIST/EXPLODED DRAWING FOR FUTURE REFERENCE 81
REMOVE THIS PART IDENTIFICATION CHART PART LIST/EXPLODED DRAWING SAVE THIS PART IDENTIFICATION CHART PART LIST/EXPLODED DRAWING FOR FUTURE REFERENCE 81

English Manual
Page 18
...) M6 x 50mm Screw (38) M8 x 55mm Bolt (22) M10 x 55mm Bolt (49) M10 x 67mm Bolt (46) M8 x 68mm Bolt (28) PART IDENTIFICATION CHART Refer to the drawings below to identify small parts used in the parts bag, check to see if it has been pre-attached. If a part is the key number of the part, from the PART LIST in the center of this manual. The number in parentheses...
...) M6 x 50mm Screw (38) M8 x 55mm Bolt (22) M10 x 55mm Bolt (49) M10 x 67mm Bolt (46) M8 x 68mm Bolt (28) PART IDENTIFICATION CHART Refer to the drawings below to identify small parts used in the parts bag, check to see if it has been pre-attached. If a part is the key number of the part, from the PART LIST in the center of this manual. The number in parentheses...
English Manual
Page 19
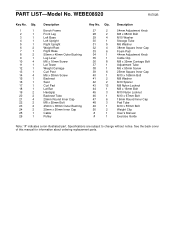
.... Specifications are subject to change without notice. PART LIST-Model No. Qty. 1 1 2 1 3 1 4 1 5 1 6 2 7 1 8 2 9 1 10 4 11 1 12 1 13 1 14 4 15 1 16 1 17 1 18 1 19 2 20 2 21 4 22 2 23 2 24 2 25 1 26 1 Description Bench Frame Front Leg Left Base Left Upright Right Upright Weight Rest Right Base 50mm x 45mm Outer Bushing Leg Lever M6 x 16mm Screw Lat Tower Weight Carriage Curl Post M6 x 38mm Screw Backrest Seat Curl Pad Lat Bar...
.... Specifications are subject to change without notice. PART LIST-Model No. Qty. 1 1 2 1 3 1 4 1 5 1 6 2 7 1 8 2 9 1 10 4 11 1 12 1 13 1 14 4 15 1 16 1 17 1 18 1 19 2 20 2 21 4 22 2 23 2 24 2 25 1 26 1 Description Bench Frame Front Leg Left Base Left Upright Right Upright Weight Rest Right Base 50mm x 45mm Outer Bushing Leg Lever M6 x 16mm Screw Lat Tower Weight Carriage Curl Post M6 x 38mm Screw Backrest Seat Curl Pad Lat Bar...

English Manual
Page 20
WEBE08920 R0702B 32 45 29 42 42 29 26 49 17 19 10 13 25 6 35 11 39 37 18 39 19 25 43 21 32 33 16 8 34 27 30 5 15 43 43 23 24 44 12 21 23 43 36 31 43 14 45 29 14 20 31 31 7 43 36 39 32 14 29 40 33 45 36 22 1 43 47 31 41 10 38 43 9 43 21 41 46 2 48 22 10 28 47 47 36 33 3 47 21 48 50 32 47 48 33 47 6 27 8 39 39 4 43 43 24 36 EXPLODED DRAWING-Model No.
WEBE08920 R0702B 32 45 29 42 42 29 26 49 17 19 10 13 25 6 35 11 39 37 18 39 19 25 43 21 32 33 16 8 34 27 30 5 15 43 43 23 24 44 12 21 23 43 36 31 43 14 45 29 14 20 31 31 7 43 36 39 32 14 29 40 33 45 36 22 1 43 47 31 41 10 38 43 9 43 21 41 46 2 48 22 10 28 47 47 36 33 3 47 21 48 50 32 47 48 33 47 6 27 8 39 39 4 43 43 24 36 EXPLODED DRAWING-Model No.


