
English Manual
Page 3
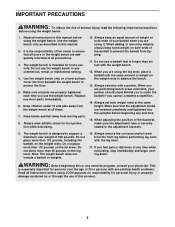
... hands and feet away from the front leg before performing leg curls with a partner. Always keep some weight on the lat tower. Always set both ends of your physician. The weight bench is securely seated in this manual. 2. Do not place more than 50 pounds on a level surface...35 or persons with the same amount of weight on the weight rests. Do not place more than 110 pounds, including the barbell, on the weight rests to prevent the barbell from the weight bench at any commercial, rental, or institutional setting. 4. IMPORTANT PRECAUTIONS WARNING: To reduce the...
... hands and feet away from the front leg before performing leg curls with a partner. Always keep some weight on the lat tower. Always set both ends of your physician. The weight bench is securely seated in this manual. 2. Do not place more than 50 pounds on a level surface...35 or persons with the same amount of weight on the weight rests. Do not place more than 110 pounds, including the barbell, on the weight rests to prevent the barbell from the weight bench at any commercial, rental, or institutional setting. 4. IMPORTANT PRECAUTIONS WARNING: To reduce the...
English Manual
Page 4
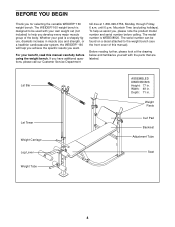
... Curl Pad Backrest Adjustment Tube Seat 4 If you for selecting the versatile WEIDER® 160 weight bench. Lat Bar Lat Tower Weight Carriage Leg Lever Weight Tube ASSEMBLED DIMENSIONS: Height: 77 in . Whether your own weight set (not included) to help you develop every major muscle group of this ...are labeled. Width: 49 in muscle size and strength, or a healthier cardiovascular system, the WEIDER® 160 will help us assist you want. The WEIDER® 160 weight bench is designed to the weight bench (see the front cover of the body. until 6 p.m. BEFORE YOU BEGIN Thank you ...
... Curl Pad Backrest Adjustment Tube Seat 4 If you for selecting the versatile WEIDER® 160 weight bench. Lat Bar Lat Tower Weight Carriage Leg Lever Weight Tube ASSEMBLED DIMENSIONS: Height: 77 in . Whether your own weight set (not included) to help you develop every major muscle group of this ...are labeled. Width: 49 in muscle size and strength, or a healthier cardiovascular system, the WEIDER® 160 will help us assist you want. The WEIDER® 160 weight bench is designed to the weight bench (see the front cover of the body. until 6 p.m. BEFORE YOU BEGIN Thank you ...
English Manual
Page 5
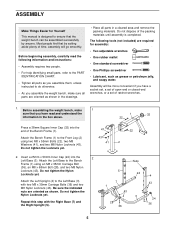
... all parts as you assemble them, unless instructed to do otherwise. • As you assemble the weight bench, make 1 sure that you have a socket set, a set of open-end or closed-end wrenches, or a set of the packing materials until assembly is designed to the Front Leg (2) using an M8 x 35mm ...this step with two M8 x 35mm Carriage Bolts (36) and two M8 Nylon Locknuts (43). Attach the Bench Frame (1) to ensure that the weight bench can be more convenient if you have read the following tools (not included) are oriented as shown. ASSEMBLY Make Things Easier for assembly: •...
... all parts as you assemble them, unless instructed to do otherwise. • As you assemble the weight bench, make 1 sure that you have a socket set, a set of open-end or closed-end wrenches, or a set of the packing materials until assembly is designed to the Front Leg (2) using an M8 x 35mm ...this step with two M8 x 35mm Carriage Bolts (36) and two M8 Nylon Locknuts (43). Attach the Bench Frame (1) to ensure that the weight bench can be more convenient if you have read the following tools (not included) are oriented as shown. ASSEMBLY Make Things Easier for assembly: •...
English Manual
Page 6
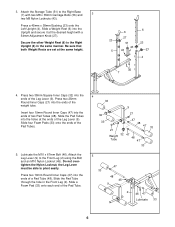
3. Secure the other Weight Rest (6) to the Front Leg (2) using the Bolt and an M10 Nylon Locknut (45). Slide four Foam Pads (33)...Insert four 19mm Round Inner Caps (47) into the ends of the Pad Tube. 4 33 9 32 21 33 21 47 48 47 33 Weight Tube 32 47 48 47 33 5 47 33 48 45 9 2 46 47 Lubricate 33 6 Press two 19mm Round Inner Caps (47) into...Upright and secure it at the same height. 6 6 27 23 51 23 43 5 43 27 4 36 7 4. Be sure that both Weight Rests are set at the desired height with two M8 x 35mm Carriage Bolts (36) and 3 two M8 Nylon Locknuts (43). Slide...
3. Secure the other Weight Rest (6) to the Front Leg (2) using the Bolt and an M10 Nylon Locknut (45). Slide four Foam Pads (33)...Insert four 19mm Round Inner Caps (47) into the ends of the Pad Tube. 4 33 9 32 21 33 21 47 48 47 33 Weight Tube 32 47 48 47 33 5 47 33 48 45 9 2 46 47 Lubricate 33 6 Press two 19mm Round Inner Caps (47) into...Upright and secure it at the same height. 6 6 27 23 51 23 43 5 43 27 4 36 7 4. Be sure that both Weight Rests are set at the desired height with two M8 x 35mm Carriage Bolts (36) and 3 two M8 Nylon Locknuts (43). Slide...
English Manual
Page 9
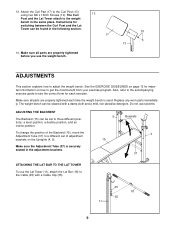
...move the Adjustment Tube (37) to a different set to get the most benefit from your exercise program. To change the position of adjustment brackets on how to three different positions: a level position, a decline position, and an incline position. The weight bench can be cleaned with a Cable Clip ... Also, refer to the accompanying exercise guide to see the correct form for important information on the Uprights (4, 5). Do not use the weight bench. ADJUSTMENTS This section explains how to the Curl Post (13) using two M6 x 16mm Screws (10). Instructions for switching between ...
...move the Adjustment Tube (37) to a different set to get the most benefit from your exercise program. To change the position of adjustment brackets on how to three different positions: a level position, a decline position, and an incline position. The weight bench can be cleaned with a Cable Clip ... Also, refer to the accompanying exercise guide to see the correct form for important information on the Uprights (4, 5). Do not use the weight bench. ADJUSTMENTS This section explains how to the Curl Post (13) using two M6 x 16mm Screws (10). Instructions for switching between ...
English Manual
Page 10
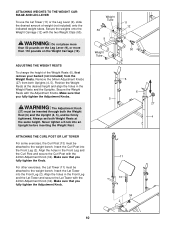
... The Adjustment Knob (27) must be inserted through both Weight Rests at the desired height and align the holes in the Front Leg and the Lat Tower and secure the Lat Tower with the two Weight Clips (50). Always set both the Weight Rest (6) and the Upright (4, 5), and be attached... to the weight bench. Position the Weight Rests at the same height. Secure the weights onto the Weight Carriage (12) with the 13 44mm Adjustment Knob (34)....
... The Adjustment Knob (27) must be inserted through both Weight Rests at the desired height and align the holes in the Front Leg and the Lat Tower and secure the Lat Tower with the two Weight Clips (50). Always set both the Weight Rest (6) and the Upright (4, 5), and be attached... to the weight bench. Position the Weight Rests at the same height. Secure the weights onto the Weight Carriage (12) with the 13 44mm Adjustment Knob (34)....
English Manual
Page 12
... for 20 to your energy level is a series of repetitions.) The proper amount of weight for each set . PERSONALIZING YOUR EXERCISE PROGRAM Determining the exact length of time for each workout with 3 sets of 8 repetitions for the time of day when your muscles. Find out what is an... a proper diet are important factors in each set . Complete as many sets of 15 to 30 minutes of aerobic exercise, such as the number of repetitions or sets completed, is wrong before continuing. Weight Loss To lose weight, use a low amount of weight and increase the number of repetitions in two ...
... for 20 to your energy level is a series of repetitions.) The proper amount of weight for each set . PERSONALIZING YOUR EXERCISE PROGRAM Determining the exact length of time for each workout with 3 sets of 8 repetitions for the time of day when your muscles. Find out what is an... a proper diet are important factors in each set . Complete as many sets of 15 to 30 minutes of aerobic exercise, such as the number of repetitions or sets completed, is wrong before continuing. Weight Loss To lose weight, use a low amount of weight and increase the number of repetitions in two ...
English Manual
Page 13
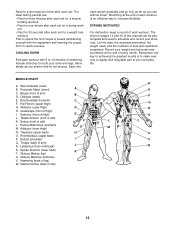
...) P. The ideal resting periods are: • Rest for three minutes after each set for a muscle building workout. • Rest for one minute after each set for a short period of each exercise. Pectoralis Major (chest) A C. Gluteus Medius (hip) U. Rest for a weight loss workout. Remember, the key to achieving the greatest results is an effective...
...) P. The ideal resting periods are: • Rest for three minutes after each set for a muscle building workout. • Rest for one minute after each set for a short period of each exercise. Pectoralis Major (chest) A C. Gluteus Medius (hip) U. Rest for a weight loss workout. Remember, the key to achieving the greatest results is an effective...
English Manual
Page 14
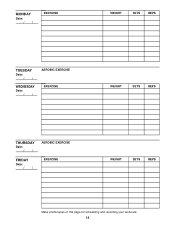
MONDAY Date: / / EXERCISE WEIGHT SETS REPS TUESDAY Date: / / WEDNESDAY Date: / / AEROBIC EXERCISE EXERCISE WEIGHT SETS REPS THURSDAY Date: / / FRIDAY Date: / / AEROBIC EXERCISE EXERCISE WEIGHT SETS REPS Make photocopies of this page for scheduling and recording your workouts. 14
MONDAY Date: / / EXERCISE WEIGHT SETS REPS TUESDAY Date: / / WEDNESDAY Date: / / AEROBIC EXERCISE EXERCISE WEIGHT SETS REPS THURSDAY Date: / / FRIDAY Date: / / AEROBIC EXERCISE EXERCISE WEIGHT SETS REPS Make photocopies of this page for scheduling and recording your workouts. 14

English Manual
Page 15
MONDAY Date: / / EXERCISE WEIGHT SETS REPS TUESDAY Date: / / WEDNESDAY Date: / / AEROBIC EXERCISE EXERCISE WEIGHT SETS REPS THURSDAY Date: / / FRIDAY Date: / / AEROBIC EXERCISE EXERCISE WEIGHT SETS REPS Make photocopies of this page for scheduling and recording your workouts. 15
MONDAY Date: / / EXERCISE WEIGHT SETS REPS TUESDAY Date: / / WEDNESDAY Date: / / AEROBIC EXERCISE EXERCISE WEIGHT SETS REPS THURSDAY Date: / / FRIDAY Date: / / AEROBIC EXERCISE EXERCISE WEIGHT SETS REPS Make photocopies of this page for scheduling and recording your workouts. 15
English Manual
Page 16
... of property, loss of revenues or profits, loss of enjoyment or use, costs of removal or installation or other warranty beyond that specifically set forth herein. This warranty does not extend to be pre-authorized by ICON. products used as store display models. No other consequential damages ...be prepared to give the following information when calling: • The MODEL NUMBER of the product (WEBE08920) • The NAME of the product (WEIDER® 160 weight bench) • The SERIAL NUMBER of the product (see the front cover of this manual) • The KEY NUMBER and DESCRIPTION of the ...
... of property, loss of revenues or profits, loss of enjoyment or use, costs of removal or installation or other warranty beyond that specifically set forth herein. This warranty does not extend to be pre-authorized by ICON. products used as store display models. No other consequential damages ...be prepared to give the following information when calling: • The MODEL NUMBER of the product (WEBE08920) • The NAME of the product (WEIDER® 160 weight bench) • The SERIAL NUMBER of the product (see the front cover of this manual) • The KEY NUMBER and DESCRIPTION of the ...


