
Operating Instructions
Page 2
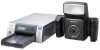
... Canada technical specifications were met. 2 If you may not cause harmful interference, and (2) this apparatus to rain or moisture. For the UP-DX100 Printer and the DKC-C300X Digital Still Camera For the customers in the U.S.A. Owner's Record The model and serial numbers are designed to provide reasonable protection against harmful interference in a residential installation. This equipment generates, uses, and...
... Canada technical specifications were met. 2 If you may not cause harmful interference, and (2) this apparatus to rain or moisture. For the UP-DX100 Printer and the DKC-C300X Digital Still Camera For the customers in the U.S.A. Owner's Record The model and serial numbers are designed to provide reasonable protection against harmful interference in a residential installation. This equipment generates, uses, and...
Operating Instructions
Page 3
... in separate service or guarantee documents. Operation is subject to switch the power supply off, or disconnect the power plug. Use the Power Cord (2-core mains lead)/Appliance Connector/Plug conforming to an easily accessible socketoutlet near the unit. For the UP-DX100 Printer and the DKC-C300X Digital Still Camera For the customers in compliance with Part 15 of those materials beyond this manual. For...
... in separate service or guarantee documents. Operation is subject to switch the power supply off, or disconnect the power plug. Use the Power Cord (2-core mains lead)/Appliance Connector/Plug conforming to an easily accessible socketoutlet near the unit. For the UP-DX100 Printer and the DKC-C300X Digital Still Camera For the customers in compliance with Part 15 of those materials beyond this manual. For...
Operating Instructions
Page 4
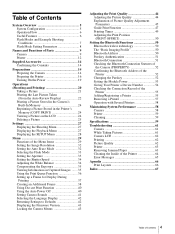
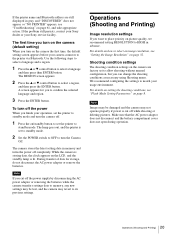
... 16 Turning On the Power 19 Operations (Shooting and Printing 20 Taking a Picture 21 Printing the Last Picture Taken (From the Auto-Review Display 22 Printing a Picture Stored in the Camera's Built-In Memory 24 Reprinting a Picture Stored in the Printer's Memory (COPY PRINT 24 Viewing a Picture on the LCD 24 Deleting a Picture 25 Settings 27 Displaying the Shooting Menu 27 Displaying the Playback Menu 27 Displaying the SETUP Menu 28 Menu 29 Functions of the Menu Items 29 Setting the Image Resolution 32 Setting the Auto Erase Mode...
... 16 Turning On the Power 19 Operations (Shooting and Printing 20 Taking a Picture 21 Printing the Last Picture Taken (From the Auto-Review Display 22 Printing a Picture Stored in the Camera's Built-In Memory 24 Reprinting a Picture Stored in the Printer's Memory (COPY PRINT 24 Viewing a Picture on the LCD 24 Deleting a Picture 25 Settings 27 Displaying the Shooting Menu 27 Displaying the Playback Menu 27 Displaying the SETUP Menu 28 Menu 29 Functions of the Menu Items 29 Setting the Image Resolution 32 Setting the Auto Erase Mode...
Operating Instructions
Page 5
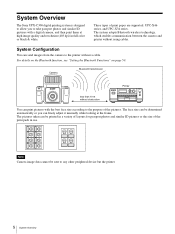
... ID pictures with the best face size according to the purpose of the pictures. System Overview The Sony UPX-C300 digital printing system is designed to allow you can finely adjust it manually while looking at high image quality and resolution (403 dpi) in full color or black & white. The system adopts Bluetooth wireless technology, which enables communication between the camera and printer without using cables.
... ID pictures with the best face size according to the purpose of the pictures. System Overview The Sony UPX-C300 digital printing system is designed to allow you can finely adjust it manually while looking at high image quality and resolution (403 dpi) in full color or black & white. The system adopts Bluetooth wireless technology, which enables communication between the camera and printer without using cables.

Operating Instructions
Page 10
... is being charged, or data is in progress. B /COLOR/B&W (Delete/Color/Black & white) button Delete During Auto Review mode or image playback, pressing this button deletes the image displayed on the LCD. When the mode switch is Lamp status Camera status Lights (orange) Normal operation Flashing (orange) The camera is starting up or Bluetooth authentication is full so that no more images can be stored. Or, AUTO ERASE is off and the internal memory is in progress. Lights (red) This indicates camera malfunction. Flashing (red) This...
... is being charged, or data is in progress. B /COLOR/B&W (Delete/Color/Black & white) button Delete During Auto Review mode or image playback, pressing this button deletes the image displayed on the LCD. When the mode switch is Lamp status Camera status Lights (orange) Normal operation Flashing (orange) The camera is starting up or Bluetooth authentication is full so that no more images can be stored. Or, AUTO ERASE is off and the internal memory is in progress. Lights (red) This indicates camera malfunction. Flashing (red) This...

Operating Instructions
Page 11
... a playback image to print the image displayed on the LCD. While the ADJUST screen is displayed, pressing this button to display on the LCD. When an external flash that supports an X contact. When the mode switch is set to the previous screen display. I b v V B control buttons When the mode switch is set to Use v or V to 2× zoom is available. picture display. W: The display is connected with the synchronization cord, the flash lights synchronizing with the shutter. 11 Names and Functions of the displayed image. When displaying the ADJUST screen Zooms in image...
... a playback image to print the image displayed on the LCD. While the ADJUST screen is displayed, pressing this button to display on the LCD. When an external flash that supports an X contact. When the mode switch is set to the previous screen display. I b v V B control buttons When the mode switch is set to Use v or V to 2× zoom is available. picture display. W: The display is connected with the synchronization cord, the flash lights synchronizing with the shutter. 11 Names and Functions of the displayed image. When displaying the ADJUST screen Zooms in image...

Operating Instructions
Page 15
... camera's LCD. The battery charge is low, and shooting will not recharge the batteries. Ready the AC power adapter or a new set of the camera's LCD. The batteries are inside the camera will be disabled shortly. To recharge the batteries, use four size AA Nickel Metal Hydride batteries available commercially. Use the AC power adapter or replace the batteries. Shooting is getting low, but you can continue shooting. When using batteries When the battery charge is disabled. Note Connecting the AC adapter...
... camera's LCD. The battery charge is low, and shooting will not recharge the batteries. Ready the AC power adapter or a new set of the camera's LCD. The batteries are inside the camera will be disabled shortly. To recharge the batteries, use four size AA Nickel Metal Hydride batteries available commercially. Use the AC power adapter or replace the batteries. Shooting is getting low, but you can continue shooting. When using batteries When the battery charge is disabled. Note Connecting the AC adapter...
Operating Instructions
Page 20
... removing the batteries while the camera transfers settings data to memory, any new settings may be damaged and the camera may revert to its previous settings. Shooting condition settings The shooting condition settings on /standby button to set the printer to standby mode. Note Images may be lost, and the camera may not operate properly if power is set the printer to standby mode and turn the Camera Off. The REGION screen appears. 2 Press the v or V control button...
... removing the batteries while the camera transfers settings data to memory, any new settings may be damaged and the camera may revert to its previous settings. Shooting condition settings The shooting condition settings on /standby button to set the printer to standby mode. Note Images may be lost, and the camera may not operate properly if power is set the printer to standby mode and turn the Camera Off. The REGION screen appears. 2 Press the v or V control button...

Operating Instructions
Page 21
... the subject, and adjust the frame while monitoring the camera LCD. Power source (AC power adaptor or battery indicator) Resolution Flash mode Focus mark 1) Remaining number of the way. A picture is not in flash is charged for shutter speed and aperture appear only when the release button is pressed. 5) Appears only when the v or V control button is different from the auto-review display without switching the mode switch setting. Pressing the zoom lever allows you press...
... the subject, and adjust the frame while monitoring the camera LCD. Power source (AC power adaptor or battery indicator) Resolution Flash mode Focus mark 1) Remaining number of the way. A picture is not in flash is charged for shutter speed and aperture appear only when the release button is pressed. 5) Appears only when the v or V control button is different from the auto-review display without switching the mode switch setting. Pressing the zoom lever allows you press...

Operating Instructions
Page 23
... button halfway or press the zoom lever to the auto-review display. Press the MENU button to gray. Once printing ends, you can independently adjust the print quality for color prints and black & white prints, respectively. The image is set to , the LCD returns to turn off the auto-review display. Picture data are stored, the camera automatically selects the appropriate adjusted value for color pictures and black & white pictures and store the adjusted values. To take another picture...
... button halfway or press the zoom lever to the auto-review display. Press the MENU button to gray. Once printing ends, you can independently adjust the print quality for color prints and black & white prints, respectively. The image is set to , the LCD returns to turn off the auto-review display. Picture data are stored, the camera automatically selects the appropriate adjusted value for color pictures and black & white pictures and store the adjusted values. To take another picture...
Operating Instructions
Page 24
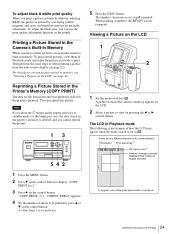
... power adaptor) Resolution Print queue flag 1) STD 001/018 Print queue icon 1) Number of images currently displayed/Total number of pictures set . 5 Press the EXEC button. When printing completes, the READY screen reappears. To adjust black & white print quality When you print a picture in memory, see "Viewing a Picture on the LCD" on page 24. Printing a Picture Stored in the Camera's Built-In Memory When a picture is taken, its data is turned on. 24 Operations (Shooting...
... power adaptor) Resolution Print queue flag 1) STD 001/018 Print queue icon 1) Number of images currently displayed/Total number of pictures set . 5 Press the EXEC button. When printing completes, the READY screen reappears. To adjust black & white print quality When you print a picture in memory, see "Viewing a Picture on the LCD" on page 24. Printing a Picture Stored in the Camera's Built-In Memory When a picture is taken, its data is turned on. 24 Operations (Shooting...

Operating Instructions
Page 44
... V control button to select COLOR ADJUST. 3 Press the ENTER button. The guide print function of color prints," press the V control button. For details on how to display the menu, see "Explanation of color prints 37 2, 4, 5, 6 1 Display the SETUP menu. CYN-RED: Pressing b gives the picture more cyan, while pressing B makes it more reddish. The Guide Print screen appears. 6 Press the v or V control button to select a value. Check the guide picture printed in the bright parts. The...
... V control button to select COLOR ADJUST. 3 Press the ENTER button. The guide print function of color prints," press the V control button. For details on how to display the menu, see "Explanation of color prints 37 2, 4, 5, 6 1 Display the SETUP menu. CYN-RED: Pressing b gives the picture more cyan, while pressing B makes it more reddish. The Guide Print screen appears. 6 Press the v or V control button to select a value. Check the guide picture printed in the bright parts. The...
Operating Instructions
Page 45
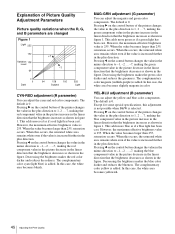
... this case, the white area becomes yellowish. 45 Adjusting the Print Quality Pressing B on the control button changes the value in the minus direction to 1, 2 ... 7, making the green component value in the picture decrease in the linear direction that the brightness increases as shown in the plus direction to -1, -2 ... -7, making the red component value in the picture increase in the linear...
... this case, the white area becomes yellowish. 45 Adjusting the Print Quality Pressing B on the control button changes the value in the minus direction to 1, 2 ... 7, making the green component value in the picture decrease in the linear direction that the brightness increases as shown in the plus direction to -1, -2 ... -7, making the red component value in the picture increase in the linear...

Operating Instructions
Page 49
... corresponding color. direction When the R parameter is set to -3, for example, the light of the red component is for the R and G parameters without changing the white. • Setting in the Guide PrintRGB. Specific example 1: Removing yellow To remove yellow from the subject, we recommend setting the B parameter to understand that make up the picture data are saturated such as pure magenta, red, and yellow parts, their intermediate colors...
... corresponding color. direction When the R parameter is set to -3, for example, the light of the red component is for the R and G parameters without changing the white. • Setting in the Guide PrintRGB. Specific example 1: Removing yellow To remove yellow from the subject, we recommend setting the B parameter to understand that make up the picture data are saturated such as pure magenta, red, and yellow parts, their intermediate colors...

Operating Instructions
Page 50
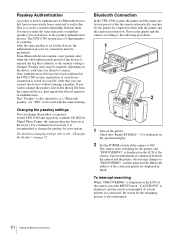
... on the control button. This is a specific code for distinguishing each Bluetooth device, and is correctly positioned on the print paper. 1 2 34 65 1 Turn on the printer. 2 Press the MENU button. 3 Press v or V on the control button. 6 Press the EXEC button. Print a picture and check that the printed picture is called a Bluetooth address or a Bluetooth ID. If further adjustment is confirmed, and the PRINT SETTING screen reappears...
... on the control button. This is a specific code for distinguishing each Bluetooth device, and is correctly positioned on the print paper. 1 2 34 65 1 Turn on the printer. 2 Press the MENU button. 3 Press v or V on the control button. 6 Press the EXEC button. Print a picture and check that the printed picture is called a Bluetooth address or a Bluetooth ID. If further adjustment is confirmed, and the PRINT SETTING screen reappears...
Operating Instructions
Page 51
... message changes to as a passkey. Once authentication of devices has been confirmed in the UPX-C300 system, registration of the camera to enter the same characters or numbers (passkey) for connection when both the printer and the camera are displayed in black. You need to ON. Passkey Authentication A passkey is stored in a log file. This is displayed on the operation display. 2 Set the POWER switch of each device connection is used with...
... message changes to as a passkey. Once authentication of devices has been confirmed in the UPX-C300 system, registration of the camera to enter the same characters or numbers (passkey) for connection when both the printer and the camera are displayed in black. You need to ON. Passkey Authentication A passkey is stored in a log file. This is displayed on the operation display. 2 Set the POWER switch of each device connection is used with...

Operating Instructions
Page 57
... Step 7, while "Searching New Printers . . ." For details, see "Displaying the SETUP Menu" on the camera LCD. t Delete an unnecessary printer. • The passkey of the printer is canceled, and the display returns to select REMOVE PRINTER. t Set the same passkey as that of the camera. Removing a Printer 1 Display the Setup display. Deletion of ADD, then Press the ENTER button. is canceled. Searching is interrupted, and the...
... Step 7, while "Searching New Printers . . ." For details, see "Displaying the SETUP Menu" on the camera LCD. t Delete an unnecessary printer. • The passkey of the printer is canceled, and the display returns to select REMOVE PRINTER. t Set the same passkey as that of the camera. Removing a Printer 1 Display the Setup display. Deletion of ADD, then Press the ENTER button. is canceled. Searching is interrupted, and the...

Operating Instructions
Page 61
... Troubleshooting Troubleshooting Check the following items prior to . • Image data storage is in progress or the flash is charging (the standby lamp is not set to tWait a while. If the problem persists, contact your nearest Sony dealer. Camera Symptom Cause/Solution The power does • The camera's internal processing is lit orange or red, your nearest Sony dealer. If the power still does not turn off . The POWER...
... Troubleshooting Troubleshooting Check the following items prior to . • Image data storage is in progress or the flash is charging (the standby lamp is not set to tWait a while. If the problem persists, contact your nearest Sony dealer. Camera Symptom Cause/Solution The power does • The camera's internal processing is lit orange or red, your nearest Sony dealer. If the power still does not turn off . The POWER...
Operating Instructions
Page 67
... Guide Print-DLGm 48 Guide Print-RGB 47 I ID photo frame Setting up a frame for display during printing 37 Image Push Feature 50 Image resolution 20, 32 L LANGUAGE 31 LCD screen (camera) During layout preview 23 During playback 24 While taking pictures 21 LCD screen (printer) During printing 49 Lens 9 Locking menus 43 M Memory Deleting pictures 21 Menu (camera) Capture mode 29 Functions of menu items 29 Locking 43 Playback mode 30 SETUP 30 MENU button 11 Mode switch 11 Module Power Changing the setting...
... Guide Print-DLGm 48 Guide Print-RGB 47 I ID photo frame Setting up a frame for display during printing 37 Image Push Feature 50 Image resolution 20, 32 L LANGUAGE 31 LCD screen (camera) During layout preview 23 During playback 24 While taking pictures 21 LCD screen (printer) During printing 49 Lens 9 Locking menus 43 M Memory Deleting pictures 21 Menu (camera) Capture mode 29 Functions of menu items 29 Locking 43 Playback mode 30 SETUP 30 MENU button 11 Mode switch 11 Module Power Changing the setting...
Operating Instructions
Page 68
..., 52 Q Quick Review mode 58 R Recording capacity 59 Release button 9 Removing jammed paper 63 Reprinting (from the printer's memory) 24 Setting the number of sheets 24 Reset default settings 42 RESET SETTING 31 RESOLUTION 29 Resolution 21, 24 RGB parameter adjustment 47 RSSI (Received Signal Strength Indicator) 56 S Settings 27 SETUP 29, 30 SETUP Menu 28 SETUP menu 30 Shooting condition 8, 20 Factory settings 20 Shooting environments 7 SHUTTER 29 Shutter speed 34 Size (print layout) 37, 66 Sound (camera) 41...
..., 52 Q Quick Review mode 58 R Recording capacity 59 Release button 9 Removing jammed paper 63 Reprinting (from the printer's memory) 24 Setting the number of sheets 24 Reset default settings 42 RESET SETTING 31 RESOLUTION 29 Resolution 21, 24 RGB parameter adjustment 47 RSSI (Received Signal Strength Indicator) 56 S Settings 27 SETUP 29, 30 SETUP Menu 28 SETUP menu 30 Shooting condition 8, 20 Factory settings 20 Shooting environments 7 SHUTTER 29 Shutter speed 34 Size (print layout) 37, 66 Sound (camera) 41...


