Operating Instructions
Page 4
... the Language Display 42 Returning Settings to Defaults 42 Displaying the Firmware Version 43 Locking the Camera Menus 43 Adjusting the Print Quality 44 Adjusting the Picture Quality 44 Explanation of Picture Quality Adjustment Parameters 45 Guide Print Function 47 Printing Times 49 Adjusting the Print Position (PRINT OFFSET 50 Setting the Bluetooth Functions 50 Bluetooth wireless technology 50 The "Basic Imaging Profile...
... the Language Display 42 Returning Settings to Defaults 42 Displaying the Firmware Version 43 Locking the Camera Menus 43 Adjusting the Print Quality 44 Adjusting the Picture Quality 44 Explanation of Picture Quality Adjustment Parameters 45 Guide Print Function 47 Printing Times 49 Adjusting the Print Position (PRINT OFFSET 50 Setting the Bluetooth Functions 50 Bluetooth wireless technology 50 The "Basic Imaging Profile...
Operating Instructions
Page 5
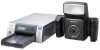
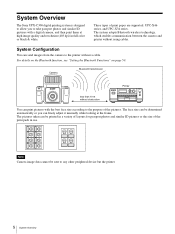
...pictures or the size of the print pack in full color or black & white. Camera Bluetooth transmission less than 10 m without obstruction Printer MENU EXEC PRINT ALARM You can print pictures with a digital camera, and then print them at the frame. Three ...camera to the printer without using cables. The system adopts Bluetooth wireless technology, which enables communication between the camera and printer without a cable. System Overview The Sony UPX-C300 digital printing system is designed to allow you can finely adjust it manually while looking at high image quality...
...pictures or the size of the print pack in full color or black & white. Camera Bluetooth transmission less than 10 m without obstruction Printer MENU EXEC PRINT ALARM You can print pictures with a digital camera, and then print them at the frame. Three ...camera to the printer without using cables. The system adopts Bluetooth wireless technology, which enables communication between the camera and printer without a cable. System Overview The Sony UPX-C300 digital printing system is designed to allow you can finely adjust it manually while looking at high image quality...

Operating Instructions
Page 23
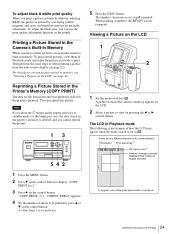
... is lit in color or black & white. 8 If necessary, adjust the size of the camera. Reception indicator Bluetooth 1. To adjust the print quality On the camera, you can independently adjust the print quality for color prints and black & white prints, respectively. Once these values are transmitted to select a ID photo .... You can press the zoom lever to adjust the size of frames You can print the same picture again at a different size, color, etc. Sony UP-DX100 1 Printer name JPN Passport 3 35 45mm 8 Number of prints ID Photo Frame Frame size Number of the...
... is lit in color or black & white. 8 If necessary, adjust the size of the camera. Reception indicator Bluetooth 1. To adjust the print quality On the camera, you can independently adjust the print quality for color prints and black & white prints, respectively. Once these values are transmitted to select a ID photo .... You can press the zoom lever to adjust the size of frames You can print the same picture again at a different size, color, etc. Sony UP-DX100 1 Printer name JPN Passport 3 35 45mm 8 Number of prints ID Photo Frame Frame size Number of the...
Operating Instructions
Page 24
... set in step 4 is turned on. 24 Operations (Shooting and Printing) A picture stored in the camera's memory appears on the LCD. 2 Select a picture to view by press v or V on the control button. To adjust the black tone, you wish to print. To adjust black & white print quality When you press the 1 button on the printer and set...
... set in step 4 is turned on. 24 Operations (Shooting and Printing) A picture stored in the camera's memory appears on the LCD. 2 Select a picture to view by press v or V on the control button. To adjust the black tone, you wish to print. To adjust black & white print quality When you press the 1 button on the printer and set...
Operating Instructions
Page 31
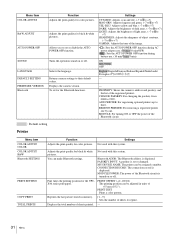
... Prints a color pattern. Adjusts the print quality for the Bluetooth functions. PASSKEY INPUT: A passkey is turned on or off . Fine tunes the printing position for color pictures. Menu Item COLOR ADJUST B&W ADJUST AUTO POWER OFF SOUND LANGUAGE DEFAULT SETTING FIRMWARE VERSION Bluetooth Function Adjusts the print quality for the UPCX46 series print paper. CONNECTION RECORD: The connection record is displayed. Returns camera...
... Prints a color pattern. Adjusts the print quality for the Bluetooth functions. PASSKEY INPUT: A passkey is turned on or off . Fine tunes the printing position for color pictures. Menu Item COLOR ADJUST B&W ADJUST AUTO POWER OFF SOUND LANGUAGE DEFAULT SETTING FIRMWARE VERSION Bluetooth Function Adjusts the print quality for the UPCX46 series print paper. CONNECTION RECORD: The connection record is displayed. Returns camera...

Operating Instructions
Page 44
...ENTER button. The SETUP menu returns. Check the guide picture printed in the bright parts. The camera enters the picture quality adjustment mode for color prints. 44 Adjusting the Print Quality Press the v or V control button to select the next adjustment item, and then press b or B to select OK...pressing B makes it more magenta, while pressing B makes it deeper. Adjusting the Print Quality You can use the MENU function of the camera to check the adjustment results. The COLOR ADJUST screen appears. 4 Specify each adjustment item. CYN-RED: Pressing b gives the picture more cyan, while...
...ENTER button. The SETUP menu returns. Check the guide picture printed in the bright parts. The camera enters the picture quality adjustment mode for color prints. 44 Adjusting the Print Quality Press the v or V control button to select the next adjustment item, and then press b or B to select OK...pressing B makes it more magenta, while pressing B makes it deeper. Adjusting the Print Quality You can use the MENU function of the camera to check the adjustment results. The COLOR ADJUST screen appears. 4 Specify each adjustment item. CYN-RED: Pressing b gives the picture more cyan, while...
Operating Instructions
Page 45
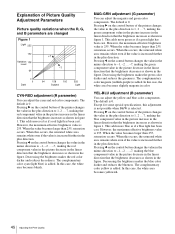
...default is 0. In this case, the white area becomes bluish. In this case, the white area becomes yellowish. 45 Adjusting the Print Quality Decreasing the brightness makes the green color darker and reduces the greenness. This adds more red as shown in the plus ... if a red light has been cast. Explanation of Picture Quality Adjustment Parameters Picture quality variations when the R, G, and B parameters are changed Figure 1 Light Variation Level Dark Subject Light CYN-RED adjustment (R parameter) You can adjust the magenta and green color components. This adds more blue ...
...default is 0. In this case, the white area becomes bluish. In this case, the white area becomes yellowish. 45 Adjusting the Print Quality Decreasing the brightness makes the green color darker and reduces the greenness. This adds more red as shown in the plus ... if a red light has been cast. Explanation of Picture Quality Adjustment Parameters Picture quality variations when the R, G, and B parameters are changed Figure 1 Light Variation Level Dark Subject Light CYN-RED adjustment (R parameter) You can adjust the magenta and green color components. This adds more blue ...

Operating Instructions
Page 46
... simultaneously in the menu screen. This adds more depth. This gives an overexposed quality to +2 or +3. 46 Adjusting the Print Quality Picture quality variations when the D, L, and Gm parameters are changed Figure 2 Light Variation Level Dark Subject Light DARK adjustment (D parameter) You can adjust the sharpness of pictures. Pressing B on the control button of dark and light...
... simultaneously in the menu screen. This adds more depth. This gives an overexposed quality to +2 or +3. 46 Adjusting the Print Quality Picture quality variations when the D, L, and Gm parameters are changed Figure 2 Light Variation Level Dark Subject Light DARK adjustment (D parameter) You can adjust the sharpness of pictures. Pressing B on the control button of dark and light...

Operating Instructions
Page 47
... parameters. The following is displayed for the RGB parameters. Guide Print-RGB (adjusting RGB parameters) Selecting the Guide Print-RGB layout enables a guide picture (adjustment simulation) to be printed on the camera, you can be printed for reference. The current state of each of the DARK, LIGHT...in the current picture, and overall the picture appears slightly yellow. The picture in the center. 47 Adjusting the Print Quality This is printed using the current color tone adjustment values. This is a picture showing the RED parameter increased by 3 from the current state. If, ...
... parameters. The following is displayed for the RGB parameters. Guide Print-RGB (adjusting RGB parameters) Selecting the Guide Print-RGB layout enables a guide picture (adjustment simulation) to be printed on the camera, you can be printed for reference. The current state of each of the DARK, LIGHT...in the current picture, and overall the picture appears slightly yellow. The picture in the center. 47 Adjusting the Print Quality This is printed using the current color tone adjustment values. This is a picture showing the RED parameter increased by 3 from the current state. If, ...

Operating Instructions
Page 48
...color tone. For example, increasing red makes cyan lighter and decreasing red makes cyan deeper. 48 Adjusting the Print Quality Guide Print-DLGm (adjusting DLGm parameters) Selecting the Guide Print-DLGm layout enables a color guide to be visible. This is a picture showing the GAMMA ... the camera This is a picture showing the DARK parameter decreased by 3 from the current state. Therefore, a perfectly achromatic picture may not be obtained and colors may sometimes be printed for reference. A black & white guide print can actually adjust the picture quality while looking...
...color tone. For example, increasing red makes cyan lighter and decreasing red makes cyan deeper. 48 Adjusting the Print Quality Guide Print-DLGm (adjusting DLGm parameters) Selecting the Guide Print-DLGm layout enables a color guide to be visible. This is a picture showing the GAMMA ... the camera This is a picture showing the DARK parameter decreased by 3 from the current state. Therefore, a perfectly achromatic picture may not be obtained and colors may sometimes be printed for reference. A black & white guide print can actually adjust the picture quality while looking...

Operating Instructions
Page 49
...Printing Times Print times differ depending on the camera to 0) are examples of the picture increases by the corresponding amount. sec UPC-X46 STD series HIGH Approx. ?? Ready Receiving Image BT [ ] PROCESSING Receiving image data Processing received data PRINTING [YELLOW] PRINTING [MAGENTA] PRINTING [CYAN] PRINTING [LAMI] Printing yellow Printing magenta Printing cyan Laminating 49 Adjusting the Print Quality...approximate time it takes from the camera and prints one picture. To avoid this feature enables you print a Guide Print-RGB with saturated light components (...
...Printing Times Print times differ depending on the camera to 0) are examples of the picture increases by the corresponding amount. sec UPC-X46 STD series HIGH Approx. ?? Ready Receiving Image BT [ ] PROCESSING Receiving image data Processing received data PRINTING [YELLOW] PRINTING [MAGENTA] PRINTING [CYAN] PRINTING [LAMI] Printing yellow Printing magenta Printing cyan Laminating 49 Adjusting the Print Quality...approximate time it takes from the camera and prints one picture. To avoid this feature enables you print a Guide Print-RGB with saturated light components (...

Operating Instructions
Page 62
...finishes feeding and printing transmission ends. tPrint using the print queue function, or cancel this function. (See "Using the Print Queue Function" on page 34) Part of focus. tUse the flash. tSet the white balance correctly. (See "Adjusting the White Balance" on page 36) Picture Quality Symptom Cause/... ones. • The life of the LCD, perform the operation again. fire. tContact your nearest Sony dealer. The colors in the menu to the printer. tHold the camera correctly and make sure nothing is blocking the lens. 62 Troubleshooting tSet FLASH MODE in a picture taken...
...finishes feeding and printing transmission ends. tPrint using the print queue function, or cancel this function. (See "Using the Print Queue Function" on page 34) Part of focus. tUse the flash. tSet the white balance correctly. (See "Adjusting the White Balance" on page 36) Picture Quality Symptom Cause/... ones. • The life of the LCD, perform the operation again. fire. tContact your nearest Sony dealer. The colors in the menu to the printer. tHold the camera correctly and make sure nothing is blocking the lens. 62 Troubleshooting tSet FLASH MODE in a picture taken...

Operating Instructions
Page 66
Layout examples when using UPC-X46 series print paper 90 × 65 mm 80 × 60 mm 60 × 40 mm 47 × 37 mm 45 × 35 mm Guide print 34 × 28 mm Guide Print-RGB Guide Print-DLGm These guides are useful when adjusting the image quality of the printer. Apendix 66 Apendix Print Layouts Layout examples when using UPC-X34 series print paper 90 × 65 mm Guide print 2 × 2 inch 60 × 40 mm 45 × 35 mm 34 × 28 mm Guide Print-RGB Guide Print-DLGm These guides are useful when adjusting the image quality of the printer.
Layout examples when using UPC-X46 series print paper 90 × 65 mm 80 × 60 mm 60 × 40 mm 47 × 37 mm 45 × 35 mm Guide print 34 × 28 mm Guide Print-RGB Guide Print-DLGm These guides are useful when adjusting the image quality of the printer. Apendix 66 Apendix Print Layouts Layout examples when using UPC-X34 series print paper 90 × 65 mm Guide print 2 × 2 inch 60 × 40 mm 45 × 35 mm 34 × 28 mm Guide Print-RGB Guide Print-DLGm These guides are useful when adjusting the image quality of the printer.
Operating Instructions
Page 68
... Preparations Camera 14 Printer 16 Print cartridge cover 12 Print cartridge slot 12 Print cartridges Loading 17 PRINT lamp (printer) 12 Print layout List 66 PRINT OFFSET 50 Print packs 16 Print paper 18 Print preview screen 23 Print quality adjustment 23, 44 Black & white prints 24 Printer 44 Print quality adjustment (printer) 44 Parameters 45 Print queue flag 24 Print size 23, 32 Print size (print layout) List 66 PRINT SIZE...
... Preparations Camera 14 Printer 16 Print cartridge cover 12 Print cartridge slot 12 Print cartridges Loading 17 PRINT lamp (printer) 12 Print layout List 66 PRINT OFFSET 50 Print packs 16 Print paper 18 Print preview screen 23 Print quality adjustment 23, 44 Black & white prints 24 Printer 44 Print quality adjustment (printer) 44 Parameters 45 Print queue flag 24 Print size 23, 32 Print size (print layout) List 66 PRINT SIZE...


