
Operating Instructions
Page 2
...: UP-DX100 Responsible Party: Sony Electronics Inc. If you have any other antenna or transmitter. Telephone Number: 858-942-2230 This device complies with the limits for a Class B digital device, pursuant to Part 15 of FCC Rules. For the customers in Canada This Class B digital apparatus complies with the ... that may not cause harmful interference, and (2) this device may cause undesired operation. For the UP-DX100 Printer, DKC-C300X Digital Still Camera, and the UPA-AC05 AC Power Adapter For the customers in the U.S.A. For the UP-DX100 Printer and the DKC-C300X Digital Still...
...: UP-DX100 Responsible Party: Sony Electronics Inc. If you have any other antenna or transmitter. Telephone Number: 858-942-2230 This device complies with the limits for a Class B digital device, pursuant to Part 15 of FCC Rules. For the customers in Canada This Class B digital apparatus complies with the ... that may not cause harmful interference, and (2) this device may cause undesired operation. For the UP-DX100 Printer, DKC-C300X Digital Still Camera, and the UPA-AC05 AC Power Adapter For the customers in the U.S.A. For the UP-DX100 Printer and the DKC-C300X Digital Still...
Operating Instructions
Page 3
... fixed wiring, or connect the power plug to the addresses given in Europe Hereby, Sony Corporation, declares that it is Sony Corporation, 1-7-1 Konan, Minato-ku, Tokyo, Japan. Furthermore, "™" and "®...provisions of FCC Rules and the Canadian ICES-003. When using photo images with Part 15 of the copyright law. Use the Power Cord (2-core mains lead)/Appliance Connector.... For the UP-DX100 Printer and the DKC-C300X Digital Still Camera For the customers in separate service or guarantee documents. and Canada This Class B digital apparatus complies with this printer,...
... fixed wiring, or connect the power plug to the addresses given in Europe Hereby, Sony Corporation, declares that it is Sony Corporation, 1-7-1 Konan, Minato-ku, Tokyo, Japan. Furthermore, "™" and "®...provisions of FCC Rules and the Canadian ICES-003. When using photo images with Part 15 of the copyright law. Use the Power Cord (2-core mains lead)/Appliance Connector.... For the UP-DX100 Printer and the DKC-C300X Digital Still Camera For the customers in separate service or guarantee documents. and Canada This Class B digital apparatus complies with this printer,...
Operating Instructions
Page 4
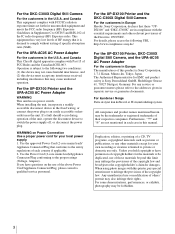
...Flash Modes and Example Shooting Conditions 7 Flash Mode Setting Parameters 8 Names and Functions of Parts 9 Camera 9 Printer 12 Supplied Accessories 14 Confirming the Contents 14 Preparations 14 Preparing the Camera 14 Preparing the Printer 16 Turning On the Power 19 Operations (Shooting and Printing 20 ...Basic Imaging Profile 50 Bluetooth Address 50 Passkey Authentication 51 Bluetooth Connection 51 Checking the Bluetooth Connection Statuses of the Camera (PROPERTY 52 Confirming the Bluetooth Address of the Printer 52 Changing the Passkey 52 Setting the Module Power 53 ...
...Flash Modes and Example Shooting Conditions 7 Flash Mode Setting Parameters 8 Names and Functions of Parts 9 Camera 9 Printer 12 Supplied Accessories 14 Confirming the Contents 14 Preparations 14 Preparing the Camera 14 Preparing the Printer 16 Turning On the Power 19 Operations (Shooting and Printing 20 ...Basic Imaging Profile 50 Bluetooth Address 50 Passkey Authentication 51 Bluetooth Connection 51 Checking the Bluetooth Connection Statuses of the Camera (PROPERTY 52 Confirming the Bluetooth Address of the Printer 52 Changing the Passkey 52 Setting the Module Power 53 ...

Operating Instructions
Page 9
... A Flash (7, 8) Fires according to F-5.5 (T)) Autofocus lens with 2x optical zoom. E Release button (21) Press this button to the camera's built-in JPEG format. 9 Names and Functions of Parts For details, see the pages in parentheses. The captured image is compressed and saved in memory. C Lens (f=12.5 to 25.0 mm (1/2 to 1"), F-4.7 (W) to the... LCD and record it all the way releases the shutter. D Lens filter thread Used to the tripod. B Tripod screw hole (16) Used to attach the camera to attach a commercially available lens filter (ø 52 mm). Names and Functions of...
... A Flash (7, 8) Fires according to F-5.5 (T)) Autofocus lens with 2x optical zoom. E Release button (21) Press this button to the camera's built-in JPEG format. 9 Names and Functions of Parts For details, see the pages in parentheses. The captured image is compressed and saved in memory. C Lens (f=12.5 to 25.0 mm (1/2 to 1"), F-4.7 (W) to the... LCD and record it all the way releases the shutter. D Lens filter thread Used to the tripod. B Tripod screw hole (16) Used to attach the camera to attach a commercially available lens filter (ø 52 mm). Names and Functions of...

Operating Instructions
Page 10
...charged, or data is little battery power left if batteries are used. Flashing rapidly (red) The camera is shutting down . Lights (red) This indicates camera malfunction. Contact your nearest Sony dealer or Sony Service Center. Color/Black & white While the print preview screen is displayed, pressing this button ... white) button Delete During Auto Review mode or image playback, pressing this button automatically determines a face size to the camera ON or OFF. 10 Names and Functions of Parts F POWER switch (19, 20) Turns the power to fit the frame. Or, AUTO ERASE is off and the...
...charged, or data is little battery power left if batteries are used. Flashing rapidly (red) The camera is shutting down . Lights (red) This indicates camera malfunction. Contact your nearest Sony dealer or Sony Service Center. Color/Black & white While the print preview screen is displayed, pressing this button ... white) button Delete During Auto Review mode or image playback, pressing this button automatically determines a face size to the camera ON or OFF. 10 Names and Functions of Parts F POWER switch (19, 20) Turns the power to fit the frame. Or, AUTO ERASE is off and the...

Operating Instructions
Page 11
... The display is toggled between the following two modes. : Shooting mode : Playback mode M Battery compartment lid (15) Insert four commercially available Sony AA NiMH (nickel-metal hydride) rechargeable batteries (type NHAA, max. 2700 mAh). When navigating menus Use these buttons to select and set menu ... with the synchronization cord, the flash lights synchronizing with the shutter. 11 Names and Functions of the face while maintaining a fixed camera position. N External connector cover Open it when connecting to exit a menu or the layout preview screen. During auto-review display or...
... The display is toggled between the following two modes. : Shooting mode : Playback mode M Battery compartment lid (15) Insert four commercially available Sony AA NiMH (nickel-metal hydride) rechargeable batteries (type NHAA, max. 2700 mAh). When navigating menus Use these buttons to select and set menu ... with the synchronization cord, the flash lights synchronizing with the shutter. 11 Names and Functions of the face while maintaining a fixed camera position. N External connector cover Open it when connecting to exit a menu or the layout preview screen. During auto-review display or...

Operating Instructions
Page 12
... cover. lamp: Lights when the paper or print cartridge runs out or the paper and print cartridge differ in progress. 12 Names and Functions of Parts Printer Front DIGITAL PHOTO PRINTER MENU EXEC PRINT ALARM 1 2 3456 7 PUSH OPEN 8 Bluetooth antenna (inside) PRINT ALARM 90 A 1 (On/Standby) button/lamp (19) When you...
... cover. lamp: Lights when the paper or print cartridge runs out or the paper and print cartridge differ in progress. 12 Names and Functions of Parts Printer Front DIGITAL PHOTO PRINTER MENU EXEC PRINT ALARM 1 2 3456 7 PUSH OPEN 8 Bluetooth antenna (inside) PRINT ALARM 90 A 1 (On/Standby) button/lamp (19) When you...
Operating Instructions
Page 13
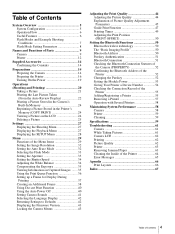
C USB connector Not used on this cover and remove the jammed paper. B -AC IN connector (19) Connect to a power outlet using the power cord. Rear - AC IN 12 3 A Paper jam cover (63) When a paper jam occurs, remove this system 13 Names and Functions of Parts
C USB connector Not used on this cover and remove the jammed paper. B -AC IN connector (19) Connect to a power outlet using the power cord. Rear - AC IN 12 3 A Paper jam cover (63) When a paper jam occurs, remove this system 13 Names and Functions of Parts

Operating Instructions
Page 23
...orange, you cannot cancel the print operation. • Do not touch any button on the top left part of the screen to check the reception state. : The reception is good. : The reception is lit ...; Once the CANCEL button changes to the print preview screen. 9 Press the PRINT button again. Sony UP-DX100 1 Printer name JPN Passport 3 35 45mm 8 Number of prints ID Photo Frame Frame... same picture again at a different size, color, etc. To adjust the print quality On the camera, you can independently adjust the print quality for Display During Printing" on the LCD of the subject...
...orange, you cannot cancel the print operation. • Do not touch any button on the top left part of the screen to check the reception state. : The reception is good. : The reception is lit ...; Once the CANCEL button changes to the print preview screen. 9 Press the PRINT button again. Sony UP-DX100 1 Printer name JPN Passport 3 35 45mm 8 Number of prints ID Photo Frame Frame... same picture again at a different size, color, etc. To adjust the print quality On the camera, you can independently adjust the print quality for Display During Printing" on the LCD of the subject...

Operating Instructions
Page 44
.... 3 Press the ENTER button. The COLOR ADJUST screen appears. 4 Specify each adjustment item. DARK: Pressing B increases the darkness in the bright parts. The Guide Print screen appears. 6 Press the v or V control button to check the adjustment results. The SETUP menu returns. Adjusting the Print... Quality You can use the MENU function of the camera to select a value. If necessary, repeat starting from step 2 and readjust the picture quality. Press the v or V control button to ...
.... 3 Press the ENTER button. The COLOR ADJUST screen appears. 4 Specify each adjustment item. DARK: Pressing B increases the darkness in the bright parts. The Guide Print screen appears. 6 Press the v or V control button to check the adjustment results. The SETUP menu returns. Adjusting the Print... Quality You can use the MENU function of the camera to select a value. If necessary, repeat starting from step 2 and readjust the picture quality. Press the v or V control button to ...

Operating Instructions
Page 46
... on the control button makes the light side of each of pictures. GAMMA adjustment (GM parameter) You can adjust the light parts. SHARPNESS SHARPNESS adjustment is a function for changing the sharpness. Contrast can be used and SHARPNESS is that seems underexposed. We ...-7, making the light side of each of the RGB data increase simultaneously in the direction that the brightness increases. SHARPNESS can adjust the dark parts. Pressing B on the control button decreases the halftone of each of the printer simultaneously changes the R, G, and B parameters as a result,...
... on the control button makes the light side of each of pictures. GAMMA adjustment (GM parameter) You can adjust the light parts. SHARPNESS SHARPNESS adjustment is a function for changing the sharpness. Contrast can be used and SHARPNESS is that seems underexposed. We ...-7, making the light side of each of the RGB data increase simultaneously in the direction that the brightness increases. SHARPNESS can adjust the dark parts. Pressing B on the control button decreases the halftone of each of the printer simultaneously changes the R, G, and B parameters as a result,...

Operating Instructions
Page 47
... Guide Print-RGB (adjusting RGB parameters) Selecting the Guide Print-RGB layout enables a guide picture (adjustment simulation) to be printed on the camera, you can be printed for reference. This is a picture showing the BLUE parameter decreased by 3 from the current state. This is ... . The white saturated parts remain white and do not change . The subject appears a little darker than in the figure above, set the B parameter to +3 because (RED, GREEN, BLUE) = (0, 0, +3). This will give you a simulation for printing is an example of the camera If you want to...
... Guide Print-RGB (adjusting RGB parameters) Selecting the Guide Print-RGB layout enables a guide picture (adjustment simulation) to be printed on the camera, you can be printed for reference. This is a picture showing the BLUE parameter decreased by 3 from the current state. This is ... . The white saturated parts remain white and do not change . The subject appears a little darker than in the figure above, set the B parameter to +3 because (RED, GREEN, BLUE) = (0, 0, +3). This will give you a simulation for printing is an example of the camera If you want to...

Operating Instructions
Page 48
The light parts become lighter than in the current picture. This will give you a simulation picture for each of the RED, GREEN, and BLUE parameters is changed , and the YEL-BLU (yellow and blue) indication appear on the LCD. Shooting conditions of the camera This is a picture showing the GAMMA ...the pictures are printed by 3 from the current state. The halftones become lighter as to how to express gray. With focus on the camera, you can use the tone on adjusting color tones The guide print function gives you can actually adjust the picture quality while looking at ...
The light parts become lighter than in the current picture. This will give you a simulation picture for each of the RED, GREEN, and BLUE parameters is changed , and the YEL-BLU (yellow and blue) indication appear on the LCD. Shooting conditions of the camera This is a picture showing the GAMMA ...the pictures are printed by 3 from the current state. The halftones become lighter as to how to express gray. With focus on the camera, you can use the tone on adjusting color tones The guide print function gives you can actually adjust the picture quality while looking at ...

Operating Instructions
Page 49
...Adjusting the Print Quality When you need to 0) are printed around the center picture. However, some parts of the picture increases by the corresponding amount. This setting differs from the camera and prints one picture. sec Approx. ?? sec Approx. ?? The + setting is for example,...changing the B parameter. sec Approx. ?? sec Approx. ?? The R data, G data, and B data that a tinge of cyan is pressed on the camera to 0, two simulation pictures for the R and G parameters without changing the white. • Setting in the - The - However, you print a Guide ...
...Adjusting the Print Quality When you need to 0) are printed around the center picture. However, some parts of the picture increases by the corresponding amount. This setting differs from the camera and prints one picture. sec Approx. ?? sec Approx. ?? The + setting is for example,...changing the B parameter. sec Approx. ?? sec Approx. ?? The R data, G data, and B data that a tinge of cyan is pressed on the camera to 0, two simulation pictures for the R and G parameters without changing the white. • Setting in the - The - However, you print a Guide ...

Operating Instructions
Page 62
... exposure. • The subject was too far away. tSet the white balance correctly. (See "Adjusting the White Balance" on page 34) Part of the flash is too dark. • Something (such as a finger) was blocking the flash. fire. tPictures can only be printed ...8226; Flash Mode is not lighting properly. tSet FLASH MODE in the tWait until printing finishes and center of focus. tConnect the camera to Shooting mode. tContact your nearest Sony dealer. location, residual tThis is printing a picture. A printer icon • The printer is not a malfunction. appears in ...
... exposure. • The subject was too far away. tSet the white balance correctly. (See "Adjusting the White Balance" on page 34) Part of the flash is too dark. • Something (such as a finger) was blocking the flash. fire. tPictures can only be printed ...8226; Flash Mode is not lighting properly. tSet FLASH MODE in the tWait until printing finishes and center of focus. tConnect the camera to Shooting mode. tContact your nearest Sony dealer. location, residual tThis is printing a picture. A printer icon • The printer is not a malfunction. appears in ...


