Operating Instructions
Page 4
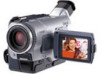
... them back • Recording a picture (p. 19) • Recording a still image on a tape (p. 33) • Playing back a tape (p. 27) • Recording still images on "Memory Stick" (p. 93) (DCR-TRV330/TRV530 only) • Viewing a still image recorded on "Memory Stick" (p. 107) (DCR-TRV330/TRV530 only) b Capturing images on your computer • Using with analog video unit and your computer (p. 74) • Viewing images recorded on "Memory Stick" using USB cable (p. 110) (DCR-TRV330/TRV530 only) Other uses Functions to adjust exposure in the recording mode • Back light (p. 23) •...
... them back • Recording a picture (p. 19) • Recording a still image on a tape (p. 33) • Playing back a tape (p. 27) • Recording still images on "Memory Stick" (p. 93) (DCR-TRV330/TRV530 only) • Viewing a still image recorded on "Memory Stick" (p. 107) (DCR-TRV330/TRV530 only) b Capturing images on your computer • Using with analog video unit and your computer (p. 74) • Viewing images recorded on "Memory Stick" using USB cable (p. 110) (DCR-TRV330/TRV530 only) Other uses Functions to adjust exposure in the recording mode • Back light (p. 23) •...
Operating Instructions
Page 5
...function 44 Adjusting the exposure manually 46 Focusing manually 47 Superimposing a title 48 Making your computer - Photo save 105 Viewing a still image - SLIDE SHOW 118 Preventing accidental erasure - Signal convert function ..... 74 Recording video or TV programs 75 Inserting a scene from a tape - Memory Photo recording 93 Superimposing a still image in the "Memory Stick" on "Memory Stick" - Picture effect 40 Using special effects - Insert Editing 77 Customizing Your Camcorder Changing the menu settings 79 "Memory Stick" operations (DCR-TRV330/TRV530 only) Using...
...function 44 Adjusting the exposure manually 46 Focusing manually 47 Superimposing a title 48 Making your computer - Photo save 105 Viewing a still image - SLIDE SHOW 118 Preventing accidental erasure - Signal convert function ..... 74 Recording video or TV programs 75 Inserting a scene from a tape - Memory Photo recording 93 Superimposing a still image in the "Memory Stick" on "Memory Stick" - Picture effect 40 Using special effects - Insert Editing 77 Customizing Your Camcorder Changing the menu settings 79 "Memory Stick" operations (DCR-TRV330/TRV530 only) Using...
Operating Instructions
Page 7
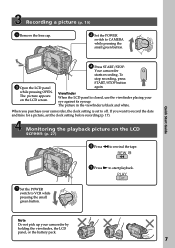
... record the date and time for a picture, set to off. PLAY OFCFR(CHG) 1 Set the POWER switch to start playback. V POWER OFCFR(CHG) E ERMAORY E ERMAORY CAM M Quick Start Guide 3 Open the LCD panel while pressing OPEN. Monitoring the playback picture on the LCD screen. 4 Press START/STOP. REW 3 Press N to VCR while pressing the small green button. Your camcorder starts recording. Viewfinder When the LCD panel is black and white. If you purchase your camcorder by holding the viewfinder, the LCD...
... record the date and time for a picture, set to off. PLAY OFCFR(CHG) 1 Set the POWER switch to start playback. V POWER OFCFR(CHG) E ERMAORY E ERMAORY CAM M Quick Start Guide 3 Open the LCD panel while pressing OPEN. Monitoring the playback picture on the LCD screen. 4 Press START/STOP. REW 3 Press N to VCR while pressing the small green button. Your camcorder starts recording. Viewfinder When the LCD panel is black and white. If you purchase your camcorder by holding the viewfinder, the LCD...
Operating Instructions
Page 8
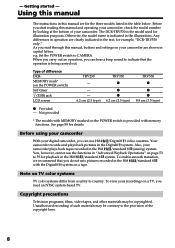
... models with memory functions. Otherwise, the model name is provided with MEMORY marked on the POWER switch) Self-timer (USB) jack LCD screen TRV230 - - - 6.2 cm (2.5 type) TRV330 z z z 6.2 cm (2.5 type) TRV530 z z z 8.8 cm (3.5 type) z Provided - Before using your camcorder With your camcorder are shown in the Hi8 /standard 8 (analog) system. Unauthorized recording of your camcorder plays back tapes recorded in capital letters. Before you start reading this manual, buttons and settings on your digital camcorder, you can use the functions in...
... models with memory functions. Otherwise, the model name is provided with MEMORY marked on the POWER switch) Self-timer (USB) jack LCD screen TRV230 - - - 6.2 cm (2.5 type) TRV330 z z z 6.2 cm (2.5 type) TRV530 z z z 8.8 cm (3.5 type) z Provided - Before using your camcorder With your camcorder are shown in the Hi8 /standard 8 (analog) system. Unauthorized recording of your camcorder plays back tapes recorded in capital letters. Before you start reading this manual, buttons and settings on your digital camcorder, you can use the functions in...
Operating Instructions
Page 17
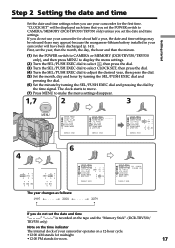
... L ANGUAGE DEMO MODE RETURN [ MENU ] : END If you use your camcorder will be released (bars may appear) because the manganese-lithium battery installed in your camcorder for noon. 17 "CLOCK SET" will have been discharged (p. 141). If you do not set the date and time is recorded on the tape and the "Memory Stick". (DCR-TRV330/ TRV530 only) Note on the time indicator The internal clock of your camcorder operates on a 12...
... L ANGUAGE DEMO MODE RETURN [ MENU ] : END If you use your camcorder will be released (bars may appear) because the manganese-lithium battery installed in your camcorder for noon. 17 "CLOCK SET" will have been discharged (p. 141). If you do not set the date and time is recorded on the tape and the "Memory Stick". (DCR-TRV330/ TRV530 only) Note on the time indicator The internal clock of your camcorder operates on a 12...
Operating Instructions
Page 20
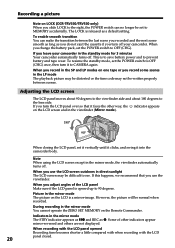
... turn the LCD panel over so that you use the LCD screen outdoors in the viewfinder (Mirror mode). 180° 90° When closing the LCD panel, set to 90 degrees. Recording a picture Note on LOCK (DCR-TRV330/TRV530 only) When you slide LOCK to the right, the POWER switch can make the transition between scenes. The LOCK is to save battery power and to prevent battery and tape...
... turn the LCD panel over so that you use the LCD screen outdoors in the viewfinder (Mirror mode). 180° 90° When closing the LCD panel, set to 90 degrees. Recording a picture Note on LOCK (DCR-TRV330/TRV530 only) When you slide LOCK to the right, the POWER switch can make the transition between scenes. The LOCK is to save battery power and to prevent battery and tape...
Operating Instructions
Page 22
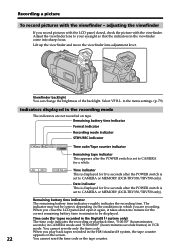
... for the correct remaining battery time in the viewfinder come into sharp focus. Adjust the viewfinder lens to CAMERA or MEMORY (DCR-TRV330/TRV530 only). Remaining battery time indicator The remaining battery time indicator roughly indicates the recording time. The indicator may not be displayed. Date indicator This is displayed for tapes recorded in the Digital8 system only) The time code indicates the recording or playback time, "0:00:00" (hours:minutes: seconds) in CAMERA mode and "0:00:00...
... for the correct remaining battery time in the viewfinder come into sharp focus. Adjust the viewfinder lens to CAMERA or MEMORY (DCR-TRV330/TRV530 only). Remaining battery time indicator The remaining battery time indicator roughly indicates the recording time. The indicator may not be displayed. Date indicator This is displayed for tapes recorded in the Digital8 system only) The time code indicates the recording or playback time, "0:00:00" (hours:minutes: seconds) in CAMERA mode and "0:00:00...

Operating Instructions
Page 24
... autofocus mode when using the NightShot function, you can not use the NightShot function in CAMERA mode. While using the NightShot function, focus manually. Fader - Digital effect - and "NIGHTSHOT" indicators flash on the screen. To cancel the Super NightShot mode, press SUPER NIGHTSHOT again. In MEMORY mode (DCR-TRV330/TRV530 only) You cannot use the following functions: - Exposure - The motion of the background. The maximum shooting distance using the Super NightShot function, you keep NIGHTSHOT set N.S.LIGHT...
... autofocus mode when using the NightShot function, you can not use the NightShot function in CAMERA mode. While using the NightShot function, focus manually. Fader - Digital effect - and "NIGHTSHOT" indicators flash on the screen. To cancel the Super NightShot mode, press SUPER NIGHTSHOT again. In MEMORY mode (DCR-TRV330/TRV530 only) You cannot use the following functions: - Exposure - The motion of the background. The maximum shooting distance using the Super NightShot function, you keep NIGHTSHOT set N.S.LIGHT...
Operating Instructions
Page 31
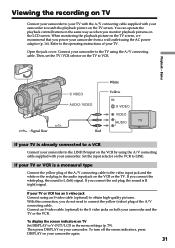
... connect the white plug, the sound is already connected to a VCR Connect your camcorder to the LINE IN input on your TV or VCR has an S video jack Connect using the A/V connecting cable supplied with your camcorder to the audio input jack on the VCR or the TV. Open the jack cover. Connect your TV. Basics : Signal flow S VIDEO AUDIO / VIDEO Red White Yellow IN S VIDEO VIDEO AUDIO If your TV is L (left) signal. You can operate the playback control buttons in the menu settings...
... connect the white plug, the sound is already connected to a VCR Connect your camcorder to the LINE IN input on your TV or VCR has an S video jack Connect using the A/V connecting cable supplied with your camcorder to the audio input jack on the VCR or the TV. Open the jack cover. Connect your TV. Basics : Signal flow S VIDEO AUDIO / VIDEO Red White Yellow IN S VIDEO VIDEO AUDIO If your TV is L (left) signal. You can operate the playback control buttons in the menu settings...
Operating Instructions
Page 32
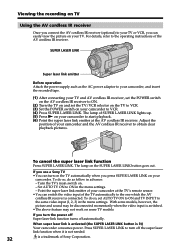
... momentarily when the video input is lit) Your camcorder consumes power. The lamp on . - Set AUTO TV ON to VCR. (4) Press SUPER LASER LINK. To do so, do so, set the TV/VCR selector on the TV to VCR. (3) Set the POWER switch on your camcorder at the AV cordless IR receiver. With some models, however, the picture and sound may not work on some TV models. SUPER LASER...
... momentarily when the video input is lit) Your camcorder consumes power. The lamp on . - Set AUTO TV ON to VCR. (4) Press SUPER LASER LINK. To do so, do so, set the TV/VCR selector on the TV to VCR. (3) Set the POWER switch on your camcorder at the AV cordless IR receiver. With some models, however, the picture and sound may not work on some TV models. SUPER LASER...
Operating Instructions
Page 33
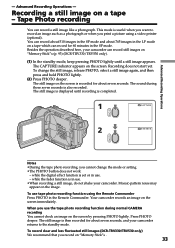
... "Memory Stick"s (p. 93) (DCR-TRV330/TRV530 only). (1) In the standby mode, keep pressing PHOTO lightly until recording is then recorded for about seven seconds, and your camcorder returns to record an image such as a photograph or when you cannot change the still image, release PHOTO, select a still image again, and then press and hold PHOTO lightly. (2) Press PHOTO deeper. while the digital effect function is recorded for about seven seconds. Advanced Recording Operations - The still image on a tape - The still image...
... "Memory Stick"s (p. 93) (DCR-TRV330/TRV530 only). (1) In the standby mode, keep pressing PHOTO lightly until recording is then recorded for about seven seconds, and your camcorder returns to record an image such as a photograph or when you cannot change the still image, release PHOTO, select a still image again, and then press and hold PHOTO lightly. (2) Press PHOTO deeper. while the digital effect function is recorded for about seven seconds. Advanced Recording Operations - The still image on a tape - The still image...
Operating Instructions
Page 55
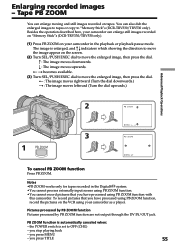
... can enlarge still images recorded on "Memory Stick"s (DCR-TRV330/TRV530 only). (1) Press PB ZOOM on the VCR using PB ZOOM function with this camcorder. Besides the operation described here, your camcorder as a player. Notes •PB ZOOM works only for tapes recorded in the playback or playback pause mode. Pictures processed by PB ZOOM function Pictures processed by PB ZOOM function are not output through the DV IN/OUT jack. The image is enlarged, and R r indicators which showing the direction to...
... can enlarge still images recorded on "Memory Stick"s (DCR-TRV330/TRV530 only). (1) Press PB ZOOM on the VCR using PB ZOOM function with this camcorder. Besides the operation described here, your camcorder as a player. Notes •PB ZOOM works only for tapes recorded in the playback or playback pause mode. Pictures processed by PB ZOOM function Pictures processed by PB ZOOM function are not output through the DV IN/OUT jack. The image is enlarged, and R r indicators which showing the direction to...
Operating Instructions
Page 71
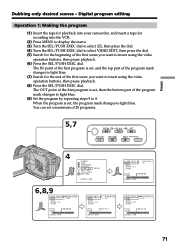
... 71 The IN point of the first program is set , then the bottom part of the first scene you want to insert using the video operation buttons, then pause playback. (8) Press the SEL/PUSH EXEC dial. Digital program editing Operation 1: Making the program (1) Insert the tape for playback into the VCR. (2) Press MENU to display the menu. (3) Turn the SEL/PUSH EXEC dial to select , then press...
... 71 The IN point of the first program is set , then the bottom part of the first scene you want to insert using the video operation buttons, then pause playback. (8) Press the SEL/PUSH EXEC dial. Digital program editing Operation 1: Making the program (1) Insert the tape for playback into the VCR. (2) Press MENU to display the menu. (3) Turn the SEL/PUSH EXEC dial to select , then press...
Operating Instructions
Page 80
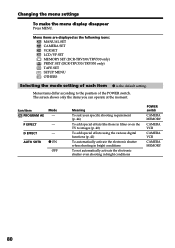
Menu items are displayed as the following icons: MANUAL SET CAMERA SET VCR SET LCD/VF SET MEMORY SET (DCR-TRV330/TRV530 only) PRINT SET (DCR-TRV330/TRV530 only) TAPE SET SETUP MENU OTHERS Selecting the mode setting of the POWER switch. The screen shows only the items you can operate at the moment. D EFFECT - AUTO SHTR z ON OFF Meaning To suit your specific shooting requirement (p. 44) To add special effects like those in films or on the TV to the...
Menu items are displayed as the following icons: MANUAL SET CAMERA SET VCR SET LCD/VF SET MEMORY SET (DCR-TRV330/TRV530 only) PRINT SET (DCR-TRV330/TRV530 only) TAPE SET SETUP MENU OTHERS Selecting the mode setting of the POWER switch. The screen shows only the items you can operate at the moment. D EFFECT - AUTO SHTR z ON OFF Meaning To suit your specific shooting requirement (p. 44) To add special effects like those in films or on the TV to the...
Operating Instructions
Page 85
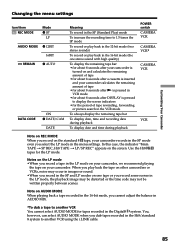
... on AUDIO MODE When playing back a tape recorded in the 16-bit mode, you cannot adjust the balance in AUDIO MIX. *To dub a tape to another VCR You cannot select AUDIO MODE for tapes recorded in the Digital8 system. Use the Hi8 tapes for the period of tape rewinding, forwarding or picture search in the VCR mode To always display the remaining tape bar To display date, time and recording data during playback To display date and time during playback POWER switch CAMERA VCR CAMERA VCR* CAMERA VCR VCR Note on REC MODE When you record...
... on AUDIO MODE When playing back a tape recorded in the 16-bit mode, you cannot adjust the balance in AUDIO MIX. *To dub a tape to another VCR You cannot select AUDIO MODE for tapes recorded in the Digital8 system. Use the Hi8 tapes for the period of tape rewinding, forwarding or picture search in the VCR mode To always display the remaining tape bar To display date, time and recording data during playback To display date and time during playback POWER switch CAMERA VCR CAMERA VCR* CAMERA VCR VCR Note on REC MODE When you record...
Operating Instructions
Page 103
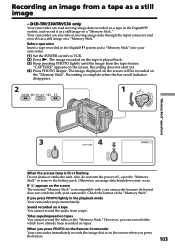
... turn the power off , eject the "Memory Stick" or remove the battery pack. Titles superimposed on tapes You cannot record the titles on the tape is played back. (3) Keep pressing PHOTO lightly until the image from the tape freezes. If appears on a tape You cannot record the audio from a tape. Sound recorded on the screen The inserted "Memory Stick" is on the screen. When you press the button. 103 Check the format of the "Memory Stick". Recording an image from a tape as a still image on a "Memory Stick." DCR-TRV330...
... turn the power off , eject the "Memory Stick" or remove the battery pack. Titles superimposed on tapes You cannot record the titles on the tape is played back. (3) Keep pressing PHOTO lightly until the image from the tape freezes. If appears on a tape You cannot record the audio from a tape. Sound recorded on the screen The inserted "Memory Stick" is on the screen. When you press the button. 103 Check the format of the "Memory Stick". Recording an image from a tape as a still image on a "Memory Stick." DCR-TRV330...
Operating Instructions
Page 111
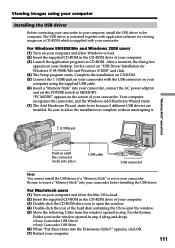
...;Sony Camcorder USB Driver •Sony Camcorder USB Shim (6) When "Put these items into the Extensions folder?" Your computer recognizes the camcorder, and the Windows Add Hardware Wizard starts. (7) The Add Hardware Wizard starts twice because 2 different USB drivers are installed. appears, click OK. (7) Restart your computer, install the USB driver to the computer. Viewing images using the supplied USB cable. (6) Insert a "Memory Stick" into your camcorder, connect the AC power adaptor and set the POWER switch to MEMORY...
...;Sony Camcorder USB Driver •Sony Camcorder USB Shim (6) When "Put these items into the Extensions folder?" Your computer recognizes the camcorder, and the Windows Add Hardware Wizard starts. (7) The Add Hardware Wizard starts twice because 2 different USB drivers are installed. appears, click OK. (7) Restart your computer, install the USB driver to the computer. Viewing images using the supplied USB cable. (6) Insert a "Memory Stick" into your camcorder, connect the AC power adaptor and set the POWER switch to MEMORY...

Operating Instructions
Page 112
... applicable drive. (2) A message to MEMORY. Make sure that the access lamp of the USB cable to the (USB) jack on the camcorder and the other end to the USB connector on Windows 98 and double click the newly recognized drive. (Example: "Removable Disk (D:)") The folders inside the "Memory Stick" are displayed. (6) Select and double-click the desired image file from the system appears, then unplug the USB cable or eject the "Memory Stick...
... applicable drive. (2) A message to MEMORY. Make sure that the access lamp of the USB cable to the (USB) jack on the camcorder and the other end to the USB connector on Windows 98 and double click the newly recognized drive. (Example: "Removable Disk (D:)") The folders inside the "Memory Stick" are displayed. (6) Select and double-click the desired image file from the system appears, then unplug the USB cable or eject the "Memory Stick...
Operating Instructions
Page 144
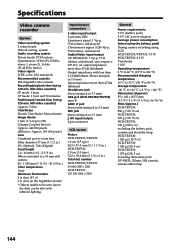
...Output impedance with infrared lighting. Specifications Video camera recorder System Video recording system 2 rotary heads Helical scaning system Audio recording system Rotary heads, PCM system Quantization: 12 bits (Fs 32 kHz, stereo 1, stereo 2), 16 bits (Fs 48 kHz, stereo) Video signal NTSC color, EIA standards Recommended cassette Hi8/Digital8 video cassette Recording/playback time (using 120 min. Viewfinder Electric Viewfinder, Monochrome Image device 3 mm (1/6 type CCD) (Charge Coupled Device) Approx. 460 000 pixels (Effective: Approx. 290 000 pixels) Lens Combined power zoom lens...
...Output impedance with infrared lighting. Specifications Video camera recorder System Video recording system 2 rotary heads Helical scaning system Audio recording system Rotary heads, PCM system Quantization: 12 bits (Fs 32 kHz, stereo 1, stereo 2), 16 bits (Fs 48 kHz, stereo) Video signal NTSC color, EIA standards Recommended cassette Hi8/Digital8 video cassette Recording/playback time (using 120 min. Viewfinder Electric Viewfinder, Monochrome Image device 3 mm (1/6 type CCD) (Charge Coupled Device) Approx. 460 000 pixels (Effective: Approx. 290 000 pixels) Lens Combined power zoom lens...
Operating Instructions
Page 154
... 98 Memory overlap 98 Memory PB ZOOM 116 Memory photo recording ...... 93 "Memory Stick 88 Menu settings 79 Mirror mode 20 Moisture condensation ........ 139 Monaural 31 MONOTONE 37 Mosaic fader 37 NIGHTSHOT 23 NTSC system 138 O, P, Q OLD MOVIE 41 Operation indicators 153 OVERLAP 37 Photo scan 59 Photo search 58 PICTURE EFFECT 40, 53 Picture search 29 Playback pause 29 Print mark 123 PROGRAM AE 44 R Recording time 14 RESET button 129 Rec Review 26 Remaining battery time...
... 98 Memory overlap 98 Memory PB ZOOM 116 Memory photo recording ...... 93 "Memory Stick 88 Menu settings 79 Mirror mode 20 Moisture condensation ........ 139 Monaural 31 MONOTONE 37 Mosaic fader 37 NIGHTSHOT 23 NTSC system 138 O, P, Q OLD MOVIE 41 Operation indicators 153 OVERLAP 37 Photo scan 59 Photo search 58 PICTURE EFFECT 40, 53 Picture search 29 Playback pause 29 Print mark 123 PROGRAM AE 44 R Recording time 14 RESET button 129 Rec Review 26 Remaining battery time...


