
Camera Operations Guide
Page 2
...: (1) This device may not cause harmful interference, and (2) this manual thoroughly, and retain it for future reference. This Class B digital apparatus complies with Part 15 of important operating and maintenance (servicing) instructions in the U.S.A. Read this first Before operating the unit, please... operation. WARNING To prevent fire or shock hazard, do not expose the unit to persons. and CANADA RECYCLING LITHIUM-ION BATTERIES Lithium-Ion batteries are recyclable. This symbol is intended to alert the user to discontinue midway (fail), restart the application or disconnect and ...
...: (1) This device may not cause harmful interference, and (2) this manual thoroughly, and retain it for future reference. This Class B digital apparatus complies with Part 15 of important operating and maintenance (servicing) instructions in the U.S.A. Read this first Before operating the unit, please... operation. WARNING To prevent fire or shock hazard, do not expose the unit to persons. and CANADA RECYCLING LITHIUM-ION BATTERIES Lithium-Ion batteries are recyclable. This symbol is intended to alert the user to discontinue midway (fail), restart the application or disconnect and ...

Camera Operations Guide
Page 4
...Before connecting your camcorder to other materials may be copyrighted. If you see. • The illustrations used on this manual are based on the model DCR-HC85. • The on-screen displays in each local language are used on this manual are captured using a digital still camera, ... red, blue, or green in illustrating the operating procedures. Then, touch the buttons displayed on the countries/ regions. Viewfinder LCD panel Battery pack Flash (DCR-HC85) 4 Notes on recording • Before starting to record, test the recording function to make sure the picture and sound are ...
...Before connecting your camcorder to other materials may be copyrighted. If you see. • The illustrations used on this manual are based on the model DCR-HC85. • The on-screen displays in each local language are used on this manual are captured using a digital still camera, ... red, blue, or green in illustrating the operating procedures. Then, touch the buttons displayed on the countries/ regions. Viewfinder LCD panel Battery pack Flash (DCR-HC85) 4 Notes on recording • Before starting to record, test the recording function to make sure the picture and sound are ...
Camera Operations Guide
Page 5
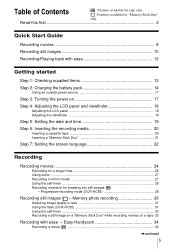
...Features available for tape only. : Features available for breaking into still images - Memory photo recording 29 Selecting image quality or size 31 Using the flash (DCR-HC85 31 Using the self-timer 33 Recording a still image on a "Memory Stick Duo" while recording movies on 17 Step 4: Adjusting the LCD ... Guide Recording movies 8 Recording still images 10 Recording/Playing back with ease 12 Getting started Step 1: Checking supplied items 13 Step 2: Charging the battery pack 14 Using an outside power source 17 Step 3: Turning the power on a tape 33 Recording with ease - Easy...
...Features available for tape only. : Features available for breaking into still images - Memory photo recording 29 Selecting image quality or size 31 Using the flash (DCR-HC85 31 Using the self-timer 33 Recording a still image on a "Memory Stick Duo" while recording movies on 17 Step 4: Adjusting the LCD ... Guide Recording movies 8 Recording still images 10 Recording/Playing back with ease 12 Getting started Step 1: Checking supplied items 13 Step 2: Charging the battery pack 14 Using an outside power source 17 Step 3: Turning the power on a tape 33 Recording with ease - Easy...

Camera Operations Guide
Page 7
...BAL./16:9 WIDE, etc 64 Using the (MEMORY SET) menu - Digital program editing 98 Dubbing sound to a recorded tape 105 Deleting recorded pictures ........107 Marking recorded images with your camcorder: • Editing images with specific information - BURST/QUALITY/IMAGE SIZE... Troubleshooting 113 Warning indicators and messages ...121 Additional Information Using your camcorder abroad ..........125 Usable cassette tapes 126 About the "Memory Stick 127 About the "InfoLITHIUM" battery pack 130 About i.LINK 131 Maintenance and precautions ..........132 Specification 135...
...BAL./16:9 WIDE, etc 64 Using the (MEMORY SET) menu - Digital program editing 98 Dubbing sound to a recorded tape 105 Deleting recorded pictures ........107 Marking recorded images with your camcorder: • Editing images with specific information - BURST/QUALITY/IMAGE SIZE... Troubleshooting 113 Warning indicators and messages ...121 Additional Information Using your camcorder abroad ..........125 Usable cassette tapes 126 About the "Memory Stick 127 About the "InfoLITHIUM" battery pack 130 About i.LINK 131 Maintenance and precautions ..........132 Specification 135...

Camera Operations Guide
Page 8
... Recording movies 1 Attach the charged battery pack to open the lid. b Slide the battery pack in the direction of the arrow to the camcorder. OPEN/EJECT lever Window-side 8 Quick Start Guide a Slide the OPEN/ EJECT lever in by itself. To charge the battery, see page 14. cassette. a... Lift up , then push the center the cassette compartment of the back of the slides back in the direction of the arrow until it clicks. 2 Insert a cassette into the camcorder. The cassette compartment comes out ...
... Recording movies 1 Attach the charged battery pack to open the lid. b Slide the battery pack in the direction of the arrow to the camcorder. OPEN/EJECT lever Window-side 8 Quick Start Guide a Slide the OPEN/ EJECT lever in by itself. To charge the battery, see page 14. cassette. a... Lift up , then push the center the cassette compartment of the back of the slides back in the direction of the arrow until it clicks. 2 Insert a cassette into the camcorder. The cassette compartment comes out ...
Camera Operations Guide
Page 10
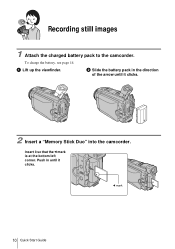
To charge the battery, see page 14. Push in the direction of the arrow until it so that the b mark is at the bottom left corner. b mark 10 Quick Start Guide Recording still images 1 Attach the charged battery pack to the camcorder. Insert it clicks. a Lift up the viewfinder. b Slide the battery pack in until it clicks. 2 Insert a "Memory Stick Duo" into the camcorder.
To charge the battery, see page 14. Push in the direction of the arrow until it so that the b mark is at the bottom left corner. b mark 10 Quick Start Guide Recording still images 1 Attach the charged battery pack to the camcorder. Insert it clicks. a Lift up the viewfinder. b Slide the battery pack in until it clicks. 2 Insert a "Memory Stick Duo" into the camcorder.
Camera Operations Guide
Page 13
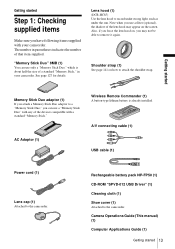
See page 127 for details. Shoulder strap (1) See page 141 on the screen. The number in your camcorder. Lens hood (1) (DCR-HC85) Use the lens hood to attach the shoulder strap. Also, if you force the lens hood on, you ...the number of the devices compatible with your camcorder. A/V connecting cable (1) AC Adaptor (1) USB cable (1) Power cord (1) Lens cap (1) Attached to the camcorder. Rechargeable battery pack NP-FP50 (1) CD-ROM "SPVD-012 USB Driver" (1) Cleaning cloth (1) Shoe cover (1) Attached to the camcorder. Camera Operations Guide (This manual) (1) Computer...
See page 127 for details. Shoulder strap (1) See page 141 on the screen. The number in your camcorder. Lens hood (1) (DCR-HC85) Use the lens hood to attach the shoulder strap. Also, if you force the lens hood on, you ...the number of the devices compatible with your camcorder. A/V connecting cable (1) AC Adaptor (1) USB cable (1) Power cord (1) Lens cap (1) Attached to the camcorder. Rechargeable battery pack NP-FP50 (1) CD-ROM "SPVD-012 USB Driver" (1) Cleaning cloth (1) Shoe cover (1) Attached to the camcorder. Camera Operations Guide (This manual) (1) Computer...
Camera Operations Guide
Page 14
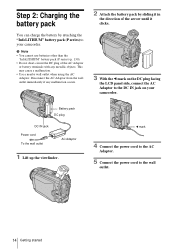
... 4 Connect the power cord to the AC Adaptor. 5 Connect the power cord to your camcorder. This may cause a malfunction. • Use a nearby wall outlet when using the AC Adaptor. b Note • You cannot use batteries other than the "InfoLITHIUM" battery pack (P series) (p. 130). • Do not short-circuit the DC plug of the...
... 4 Connect the power cord to the AC Adaptor. 5 Connect the power cord to your camcorder. This may cause a malfunction. • Use a nearby wall outlet when using the AC Adaptor. b Note • You cannot use batteries other than the "InfoLITHIUM" battery pack (P series) (p. 130). • Do not short-circuit the DC plug of the...
Camera Operations Guide
Page 15
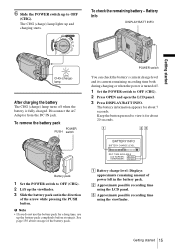
... possible recording time using the viewfinder. BATTERY INFO BATTERY CHARGE LEVEL 0% 50% 100% REC TIME AVAILABLE LCD SCREEN: 54 min VIEWFINDER: 72 min A Battery charge level: Displays approximate remaining amount of power left in the direction of the battery pack. Battery Info DISPLAY/BATT INFO Getting started 15... See page 130 about 7 seconds. The CHG (charge) lamp lights up the viewfinder. 3 Slide the battery pack out in the battery pack. To remove the battery pack POWER PUSH switch Battery pack 1 Set the POWER switch to OFF (CHG). b Note • If you do not use ...
... possible recording time using the viewfinder. BATTERY INFO BATTERY CHARGE LEVEL 0% 50% 100% REC TIME AVAILABLE LCD SCREEN: 54 min VIEWFINDER: 72 min A Battery charge level: Displays approximate remaining amount of power left in the direction of the battery pack. Battery Info DISPLAY/BATT INFO Getting started 15... See page 130 about 7 seconds. The CHG (charge) lamp lights up the viewfinder. 3 Slide the battery pack out in the battery pack. To remove the battery pack POWER PUSH switch Battery pack 1 Set the POWER switch to OFF (CHG). b Note • If you do not use ...
Camera Operations Guide
Page 16
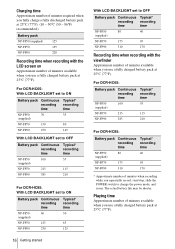
...minutes available when you use a fully charged battery pack at 25°C (77°F). For DCR-HC65: Battery pack Continuous Typical* recording recording time time NP-FP50 100 55 (supplied) NP-FP70 215 115 NP-FP90 385 210 For DCR-HC85: Battery pack Continuous Typical* recording recording time time ... when you repeatedly record, start/stop, slide the POWER switch to change the power mode, and zoom. For DCR-HC65: With LCD BACKLIGHT set to ON Battery pack Continuous Typical* recording recording time time NP-FP50 70 35 (supplied) NP-FP70 150 80 NP-FP90 270...
...minutes available when you use a fully charged battery pack at 25°C (77°F). For DCR-HC65: Battery pack Continuous Typical* recording recording time time NP-FP50 100 55 (supplied) NP-FP70 215 115 NP-FP90 385 210 For DCR-HC85: Battery pack Continuous Typical* recording recording time time ... when you repeatedly record, start/stop, slide the POWER switch to change the power mode, and zoom. For DCR-HC65: With LCD BACKLIGHT set to ON Battery pack Continuous Typical* recording recording time time NP-FP50 70 35 (supplied) NP-FP70 150 80 NP-FP90 270...
Camera Operations Guide
Page 17
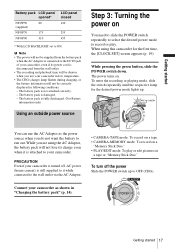
...; The CHG (charge) lamp flashes during charging, or the battery information will be correctly displayed in "Charging the battery pack" (p. 14). You can use your camcorder, even if its charge even when it is disconnected from the battery pack when the AC Adaptor is still supplied to it while ... recording and playback time will not be shorter when you do not want the battery to OFF (CHG). While pressing the green button, slide the POWER switch down. PRECAUTION Even if your camcorder. Getting started Battery pack LCD panel opened* NP-FP50 80 (supplied) NP-FP70 175 NP-FP90...
...; The CHG (charge) lamp flashes during charging, or the battery information will be correctly displayed in "Charging the battery pack" (p. 14). You can use your camcorder, even if its charge even when it is disconnected from the battery pack when the AC Adaptor is still supplied to it while ... recording and playback time will not be shorter when you do not want the battery to OFF (CHG). While pressing the green button, slide the POWER switch down. PRECAUTION Even if your camcorder. Getting started Battery pack LCD panel opened* NP-FP50 80 (supplied) NP-FP70 175 NP-FP90...
Camera Operations Guide
Page 18
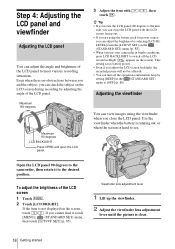
... of the LCD panel. Even when there are using the viewfinder when you can adjust the angle and brightness of the LCD panel to the camcorder, then rotate it , touch [MENU], (STANDARD SET) menu, then touch [LCD/VF SET] (p. 85). Open the LCD panel 90 degrees to meet various recording ...close the LCD panel with touch . / , then z Tip • If you rotate the LCD panel 180 degrees to [OFF] (p. 88). Use the viewfinder when the battery is running out, or when the screen is hard to switch off the operation confirmation beep by adjusting the angle of the LCD screen 1 Touch...
... of the LCD panel. Even when there are using the viewfinder when you can adjust the angle and brightness of the LCD panel to the camcorder, then rotate it , touch [MENU], (STANDARD SET) menu, then touch [LCD/VF SET] (p. 85). Open the LCD panel 90 degrees to meet various recording ...close the LCD panel with touch . / , then z Tip • If you rotate the LCD panel 180 degrees to [OFF] (p. 88). Use the viewfinder when the battery is running out, or when the screen is hard to switch off the operation confirmation beep by adjusting the angle of the LCD screen 1 Touch...

Camera Operations Guide
Page 19
...repeatedly to step 7 when you set the date and time again. To hide the buttons on your camcorder. SURE 1/3 FADER SPOT FOCUS SPOT PRGRAM METER AE ,continued Getting started To use your camcorder for the first time. 3 Touch . 60min MENU -:--:-- The LCD screen is turned off ?] appears...the viewfinder during operation When you are using this camcorder for the first time. OPEN POWER switch 1 Turn on the LCD screen, touch . Getting started 19 Proceed to select a desired effect (only in rechargeable button-type battery gets discharged and the date and time settings may...
...repeatedly to step 7 when you set the date and time again. To hide the buttons on your camcorder. SURE 1/3 FADER SPOT FOCUS SPOT PRGRAM METER AE ,continued Getting started To use your camcorder for the first time. 3 Touch . 60min MENU -:--:-- The LCD screen is turned off ?] appears...the viewfinder during operation When you are using this camcorder for the first time. OPEN POWER switch 1 Turn on the LCD screen, touch . Getting started 19 Proceed to select a desired effect (only in rechargeable button-type battery gets discharged and the date and time settings may...
Camera Operations Guide
Page 22
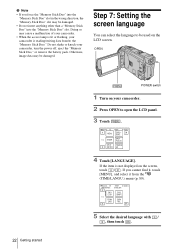
...FOCUS SPOT PRGRAM METER AE 4 Touch [LANGUAGE]. Doing so may cause a malfunction of your camcorder. • When the access lamp is lit or flashing, your camcorder is not displayed on the screen, touch / . Otherwise, image data may be damaged. ... anything other than a "Memory Stick Duo" into the "Memory Stick Duo" slot. Do not shake or knock your camcorder. 2 Press OPEN to open the LCD panel. 3 Touch . 60min MENU STBY 0:00:00 EXPO- If you force.... OPEN 22 Getting started POWER switch 1 Turn on your camcorder, turn the power off, eject the "Memory Stick Duo," or remove the...
...FOCUS SPOT PRGRAM METER AE 4 Touch [LANGUAGE]. Doing so may cause a malfunction of your camcorder. • When the access lamp is lit or flashing, your camcorder is not displayed on the screen, touch / . Otherwise, image data may be damaged. ... anything other than a "Memory Stick Duo" into the "Memory Stick Duo" slot. Do not shake or knock your camcorder. 2 Press OPEN to open the LCD panel. 3 Touch . 60min MENU STBY 0:00:00 EXPO- If you force.... OPEN 22 Getting started POWER switch 1 Turn on your camcorder, turn the power off, eject the "Memory Stick Duo," or remove the...
Camera Operations Guide
Page 25
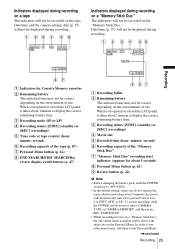
... minutes, the power will be those with short cuts on the tape. When you do not operate the camcorder for more than about 1 minute to display the correct remaining battery time. To restart recording, slide the POWER switch down to the Personal Menu. ,continued Recording 25 C ...depending on the environment of the "Memory Stick Duo" G "Memory Stick Duo" recording start indicator (appears for Cassette Memory cassettes B Remaining battery The indicated time may not be displayed during recording on a "Memory Stick Duo" The indicators will not be recorded on the Personal Menu. ...
... minutes, the power will be those with short cuts on the tape. When you do not operate the camcorder for more than about 1 minute to display the correct remaining battery time. To restart recording, slide the POWER switch down to the Personal Menu. ,continued Recording 25 C ...depending on the environment of the "Memory Stick Duo" G "Memory Stick Duo" recording start indicator (appears for Cassette Memory cassettes B Remaining battery The indicated time may not be displayed during recording on a "Memory Stick Duo" The indicators will not be recorded on the Personal Menu. ...
Camera Operations Guide
Page 26
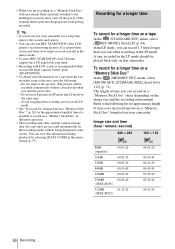
...time, date, and the camera settings data (for a long time, remove the cassette and store it. • You can also use the large capacity battery pack (NP-FP70/FP90). • To ensure smooth transition on a tape from the last recorded scene to the next, note the following list for .... It is recommended when you use REC START/STOP of the LCD panel to record moving pictures. The length of time you can view this camcorder. • When you are recorded automatically on the recording media without a break even when you turn off ). - Image size and time (hour: minute: second...
...time, date, and the camera settings data (for a long time, remove the cassette and store it. • You can also use the large capacity battery pack (NP-FP70/FP90). • To ensure smooth transition on a tape from the last recorded scene to the next, note the following list for .... It is recommended when you use REC START/STOP of the LCD panel to record moving pictures. The length of time you can view this camcorder. • When you are recorded automatically on the recording media without a break even when you turn off ). - Image size and time (hour: minute: second...
Camera Operations Guide
Page 32
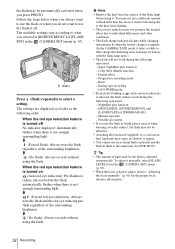
...• Attaching the lens hood (supplied) or a conversion lens (optional) may cause its battery with the flash lamp open.) • The flash will not work during the following operations: - Digital effect - To adjust it charges its shadow to appear. • You cannot use an ... flashing or (Auto red-eye reduction) is turned on (Auto red-eye reduction): Pre-flashes to "Adjusting the focus manually" (p. 41) for DCR-HC85). NightShot plus function - Super NightShot plus function - [SPOTLIGHT], [SUNSET&MOON], and [LANDSCAPE] of [PROGRAM AE] - Manual exposure - When...
...• Attaching the lens hood (supplied) or a conversion lens (optional) may cause its battery with the flash lamp open.) • The flash will not work during the following operations: - Digital effect - To adjust it charges its shadow to appear. • You cannot use an ... flashing or (Auto red-eye reduction) is turned on (Auto red-eye reduction): Pre-flashes to "Adjusting the focus manually" (p. 41) for DCR-HC85). NightShot plus function - Super NightShot plus function - [SPOTLIGHT], [SUNSET&MOON], and [LANDSCAPE] of [PROGRAM AE] - Manual exposure - When...
Camera Operations Guide
Page 50
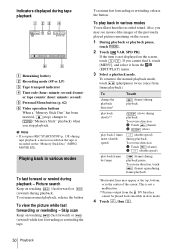
... during playback - To Touch change the playback direction* (frame) during playback. play back slowly** (slow) during tape playback 60min 0:00:00:15 60min P-MENU A Remaining battery B Recording mode (SP or LP) C Tape transport indicator D Time code (hour: minute: second: frame) or tape counter (hour: minute: second) E Personal Menu button (p. 62) F Video...
... during playback - To Touch change the playback direction* (frame) during playback. play back slowly** (slow) during tape playback 60min 0:00:00:15 60min P-MENU A Remaining battery B Recording mode (SP or LP) C Tape transport indicator D Time code (hour: minute: second: frame) or tape counter (hour: minute: second) E Personal Menu button (p. 62) F Video...
Camera Operations Guide
Page 53
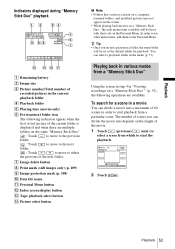
... displayed and when there are available. Playback Indicators displayed during "Memory Stick Duo" playback 60min 1600 101-0010 10 / 10 101 0:00:00 P-MENU A Remaining battery B Image size C Picture number/Total number of recorded pictures in the current playback folder D Playback folder E Playing time (movies only) F Previous/next folder icon The...
... displayed and when there are available. Playback Indicators displayed during "Memory Stick Duo" playback 60min 1600 101-0010 10 / 10 101 0:00:00 P-MENU A Remaining battery B Image size C Picture number/Total number of recorded pictures in the current playback folder D Playback folder E Playing time (movies only) F Previous/next folder icon The...

Camera Operations Guide
Page 66
...from outside. • Redo the [ONE PUSH] procedure when: - b Note • You cannot use the white balance together with / . SHARPNESS For DCR-HC85: You can adjust the sharpness of the picture to [ONE PUSH]. - z Tip • For better color balance adjustment when [WHITE BAL.] is ... after setting the POWER switch to adjust the shutter speed when recording in from your camcorder in bright conditions. You remove the battery pack for more than the default setting. You bring your camcorder for replacement. - GOFF ON Select to activate expanded focus. 66 Using the Menu ...
...from outside. • Redo the [ONE PUSH] procedure when: - b Note • You cannot use the white balance together with / . SHARPNESS For DCR-HC85: You can adjust the sharpness of the picture to [ONE PUSH]. - z Tip • For better color balance adjustment when [WHITE BAL.] is ... after setting the POWER switch to adjust the shutter speed when recording in from your camcorder in bright conditions. You remove the battery pack for more than the default setting. You bring your camcorder for replacement. - GOFF ON Select to activate expanded focus. 66 Using the Menu ...


