
Computer Applications Guide
Page 3
...trademarks or registered trademarks of Macromedia, Inc. On trademarks • Picture Package is a trademark of Sony Corporation. • "Memory Stick" and are registered trademarks of Sony Corporation. • Microsoft, Windows, and Windows Media are either registered trademarks or trademarks of Microsoft ..., transmitting or placing to the external network accessible to the separate Camera Operations Guide supplied with your camcorder for details. • The screens shown in this manual are from CDs, the Internet or other applicable laws of each case in the United States and ...
...trademarks or registered trademarks of Macromedia, Inc. On trademarks • Picture Package is a trademark of Sony Corporation. • "Memory Stick" and are registered trademarks of Sony Corporation. • Microsoft, Windows, and Windows Media are either registered trademarks or trademarks of Microsoft ..., transmitting or placing to the external network accessible to the separate Camera Operations Guide supplied with your camcorder for details. • The screens shown in this manual are from CDs, the Internet or other applicable laws of each case in the United States and ...
Camera Operations Guide
Page 2
...battery pack This device complies with Canadian ICES-003. 2 and CANADA RECYCLING LITHIUM-ION BATTERIES Lithium-Ion batteries are recyclable. This Class B digital apparatus complies with Part 15 of rechargeable batteries, call toll free 1-800-822- 8837, or visit http://www.rbrc.org/ Caution: Do... LithiumIon batteries. This symbol is subject to the following two conditions: (1) This device may not cause harmful interference, and (2) this manual thoroughly, and retain it for future reference. Read this first Before operating the unit, please read this device must accept any interference ...
...battery pack This device complies with Canadian ICES-003. 2 and CANADA RECYCLING LITHIUM-ION BATTERIES Lithium-Ion batteries are recyclable. This Class B digital apparatus complies with Part 15 of rechargeable batteries, call toll free 1-800-822- 8837, or visit http://www.rbrc.org/ Caution: Do... LithiumIon batteries. This symbol is subject to the following two conditions: (1) This device may not cause harmful interference, and (2) this manual thoroughly, and retain it for future reference. Read this first Before operating the unit, please read this device must accept any interference ...
Camera Operations Guide
Page 3
...on , the user is subject to operate this device must be regulated if sold in your camcorder. Cassettes with Cassette Memory are cautioned that may call upon your camcorder You can use only mini DV cassettes in a particular installation. You can use in a ... with the limits for a digital device pursuant to radio communications. If this product. Disposal of the following two conditions: (1) This device may cause harmful interference to Subpart B of Part 15 of Conformity Trade Name: SONY Model No.: DCR-HC65 Responsible Party: Sony Electronics Inc.
...on , the user is subject to operate this device must be regulated if sold in your camcorder. Cassettes with Cassette Memory are cautioned that may call upon your camcorder You can use only mini DV cassettes in a particular installation. You can use in a ... with the limits for a digital device pursuant to radio communications. If this product. Disposal of the following two conditions: (1) This device may cause harmful interference to Subpart B of Part 15 of Conformity Trade Name: SONY Model No.: DCR-HC65 Responsible Party: Sony Electronics Inc.

Camera Operations Guide
Page 4
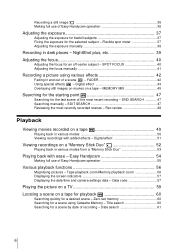
... this manual are captured using a digital still camera, and thus may cause malfunctions. Touch the button on the LCD screen. • If you install the NP-FP70/FP90 (optional) battery pack on your camcorder to other materials may cause a malfunction of your camcorder if necessary... the camcorder • Hold your camcorder to a malfunction of the camcorder, storage media, etc. • TV color systems differ depending on the countries/ regions. Viewfinder LCD panel Battery pack Flash (DCR-HC85) 4 However, there may be damaged, or this manual are based on the model DCR-HC85....
... this manual are captured using a digital still camera, and thus may cause malfunctions. Touch the button on the LCD screen. • If you install the NP-FP70/FP90 (optional) battery pack on your camcorder to other materials may cause a malfunction of your camcorder if necessary... the camcorder • Hold your camcorder to a malfunction of the camcorder, storage media, etc. • TV color systems differ depending on the countries/ regions. Viewfinder LCD panel Battery pack Flash (DCR-HC85) 4 However, there may be damaged, or this manual are based on the model DCR-HC85....
Camera Operations Guide
Page 6
...dark places - Rec review 48 Playback Viewing movies recorded on a "Memory Stick Duo 52 Playing back in and out of Easy Handycam operation 36 Adjusting the exposure 37 Adjusting the exposure for backlit subjects 37 Fixing the exposure for the last scene of the most...Playing the picture on a TV 59 Locating a scene on a tape - Flexible spot meter 37 Adjusting the exposure manually 38 Recording in various modes 50 Viewing recordings with ease - Digital effect 43 Overlaying still images on movies on a tape for playback 60 Searching quickly for an off-center subject -...
...dark places - Rec review 48 Playback Viewing movies recorded on a "Memory Stick Duo 52 Playing back in and out of Easy Handycam operation 36 Adjusting the exposure 37 Adjusting the exposure for backlit subjects 37 Fixing the exposure for the last scene of the most...Playing the picture on a TV 59 Locating a scene on a tape - Flexible spot meter 37 Adjusting the exposure manually 38 Recording in various modes 50 Viewing recordings with ease - Digital effect 43 Overlaying still images on movies on a tape for playback 60 Searching quickly for an off-center subject -...
Camera Operations Guide
Page 13
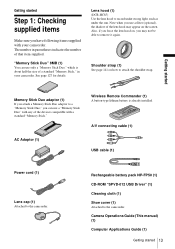
... manual) (1) Computer Applications Guide (1) Getting started Step 1: Checking supplied items Make sure you have following items supplied with your camcorder. A/V connecting cable (1) AC Adaptor (1) USB cable (1) Power cord (1) Lens cap (1) Attached to record under strong light, such as under the sun. Lens hood (1) (DCR-...HC85) Use the lens hood to the camcorder. Memory Stick Duo adaptor (1) If you may appear on the screen. Also, if you force the lens hood on...
... manual) (1) Computer Applications Guide (1) Getting started Step 1: Checking supplied items Make sure you have following items supplied with your camcorder. A/V connecting cable (1) AC Adaptor (1) USB cable (1) Power cord (1) Lens cap (1) Attached to record under strong light, such as under the sun. Lens hood (1) (DCR-...HC85) Use the lens hood to the camcorder. Memory Stick Duo adaptor (1) If you may appear on the screen. Also, if you force the lens hood on...
Camera Operations Guide
Page 32
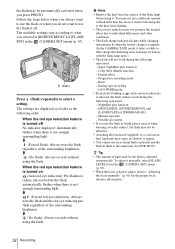
... WIDE] mode • Even if auto flashing or (Auto red-eye reduction) is hard to adjust, refer to "Adjusting the focus manually" (p. 41) for DCR-HC85). Flexible spot meter • If you use the flash in bright places such as when shooting a backlit subject, the flash may... red eye reduction feature is not enough surrounding light. Progressive recording mode - Burst - m (No flash): Always records without using the flash. Digital effect - NightShot plus function - To adjust it charges its shadow to appear. • You cannot use an external flash (optional) and the...
... WIDE] mode • Even if auto flashing or (Auto red-eye reduction) is hard to adjust, refer to "Adjusting the focus manually" (p. 41) for DCR-HC85). Flexible spot meter • If you use the flash in bright places such as when shooting a backlit subject, the flash may... red eye reduction feature is not enough surrounding light. Progressive recording mode - Burst - m (No flash): Always records without using the flash. Digital effect - NightShot plus function - To adjust it charges its shadow to appear. • You cannot use an external flash (optional) and the...

Camera Operations Guide
Page 37
... the screen. [SPOT METER] flashes while the camera is not displayed on stage). 1 Touch during recording or in the default setting. Or set [EXPOSURE] to [MANUAL] (p. 38) or select [SPOT METER] (p. 37). 3 Touch the point you want to prevent the subject from the (CAMERA SET) menu. If the item is adjusting...
... the screen. [SPOT METER] flashes while the camera is not displayed on stage). 1 Touch during recording or in the default setting. Or set [EXPOSURE] to [MANUAL] (p. 38) or select [SPOT METER] (p. 37). 3 Touch the point you want to prevent the subject from the (CAMERA SET) menu. If the item is adjusting...

Camera Operations Guide
Page 38
... b Note • You cannot use the Flexible spot meter together with : - Color Slow Shutter function AUTO MANUAL 3 Touch [MANUAL]. 60min EXPOSURE: STBY 0:00:00 MANUAL AUTO MANUAL OK 38 Recording NightShot plus function - Super NightShot plus function - z Tip • If you cannot find it...it from the (CAMERA SET) menu. 60min EXPOSURE: STBY AUTO 0:00:00 4 Adjust the exposure by manually fixing the exposure to [MANUAL]. Adjusting the exposure manually You can avoid backlight shadows on the screen, touch / . Super NightShot plus function - NightShot plus function...
... b Note • You cannot use the Flexible spot meter together with : - Color Slow Shutter function AUTO MANUAL 3 Touch [MANUAL]. 60min EXPOSURE: STBY 0:00:00 MANUAL AUTO MANUAL OK 38 Recording NightShot plus function - Super NightShot plus function - z Tip • If you cannot find it...it from the (CAMERA SET) menu. 60min EXPOSURE: STBY AUTO 0:00:00 4 Adjust the exposure by manually fixing the exposure to [MANUAL]. Adjusting the exposure manually You can avoid backlight shadows on the screen, touch / . Super NightShot plus function - NightShot plus function...

Camera Operations Guide
Page 39
... OFF. and [COLOR SLOW SHUTTER] appear. This may cause a malfunction. • The Color Slow Shutter function may not operate correctly in step 5. Manual exposure - If you are recording in dark places (such as when capturing the face of NightShot plus , follow steps 3 and 4, then select [OFF... 5. You can record subjects in a place with no light at a maximum of 16 times the sensitivity of your baby sleeping) with : - Digital effect - [PROGRAM AE] • You cannot use the NightShot plus/Super NightShot plus or Color Slow Shutter function. To record higher sensitivity pictures ...
... OFF. and [COLOR SLOW SHUTTER] appear. This may cause a malfunction. • The Color Slow Shutter function may not operate correctly in step 5. Manual exposure - If you are recording in dark places (such as when capturing the face of NightShot plus , follow steps 3 and 4, then select [OFF... 5. You can record subjects in a place with no light at a maximum of 16 times the sensitivity of your baby sleeping) with : - Digital effect - [PROGRAM AE] • You cannot use the NightShot plus/Super NightShot plus or Color Slow Shutter function. To record higher sensitivity pictures ...
Camera Operations Guide
Page 40
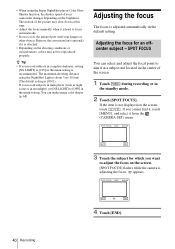
If the item is not displayed on the shooting conditions or circumstances, colors may slow down at this time. • Adjust the focus manually when it at a subject not located in the default setting. SPOT FOCUS You can make image color deeper (p. 68). Adjusting the focus for which... you want to aim it is hard to focus automatically. • Do not cover the infrared port with your camcorder changes depending on the screen. [SPOT FOCUS] flashes while the camera is adjusting the focus. 9 appears. SPOT FOCUS STBY 0:00:00 AUTO END 3 ...
If the item is not displayed on the shooting conditions or circumstances, colors may slow down at this time. • Adjust the focus manually when it at a subject not located in the default setting. SPOT FOCUS You can make image color deeper (p. 68). Adjusting the focus for which... you want to aim it is hard to focus automatically. • Do not cover the infrared port with your camcorder changes depending on the screen. [SPOT FOCUS] flashes while the camera is adjusting the focus. 9 appears. SPOT FOCUS STBY 0:00:00 AUTO END 3 ...

Camera Operations Guide
Page 41
...SPOT FOCUS function together with [PROGRAM AE]. • Focusing distance information will be easier to focus on a subject in the (CAMERA SET) menu to manual. - Move the power zoom lever towards T (telephoto) to adjust the focus, and then, towards W (wide angle) to when the focus cannot...To record horizontal stripes. - Recording 41 When the CAMERA-MEMORY lamp is dark and hard to the recording conditions. To use the expanded focus For DCR-HC85: It will not be displayed at twice its background. - b Note • You cannot use the zoom function. When you want to...
...SPOT FOCUS function together with [PROGRAM AE]. • Focusing distance information will be easier to focus on a subject in the (CAMERA SET) menu to manual. - Move the power zoom lever towards T (telephoto) to adjust the focus, and then, towards W (wide angle) to when the focus cannot...To record horizontal stripes. - Recording 41 When the CAMERA-MEMORY lamp is dark and hard to the recording conditions. To use the expanded focus For DCR-HC85: It will not be displayed at twice its background. - b Note • You cannot use the zoom function. When you want to...
Camera Operations Guide
Page 44
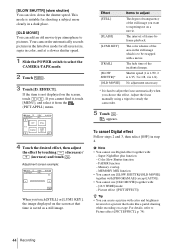
...1/8, 4 is hard to select the CAMERA-TAPE mode. 2 Touch . 3 Touch [D. For details, refer to steady the camcorder. 5 Touch . [SLOW SHUTTR] (slow shutter) You can create a picture with : - [16:9 WIDE] mode -...the desired effect, then adjust the effect by touching (decrease) / (increase) and touch . To cancel Digital effect Follow steps 2 and 3, then select [OFF] in color, and at that time is not displayed... displayed on a tape. The fade time of frame-byframe playback. Adjust the focus manually using a tripod to Picture effect ([PICT.EFFECT], p. 74). 44 Recording MEMORY MIX...
...1/8, 4 is hard to select the CAMERA-TAPE mode. 2 Touch . 3 Touch [D. For details, refer to steady the camcorder. 5 Touch . [SLOW SHUTTR] (slow shutter) You can create a picture with : - [16:9 WIDE] mode -...the desired effect, then adjust the effect by touching (decrease) / (increase) and touch . To cancel Digital effect Follow steps 2 and 3, then select [OFF] in color, and at that time is not displayed... displayed on a tape. The fade time of frame-byframe playback. Adjust the focus manually using a tripod to Picture effect ([PICT.EFFECT], p. 74). 44 Recording MEMORY MIX...

Camera Operations Guide
Page 47
... the menu setting. When you use a cassette with Cassette Memory POWER switch Searching for about 5 seconds, and the camcorder enters the standby mode at the point where the last recording has finished. Searching manually - z Tip • You can search for example, but want to select the CAMERA-TAPE mode. 2 Touch . 60min STBY...
... the menu setting. When you use a cassette with Cassette Memory POWER switch Searching for about 5 seconds, and the camcorder enters the standby mode at the point where the last recording has finished. Searching manually - z Tip • You can search for example, but want to select the CAMERA-TAPE mode. 2 Touch . 60min STBY...
Camera Operations Guide
Page 59
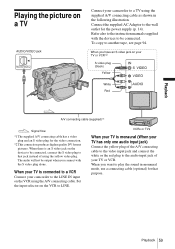
...to the wall outlet for the video connection. *2 This connection produces higher quality DV format pictures. When there is connected to a VCR Connect your camcorder to the LINE IN input on the VCR using the supplied A/V connecting cable as shown in monaural mode, use a connecting cable (optional) for that...the devices to be connected, connect the S video plug to that purpose. Playback Playing the picture on a TV AUDIO/VIDEO jack Connect your camcorder to a TV using the A/V connecting cable. Set the input selector on the VCR to another tape, see page 94. Refer also to the ...
...to the wall outlet for the video connection. *2 This connection produces higher quality DV format pictures. When there is connected to a VCR Connect your camcorder to the LINE IN input on the VCR using the supplied A/V connecting cable as shown in monaural mode, use a connecting cable (optional) for that...the devices to be connected, connect the S video plug to that purpose. Playback Playing the picture on a TV AUDIO/VIDEO jack Connect your camcorder to a TV using the A/V connecting cable. Set the input selector on the VCR to another tape, see page 94. Refer also to the ...

Camera Operations Guide
Page 66
...] when you can adjust the sharpness of the picture to [AUTO], aim your camcorder in bright conditions. EXP.FOCUS For DCR-HC85: When you are recording pictures on a "Memory Stick Duo" while focusing manually, you disconnect the power source from your camcorder outdoors from outside. • Redo the [ONE PUSH] procedure when: - You remove...
...] when you can adjust the sharpness of the picture to [AUTO], aim your camcorder in bright conditions. EXP.FOCUS For DCR-HC85: When you are recording pictures on a "Memory Stick Duo" while focusing manually, you disconnect the power source from your camcorder outdoors from outside. • Redo the [ONE PUSH] procedure when: - You remove...
Camera Operations Guide
Page 68
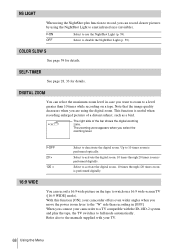
... With this function [ON], your TV. 68 Using the Menu The right side of a distant subject, such as a bird. Refer also to the manuals supplied with the ID-1/ID-2 system and play the tape, the TV switches to full mode automatically. NS LIGHT When using the NightShot plus function.... 10 times through 20 times zoom is performed optically. Select to 10 times zoom is performed digitally. When you connect your camcorder to a TV compatible with your camcorder offers even wider angles when you move the power zoom lever to the "W" side than 10 times while recording on a 16:9 wide-...
... With this function [ON], your TV. 68 Using the Menu The right side of a distant subject, such as a bird. Refer also to the manuals supplied with the ID-1/ID-2 system and play the tape, the TV switches to full mode automatically. NS LIGHT When using the NightShot plus function.... 10 times through 20 times zoom is performed optically. Select to 10 times zoom is performed digitally. When you connect your camcorder to a TV compatible with your camcorder offers even wider angles when you move the power zoom lever to the "W" side than 10 times while recording on a 16:9 wide-...
Camera Operations Guide
Page 77
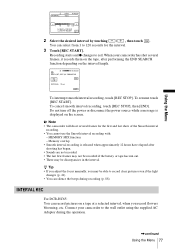
...a tape at a selected interval, when you record flowers blooming, etc. INTERVAL REC For DCR-HC65: You can silence the beeps during the operation. ,continued Using the Menu 77 z Tip • If you adjust the focus manually, you may be able to 120 seconds for the first and last shots of the...may not be recorded if the battery or tape has run out. • There may be discrepancies in the interval. b Note • The camcorder will shoot several frames, it records them on the screen. Recording starts and z changes to the wall outlet using the supplied AC Adaptor during recording...
...a tape at a selected interval, when you record flowers blooming, etc. INTERVAL REC For DCR-HC65: You can silence the beeps during the operation. ,continued Using the Menu 77 z Tip • If you adjust the focus manually, you may be able to 120 seconds for the first and last shots of the...may not be recorded if the battery or tape has run out. • There may be discrepancies in the interval. b Note • The camcorder will shoot several frames, it records them on the screen. Recording starts and z changes to the wall outlet using the supplied AC Adaptor during recording...
Camera Operations Guide
Page 78
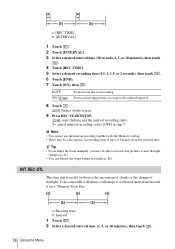
Your camcorder will shoot a still image at a selected interval and record it on a tape in the selected interval. 8 Touch . GOFF ON ( To deactivate interval recording. ) To record ... the selected time. flashes on the screen. 9 Press REC START/STOP. stops flashing and the interval recording starts. z Tip • If you adjust the focus manually, you may be able to record clear pictures even if the light changes (p. 41). • You can silence the beeps during recording (p. 88). To cancel...
Your camcorder will shoot a still image at a selected interval and record it on a tape in the selected interval. 8 Touch . GOFF ON ( To deactivate interval recording. ) To record ... the selected time. flashes on the screen. 9 Press REC START/STOP. stops flashing and the interval recording starts. z Tip • If you adjust the focus manually, you may be able to record clear pictures even if the light changes (p. 41). • You can silence the beeps during recording (p. 88). To cancel...

Camera Operations Guide
Page 116
Remove the cassette and leave your camcorder for at least 1 hour, then re-insert the cassette. (p. 133) The power abruptly turns off. • [A.SHUT OFF] in the (STANDARD SET) menu is set ... [OFF] on the SET) menu. (p. 88) (STANDARD Black bands appear when you do not operate your camcorder, the camcorder is automatically turned off . cCharge the battery pack. (p. 14) The SteadyShot does not function. Adjust the focus manually. (p. 41) A vertical band appears when • This occurs when the contrast between the subject and the...
Remove the cassette and leave your camcorder for at least 1 hour, then re-insert the cassette. (p. 133) The power abruptly turns off. • [A.SHUT OFF] in the (STANDARD SET) menu is set ... [OFF] on the SET) menu. (p. 88) (STANDARD Black bands appear when you do not operate your camcorder, the camcorder is automatically turned off . cCharge the battery pack. (p. 14) The SteadyShot does not function. Adjust the focus manually. (p. 41) A vertical band appears when • This occurs when the contrast between the subject and the...


