
Computer Applications Guide
Page 2
... above OS has been upgraded. • CPU: MMX Pentium 200 MHz or faster • Application: Windows Media Player (this must be installed to play back movies.) • Others: USB port (this must be provided as standard), disc drive For Macintosh users b Note • When you connect your camcorder to a Macintosh computer using a USB cable, you cannot copy pictures recorded on a tape to play back movies.) • Others: USB port (this must be...
... above OS has been upgraded. • CPU: MMX Pentium 200 MHz or faster • Application: Windows Media Player (this must be installed to play back movies.) • Others: USB port (this must be provided as standard), disc drive For Macintosh users b Note • When you connect your camcorder to a Macintosh computer using a USB cable, you cannot copy pictures recorded on a tape to play back movies.) • Others: USB port (this must be...
Computer Applications Guide
Page 14
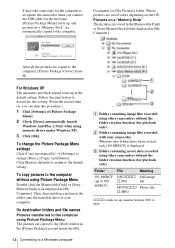
... skip this setting. (From the second time on a "Memory Stick" The pictures are stored in the [Removable Disk] or [Sony MemoryStick] folder displayed in [My Computer]. On destination folders and file names Pictures transferred to a Windows computer A B C A Folder containing image files recorded using memory device under Windows XP). 3 Click [OK]. Where pictures are copied to the [Date] folders in the [Picture Package] created inside the [My 14 Connecting to the computer using Picture Package Menu The pictures are saved varies...
... skip this setting. (From the second time on a "Memory Stick" The pictures are stored in the [Removable Disk] or [Sony MemoryStick] folder displayed in [My Computer]. On destination folders and file names Pictures transferred to a Windows computer A B C A Folder containing image files recorded using memory device under Windows XP). 3 Click [OK]. Where pictures are copied to the [Date] folders in the [Picture Package] created inside the [My 14 Connecting to the computer using Picture Package Menu The pictures are saved varies...
Computer Applications Guide
Page 18
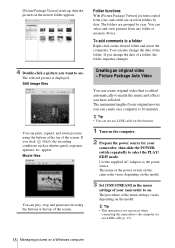
...; You can play, stop, and pause movies using the buttons at the top of the power switch on the camcorder varies depending on . The name of the screen. Folder functions With [Picture Package Viewer], pictures copied from any folder or memory device. z Tip • This operation is 10 minutes. Movie files You can use an i.LINK cable for this function. 1 Turn on the computer. 2 Prepare the power source for your camcorder to on the model. 3 Set [USB STREAM...
...; You can play, stop, and pause movies using the buttons at the top of the power switch on the camcorder varies depending on . The name of the screen. Folder functions With [Picture Package Viewer], pictures copied from any folder or memory device. z Tip • This operation is 10 minutes. Movie files You can use an i.LINK cable for this function. 1 Turn on the computer. 2 Prepare the power source for your camcorder to on the model. 3 Set [USB STREAM...
Computer Applications Guide
Page 24
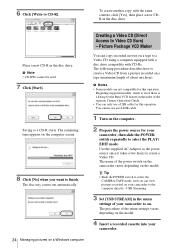
... used. 7 Click [Start]. The disc tray comes out automatically. . 24 Managing pictures on the model. Regarding supported models, check to select the PLAY/ EDIT mode. You cannot use a USB cable for this operation. USB Streaming. 3 Set [USB STREAM] in the disc drive. Saving to create a Video CD. The procedure of the menu settings varies depending on . Picture Package VCD Maker You can view pictures recorded on your camcorder to on the model. 4 Insert a recorded cassette into your camcorder, then slide the POWER switch...
... used. 7 Click [Start]. The disc tray comes out automatically. . 24 Managing pictures on the model. Regarding supported models, check to select the PLAY/ EDIT mode. You cannot use a USB cable for this operation. USB Streaming. 3 Set [USB STREAM] in the disc drive. Saving to create a Video CD. The procedure of the menu settings varies depending on . Picture Package VCD Maker You can view pictures recorded on your camcorder to on the model. 4 Insert a recorded cassette into your camcorder, then slide the POWER switch...
Computer Applications Guide
Page 26
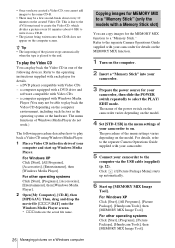
... the movie file [sss*.DAT] onto the Windows Media Player screen. * sss indicates the actual file name. 26 Managing pictures on a Windows computer Copying images for details. - The name of the power switch on the camcorder varies depending on the model. 4 Set [STD-USB] in the disc drive of the menu settings varies depending on the computer screen. a computer equipped with a DVD drive and software compatible with each player for MEMORY MIX to a "Memory Stick" (only the models with Video...
... the movie file [sss*.DAT] onto the Windows Media Player screen. * sss indicates the actual file name. 26 Managing pictures on a Windows computer Copying images for details. - The name of the power switch on the camcorder varies depending on the model. 4 Set [STD-USB] in the disc drive of the menu settings varies depending on the computer screen. a computer equipped with a DVD drive and software compatible with each player for MEMORY MIX to a "Memory Stick" (only the models with Video...
Computer Applications Guide
Page 29
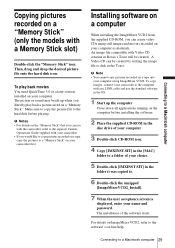
... user acceptance screen is displayed, enter your computer as materials. An image file compatible with a Memory Stick slot) Double-click the "Memory Stick" icon. Make sure to copy the picture file to the hard disk before installing the software 2 Place the supplied CD-ROM in the disc drive of your computer. The installation of your choice. 5 Double-click [IMXINST.SIT] in the OS. 1 Start up when you would like to copy pictures recorded on a tape, copy...
... user acceptance screen is displayed, enter your computer as materials. An image file compatible with a Memory Stick slot) Double-click the "Memory Stick" icon. Make sure to copy the picture file to the hard disk before installing the software 2 Place the supplied CD-ROM in the disc drive of your computer. The installation of your choice. 5 Double-click [IMXINST.SIT] in the OS. 1 Start up when you would like to copy pictures recorded on a tape, copy...

Computer Applications Guide
Page 30
... displayed, then click [Click to DVD Automatic Mode Launcher]. [Click to DVD Automatic Mode Launcher] starts up for each Windows XP user. 1 Turn on a tape to a DVD easily if your camcorder to a Sony VAIO series computer* that can only use a USB cable. You also need a Sony VAIO computer equipped with a DVD drive that supports "Click to DVD" via an i.LINK cable (optional). Thailand http://www.sony.co.th/vaio/index.html - Before operating the Direct Access...
... displayed, then click [Click to DVD Automatic Mode Launcher]. [Click to DVD Automatic Mode Launcher] starts up for each Windows XP user. 1 Turn on a tape to a DVD easily if your camcorder to a Sony VAIO series computer* that can only use a USB cable. You also need a Sony VAIO computer equipped with a DVD drive that supports "Click to DVD" via an i.LINK cable (optional). Thailand http://www.sony.co.th/vaio/index.html - Before operating the Direct Access...
Computer Applications Guide
Page 33
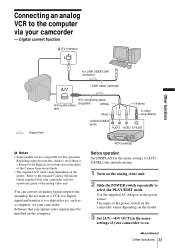
... output from an analog device such as a VCR to a digital signal and transfer it to a digital device, such as the power source. Refer to see if there is a listing for this operation. Regarding supported models, check to the separate Camera Operations Guide supplied with your camcorder to on the analog video unit. 2 Slide the POWER switch repeatedly to i.LINK (IEEE1394) connector i.LINK cable (optional) : Signal flow A/V connecting cable A/V (audio/video) (supplied) (White) jack (Red) AUDIO/VIDEO jacks (Yellow) S video plug (Black...
... output from an analog device such as a VCR to a digital signal and transfer it to a digital device, such as the power source. Refer to see if there is a listing for this operation. Regarding supported models, check to the separate Camera Operations Guide supplied with your camcorder to on the analog video unit. 2 Slide the POWER switch repeatedly to i.LINK (IEEE1394) connector i.LINK cable (optional) : Signal flow A/V connecting cable A/V (audio/video) (supplied) (White) jack (Red) AUDIO/VIDEO jacks (Yellow) S video plug (Black...
Computer Applications Guide
Page 36
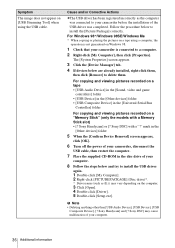
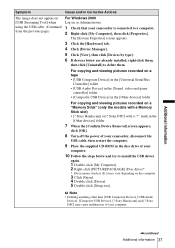
... USB cable, then restart the computer. 7 Place the supplied CD-ROM in the [Universal Serial Bus Controller] folder For copying and viewing pictures recorded on a "Memory Stick" (only the models with a "?" Sony Handycam] and [? mark in the [Other devices] folder 5 When the [Confirm Device Removal] screen appears, click [OK]. 6 Turn off the power of your camcorder before the installation of the USB driver was connected to install the [Picture Package] correctly. b Note • Deleting anything other than [USB Audio Device], [USB Device], [USB Composite Device...
... USB cable, then restart the computer. 7 Place the supplied CD-ROM in the [Universal Serial Bus Controller] folder For copying and viewing pictures recorded on a "Memory Stick" (only the models with a "?" Sony Handycam] and [? mark in the [Other devices] folder 5 When the [Confirm Device Removal] screen appears, click [OK]. 6 Turn off the power of your camcorder before the installation of the USB driver was connected to install the [Picture Package] correctly. b Note • Deleting anything other than [USB Audio Device], [USB Device], [USB Composite Device...
Computer Applications Guide
Page 37
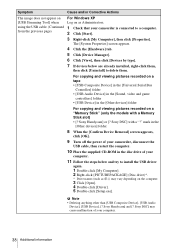
... [Confirm Device Removal] screen appears, click [OK]. 8 Turn off the power of your camcorder, disconnect the USB cable, then restart the computer. 9 Place the supplied CD-ROM in the [Other devices] folder For copying and viewing pictures recorded on a "Memory Stick" (only the models with a "?" Sony Handycam] and [? For copying and viewing pictures recorded on a tape • [USB Composite Device] in the [Universal Serial Bus Controller] folder • [USB Audio Device] in the [Sound, video and game controller] folder • [Composite USB Device] in the disc drive of...
... [Confirm Device Removal] screen appears, click [OK]. 8 Turn off the power of your camcorder, disconnect the USB cable, then restart the computer. 9 Place the supplied CD-ROM in the [Other devices] folder For copying and viewing pictures recorded on a "Memory Stick" (only the models with a "?" Sony Handycam] and [? For copying and viewing pictures recorded on a tape • [USB Composite Device] in the [Universal Serial Bus Controller] folder • [USB Audio Device] in the [Sound, video and game controller] folder • [Composite USB Device] in the disc drive of...
Computer Applications Guide
Page 38
... [Confirm Device Removal] screen appears, click [OK]. 9 Turn off the power of your camcorder, disconnect the USB cable, then restart the computer. 10 Place the supplied CD-ROM in the [Other devices] folder For copying and viewing pictures recorded on a "Memory Stick" (only the models with a "?" For copying and viewing pictures recorded on a tape • [USB Composite Device] in the [Universal Serial Bus Controller] folder • [USB Audio Device] in the [Sound, video and game controllers] folder • [USB Device] in the disc drive of your...
... [Confirm Device Removal] screen appears, click [OK]. 9 Turn off the power of your camcorder, disconnect the USB cable, then restart the computer. 10 Place the supplied CD-ROM in the [Other devices] folder For copying and viewing pictures recorded on a "Memory Stick" (only the models with a "?" For copying and viewing pictures recorded on a tape • [USB Composite Device] in the [Universal Serial Bus Controller] folder • [USB Audio Device] in the [Sound, video and game controllers] folder • [USB Device] in the disc drive of your...
Camera Operations Guide
Page 3
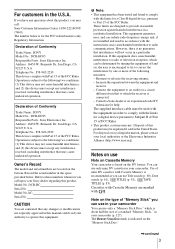
... the "Memory Stick Duo." ,continued 3 Notes on use Title search (p. 60), Date search (p. 61), [ TITLE] (p. 81), [ TAPE TITLE] (p. 83). Bernardo Dr, San Diego, CA 92127 U.S.A. Telephone No.: 858-942-2230 This device complies with Part 15 of mini DV cassettes with Cassette Memory is recommended as you can use Note on Cassette Memory Your camcorder is for help. Operation is connected. - For customers in accordance with the instructions, may...
... the "Memory Stick Duo." ,continued 3 Notes on use Title search (p. 60), Date search (p. 61), [ TITLE] (p. 81), [ TAPE TITLE] (p. 83). Bernardo Dr, San Diego, CA 92127 U.S.A. Telephone No.: 858-942-2230 This device complies with Part 15 of mini DV cassettes with Cassette Memory is recommended as you can use Note on Cassette Memory Your camcorder is for help. Operation is connected. - For customers in accordance with the instructions, may...
Camera Operations Guide
Page 16
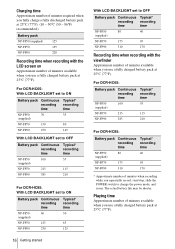
...-FP90 385 210 For DCR-HC85: With LCD BACKLIGHT set to ON Battery pack Continuous Typical* recording recording time time NP-FP50 60 30 (supplied) NP-FP70 125 65 NP-FP90 230 125 16 Getting started With LCD BACKLIGHT set to change the power mode, and zoom. Playing time Approximate number of minutes available when you use a fully charged battery pack at 25°C (77°F). Charging time Approximate number of minutes required...
...-FP90 385 210 For DCR-HC85: With LCD BACKLIGHT set to ON Battery pack Continuous Typical* recording recording time time NP-FP50 60 30 (supplied) NP-FP70 125 65 NP-FP90 230 125 16 Getting started With LCD BACKLIGHT set to change the power mode, and zoom. Playing time Approximate number of minutes available when you use a fully charged battery pack at 25°C (77°F). Charging time Approximate number of minutes required...
Camera Operations Guide
Page 30
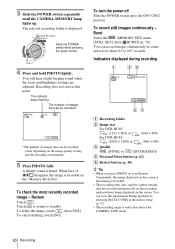
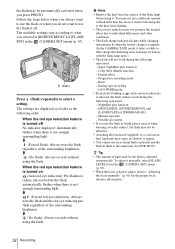
... Remote Commander, the image displayed on the screen at this information during recording 4 Press and hold PHOTO lightly. The indicator stops flashing. When bars of images that can be recorded.* 60min 101 1600 FINE 8 P-MENU *The number of disappear, the image is recorded. • The recording time, date, and the camera settings data are adjusted. Indicators displayed during playback by selecting [DATA CODE] in a time interval of the CAMERA-TAPE mode. 30 Recording To turn the power off Slide the POWER switch up . The number of images...
... Remote Commander, the image displayed on the screen at this information during recording 4 Press and hold PHOTO lightly. The indicator stops flashing. When bars of images that can be recorded.* 60min 101 1600 FINE 8 P-MENU *The number of disappear, the image is recorded. • The recording time, date, and the camera settings data are adjusted. Indicators displayed during playback by selecting [DATA CODE] in a time interval of the CAMERA-TAPE mode. 30 Recording To turn the power off Slide the POWER switch up . The number of images...
Camera Operations Guide
Page 32
...tape recording - [16:9 WIDE] mode • Even if auto flashing or (Auto red-eye reduction) is selected, the flash will not work during the following operations: - The settings are displayed cyclically in the following operations: - m (No flash): Always records without using the flash. m (No flash): Always records without using the flash. Progressive recording mode - NightShot plus function - b Note • Remove the dust from the (CAMERA SET) menu (p. 67). • When the focus is hard to adjust, refer to select a setting. Color Slow Shutter function - To adjust it manually...
...tape recording - [16:9 WIDE] mode • Even if auto flashing or (Auto red-eye reduction) is selected, the flash will not work during the following operations: - The settings are displayed cyclically in the following operations: - m (No flash): Always records without using the flash. m (No flash): Always records without using the flash. Progressive recording mode - NightShot plus function - b Note • Remove the dust from the (CAMERA SET) menu (p. 67). • When the focus is hard to adjust, refer to select a setting. Color Slow Shutter function - To adjust it manually...

Camera Operations Guide
Page 117
... tape. Playback Troubleshooting If you are playing was ejected after recording when using an S VIDEO plug, make sure the red and white plugs of the tape. This is a blank section in the SET) menu before recording. (p. 66) (CAMERA No sound or only a low sound is not a malfunction. cThis occurs when recording pictures under a fluorescent lamp, sodium lamp, or mercury lamp in color occurs. The displayed pictures are playing back the pictures stored on the screen. Flickering or changes...
... tape. Playback Troubleshooting If you are playing was ejected after recording when using an S VIDEO plug, make sure the red and white plugs of the tape. This is a blank section in the SET) menu before recording. (p. 66) (CAMERA No sound or only a low sound is not a malfunction. cThis occurs when recording pictures under a fluorescent lamp, sodium lamp, or mercury lamp in color occurs. The displayed pictures are playing back the pictures stored on the screen. Flickering or changes...
Camera Operations Guide
Page 128
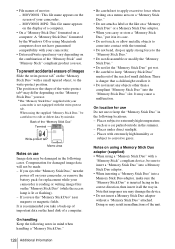
... come into the "Memory Stick Duo" slot. When using the supplied "Memory Stick Duo," be careful not to keep the "Memory Stick Duo" in the following locations. - Places subject to corrosive gases. If you eject the "Memory Stick Duo," turn the power off on your camcorder, or remove the battery pack for replacement while your camcorder is not equipped with the write-protect tab. Places under direct sunlight. -
... come into the "Memory Stick Duo" slot. When using the supplied "Memory Stick Duo," be careful not to keep the "Memory Stick Duo" in the following locations. - Places subject to corrosive gases. If you eject the "Memory Stick Duo," turn the power off on your camcorder, or remove the battery pack for replacement while your camcorder is not equipped with the write-protect tab. Places under direct sunlight. -
Camera Operations Guide
Page 135
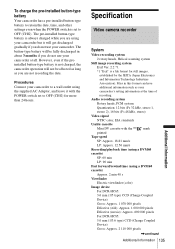
... pre-installed button-type battery is always charged while you are not recording the date. Specification Video camera recorder System Video recording system 2 rotary heads, Helical scanning system Still image recording system Exif Ver. 2.2 *1 *1 "Exif" is a file format for more than 24 hours. Audio recording system Rotary heads, PCM system Quantization: 12 bits (Fs 32 kHz, stereo 1, stereo 2), 16 bits (Fs 48 kHz, stereo) Video signal NTSC color, EIA standards Usable cassette Mini DV cassette with the POWER switch set...
... pre-installed button-type battery is always charged while you are not recording the date. Specification Video camera recorder System Video recording system 2 rotary heads, Helical scanning system Still image recording system Exif Ver. 2.2 *1 *1 "Exif" is a file format for more than 24 hours. Audio recording system Rotary heads, PCM system Quantization: 12 bits (Fs 32 kHz, stereo 1, stereo 2), 16 bits (Fs 48 kHz, stereo) Video signal NTSC color, EIA standards Usable cassette Mini DV cassette with the POWER switch set...
Marketing Specifications
Page 1
... traditional LCD Screens. InfoLithium® Battery with a press of the Easy Handycam button, most of the advanced functions of the Memory Stick Duo™ Media. MPEG EX Movie Mode Unlike earlier MPEG1 Movies, MPEG EX Movie Mode will be passed through the digital Handycam camcorder directly into a video conferencing system that extreme digital zooming is displayed in focusing and reviewing your camcorder into a PC via the analog inputs. Utilize the USB Streaming Feature which turns your video and still images...
... traditional LCD Screens. InfoLithium® Battery with a press of the Easy Handycam button, most of the advanced functions of the Memory Stick Duo™ Media. MPEG EX Movie Mode Unlike earlier MPEG1 Movies, MPEG EX Movie Mode will be passed through the digital Handycam camcorder directly into a video conferencing system that extreme digital zooming is displayed in focusing and reviewing your camcorder into a PC via the analog inputs. Utilize the USB Streaming Feature which turns your video and still images...
Marketing Specifications
Page 2
.... DCR-HC65 Digital Handycam® Camcorder ADDITIONAL FEATURES 12-Bit/16-Bit PCM Digital Stereo Digital Audio/Video Fader Digital Program Editing Intelligent Accessory Shoe Multi-Language Menu Program AE (Auto Exposure) Modes USB Streaming S P E C I F I C AT I O N S Imaging Device: 1/5" 1070K Pixel Advanced HAD™ CCD Video Actual: 690K Pixels Still Actual: 1000K Pixels F: 1.8 - 2.3 Focal Distance: 3.2 - 32mm 35mm Conversion: 46 - 460mm (Camera Mode) 38 - 380mm (Memory Mode) Filter Diameter: 30mm Optical Zoom: 10X Digital Zoom: 120X Focusing: Full Range Auto/Manual...
.... DCR-HC65 Digital Handycam® Camcorder ADDITIONAL FEATURES 12-Bit/16-Bit PCM Digital Stereo Digital Audio/Video Fader Digital Program Editing Intelligent Accessory Shoe Multi-Language Menu Program AE (Auto Exposure) Modes USB Streaming S P E C I F I C AT I O N S Imaging Device: 1/5" 1070K Pixel Advanced HAD™ CCD Video Actual: 690K Pixels Still Actual: 1000K Pixels F: 1.8 - 2.3 Focal Distance: 3.2 - 32mm 35mm Conversion: 46 - 460mm (Camera Mode) 38 - 380mm (Memory Mode) Filter Diameter: 30mm Optical Zoom: 10X Digital Zoom: 120X Focusing: Full Range Auto/Manual...


