AR-M162 | AR-M207 Operation Manual Suite
Page 12
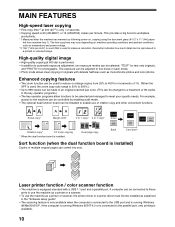
... exposure adjustment, two exposure modes can be used to reduce or enlarge copies from machine tray 1). High-quality digital image • High-quality copying at 300 dpi*2 is only 7.2 seconds. • Copying speed is 20 (AR-M207) or 16 (AR-M162) copies per inch") is a unit that is used to the USB port and is running Windows 95/NT 4.0 or is connected to meet your specific needs. Dual page copy Back Card shot* Sort function...
... exposure adjustment, two exposure modes can be used to reduce or enlarge copies from machine tray 1). High-quality digital image • High-quality copying at 300 dpi*2 is only 7.2 seconds. • Copying speed is 20 (AR-M207) or 16 (AR-M162) copies per inch") is a unit that is used to the USB port and is running Windows 95/NT 4.0 or is connected to meet your specific needs. Dual page copy Back Card shot* Sort function...
AR-M162 | AR-M207 Operation Manual Suite
Page 15
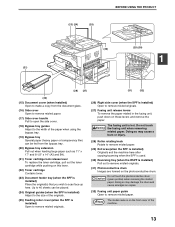
... exit the machine here after copying/scanning when the SPF is used. (30) Reversing tray (when the RSPF is hot. The model name is on the front cover of the originals. (25) Feeding roller cover (when the SPF is installed) Open to remove misfed originals. (26) Right side cover (when the SPF is installed) Open to remove misfed originals. (27) Fusing unit release levers To remove the paper misfed in...
... exit the machine here after copying/scanning when the SPF is used. (30) Reversing tray (when the RSPF is hot. The model name is on the front cover of the originals. (25) Feeding roller cover (when the SPF is installed) Open to remove misfed originals. (26) Right side cover (when the SPF is installed) Open to remove misfed originals. (27) Fusing unit release levers To remove the paper misfed in...
AR-M162 | AR-M207 Operation Manual Suite
Page 27
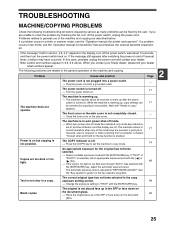
... exposure mode with the [EXPOSURE] key, adjust the automatic exposure level. Problems related to copy mode. 14 Copies are pressed, a print job is 17 received, a fax is received, or when scanning from a computer is turned on and off several times, a failure may have occurred. The following troubleshooting list before requesting service as many problems can 17 be fixed by checking the list, turn off . → Turn the power switch on the document 45 glass. 25 Blank copies The original...
... exposure mode with the [EXPOSURE] key, adjust the automatic exposure level. Problems related to copy mode. 14 Copies are pressed, a print job is 17 received, a fax is received, or when scanning from a computer is turned on and off several times, a failure may have occurred. The following troubleshooting list before requesting service as many problems can 17 be fixed by checking the list, turn off . → Turn the power switch on the document 45 glass. 25 Blank copies The original...

AR-M162 | AR-M207 Operation Manual Suite
Page 95
... THE PRINTER DRIVER FROM THE [START] BUTTON 5 PRINTER DRIVER SETTINGS 6 ● TWO-SIDED PRINTING (ONLY FOR MODELS THAT SUPPORT TWO-SIDED PRINTING) .....7 ● PRINTING MULTIPLE PAGES ON ONE PAGE ......7 ● FITTING THE PRINT IMAGE TO THE PAPER....8 ● ROTATING THE PRINT IMAGE 180 DEGREES .....9 ● PRINTING A WATERMARK 9 OUTLINE OF THE PRINT STATUS WINDOW ... 10 4 KEY OPERATOR PROGRAMS KEY OPERATOR PROGRAM LIST 26 USING THE KEY OPERATOR PROGRAMS...... 27 5 TROUBLESHOOTING TROUBLESHOOTING 28 ● PRINTING PROBLEMS 28 ● SCANNING PROBLEMS 30 6 SPECIFICATIONS...
... THE PRINTER DRIVER FROM THE [START] BUTTON 5 PRINTER DRIVER SETTINGS 6 ● TWO-SIDED PRINTING (ONLY FOR MODELS THAT SUPPORT TWO-SIDED PRINTING) .....7 ● PRINTING MULTIPLE PAGES ON ONE PAGE ......7 ● FITTING THE PRINT IMAGE TO THE PAPER....8 ● ROTATING THE PRINT IMAGE 180 DEGREES .....9 ● PRINTING A WATERMARK 9 OUTLINE OF THE PRINT STATUS WINDOW ... 10 4 KEY OPERATOR PROGRAMS KEY OPERATOR PROGRAM LIST 26 USING THE KEY OPERATOR PROGRAMS...... 27 5 TROUBLESHOOTING TROUBLESHOOTING 28 ● PRINTING PROBLEMS 28 ● SCANNING PROBLEMS 30 6 SPECIFICATIONS...

AR-M162 | AR-M207 Operation Manual Suite
Page 98
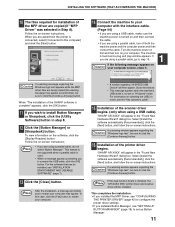
... [Control Panel]. The printer driver setup screen will appear. ☞PRINTER DRIVER SETTINGS (page 6) The printer driver setup screen will revert to open the printer driver setup screen. 3 In Windows 95/98/Me, click the [Setup] tab. 4 Click the [Printing Preferences] button in the [General] tab. Settings adjusted in this way will be the initial settings when you change the printer driver settings, follow the steps below. In Windows 2000, click [Printers]. 3 Click the [SHARP AR-XXXX] printer driver icon and select [Properties] from the [File] menu. 1 Click...
... [Control Panel]. The printer driver setup screen will appear. ☞PRINTER DRIVER SETTINGS (page 6) The printer driver setup screen will revert to open the printer driver setup screen. 3 In Windows 95/98/Me, click the [Setup] tab. 4 Click the [Printing Preferences] button in the [General] tab. Settings adjusted in this way will be the initial settings when you change the printer driver settings, follow the steps below. In Windows 2000, click [Printers]. 3 Click the [SHARP AR-XXXX] printer driver icon and select [Properties] from the [File] menu. 1 Click...
AR-M162 | AR-M207 Operation Manual Suite
Page 105
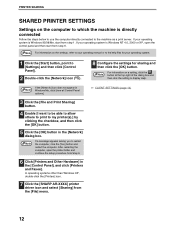
... [Control Panel], and click [Printers and Faxes]. In operating systems other than Windows XP, double-click the [Printers] icon. 7 Click the [SHARP AR-XXXX] printer driver icon and select [Sharing] from step 1. If your operating system is Windows NT 4.0, 2000 or XP, open the printer folder and continue the setup procedure from step 6. If your operating system. 1 Click the [Start] button, point to the machine as a print server. Note For information on a setting, click the button...
... [Control Panel], and click [Printers and Faxes]. In operating systems other than Windows XP, double-click the [Printers] icon. 7 Click the [SHARP AR-XXXX] printer driver icon and select [Sharing] from step 1. If your operating system is Windows NT 4.0, 2000 or XP, open the printer folder and continue the setup procedure from step 6. If your operating system. 1 Click the [Start] button, point to the machine as a print server. Note For information on a setting, click the button...
AR-M162 | AR-M207 Operation Manual Suite
Page 116
... LINE DATA PRINT SCAN LINE DATA COPY EXP DESTINATION SELECT SC1: SC2: SC3: SC4: The [SCAN] key indicator lights up to use the [ ] or [ ] key to select the USB port that you wish to indicate that starts SC1: Sharpdesk SC2: Email SC3: SC4: FAX OCR 3 SC5: Microsoft Word SC6: Filing 4 Press the [OK] key. In this method, the previously specified application will automatically start and the scanned image will be pressed in scanner mode to switch...
... LINE DATA PRINT SCAN LINE DATA COPY EXP DESTINATION SELECT SC1: SC2: SC3: SC4: The [SCAN] key indicator lights up to use the [ ] or [ ] key to select the USB port that you wish to indicate that starts SC1: Sharpdesk SC2: Email SC3: SC4: FAX OCR 3 SC5: Microsoft Word SC6: Filing 4 Press the [OK] key. In this method, the previously specified application will automatically start and the scanned image will be pressed in scanner mode to switch...
AR-M162 | AR-M207 Operation Manual Suite
Page 153
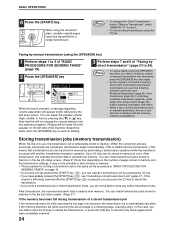
... that depending on the left side of "Faxing by the dial entry screen. Storing transmission jobs (memory transmission) When the line is in memory by pressing the [ ] or [ ] key. You can check transmission jobs stored in memory in memory at once. Faxing by pressing the [C] key. • If you can cancel a transmission job by manual transmission (using the document glass, multiple original pages cannot be stored in the fax job status screen. (Page 27) Note that this...
... that depending on the left side of "Faxing by the dial entry screen. Storing transmission jobs (memory transmission) When the line is in memory by pressing the [ ] or [ ] key. You can check transmission jobs stored in memory in memory at once. Faxing by pressing the [C] key. • If you can cancel a transmission job by manual transmission (using the document glass, multiple original pages cannot be stored in the fax job status screen. (Page 27) Note that this...
AR-M162 | AR-M207 Operation Manual Suite
Page 238
... Date and time 7 Direct transmission 23 Disable fax print hold 30 Fax reception light 103 Fax transmission - Speed dial numbers 68 End sound length 97 Enter junk fax 106 Entering characters 82 Exposure, selecting 15 Extension phone connection 60 F Fax mode 10 Fax print hold 100 Document glass 13 Dual page scan 43 Duplex reception 105 E Earlier output 28, 106 ECM 25 Editing/deleting - station set 105 G Group dialling 16 I Image rotation 25 Index print 106 Initial setting 96 K Key operator programs 92 L Line connection 4 LINE STATUS...
... Date and time 7 Direct transmission 23 Disable fax print hold 30 Fax reception light 103 Fax transmission - Speed dial numbers 68 End sound length 97 Enter junk fax 106 Entering characters 82 Exposure, selecting 15 Extension phone connection 60 F Fax mode 10 Fax print hold 100 Document glass 13 Dual page scan 43 Duplex reception 105 E Earlier output 28, 106 ECM 25 Editing/deleting - station set 105 G Group dialling 16 I Image rotation 25 Index print 106 Initial setting 96 K Key operator programs 92 L Line connection 4 LINE STATUS...

AR-M162 | AR-M207 Operation Manual Suite
Page 255
... side of the machine. (4) Quick Setup (page 13) This is used to E-mail. Enter the password that you to configure settings for that item. A password can be set for the administrator and users. (3) Clock Adjust This is set correctly when performing Scan to set the time at the operation panel of the page. Make sure the time is used to configure basic settings for the SMTP, DNS, and LDAP servers. (5) Security Port numbers can be changed or disabled for security purposes. If your model...
... side of the machine. (4) Quick Setup (page 13) This is used to E-mail. Enter the password that you to configure settings for that item. A password can be set for the administrator and users. (3) Clock Adjust This is set correctly when performing Scan to set the time at the operation panel of the page. Make sure the time is used to configure basic settings for the SMTP, DNS, and LDAP servers. (5) Security Port numbers can be changed or disabled for security purposes. If your model...
AR-M162 | AR-M207 Operation Manual Suite
Page 286
... [PAPER FEED] IS SET TO [AUTO SELECT 19 ● HOW [BYPASS TRAY] AND [BYPASS MANUAL] DIFFER IN THE [PAPER FEED] SETTINGS 19 ● JOB CONTROL FUNCTION (MAC OS 8.6 TO 9.2.2, MAC OS X V10.2 TO 10.3.4 19 2 4 WEB FUNCTIONS OF THE MACHINE HOW TO ACCESS THE WEB PAGE AND VIEW HELP 20 ABOUT THE WEB PAGES (FOR USERS) ..... 21 ● DIRECTLY PRINTING A FILE ON A COMPUTER 22 ● PRINTER DEFAULT SETTINGS 23 ABOUT THE WEB PAGES (FOR THE ADMINISTRATOR 25 ● PROTECTING INFORMATION PROGRAMMED IN THE WEB PAGE ([PASSWORDS...
... [PAPER FEED] IS SET TO [AUTO SELECT 19 ● HOW [BYPASS TRAY] AND [BYPASS MANUAL] DIFFER IN THE [PAPER FEED] SETTINGS 19 ● JOB CONTROL FUNCTION (MAC OS 8.6 TO 9.2.2, MAC OS X V10.2 TO 10.3.4 19 2 4 WEB FUNCTIONS OF THE MACHINE HOW TO ACCESS THE WEB PAGE AND VIEW HELP 20 ABOUT THE WEB PAGES (FOR USERS) ..... 21 ● DIRECTLY PRINTING A FILE ON A COMPUTER 22 ● PRINTER DEFAULT SETTINGS 23 ABOUT THE WEB PAGES (FOR THE ADMINISTRATOR 25 ● PROTECTING INFORMATION PROGRAMMED IN THE WEB PAGE ([PASSWORDS...
AR-M162 | AR-M207 Operation Manual Suite
Page 302
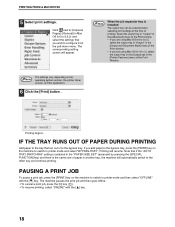
... offline. • To cancel a print job, press the [C] key ( ). • To resume printing, select "ONLINE" with the [ ] key. Printing will appear. Select the output tray in "Output" in the [Advanced] menu of the Print window. • If you are using Mac OS X v10.1.5, select the output tray in the [Output] tab in the [Output and Document Style] menu of printing. Note The settings vary depending on the machine to switch to 9.2.2, select the output tray in "Output" in the [Printer Features] menu...
... offline. • To cancel a print job, press the [C] key ( ). • To resume printing, select "ONLINE" with the [ ] key. Printing will appear. Select the output tray in "Output" in the [Advanced] menu of the Print window. • If you are using Mac OS X v10.1.5, select the output tray in the [Output] tab in the [Output and Document Style] menu of printing. Note The settings vary depending on the machine to switch to 9.2.2, select the output tray in "Output" in the [Printer Features] menu...

AR-M162 | AR-M207 Operation Manual Suite
Page 308
... side. Item Print PS Errors Settings Enable, Disable Description When this setting is enabled, an error description is installed. LF=LF; LF=CR+LF; When the setting is disabled (a checkmark does not appear), each time a PostScript error occurs. 24 This sets the default paper size used to use for printing. PCL settings Item Symbol Set Font Line Feed Code Wide A4 Settings Select one expansion font. CR=CR; The factory default setting is 78 characters long. This setting can be enabled to print 80 lines...
... side. Item Print PS Errors Settings Enable, Disable Description When this setting is enabled, an error description is installed. LF=LF; LF=CR+LF; When the setting is disabled (a checkmark does not appear), each time a PostScript error occurs. 24 This sets the default paper size used to use for printing. PCL settings Item Symbol Set Font Line Feed Code Wide A4 Settings Select one expansion font. CR=CR; The factory default setting is 78 characters long. This setting can be enabled to print 80 lines...

AR-M162 | AR-M207 Operation Manual Suite
Page 319
.... Operation manual (for general information and copier) "FORCED OUTPUT OF PRINT" is finished. The printed image is light and uneven. Printing will not adhere well to select printer mode and then select "ONLINE" with the [ ] key. 3, 17 Your machine is outside of paper have selected the machine as the printer. 3, 17 Copying or scanning is in the application, make sure you have a front and a back side. Operation manual (for installing the printer driver, see the "Software setup guide", which...
.... Operation manual (for general information and copier) "FORCED OUTPUT OF PRINT" is finished. The printed image is light and uneven. Printing will not adhere well to select printer mode and then select "ONLINE" with the [ ] key. 3, 17 Your machine is outside of paper have selected the machine as the printer. 3, 17 Copying or scanning is in the application, make sure you have a front and a back side. Operation manual (for installing the printer driver, see the "Software setup guide", which...

AR-M162 | AR-M207 Operation Manual Suite
Page 327
...AR-NB3). Software setup guide (this product. To use the machine as a PostScript compatible printer. INTRODUCTION Thank you for the printer and scanner functions. By using the machine as a PostScript printer, printing is only possible via a network connection. (Parallel and USB ports cannot be bound by means of the SOFTWARE LICENSE. Using the network printer function • Operation manual (for network printer) This is installed, scanning using the PCL5e and PCL6 printer drivers, and the PS printer driver, troubleshooting, and key operator programs for the printer and network...
...AR-NB3). Software setup guide (this product. To use the machine as a PostScript compatible printer. INTRODUCTION Thank you for the printer and scanner functions. By using the machine as a PostScript printer, printing is only possible via a network connection. (Parallel and USB ports cannot be bound by means of the SOFTWARE LICENSE. Using the network printer function • Operation manual (for network printer) This is installed, scanning using the PCL5e and PCL6 printer drivers, and the PS printer driver, troubleshooting, and key operator programs for the printer and network...
AR-M162 | AR-M207 Operation Manual Suite
Page 337
.... Follow the on -screen instructions. "SHARP AR-XXXX" will appear in the "Found New Hardware Wizard" dialog box. Follow the on -screen instructions. When you are using a USB cable, make sure the machine power is connected, select [Connected to this case, click the [Yes] button to connect the USB cable, click the [OK] button. Caution If a warning message regarding the Caution "Windows logo test", be installed, see "CONFIGURING THE PRINTER DRIVER" (page 42) to configure the printer driver settings. • If you...
.... Follow the on -screen instructions. "SHARP AR-XXXX" will appear in the "Found New Hardware Wizard" dialog box. Follow the on -screen instructions. When you are using a USB cable, make sure the machine power is connected, select [Connected to this case, click the [Yes] button to connect the USB cable, click the [OK] button. Caution If a warning message regarding the Caution "Windows logo test", be installed, see "CONFIGURING THE PRINTER DRIVER" (page 42) to configure the printer driver settings. • If you...

AR-M162 | AR-M207 Operation Manual Suite
Page 354
... your network administrator for printer and scanner)" on -screen instructions. 7 Click the [Next] button. 8 Click the [Custom installation] button. 28 "Print server" as explained here is a computer that is directly connected to the machine, and a "Client" is any other environment is configured to share the printer (the machine), follow the on the "Software CD-ROM (1)" that you double click the [Setup] icon, select the language that accompanies the machine. In Windows...
... your network administrator for printer and scanner)" on -screen instructions. 7 Click the [Next] button. 8 Click the [Custom installation] button. 28 "Print server" as explained here is a computer that is directly connected to the machine, and a "Client" is any other environment is configured to share the printer (the machine), follow the on the "Software CD-ROM (1)" that you double click the [Setup] icon, select the language that accompanies the machine. In Windows...

AR-M162 | AR-M207 Operation Manual Suite
Page 368
...-screen instructions to install it. Note that for an option, make sure that the printer driver is set as the default printer and that the number of trays on the machine and the paper size of each tray. If you are configured in that tray from the [File] menu. CONFIGURING THE PRINTER DRIVER After installing the MFP driver (printer driver) or the printer driver for the MFP driver (printer driver), this is only effective when a USB cable is connected. 6 Click the [Set Tray Status] button and select the size of paper that is loaded...
...-screen instructions to install it. Note that for an option, make sure that the printer driver is set as the default printer and that the number of trays on the machine and the paper size of each tray. If you are configured in that tray from the [File] menu. CONFIGURING THE PRINTER DRIVER After installing the MFP driver (printer driver) or the printer driver for the MFP driver (printer driver), this is only effective when a USB cable is connected. 6 Click the [Set Tray Status] button and select the size of paper that is loaded...

Operation Manual
Page 3
... PRINTER DRIVER FROM THE [START] BUTTON 5 PRINTER DRIVER SETTINGS 6 TWO-SIDED PRINTING (ONLY FOR MODELS THAT SUPPORT TWO-SIDED PRINTING) .....7 PRINTING MULTIPLE PAGES ON ONE PAGE ......7 FITTING THE PRINT IMAGE TO THE PAPER....8 ROTATING THE PRINT IMAGE 180 DEGREES .....9 PRINTING A WATERMARK 9 OUTLINE OF THE PRINT STATUS WINDOW ... 10 4 KEY OPERATOR PROGRAMS KEY OPERATOR PROGRAM LIST 26 USING THE KEY OPERATOR PROGRAMS...... 27 5 TROUBLESHOOTING TROUBLESHOOTING 28 PRINTING PROBLEMS 28 SCANNING PROBLEMS 30 6 SPECIFICATIONS 2 PRINTER SHARING SHARING THE PRINTER USING WINDOWS NETWORKING...
... PRINTER DRIVER FROM THE [START] BUTTON 5 PRINTER DRIVER SETTINGS 6 TWO-SIDED PRINTING (ONLY FOR MODELS THAT SUPPORT TWO-SIDED PRINTING) .....7 PRINTING MULTIPLE PAGES ON ONE PAGE ......7 FITTING THE PRINT IMAGE TO THE PAPER....8 ROTATING THE PRINT IMAGE 180 DEGREES .....9 PRINTING A WATERMARK 9 OUTLINE OF THE PRINT STATUS WINDOW ... 10 4 KEY OPERATOR PROGRAMS KEY OPERATOR PROGRAM LIST 26 USING THE KEY OPERATOR PROGRAMS...... 27 5 TROUBLESHOOTING TROUBLESHOOTING 28 PRINTING PROBLEMS 28 SCANNING PROBLEMS 30 6 SPECIFICATIONS 2 PRINTER SHARING SHARING THE PRINTER USING WINDOWS NETWORKING...
Operation Manual
Page 24
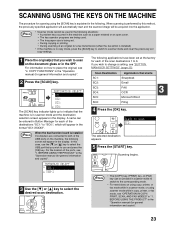
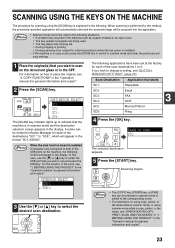
... SELECT USB-1 USB-2 3 Use the [ ] or [ ] key to place the original, see "4. Note • Scanner mode cannot be pressed in scanner mode to switch to "SC6:", which will appear in the "Operation manual (for general information and copier)". ON LINE DATA PRINT SCAN LINE DATA COPY EXP DESTINATION SELECT SC1: SC2: SC3: SC4: The [SCAN] key indicator lights up to indicate that starts SC1: Sharpdesk SC2: Email SC3: SC4: FAX OCR 3 SC5: Microsoft Word SC6: Filing 4 Press...
... SELECT USB-1 USB-2 3 Use the [ ] or [ ] key to place the original, see "4. Note • Scanner mode cannot be pressed in scanner mode to switch to "SC6:", which will appear in the "Operation manual (for general information and copier)". ON LINE DATA PRINT SCAN LINE DATA COPY EXP DESTINATION SELECT SC1: SC2: SC3: SC4: The [SCAN] key indicator lights up to indicate that starts SC1: Sharpdesk SC2: Email SC3: SC4: FAX OCR 3 SC5: Microsoft Word SC6: Filing 4 Press...


