AR-168S | AR-168D Operation Manual
Page 2
...-user, may be aware, however, that are no one is authorized to which you purchased the Product. Model Number Serial Number Date of the hardware, software or firmware embodied in or used in the USA FOR YOUR RECORDS ... To protect against the authorized dealer from copying by Sharp. Other items may experience as a result of your purchase or use of Purchase Authorized Sharp Copier Service...
...-user, may be aware, however, that are no one is authorized to which you purchased the Product. Model Number Serial Number Date of the hardware, software or firmware embodied in or used in the USA FOR YOUR RECORDS ... To protect against the authorized dealer from copying by Sharp. Other items may experience as a result of your purchase or use of Purchase Authorized Sharp Copier Service...
AR-168S | AR-168D Operation Manual
Page 4
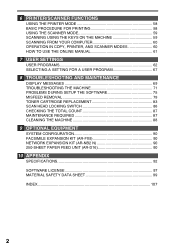
...MODE 58 BASIC PROCEDURE FOR PRINTING 58 USING THE SCANNER MODE 59 SCANNING USING THE KEYS ON THE MACHINE 59 SCANNING FROM YOUR COMPUTER 60 OPERATION IN COPY, PRINTER, AND SCANNER MODES 60 HOW TO USE THE ONLINE MANUAL 61 7 USER SETTINGS USER PROGRAMS 62 SELECTING A SETTING FOR A USER PROGRAM 67 8 TROUBLESHOOTING AND MAINTENANCE DISPLAY MESSAGES 69 TROUBLESHOOTING THE MACHINE 71 PROBLEMS DURING SETUP THE SOFTWARE 75 MISFEED REMOVAL 79 TONER CARTRIDGE REPLACEMENT 83 SCAN HEAD LOCKING SWITCH 86 CHECKING THE TOTAL COUNT 87 MAINTENANCE REQUIRED 87 CLEANING THE MACHINE 88 9 OPTIONAL...
...MODE 58 BASIC PROCEDURE FOR PRINTING 58 USING THE SCANNER MODE 59 SCANNING USING THE KEYS ON THE MACHINE 59 SCANNING FROM YOUR COMPUTER 60 OPERATION IN COPY, PRINTER, AND SCANNER MODES 60 HOW TO USE THE ONLINE MANUAL 61 7 USER SETTINGS USER PROGRAMS 62 SELECTING A SETTING FOR A USER PROGRAM 67 8 TROUBLESHOOTING AND MAINTENANCE DISPLAY MESSAGES 69 TROUBLESHOOTING THE MACHINE 71 PROBLEMS DURING SETUP THE SOFTWARE 75 MISFEED REMOVAL 79 TONER CARTRIDGE REPLACEMENT 83 SCAN HEAD LOCKING SWITCH 86 CHECKING THE TOTAL COUNT 87 MAINTENANCE REQUIRED 87 CLEANING THE MACHINE 88 9 OPTIONAL...
AR-168S | AR-168D Operation Manual
Page 8
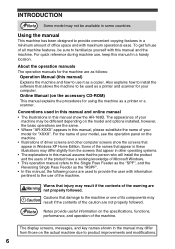
... a printer and scanner for "XXXX". Caution Cautions that allows the machine to be different depending on the model and options installed, however, the basic operations are the same. • Where "AR-XXXX" appears in this manual, please substitute the name of your model for your model, see the operation panel on the specifications, functions, performance, and operation of the caution are not properly followed. The display screens, messages, and key...
... a printer and scanner for "XXXX". Caution Cautions that allows the machine to be different depending on the model and options installed, however, the basic operations are the same. • Where "AR-XXXX" appears in this manual, please substitute the name of your model for your model, see the operation panel on the specifications, functions, performance, and operation of the caution are not properly followed. The display screens, messages, and key...
AR-168S | AR-168D Operation Manual
Page 9
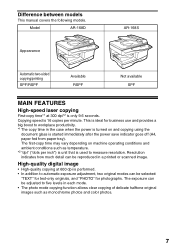
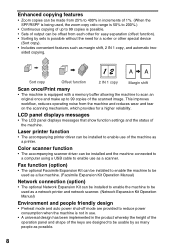
... started immediately after the power save indicator goes off (A4, paper fed from paper tray). Resolution indicates how much detail can be adjusted to five levels in each mode. • The photo mode copying function allows clear copying of delicate halftone original images such as temperature. *2 "dpi" ("dots per minute. Model AR-168D AR-168S Appearance Automatic two-sided copying/printing SPF/RSPF Available RSPF Not available SPF MAIN FEATURES High-speed laser copying First-copy time...
... started immediately after the power save indicator goes off (A4, paper fed from paper tray). Resolution indicates how much detail can be adjusted to five levels in each mode. • The photo mode copying function allows clear copying of delicate halftone original images such as temperature. *2 "dpi" ("dots per minute. Model AR-168D AR-168S Appearance Automatic two-sided copying/printing SPF/RSPF Available RSPF Not available SPF MAIN FEATURES High-speed laser copying First-copy time...
AR-168S | AR-168D Operation Manual
Page 10
... make up to 99 copies of the scanned image. This improves workflow, reduces operating noise from the machine and reduces wear and tear on the scanning mechanism, which provides for easy separation (offset function). • Sorting by as many • The machine is possible. • Sets of output can be installed and the machine connected to a computer using a USB cable to enable use of the machine as a printer. Color scanner function • The accompanying scanner driver...
... make up to 99 copies of the scanned image. This improves workflow, reduces operating noise from the machine and reduces wear and tear on the scanning mechanism, which provides for easy separation (offset function). • Sorting by as many • The machine is possible. • Sets of output can be installed and the machine connected to a computer using a USB cable to enable use of the machine as a printer. Color scanner function • The accompanying scanner driver...

AR-168S | AR-168D Operation Manual
Page 34
... cancel 2 IN 1 copying, press the [CLEAR] key ( ). • To cancel 2 IN 1 copy mode, press the [CLEAR ALL] key ( ). 32 If the number of original pages is odd, press the [ ] key after all originals have been scanned. Note • To clear the data in memory, press the [CLEAR] key ( ). Copies will be selected: "8.5x14", "8.5x13", "8.5x11", "5.5x8.5", "A4", "B5", "A5". SIZE ENTER 5.5x8.5 5 Set the number of copies setting is scanned into memory. To immediately print the scanned image, press the [ ] key. 6 Replace...
... cancel 2 IN 1 copying, press the [CLEAR] key ( ). • To cancel 2 IN 1 copy mode, press the [CLEAR ALL] key ( ). 32 If the number of original pages is odd, press the [ ] key after all originals have been scanned. Note • To clear the data in memory, press the [CLEAR] key ( ). Copies will be selected: "8.5x14", "8.5x13", "8.5x11", "5.5x8.5", "A4", "B5", "A5". SIZE ENTER 5.5x8.5 5 Set the number of copies setting is scanned into memory. To immediately print the scanned image, press the [ ] key. 6 Replace...
AR-168S | AR-168D Operation Manual
Page 38
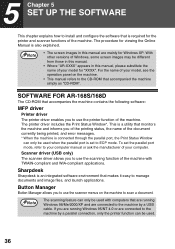
... image files, and launch applications. Sharpdesk Sharpdesk is also explained. Scanner driver (USB only) The scanner driver allows you of the printing status, the name of the machine with computers that makes it easy to use the scanning function of the document currently being printed, and error messages. * When the machine is connected through the parallel port, the Print Status Window can only be used with TWAIN-compliant and WIA-compliant applications. The printer driver includes the Print Status Window...
... image files, and launch applications. Sharpdesk Sharpdesk is also explained. Scanner driver (USB only) The scanner driver allows you of the printing status, the name of the machine with computers that makes it easy to use the scanning function of the document currently being printed, and error messages. * When the machine is connected through the parallel port, the Print Status Window can only be used with TWAIN-compliant and WIA-compliant applications. The printer driver includes the Print Status Window...

AR-168S | AR-168D Operation Manual
Page 40
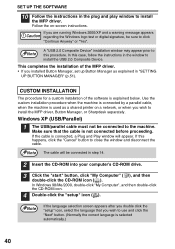
... ( ). Make sure that the cable is connected, a Plug and Play window will appear. STANDARD INSTALLATION (USB only) The procedure for right hand operation. • The scanner feature only works when using the new connection method. • In the following explanations it is recommended that you may have to click the "Cancel" button to exit the installer. Note The standard installation can only be used when the machine is connected...
... ( ). Make sure that the cable is connected, a Plug and Play window will appear. STANDARD INSTALLATION (USB only) The procedure for right hand operation. • The scanner feature only works when using the new connection method. • In the following explanations it is recommended that you may have to click the "Cancel" button to exit the installer. Note The standard installation can only be used when the machine is connected...
AR-168S | AR-168D Operation Manual
Page 42
... "setup" icon, select the language that the cable is not connected before proceeding. Make sure that you installed Button Manager, set up Button Manager as a shared printer on -screen instructions. SET UP THE SOFTWARE 10 Follow the instructions in step 14. 2 Insert the CD-ROM into your computer's CD-ROM drive. 3 Click the "start" button, click "My Computer" ( ), and then double-click the CD-ROM icon ( ). Note A "USB 2.0 Composite Device" installation window...
... "setup" icon, select the language that the cable is not connected before proceeding. Make sure that you installed Button Manager, set up Button Manager as a shared printer on -screen instructions. SET UP THE SOFTWARE 10 Follow the instructions in step 14. 2 Insert the CD-ROM into your computer's CD-ROM drive. 3 Click the "start" button, click "My Computer" ( ), and then double-click the CD-ROM icon ( ). Note A "USB 2.0 Composite Device" installation window...
AR-168S | AR-168D Operation Manual
Page 45
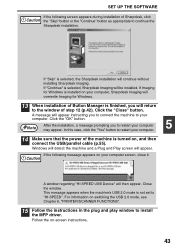
... the Sharpdesk installation. Note After the installation, a message prompting you will continue without installing Sharpdesk imaging. For information on switching the USB 2.0 mode, see Chapter 6, "PRINTER/SCANNER FUNCTIONS". 15 Follow the instructions in the plug and play window to restart your computer may appear. If the following screen appears during installation of the machine is not set to your computer. SET UP THE SOFTWARE If the following message appears on...
... the Sharpdesk installation. Note After the installation, a message prompting you will continue without installing Sharpdesk imaging. For information on switching the USB 2.0 mode, see Chapter 6, "PRINTER/SCANNER FUNCTIONS". 15 Follow the instructions in the plug and play window to restart your computer may appear. If the following screen appears during installation of the machine is not set to your computer. SET UP THE SOFTWARE If the following message appears on...
AR-168S | AR-168D Operation Manual
Page 48
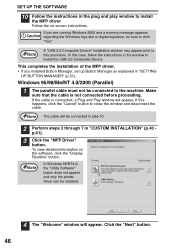
... install the USB 2.0 Composite Device. p.41). 3 Click the "MFP Driver" button. Click the "Next" button. 46 Note In Windows 95/NT4.0, the "Utility Software" button does not appear and only the printer driver can be connected to close the window and disconnect the cable. In this case, follow the instructions in "SETTING UP BUTTON MANAGER" (p.51). Note A "USB 2.0 Composite Device" installation window may appear prior to this happens, click the "Cancel" button to the machine...
... install the USB 2.0 Composite Device. p.41). 3 Click the "MFP Driver" button. Click the "Next" button. 46 Note In Windows 95/NT4.0, the "Utility Software" button does not appear and only the printer driver can be connected to close the window and disconnect the cable. In this case, follow the instructions in "SETTING UP BUTTON MANAGER" (p.51). Note A "USB 2.0 Composite Device" installation window may appear prior to this happens, click the "Cancel" button to the machine...
AR-168S | AR-168D Operation Manual
Page 50
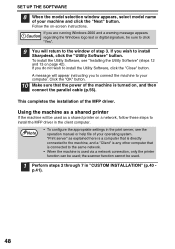
... the machine is turned on -screen instructions. To install the Utility Software, see the operation manual or help file of step 3. "Print server" as a shared printer on page 42). Click the "OK" button. 10 Make sure that the power of the machine is used via a network connection, only the printer function can be used as explained here is a computer that is directly connected to the machine, and a "Client" is any other computer that is connected to install the MFP driver...
... the machine is turned on -screen instructions. To install the Utility Software, see the operation manual or help file of step 3. "Print server" as a shared printer on page 42). Click the "OK" button. 10 Make sure that the power of the machine is used via a network connection, only the printer function can be used as explained here is a computer that is directly connected to the machine, and a "Client" is any other computer that is connected to install the MFP driver...
AR-168S | AR-168D Operation Manual
Page 53
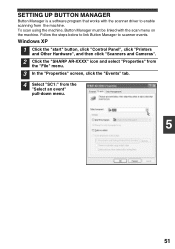
To scan using the machine, Button Manager must be linked with the scanner driver to scanner events. Windows XP 1 Click the "start" button, click "Control Panel", click "Printers and Other Hardware", and then click "Scanners and Cameras". 2 Click the "SHARP AR-XXXX" icon and select "Properties" from the "File" menu. 3 In the "Properties" screen, click the "Events" tab. 4 Select "SC1:" from the machine. SETTING UP BUTTON MANAGER Button Manager is a software program that works with the scan menu on...
To scan using the machine, Button Manager must be linked with the scanner driver to scanner events. Windows XP 1 Click the "start" button, click "Control Panel", click "Printers and Other Hardware", and then click "Scanners and Cameras". 2 Click the "SHARP AR-XXXX" icon and select "Properties" from the "File" menu. 3 In the "Properties" screen, click the "Events" tab. 4 Select "SC1:" from the machine. SETTING UP BUTTON MANAGER Button Manager is a software program that works with the scan menu on...
AR-168S | AR-168D Operation Manual
Page 57
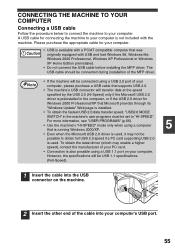
... USB 2.0 (Hi-Speed) only if the Microsoft USB 2.0 driver is preinstalled in the computer, or if the USB 2.0 driver for Windows 2000 Professional/XP that Microsoft provides through its "Windows Update" Web page is installed. • To obtain the fastest USB 2.0 data transfer speed, "USB2.0 MODE SWITCH" in the machine's user programs must be USB 1.1 specifications (Full-Speed). 5 1 Insert the cable into your computer's USB port. 55 A USB cable for your computer. Note • If the machine will be connected using a USB 1.1 port...
... USB 2.0 (Hi-Speed) only if the Microsoft USB 2.0 driver is preinstalled in the computer, or if the USB 2.0 driver for Windows 2000 Professional/XP that Microsoft provides through its "Windows Update" Web page is installed. • To obtain the fastest USB 2.0 data transfer speed, "USB2.0 MODE SWITCH" in the machine's user programs must be USB 1.1 specifications (Full-Speed). 5 1 Insert the cable into your computer's USB port. 55 A USB cable for your computer. Note • If the machine will be connected using a USB 1.1 port...
AR-168S | AR-168D Operation Manual
Page 59
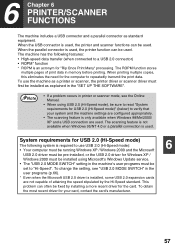
... and a USB connection are not capable of print data in memory before printing. To use USB 2.0 (Hi-Speed mode): 6 • Your computer must be running Windows XP / Windows 2000 and the Microsoft USB 2.0 driver must be used , the printer function can be installed as standard equipment. To change the setting, see the Online Manual. • When using Microsoft's Windows Update service. • The "USB 2.0 MODE SWITCH" setting in the machine's user programs must be pre-installed, or the USB 2.0 driver for the card. The ROPM function stores multiple pages of...
... and a USB connection are not capable of print data in memory before printing. To use USB 2.0 (Hi-Speed mode): 6 • Your computer must be running Windows XP / Windows 2000 and the Microsoft USB 2.0 driver must be used , the printer function can be installed as standard equipment. To change the setting, see the Online Manual. • When using Microsoft's Windows Update service. • The "USB 2.0 MODE SWITCH" setting in the machine's user programs must be pre-installed, or the USB 2.0 driver for the card. The ROPM function stores multiple pages of...

AR-168S | AR-168D Operation Manual
Page 68
...-sheet paper feed unit is paper of paper runs out in all trays. To obtain the fastest speed when using the USB 2.0 connector, first verify that your computer meets the system requirements (operating system and driver), 2 USB 2.0 MODE SWITCH*1 1: FULL-SPEED and then use this function is enabled, printing in printer mode will automatically continue using a different size of paper if the specified size of the same size in another tray, this function automatically switches to "Hi-Speed". USER SETTINGS Print mode Program number Program name Setting codes (factory default setting...
...-sheet paper feed unit is paper of paper runs out in all trays. To obtain the fastest speed when using the USB 2.0 connector, first verify that your computer meets the system requirements (operating system and driver), 2 USB 2.0 MODE SWITCH*1 1: FULL-SPEED and then use this function is enabled, printing in printer mode will automatically continue using a different size of paper if the specified size of the same size in another tray, this function automatically switches to "Hi-Speed". USER SETTINGS Print mode Program number Program name Setting codes (factory default setting...

AR-168S | AR-168D Operation Manual
Page 71
... scan head locking switch is empty. Turn the power switch off, wait about 10 seconds, and then turn the power back on. If this does not clear the error, remove the - Close the cover. - SPF/RSPF cover. 82 Error indicator Blinks REPLACE THE TONER CARTRIDGE. The machine will not function. JAM. FRONT OR SIDE COVER OPEN. XX] REFER TO USER GUIDE switch, and turn on the operation panel or the following alphanumeric codes appear in .) CLEAR PAPER A paper misfeed has occurred. 8 Chapter 8 TROUBLESHOOTING...
... scan head locking switch is empty. Turn the power switch off, wait about 10 seconds, and then turn the power back on. If this does not clear the error, remove the - Close the cover. - SPF/RSPF cover. 82 Error indicator Blinks REPLACE THE TONER CARTRIDGE. The machine will not function. JAM. FRONT OR SIDE COVER OPEN. XX] REFER TO USER GUIDE switch, and turn on the operation panel or the following alphanumeric codes appear in .) CLEAR PAPER A paper misfeed has occurred. 8 Chapter 8 TROUBLESHOOTING...

AR-168S | AR-168D Operation Manual
Page 72
... where black lines appear.) Printing is not possible if the paper size setting is TRAY. Data is not installed correctly. Reinstall the toner cartridge. 83 NO XXXX SIZE TRAY There is already selected. 31 The bypass tray cannot be 31 used . Check the cable (when using the scanner function). 55 70 Replacement of toner cartridge will begin. ("XXXX" indicates paper size. INSTALL A TONER CARTRIDGE. already selected ,or the bypass tray is selected when two-sided printing or 2 26 IN 1 copying is no cleared...
... where black lines appear.) Printing is not possible if the paper size setting is TRAY. Data is not installed correctly. Reinstall the toner cartridge. 83 NO XXXX SIZE TRAY There is already selected. 31 The bypass tray cannot be 31 used . Check the cable (when using the scanner function). 55 70 Replacement of toner cartridge will begin. ("XXXX" indicates paper size. INSTALL A TONER CARTRIDGE. already selected ,or the bypass tray is selected when two-sided printing or 2 26 IN 1 copying is no cleared...
AR-168S | AR-168D Operation Manual
Page 89
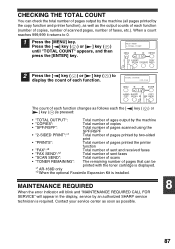
... two-sided print • "PRINTS": Total number of pages printed the printer function • "FAX":*2 Total number of sent and received faxes • "FAX SEND":*2 Total number of sent faxes • "SCAN SEND": Total number of scans • "TONER REMAINING": The remaining number of each function (number of copies, number of scanned pages, number of faxes, etc.). TOTAL OUTPUT 012,345 The count of each function changes as follows each the [ ] key ( ) or [ ] key ( )is required. CHECKING THE TOTAL COUNT You can be printed with the toner cartridge is displayed. *1 AR-168D...
... two-sided print • "PRINTS": Total number of pages printed the printer function • "FAX":*2 Total number of sent and received faxes • "FAX SEND":*2 Total number of sent faxes • "SCAN SEND": Total number of scans • "TONER REMAINING": The remaining number of each function (number of copies, number of scanned pages, number of faxes, etc.). TOTAL OUTPUT 012,345 The count of each function changes as follows each the [ ] key ( ) or [ ] key ( )is required. CHECKING THE TOTAL COUNT You can be printed with the toner cartridge is displayed. *1 AR-168D...
AR-168S | AR-168D Operation Manual
Page 110
... keys 10, 23 O Offset function during setup the software 75 108 Paper feed area 80 - Standard installation 38 Interface cable 91 Introduction 6 L Language setting 12 Loading paper 14 Loading paper in copy, printer, and scanner modes 60 Operation panel 9, 10 Optional equipment 90 Original guides 9, 21 Original types 24 P Paper 14 Paper holder arm 9, 22 Paper output tray 9 Paper output tray extension ......... 9, 22 Paper tray 9, 15 Parallel connector 9, 56 Part names 9 Photoconductive drum 9 Plug and play screen does not appear 76 Power cord 9 Power off 13 Power...
... keys 10, 23 O Offset function during setup the software 75 108 Paper feed area 80 - Standard installation 38 Interface cable 91 Introduction 6 L Language setting 12 Loading paper 14 Loading paper in copy, printer, and scanner modes 60 Operation panel 9, 10 Optional equipment 90 Original guides 9, 21 Original types 24 P Paper 14 Paper holder arm 9, 22 Paper output tray 9 Paper output tray extension ......... 9, 22 Paper tray 9, 15 Parallel connector 9, 56 Part names 9 Photoconductive drum 9 Plug and play screen does not appear 76 Power cord 9 Power off 13 Power...


