User Manual (user Manual) (ver.1.0) (English)
Page 2
... Camcorder...18 Remote Control (SCL860/L870 only) ...19 s Self Timer Recording ...19 Preparing Adjusting the Hand Strap and Shoulder Strap ...20 Lithium Battery Installation ...21 Connecting the Power Source...22 s To use the AC Power Adapter...22 s To use the Battery Pack ...23 Using the Battery Pack...24 s Continuous Recording time table...24 s Battery Level Display ...25 Inserting and Ejecting a Cassette ...26 Basic Recording Making Your First Recording ...27 Hints for Stable Image Recording ...29 s Recording with LCD Monitor...29 s Recording...
... Camcorder...18 Remote Control (SCL860/L870 only) ...19 s Self Timer Recording ...19 Preparing Adjusting the Hand Strap and Shoulder Strap ...20 Lithium Battery Installation ...21 Connecting the Power Source...22 s To use the AC Power Adapter...22 s To use the Battery Pack ...23 Using the Battery Pack...24 s Continuous Recording time table...24 s Battery Level Display ...25 Inserting and Ejecting a Cassette ...26 Basic Recording Making Your First Recording ...27 Hints for Stable Image Recording ...29 s Recording with LCD Monitor...29 s Recording...
User Manual (user Manual) (ver.1.0) (English)
Page 4
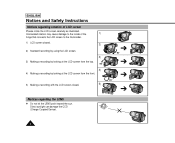
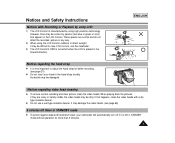
... top. 90° 4) 4) Making a recording by looking at the LCD screen from the front. 5) Making a recording with the LCD screen closed. 5) 90° 90° 90° Notices regarding rotation of LCD screen Please rotate the LCD screen carefully as illustrated. ENGLISH Notices and Safety Instructions Notices regarding the LENS 1 Do not let the LENS point toward the sun. Direct sunlight can damage the CCD (Charge Coupled Device). 4
... top. 90° 4) 4) Making a recording by looking at the LCD screen from the front. 5) Making a recording with the LCD screen closed. 5) 90° 90° 90° Notices regarding rotation of LCD screen Please rotate the LCD screen carefully as illustrated. ENGLISH Notices and Safety Instructions Notices regarding the LENS 1 Do not let the LENS point toward the sun. Direct sunlight can damage the CCD (Charge Coupled Device). 4
User Manual (user Manual) (ver.1.0) (English)
Page 6
... turn off when you set the power switch to use the viewfinder instead of the LCD when recording for more battery power. 1 Make sure that the battery pack is a good idea to CAMERA. even if the battery pack or AC power adapter is removed. 1 The lithium battery for the camcorder lasts about 8~10 months under normal operation from time of installation. 1 When the lithium battery becomes weak or dead, the date/time indicator flashes...
... turn off when you set the power switch to use the viewfinder instead of the LCD when recording for more battery power. 1 Make sure that the battery pack is a good idea to CAMERA. even if the battery pack or AC power adapter is removed. 1 The lithium battery for the camcorder lasts about 8~10 months under normal operation from time of installation. 1 When the lithium battery becomes weak or dead, the date/time indicator flashes...
User Manual (user Manual) (ver.1.0) (English)
Page 7
... very important to view. When playing back the pictures, if they are normal and do not affect the recorded picture in any way. 2) When using high precision technology. ENGLISH Notices regarding video head cleaning 1 To ensure normal recording and clear picture, clean the video heads. If this occurs, use a wet type cassette cleaner. These specks are noisy or hardly visible, the video heads may be some tiny specks (red, blue or green in color...
... very important to view. When playing back the pictures, if they are normal and do not affect the recorded picture in any way. 2) When using high precision technology. ENGLISH Notices regarding video head cleaning 1 To ensure normal recording and clear picture, clean the video heads. If this occurs, use a wet type cassette cleaner. These specks are noisy or hardly visible, the video heads may be some tiny specks (red, blue or green in color...
User Manual (user Manual) (ver.1.0) (English)
Page 9
... and supporting structure, grounding of the lead-in installation such as a bookcase or rack unless proper ventilation is intended to be placed in a built-in wire to an antenna discharge unit, size of grounding to replace your appliance dealer or local power company. A CAMCORDER is provided or the manufacturer's instructions have been adhered to insert the plug fully...
... and supporting structure, grounding of the lead-in installation such as a bookcase or rack unless proper ventilation is intended to be placed in a built-in wire to an antenna discharge unit, size of grounding to replace your appliance dealer or local power company. A CAMCORDER is provided or the manufacturer's instructions have been adhered to insert the plug fully...
User Manual (user Manual) (ver.1.0) (English)
Page 10
.... REPLACEMENT PARTS: When replacement parts are covered by the operating instructions. Unauthorized substitutions may result in fire, electric shock or other electric light or power circuits where it is damaged. This will often require extensive work by a technician before use. 18. When installing an outside antenna system should be taken to qualified service personnel under the following the operating instructions, adjust only those controls that the CAMCORDER...
.... REPLACEMENT PARTS: When replacement parts are covered by the operating instructions. Unauthorized substitutions may result in fire, electric shock or other electric light or power circuits where it is damaged. This will often require extensive work by a technician before use. 18. When installing an outside antenna system should be taken to qualified service personnel under the following the operating instructions, adjust only those controls that the CAMCORDER...
User Manual (user Manual) (ver.1.0) (English)
Page 16
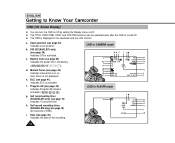
... 34) Indicates zoom position. ENGLISH Getting to Know Your Camcorder OSD (On Screen Display) 1 You can turn the OSD on/off by setting the Display menu on/off. 1 The TITLE, DATE/TIME, EASY and CUSTOM functions can be operated even after the OSD is turned off. 1 The OSD is on. a. Zoom position (see page 40) Indicates manual focus is displayed in PLAYER mode c r q Hi8 PLAY p 0:00:25 o Z.RTN u TITLE CINEMA v TAPE! e.
... 34) Indicates zoom position. ENGLISH Getting to Know Your Camcorder OSD (On Screen Display) 1 You can turn the OSD on/off by setting the Display menu on/off. 1 The TITLE, DATE/TIME, EASY and CUSTOM functions can be operated even after the OSD is turned off. 1 The OSD is on. a. Zoom position (see page 40) Indicates manual focus is displayed in PLAYER mode c r q Hi8 PLAY p 0:00:25 o Z.RTN u TITLE CINEMA v TAPE! e.
User Manual (user Manual) (ver.1.0) (English)
Page 18
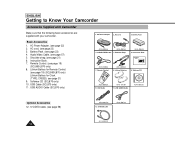
.... (TYPE: CR2025, see page 19) (SCL860/L870 only) 8. USB AUDIO Cable (SCL870 only) AD44-00038A AD39-00028A 4. Remote Control SSTTOAPRT/ TIMSEERLF DISPLAY STILL RETZUERRNO CROESUENTTER WIDE TELE AD63-00202A 8. Software CD (SCL870 only) 10. Lithium Batteries 9. Software CD AD59-00062A 10. USB Cable AD43-10130H 11. AUDIO/VIDEO Cable 5. AC cord 3. USB Cable (SCL870 only) 11. USB AUDIO Cable AD46-00033B Optional Accessories 12. Shoulder Strap AD43-00065A 6. AC Power Adapter 2. Remote Control. (see page 21) 9. Battery...
.... (TYPE: CR2025, see page 19) (SCL860/L870 only) 8. USB AUDIO Cable (SCL870 only) AD44-00038A AD39-00028A 4. Remote Control SSTTOAPRT/ TIMSEERLF DISPLAY STILL RETZUERRNO CROESUENTTER WIDE TELE AD63-00202A 8. Software CD (SCL870 only) 10. Lithium Batteries 9. Software CD AD59-00062A 10. USB Cable AD43-10130H 11. AUDIO/VIDEO Cable 5. AC cord 3. USB Cable (SCL870 only) 11. USB AUDIO Cable AD46-00033B Optional Accessories 12. Shoulder Strap AD43-00065A 6. AC Power Adapter 2. Remote Control. (see page 21) 9. Battery...
User Manual (user Manual) (ver.1.0) (English)
Page 22
... the Lens Cap is turned on regional conditions. 3. Using the AC Power Adapter : used for indoor recording. - a. Move the adapter away from the TV, camcorder or the antenna cable. 22 ENGLISH Preparing Connecting the Power Source 1 There are two ways to the AC cord. 2. Using the Battery Pack: used for outdoor recording. To use the AC Power Adapter 2 1 CAMERA 3 1. Connect the AC Power Adapter to connect power source. - Connect the AC cord to CAMERA mode. Note: The plug and wall socket type may...
... the Lens Cap is turned on regional conditions. 3. Using the AC Power Adapter : used for indoor recording. - a. Move the adapter away from the TV, camcorder or the antenna cable. 22 ENGLISH Preparing Connecting the Power Source 1 There are two ways to the AC cord. 2. Using the Battery Pack: used for outdoor recording. To use the AC Power Adapter 2 1 CAMERA 3 1. Connect the AC Power Adapter to connect power source. - Connect the AC cord to CAMERA mode. Note: The plug and wall socket type may...
User Manual (user Manual) (ver.1.0) (English)
Page 24
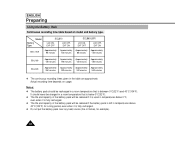
ENGLISH Preparing Using the Battery Pack Continuous recording time table based on usage. Model Battery Type SCL810 LCD ON, EVF OFF LCD OFF, EVF ON SCL860/L870 LCD ON, EVF OFF LCD OFF, EVF ON SB-L110A Approximately Approximately Approximately Approximately 90 minutes 130 minutes 80 ...put the battery pack near any heat source (fire or flames, for example). 24 Actual recording time depends on model and battery type. It should be reduced if the battery pack is between 0°C(32°F) and 40°C(104°F). Notes: 1 The battery pack should never be charged in a...
ENGLISH Preparing Using the Battery Pack Continuous recording time table based on usage. Model Battery Type SCL810 LCD ON, EVF OFF LCD OFF, EVF ON SCL860/L870 LCD ON, EVF OFF LCD OFF, EVF ON SB-L110A Approximately Approximately Approximately Approximately 90 minutes 130 minutes 80 ...put the battery pack near any heat source (fire or flames, for example). 24 Actual recording time depends on model and battery type. It should be reduced if the battery pack is between 0°C(32°F) and 40°C(104°F). Notes: 1 The battery pack should never be charged in a...
User Manual (user Manual) (ver.1.0) (English)
Page 25
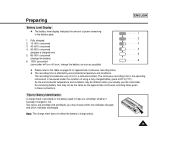
... operating instructions is affected by environmental temperature and conditions. The continuous recording time in a cold environment. Fully charged 2. 10~40% consumed 3 3. 40~60% consumed 4. 60~80% consumed 4 (prepare a charged one indicates charged and which one ) 5. 80~95% consumed 5 (change the battery) 6. 100% consumed 6 (camcorder will turn off soon, change the battery as soon as the approximate continuous recording times given in the battery pack. 1 2 1. Preparing ENGLISH Battery Level Display 1 The battery level display...
... operating instructions is affected by environmental temperature and conditions. The continuous recording time in a cold environment. Fully charged 2. 10~40% consumed 3 3. 40~60% consumed 4. 60~80% consumed 4 (prepare a charged one indicates charged and which one ) 5. 80~95% consumed 5 (change the battery) 6. 100% consumed 6 (camcorder will turn off soon, change the battery as soon as the approximate continuous recording times given in the battery pack. 1 2 1. Preparing ENGLISH Battery Level Display 1 The battery level display...
User Manual (user Manual) (ver.1.0) (English)
Page 33
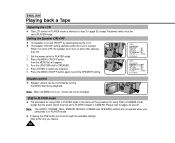
... (PLAY/STILL) button again. REW FF 33 s Volume display will automatically disappear 2 seconds after adjusting. Picture Search s Keep pressing (FF) or (REW) button during playback. PLAY/STILL Viewing a Still Picture s Press (PLAY/STILL) button during playback. Basic Recording ENGLISH Adjusting the LCD during PLAY The LCD adjustment method in speaker causes screen disturbance. Controlling the Sound from the Speaker 1 When you use the LCD monitor while playing back, you close the LCD monitor, the LCD monitor and Speaker are turned...
... (PLAY/STILL) button again. REW FF 33 s Volume display will automatically disappear 2 seconds after adjusting. Picture Search s Keep pressing (FF) or (REW) button during playback. PLAY/STILL Viewing a Still Picture s Press (PLAY/STILL) button during playback. Basic Recording ENGLISH Adjusting the LCD during PLAY The LCD adjustment method in speaker causes screen disturbance. Controlling the Sound from the Speaker 1 When you use the LCD monitor while playing back, you close the LCD monitor, the LCD monitor and Speaker are turned...

User Manual (user Manual) (ver.1.0) (English)
Page 47
... START/STOP button to record the DATE/TIME on your date and time settings are not maintained in the camcorder, it to be reset will then be turned off in EASY or CUSTOM mode. Turn the UP/DOWN dial to be reset will disappear. Press ENTER. Press ENTER after setting the minute and the clock setting screen will blink. 8. Press the DATE/TIME button the required number of times. s The DATE/TIME function cannot be displayed. s The...
... START/STOP button to record the DATE/TIME on your date and time settings are not maintained in the camcorder, it to be reset will then be turned off in EASY or CUSTOM mode. Turn the UP/DOWN dial to be reset will disappear. Press ENTER. Press ENTER after setting the minute and the clock setting screen will blink. 8. Press the DATE/TIME button the required number of times. s The DATE/TIME function cannot be displayed. s The...
User Manual (user Manual) (ver.1.0) (English)
Page 49
... picture. Press ENTER to change TITLE recording time, select title recording time (OFF, AUTO-10S, CONTINUE) on the screen for 2 ~ 3 seconds and will not operate in the language you have selected a TITLE from ENGLISH/FRENCH/ GERMAN/ITALIAN/SPANISH/RUSSIAN. 7. s The selected title will appear on MENU. Press MENU. 3. s If you desire. 9. s You may select languages from the TITLE list. 1. Press ENTER. s Open the LCD monitor and adjust...
... picture. Press ENTER to change TITLE recording time, select title recording time (OFF, AUTO-10S, CONTINUE) on the screen for 2 ~ 3 seconds and will not operate in the language you have selected a TITLE from ENGLISH/FRENCH/ GERMAN/ITALIAN/SPANISH/RUSSIAN. 7. s The selected title will appear on MENU. Press MENU. 3. s If you desire. 9. s You may select languages from the TITLE list. 1. Press ENTER. s Open the LCD monitor and adjust...
User Manual (user Manual) (ver.1.0) (English)
Page 53
... ( ): Controls WHITE BALANCE according to CAMERA mode. 2. Set the power switch to the indoor ambience. - Press ENTER. s You can set it to the outdoor ambience. Press the MENU ON/OFF button, then the MENU list will not operate in any recording condition. 1 You may select the appropriate WHITE BALANCE mode to obtain good image color quality. - MENU LCD ADJUST DIS OFF D.ZOOM OFF PIP OFF DISPLAY ON WHITE BAL ..........AUTO WL REMOCON ....ON EXIT: MENU MENU LCD ADJUST DIS OFF D.ZOOM...
... ( ): Controls WHITE BALANCE according to CAMERA mode. 2. Set the power switch to the indoor ambience. - Press ENTER. s You can set it to the outdoor ambience. Press the MENU ON/OFF button, then the MENU list will not operate in any recording condition. 1 You may select the appropriate WHITE BALANCE mode to obtain good image color quality. - MENU LCD ADJUST DIS OFF D.ZOOM OFF PIP OFF DISPLAY ON WHITE BAL ..........AUTO WL REMOCON ....ON EXIT: MENU MENU LCD ADJUST DIS OFF D.ZOOM...
User Manual (user Manual) (ver.1.0) (English)
Page 60
... power switch must be set to OFF, the speaker won't turn on , volume will not operate when your camcorder is on even after opening /closing the LCD. 1 The speaker ON/OFF setting operates when the LCD is opened. Please refer to PLAYER mode. ENGLISH Playing back a Tape Adjusting the LCD 1 The LCD control in PLAYER mode is identical to step 3 of CAMERA. Setting the Speaker ON/OFF 1 The speaker is turned ON/OFF by turning the MENU...
... power switch must be set to OFF, the speaker won't turn on , volume will not operate when your camcorder is on even after opening /closing the LCD. 1 The speaker ON/OFF setting operates when the LCD is opened. Please refer to PLAYER mode. ENGLISH Playing back a Tape Adjusting the LCD 1 The LCD control in PLAYER mode is identical to step 3 of CAMERA. Setting the Speaker ON/OFF 1 The speaker is turned ON/OFF by turning the MENU...
User Manual (user Manual) (ver.1.0) (English)
Page 62
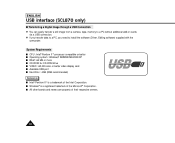
...-ROM drive s VIDEO : 65,000-color or better video display card s Available USB port s Hard Disc : 4GB (8GB recommended) Reference s Intel® Pentium IITM is a registered trademark of the Intel Corporation. s All other brands and names are property of their respective owners. 62 ENGLISH USB interface (SCL870 only) q Transferring a Digital Image through a USB Connection 1 You can easily transfer a still image from a camera, tape, memory to a PC without additional add-on cards via a USB connection. 1 If you transfer data...
...-ROM drive s VIDEO : 65,000-color or better video display card s Available USB port s Hard Disc : 4GB (8GB recommended) Reference s Intel® Pentium IITM is a registered trademark of the Intel Corporation. s All other brands and names are property of their respective owners. 62 ENGLISH USB interface (SCL870 only) q Transferring a Digital Image through a USB Connection 1 You can easily transfer a still image from a camera, tape, memory to a PC without additional add-on cards via a USB connection. 1 If you transfer data...

User Manual (user Manual) (ver.1.0) (English)
Page 64
....) 64 The user's manual can be viewed using Acrobat Reader software, which is also included on the CD. (The Acrobat Reader is completed. 8. The below window displays the folder to PC. 6. 6. Connect the camcorder to install the program. 4. Reference s USB Media 2.0 User's Manual is installed in Adobe's Portable Document Format (PDF). PC finds a new hardware and install a driver automatically. 7. ENGLISH USB interface (SCL870 only) 4. C:\Programfiles\Samsung\USB Media 2.0 s Click to change the folder. 5. Execute USB Media 2.0 player...
....) 64 The user's manual can be viewed using Acrobat Reader software, which is also included on the CD. (The Acrobat Reader is completed. 8. The below window displays the folder to PC. 6. 6. Connect the camcorder to install the program. 4. Reference s USB Media 2.0 User's Manual is installed in Adobe's Portable Document Format (PDF). PC finds a new hardware and install a driver automatically. 7. ENGLISH USB interface (SCL870 only) 4. C:\Programfiles\Samsung\USB Media 2.0 s Click to change the folder. 5. Execute USB Media 2.0 player...
User Manual (user Manual) (ver.1.0) (English)
Page 69
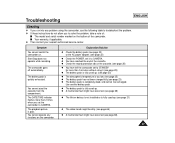
... AC power adapter. (see page 66) x A mechanical fault might have reached the end of the camcorder. The DATE/TIME indicator flashes more than 2 times when you to CAMERA. Use another battery pack. The battery pack is poor. x The battery pack is fully used up . Troubleshooting ENGLISH Checking 1 If you run into any functions on the camcorder. You cannot operate any problem using it to solve the problem, take a note of: s The model and serial number...
... AC power adapter. (see page 66) x A mechanical fault might have reached the end of the camcorder. The DATE/TIME indicator flashes more than 2 times when you to CAMERA. Use another battery pack. The battery pack is poor. x The battery pack is fully used up . Troubleshooting ENGLISH Checking 1 If you run into any functions on the camcorder. You cannot operate any problem using it to solve the problem, take a note of: s The model and serial number...
User Manual (user Manual) (ver.1.0) (English)
Page 72
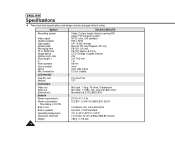
... Video out Audio out External mic General Power requirements Power consumption *Recording, LCD ON Built-in mic Built-in speaker Operating temperature Dimension (WxHxD) Weight SCL810/L860/L870 Video: 2 rotary heads Helical scanning FM Audio: FM monaural system NTSC color, EIA standard Hi8 or 8mm SP: 14.345 mm/sec Record: SP only Playback: SP only P6-120: 120 min. CCD (Charge Coupled Device) 22x 3.6~79.2 mm 1.6 46 mm Inner Auto...
... Video out Audio out External mic General Power requirements Power consumption *Recording, LCD ON Built-in mic Built-in speaker Operating temperature Dimension (WxHxD) Weight SCL810/L860/L870 Video: 2 rotary heads Helical scanning FM Audio: FM monaural system NTSC color, EIA standard Hi8 or 8mm SP: 14.345 mm/sec Record: SP only Playback: SP only P6-120: 120 min. CCD (Charge Coupled Device) 22x 3.6~79.2 mm 1.6 46 mm Inner Auto...


