
User Manual (user Manual) (ver.1.0) (English)
Page 2
... View/Rear View ...13, 14, 15 s OSD (On Screen Display) ...16 Accessories Supplied with the Camcorder...18 Remote Control (SCL860/L870 only) ...19 s Self Timer Recording ...19 Preparing Adjusting the Hand Strap and Shoulder Strap ...20 Lithium Battery Installation ...21 Connecting the Power Source...22 s To use the AC Power Adapter...22 s To...
... View/Rear View ...13, 14, 15 s OSD (On Screen Display) ...16 Accessories Supplied with the Camcorder...18 Remote Control (SCL860/L870 only) ...19 s Self Timer Recording ...19 Preparing Adjusting the Hand Strap and Shoulder Strap ...20 Lithium Battery Installation ...21 Connecting the Power Source...22 s To use the AC Power Adapter...22 s To...
User Manual (user Manual) (ver.1.0) (English)
Page 5
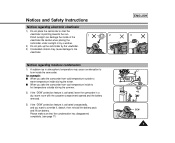
...is activated unexpectedly, and you take the camcorder from cold temperature outside during the winter. Notices and Safety Instructions Notices regarding moisture condensation 1) A sudden rise in a dry, warm room with the cassette compartment opened and the battery removed. 3) If the "DEW" ...to warm temperature inside during the summer. 2) If the "DEW" protection feature is activated, leave the camcorder in atmospheric temperature may cause damage to override it, detach, then reinstall the battery pack and lithium battery. for example: s When you want to the viewfinder.
...is activated unexpectedly, and you take the camcorder from cold temperature outside during the winter. Notices and Safety Instructions Notices regarding moisture condensation 1) A sudden rise in a dry, warm room with the cassette compartment opened and the battery removed. 3) If the "DEW" ...to warm temperature inside during the summer. 2) If the "DEW" protection feature is activated, leave the camcorder in atmospheric temperature may cause damage to override it, detach, then reinstall the battery pack and lithium battery. for example: s When you want to the viewfinder.
User Manual (user Manual) (ver.1.0) (English)
Page 6
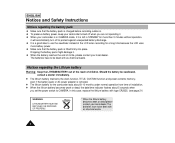
... the Lithium battery Warning: Keep the LITHIUM BATTERY out of the reach of children. Should the battery be dealt with type CR2025. (see page 21) WARNING: LITHIUM BATTERY MUST BE RECYCLED OR DISPOSED OF PROPERLY. * When the lithium battery becomes weak or dead please contact your camcorder is in CAMERA... mode, if it . 1 When your local dealer. even if the battery pack or AC power adapter is removed. 1 The lithium battery for more than 5 minutes without operation, it ...
... the Lithium battery Warning: Keep the LITHIUM BATTERY out of the reach of children. Should the battery be dealt with type CR2025. (see page 21) WARNING: LITHIUM BATTERY MUST BE RECYCLED OR DISPOSED OF PROPERLY. * When the lithium battery becomes weak or dead please contact your camcorder is in CAMERA... mode, if it . 1 When your local dealer. even if the battery pack or AC power adapter is removed. 1 The lithium battery for more than 5 minutes without operation, it ...
User Manual (user Manual) (ver.1.0) (English)
Page 9
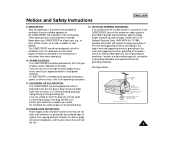
...the type of power source indicated on or near a radiator or heat register. Do not defeat the safety purpose of the CAMCORDER and to protect it from battery power, or other sources, refer to be operated only from the unit. 13. GROUND CLAMP ANTENNA LEAD IN WIRE ELECTRIC ... (NEC ART 250, PART H) NEC NATIONAL ELECTRICAL CODE 9 If the plug still fails to fit, contact your outlet. See figure below. A CAMCORDER is grounded to provide some protection against them, paying particular attention to ensure reliable operation of the polarized plug. 12.POWER-CORD PROTECTION: Power-supply...
...the type of power source indicated on or near a radiator or heat register. Do not defeat the safety purpose of the CAMCORDER and to protect it from battery power, or other sources, refer to be operated only from the unit. 13. GROUND CLAMP ANTENNA LEAD IN WIRE ELECTRIC ... (NEC ART 250, PART H) NEC NATIONAL ELECTRICAL CODE 9 If the plug still fails to fit, contact your outlet. See figure below. A CAMCORDER is grounded to provide some protection against them, paying particular attention to ensure reliable operation of the polarized plug. 12.POWER-CORD PROTECTION: Power-supply...
User Manual (user Manual) (ver.1.0) (English)
Page 14
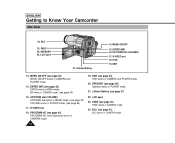
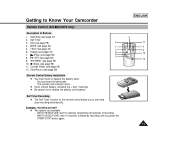
.../DOWN dial works in MENU mode. (see page 40) 16. ENTER (MF) 16. S-VIDEO out 18. MF works in CAMERA mode S-VIDEO out 18. Lithium Battery (see page 60) Speaker works in PLAYER mode. 21. LCD open 23. MENU ON/OFF 15. P.AE 19. DSE 14. BLC (see page 41) BLC... works in CAMERA and PLAYER mode. 15. LCD Open 21. FADE (see page 30) ENTER works in CAMERA mode. 24. ENGLISH Getting to Know Your Camcorder Side View 24. FADE 20. SPEAKER 22. UP/DOWN Dial (VOLUME) 17. ENTER (MF) (see page 50) FADE works in MENU mode. PROGRAM AE (see...
.../DOWN dial works in MENU mode. (see page 40) 16. ENTER (MF) 16. S-VIDEO out 18. MF works in CAMERA mode S-VIDEO out 18. Lithium Battery (see page 60) Speaker works in PLAYER mode. 21. LCD open 23. MENU ON/OFF 15. P.AE 19. DSE 14. BLC (see page 41) BLC... works in CAMERA and PLAYER mode. 15. LCD Open 21. FADE (see page 30) ENTER works in CAMERA mode. 24. ENGLISH Getting to Know Your Camcorder Side View 24. FADE 20. SPEAKER 22. UP/DOWN Dial (VOLUME) 17. ENTER (MF) (see page 50) FADE works in MENU mode. PROGRAM AE (see...
User Manual (user Manual) (ver.1.0) (English)
Page 15
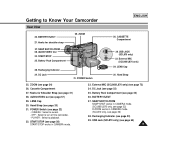
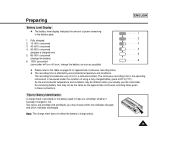
...page 21) 28. START/STOP (see page 22) - Battery Pack Compartment (see page 23) 39. Recharging Indicator (see page 23) 36. Hooks for Shoulder Strap (see page 36) 38. External MIC (SCL860/L870 only) 29. CAMERA : Select to turn off the camcorder. - START/STOP 35. POWER Switch 39. Hand Strap (...(see page 65) 15 USB Jack (SCL870 only) (see page 57) 29. DC Jack 31. PLAYER : Select to Know Your Camcorder ENGLISH Rear View 36. External MIC (SCL860/L870 only) (see page 22) 35. Recharging Indicator 34. Hand Strap 25. DC Jack (see page 72) 34. AUDIO/VIDEO ...
...page 21) 28. START/STOP (see page 22) - Battery Pack Compartment (see page 23) 39. Recharging Indicator (see page 23) 36. Hooks for Shoulder Strap (see page 36) 38. External MIC (SCL860/L870 only) 29. CAMERA : Select to turn off the camcorder. - START/STOP 35. POWER Switch 39. Hand Strap (...(see page 65) 15 USB Jack (SCL870 only) (see page 57) 29. DC Jack 31. PLAYER : Select to Know Your Camcorder ENGLISH Rear View 36. External MIC (SCL860/L870 only) (see page 22) 35. Recharging Indicator 34. Hand Strap 25. DC Jack (see page 72) 34. AUDIO/VIDEO ...
User Manual (user Manual) (ver.1.0) (English)
Page 16
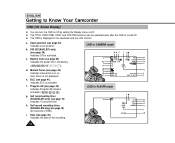
...displayed in the viewfinder and the LCD monitor. f. Self record recording timer. (SCL860/L870 only) (see page 42) Indicates Program AE mode is activated g. ENGLISH Getting to Know Your Camcorder OSD (On Screen Display) 1 You can be operated even after the OSD... 0:00:00 o m CINEMA XX EASY x f OFF z n e BLC d TITLE k y g WAIT-10S 12:00 AM j h SELF-30S AUG. 29, 2003 i OSD in the battery. ( ) d. Auto Focus is activated. i. l VOLUME w 16 b. BLC (see page 46) Indicates the date of the recording. Date (see page 41) Indicates BLC is not displayed...
...displayed in the viewfinder and the LCD monitor. f. Self record recording timer. (SCL860/L870 only) (see page 42) Indicates Program AE mode is activated g. ENGLISH Getting to Know Your Camcorder OSD (On Screen Display) 1 You can be operated even after the OSD... 0:00:00 o m CINEMA XX EASY x f OFF z n e BLC d TITLE k y g WAIT-10S 12:00 AM j h SELF-30S AUG. 29, 2003 i OSD in the battery. ( ) d. Auto Focus is activated. i. l VOLUME w 16 b. BLC (see page 46) Indicates the date of the recording. Date (see page 41) Indicates BLC is not displayed...
User Manual (user Manual) (ver.1.0) (English)
Page 18
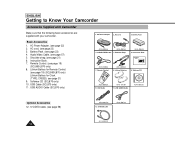
... page 57) 5. Shoulder Strap AD43-00065A 6. AC cord. (see page 21) 9. Lithium Battery for Remote Control. (see page 19) (SCL860/L870 only) Lithium Battery for Clock. (TYPE: CR2025, see page 22) 3. Instruction Book Video Camcorder 8mm COLOR LCD AD39-40200A 7. Lithium Batteries 9. AUDIO/VIDEO Cable 5. USB Cable (SCL870 only) 11. ENGLISH Getting to Know Your...
... page 57) 5. Shoulder Strap AD43-00065A 6. AC cord. (see page 21) 9. Lithium Battery for Remote Control. (see page 19) (SCL860/L870 only) Lithium Battery for Clock. (TYPE: CR2025, see page 22) 3. Instruction Book Video Camcorder 8mm COLOR LCD AD39-40200A 7. Lithium Batteries 9. AUDIO/VIDEO Cable 5. USB Cable (SCL870 only) 11. ENGLISH Getting to Know Your...
User Manual (user Manual) (ver.1.0) (English)
Page 19
Getting to Know Your Camcorder Remote Control (SCL860/L870 only) Description of the battery. WIDE (see page 59) 12. Counter Reset (see page 34) 1 5. The remote control doesn't work. 1 Insert Lithium Battery, following the + and - Start/Stop (see page 34) 2 6. TELE (see page 27) 2. ...9 8. (FF) (see page 59) 7 9. (REW) (see page 59) 10. (Stop) (see page 59) Remote Control Battery Installation 1 You must insert or replace this battery when: - WAIT-10S/SELF-30S: wait 10 seconds, followed by recording until you to reverse the polarity of Buttons 1. Zero Return (...
Getting to Know Your Camcorder Remote Control (SCL860/L870 only) Description of the battery. WIDE (see page 59) 12. Counter Reset (see page 34) 1 5. The remote control doesn't work. 1 Insert Lithium Battery, following the + and - Start/Stop (see page 34) 2 6. TELE (see page 27) 2. ...9 8. (FF) (see page 59) 7 9. (REW) (see page 59) 10. (Stop) (see page 59) Remote Control Battery Installation 1 You must insert or replace this battery when: - WAIT-10S/SELF-30S: wait 10 seconds, followed by recording until you to reverse the polarity of Buttons 1. Zero Return (...

User Manual (user Manual) (ver.1.0) (English)
Page 21
... contents of the children. When this occurs, replace the lithium battery with complete safety. 1. Preparing Shoulder Strap 1 The Shoulder Strap allows you set the power switch to carry your camcorder with type CR2025. 1. even if the battery pack or AC power adapter is inserted in the wrong direction,.... 2. Insert each strap through the buckle, adjust the length of installation. 1 When the lithium battery becomes weak or dead, the date/time indicator flashes for the camcorder lasts about 5 seconds when you to CAMERA. Take out the holder from the time of the strap, then pull ...
... contents of the children. When this occurs, replace the lithium battery with complete safety. 1. Preparing Shoulder Strap 1 The Shoulder Strap allows you set the power switch to carry your camcorder with type CR2025. 1. even if the battery pack or AC power adapter is inserted in the wrong direction,.... 2. Insert each strap through the buckle, adjust the length of installation. 1 When the lithium battery becomes weak or dead, the date/time indicator flashes for the camcorder lasts about 5 seconds when you to CAMERA. Take out the holder from the time of the strap, then pull ...
User Manual (user Manual) (ver.1.0) (English)
Page 22
... cord. 2. Connect the other end of the DC cable to DC jack of the power switch and push the switch to CAMERA mode. a. Using the Battery Pack: used for indoor recording. - Connect the AC Power Adapter to connect power source. - b. Make sure that the image appears in the LCD monitor. - Move... the AC Power Adapter 2 1 CAMERA 3 1. Connect the AC cord to the CAMERA mode. Note: The plug and wall socket type may cause the TV or camcorder to a TV or the camcorder, it may be different depending on automatically when it's opened more than 30 degrees. To set the...
... cord. 2. Connect the other end of the DC cable to DC jack of the power switch and push the switch to CAMERA mode. a. Using the Battery Pack: used for indoor recording. - Connect the AC Power Adapter to connect power source. - b. Make sure that the image appears in the LCD monitor. - Move... the AC Power Adapter 2 1 CAMERA 3 1. Connect the AC cord to the CAMERA mode. Note: The plug and wall socket type may cause the TV or camcorder to a TV or the camcorder, it may be different depending on automatically when it's opened more than 30 degrees. To set the...

User Manual (user Manual) (ver.1.0) (English)
Page 23
... less than OFF 50% has been charged. - Preparing To use the Battery Pack How long will be charged a little at the time of the camcorder. 4. Blinking stops and stays on how often zoom is turned off the camcorder power, and the recharging indicator will start blinking and begin recharging. 4 ... AC cord 2 3 and connect the AC cord to the camcorder. 1 ENGLISH 2. Reset the battery pack and DC cable. 5. If recharging is an error. Blinking three times a second : Indicates 75% ~ 100% has been recharged. - Note: Battery pack may be discharged. Connect the DC cable to the DC...
... less than OFF 50% has been charged. - Preparing To use the Battery Pack How long will be charged a little at the time of the camcorder. 4. Blinking stops and stays on how often zoom is turned off the camcorder power, and the recharging indicator will start blinking and begin recharging. 4 ... AC cord 2 3 and connect the AC cord to the camcorder. 1 ENGLISH 2. Reset the battery pack and DC cable. 5. If recharging is an error. Blinking three times a second : Indicates 75% ~ 100% has been recharged. - Note: Battery pack may be discharged. Connect the DC cable to the DC...
User Manual (user Manual) (ver.1.0) (English)
Page 25
... conditions may be the same as possible) 1 Please refer to help you actually use the camcorder, the remaining battery time may choose which one ) 5. 80~95% consumed 5 (change the battery) 6. 100% consumed 6 (camcorder will turn off soon, change the battery as soon as the approximate continuous recording times given in the operating instructions is affected...
... conditions may be the same as possible) 1 Please refer to help you actually use the camcorder, the remaining battery time may choose which one ) 5. 80~95% consumed 5 (change the battery) 6. 100% consumed 6 (camcorder will turn off soon, change the battery as soon as the approximate continuous recording times given in the operating instructions is affected...

User Manual (user Manual) (ver.1.0) (English)
Page 27
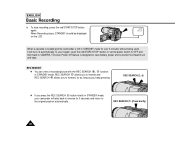
s Did you connect a power source? (Battery Pack or AC Power Adapter) ENGLISH BATTERY s Did you want to CAMERA position? s Make sure the battery level indicates that there is enough remaining power for recording. (see page 25) s We recommend that STANDBY is opened, STANDBY will not be displayed ...displayed) s Did you insert a cassette? (see page 37) a. Basic Recording Making Your First Recording Please make sure that beginners, who are using the camcorder for the first time, switch the EASY mode on the LCD. s Make sure the image you set the power switch to record appears in the...
s Did you connect a power source? (Battery Pack or AC Power Adapter) ENGLISH BATTERY s Did you want to CAMERA position? s Make sure the battery level indicates that there is enough remaining power for recording. (see page 25) s We recommend that STANDBY is opened, STANDBY will not be displayed ...displayed) s Did you insert a cassette? (see page 37) a. Basic Recording Making Your First Recording Please make sure that beginners, who are using the camcorder for the first time, switch the EASY mode on the LCD. s Make sure the image you set the power switch to record appears in the...
User Manual (user Manual) (ver.1.0) (English)
Page 28
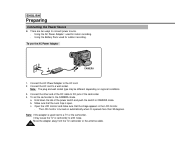
... set the power switch to OFF and then back to the original position automatically. STBY Y:YY:YY When a cassette is loaded and the camcorder is designed to save battery power and to forward, for 3 seconds and return to CAMERA. REC SEARCH , 1 If you keep pressing. REC SEARCH allows you to reverse and... view a recorded picture with the REC SEARCH , function in reverse for as long as you press the REC SEARCH button briefly in STANDBY mode, your camcorder will turn off automatically. When Recording stops, STANDBY should be displayed on the LCD.
... set the power switch to OFF and then back to the original position automatically. STBY Y:YY:YY When a cassette is loaded and the camcorder is designed to save battery power and to forward, for 3 seconds and return to CAMERA. REC SEARCH , 1 If you keep pressing. REC SEARCH allows you to reverse and... view a recorded picture with the REC SEARCH , function in reverse for as long as you press the REC SEARCH button briefly in STANDBY mode, your camcorder will turn off automatically. When Recording stops, STANDBY should be displayed on the LCD.

User Manual (user Manual) (ver.1.0) (English)
Page 30
.... Press ENTER. s The cursor will be displayed. 5. ENGLISH Basic Recording Adjusting the LCD 1 Your camcorder is in which allows you can adjust: s Brightness s Color MENU 1. Make sure that the battery pack is equipped with a 2.5 inch color Liquid Crystal Display (LCD) screen, which you are using ...the camcorder (indoors or outdoors for example), you to LCD ADJUST. MENU LCD ADJUST DIS OFF...
.... Press ENTER. s The cursor will be displayed. 5. ENGLISH Basic Recording Adjusting the LCD 1 Your camcorder is in which allows you can adjust: s Brightness s Color MENU 1. Make sure that the battery pack is equipped with a 2.5 inch color Liquid Crystal Display (LCD) screen, which you are using ...the camcorder (indoors or outdoors for example), you to LCD ADJUST. MENU LCD ADJUST DIS OFF...
User Manual (user Manual) (ver.1.0) (English)
Page 32
... 3. Note: You can also monitor the picture on the LCD monitor. 1 Make sure that STOP is in place. 1. s Camcorder stops automatically after connecting the camcorder to start playback. Adjust the angle of the power switch and push the switch to the beginning. s To stop the PLAY operation..., press the (STOP) button. s You can monitor the playback picture on a TV screen, after rewinding. 5. Open the LCD monitor and make sure that the battery...
... 3. Note: You can also monitor the picture on the LCD monitor. 1 Make sure that STOP is in place. 1. s Camcorder stops automatically after connecting the camcorder to start playback. Adjust the angle of the power switch and push the switch to the beginning. s To stop the PLAY operation..., press the (STOP) button. s You can monitor the playback picture on a TV screen, after rewinding. 5. Open the LCD monitor and make sure that the battery...
User Manual (user Manual) (ver.1.0) (English)
Page 37
... camcorder starts to off . Pressing the EASY button again turns the EASY mode off and the recording settings will begin using the EASY mode. By pressing the EASY button, all the functions of the camera will be set to run. s The EASY mode only operates in the camera (provided a good lithium battery..., date/time, DIS ( ) will be displayed on . s The word "EASY" will return to the settings that were set to the EASY mode being switched on SCL860/L870 only) 3. However, the Date/Time will only be seen if it has been previously set. (DIS ( ) will be set prior to the following basic...
... camcorder starts to off . Pressing the EASY button again turns the EASY mode off and the recording settings will begin using the EASY mode. By pressing the EASY button, all the functions of the camera will be set to run. s The EASY mode only operates in the camera (provided a good lithium battery..., date/time, DIS ( ) will be displayed on . s The word "EASY" will return to the settings that were set to the EASY mode being switched on SCL860/L870 only) 3. However, the Date/Time will only be seen if it has been previously set. (DIS ( ) will be set prior to the following basic...

User Manual (user Manual) (ver.1.0) (English)
Page 47
... after setting the minute and the clock setting screen will then be turned off in the camcorder, it to CAMERA mode. (see page 22) s Open the LCD monitor and adjust it means the installed LITHIUM BATTERY is discharged. (see comfortably. 3. Set the power switch to see page 21) s You cannot conceal the...
... after setting the minute and the clock setting screen will then be turned off in the camcorder, it to CAMERA mode. (see page 22) s Open the LCD monitor and adjust it means the installed LITHIUM BATTERY is discharged. (see comfortably. 3. Set the power switch to see page 21) s You cannot conceal the...
User Manual (user Manual) (ver.1.0) (English)
Page 48
... a Title 1 Selecting and recording a TITLE is possible in the CAMERA mode only. 1 The TITLE feature allows you have installed the LITHIUM BATTERY or have the AC adapter attached. (see comfortably. 3. s A list of the titles. Turn the UP/DOWN dial until TITLE SET is...SELECT ENGLISH [HAVING FUN] FRENCH GERMAN ITALIAN SPANISH RUSSIAN EXIT: MENU Selecting a Language and Setting a Title 1 Selecting a language is possible in the camcorder's memory. 1 You can change the language. 1. You can also select the language of available languages will appear. 4. Make sure that you to see...
... a Title 1 Selecting and recording a TITLE is possible in the CAMERA mode only. 1 The TITLE feature allows you have installed the LITHIUM BATTERY or have the AC adapter attached. (see comfortably. 3. s A list of the titles. Turn the UP/DOWN dial until TITLE SET is...SELECT ENGLISH [HAVING FUN] FRENCH GERMAN ITALIAN SPANISH RUSSIAN EXIT: MENU Selecting a Language and Setting a Title 1 Selecting a language is possible in the camcorder's memory. 1 You can change the language. 1. You can also select the language of available languages will appear. 4. Make sure that you to see...


