

User Manual (user Manual) (ver.1.0) (English)
Page 1
ENGLISH Video Camcorder 8mm COLOR LCD SCL810/L860/L870 Hi SCL810/L860/L870 SSTTOAPRT/ TIMSEELRF STIDLLISPRLEATZYUERRON CROESUENTTER WIDE TELE Owner's Instruction Book Before operating the unit, please read this instruction book thoroughly, and retain it for future reference. ELECTRONICS US
ENGLISH Video Camcorder 8mm COLOR LCD SCL810/L860/L870 Hi SCL810/L860/L870 SSTTOAPRT/ TIMSEELRF STIDLLISPRLEATZYUERRON CROESUENTTER WIDE TELE Owner's Instruction Book Before operating the unit, please read this instruction book thoroughly, and retain it for future reference. ELECTRONICS US
User Manual (user Manual) (ver.1.0) (English)
Page 2
... ...12 Descriptions s Front View/Side View/Rear View ...13, 14, 15 s OSD (On Screen Display) ...16 Accessories Supplied with the Camcorder...18 Remote Control (SCL860/L870 only) ...19 s Self Timer Recording ...19 Preparing Adjusting the Hand Strap and Shoulder Strap ...20 Lithium Battery Installation ...21 Connecting the Power Source...22 s ... Zooming In and Out ...34 Digital Zoom ...35 EASY mode (for beginners) ...37 CUSTOM-Creating your own customized recording settings...38 DIS (Digital Image Stabilizer, SCL860/L870 only) ...39 MF/AF (Manual Focus/Auto Focus)...40 BLC...41 2
... ...12 Descriptions s Front View/Side View/Rear View ...13, 14, 15 s OSD (On Screen Display) ...16 Accessories Supplied with the Camcorder...18 Remote Control (SCL860/L870 only) ...19 s Self Timer Recording ...19 Preparing Adjusting the Hand Strap and Shoulder Strap ...20 Lithium Battery Installation ...21 Connecting the Power Source...22 s ... Zooming In and Out ...34 Digital Zoom ...35 EASY mode (for beginners) ...37 CUSTOM-Creating your own customized recording settings...38 DIS (Digital Image Stabilizer, SCL860/L870 only) ...39 MF/AF (Manual Focus/Auto Focus)...40 BLC...41 2
User Manual (user Manual) (ver.1.0) (English)
Page 3
......44 Setting and Recording DATE/TIME ...46 Selecting and Recording a Title ...48 Fade In and Out ...50 PIP (SCL860/L870 only)...51 Snap Shot (SCL860/L870 only) ...52 White Balance ...53 Demonstration ...54 Setting the Date/Title color...55 Lighting Techniques...56 Playing back... Media 2.0 Program ...63 Maintenance Cleaning and Taking care of the Camcorder...66 s Cleaning the Viewfinder ...66 s Cleaning the LCD Panel...66 s Cleaning the Video Heads ...66 s Storing the Camcorder...66 Using Your Camcorder Abroad...67 Troubleshooting Self Diagnosis Display ...68 Checking...69 Moisture Condensation ...
......44 Setting and Recording DATE/TIME ...46 Selecting and Recording a Title ...48 Fade In and Out ...50 PIP (SCL860/L870 only)...51 Snap Shot (SCL860/L870 only) ...52 White Balance ...53 Demonstration ...54 Setting the Date/Title color...55 Lighting Techniques...56 Playing back... Media 2.0 Program ...63 Maintenance Cleaning and Taking care of the Camcorder...66 s Cleaning the Viewfinder ...66 s Cleaning the LCD Panel...66 s Cleaning the Video Heads ...66 s Storing the Camcorder...66 Using Your Camcorder Abroad...67 Troubleshooting Self Diagnosis Display ...68 Checking...69 Moisture Condensation ...
User Manual (user Manual) (ver.1.0) (English)
Page 4
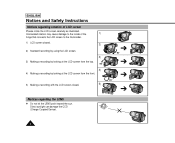
... can damage the CCD (Charge Coupled Device). 4 Unintended rotation may cause damage to the inside of the 1) hinge that connects the LCD screen to the Camcorder. 1) LCD screen closed. 2) 2) Standard recording by using the LCD screen. 3) 3) Making a recording by looking at the LCD screen from the top. 90° 4) 4) Making a recording...
... can damage the CCD (Charge Coupled Device). 4 Unintended rotation may cause damage to the inside of the 1) hinge that connects the LCD screen to the Camcorder. 1) LCD screen closed. 2) 2) Standard recording by using the LCD screen. 3) 3) Making a recording by looking at the LCD screen from the top. 90° 4) 4) Making a recording...
User Manual (user Manual) (ver.1.0) (English)
Page 5
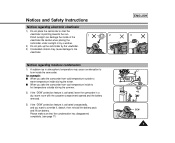
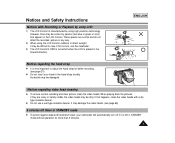
... inside to hot temperature outside to warm temperature inside of the viewfinder. Notices regarding electronic viewfinder 1) Do not place the camcorder so that the condensation has disappeared completely. (see page 71) ENGLISH 3 DEW 5 Please make sure that the viewfinder ...during the summer. 2) If the "DEW" protection feature is activated, leave the camcorder in atmospheric temperature may cause damage to the viewfinder. for example: s When you take the camcorder from cold temperature outside during the winter. Notices and Safety Instructions Notices regarding moisture...
... inside to hot temperature outside to warm temperature inside of the viewfinder. Notices regarding electronic viewfinder 1) Do not place the camcorder so that the condensation has disappeared completely. (see page 71) ENGLISH 3 DEW 5 Please make sure that the viewfinder ...during the summer. 2) If the "DEW" protection feature is activated, leave the camcorder in atmospheric temperature may cause damage to the viewfinder. for example: s When you take the camcorder from cold temperature outside during the winter. Notices and Safety Instructions Notices regarding moisture...
User Manual (user Manual) (ver.1.0) (English)
Page 6
...sure that the battery pack is charged before recording outdoors. 1 To preserve battery power, keep your camcorder turned off to protect against unexpected battery discharge. 1 It is left in STANDBY for the camcorder lasts about 8~10 months under normal operation from time of installation. 1 When the lithium battery becomes... weak or dead, the date/time indicator flashes about 5 seconds when you are not operating it. 1 When your camcorder is in CAMERA mode, if it is a good idea to be dealt with type CR2025. (see page 21) WARNING: LITHIUM BATTERY MUST BE ...
...sure that the battery pack is charged before recording outdoors. 1 To preserve battery power, keep your camcorder turned off to protect against unexpected battery discharge. 1 It is left in STANDBY for the camcorder lasts about 8~10 months under normal operation from time of installation. 1 When the lithium battery becomes... weak or dead, the date/time indicator flashes about 5 seconds when you are not operating it. 1 When your camcorder is in CAMERA mode, if it is a good idea to be dealt with type CR2025. (see page 21) WARNING: LITHIUM BATTERY MUST BE ...
User Manual (user Manual) (ver.1.0) (English)
Page 7
..., your hand in the hand strap forcibly, the buckle may be damaged. It may damage the video heads. (see page 20) 1 Do not insert your camcorder will automatically turn off if it may be difficult to adjust the hand strap for more than 5 minutes. 7 When playing back the pictures, if they...
..., your hand in the hand strap forcibly, the buckle may be damaged. It may damage the video heads. (see page 20) 1 Do not insert your camcorder will automatically turn off if it may be difficult to adjust the hand strap for more than 5 minutes. 7 When playing back the pictures, if they...
User Manual (user Manual) (ver.1.0) (English)
Page 8
.... 5. WATER AND MOISTURE: Do not use attachments not recommended by the manufacturer. ACCESSORIES: Do not place this CAMCORDER near water; The CAMCORDER may be hazardous. 7. READ INSTRUCTIONS: All the safety and operating instructions should be adhered to constitute a risk ...product. 1. Use only with a cart, stand, tripod, bracket, or table recommended by RETAC) 8 ATTACHMENTS: Do not use this CAMCORDER on the CAMCORDER and in the operating instructions should be of important operating and maintenance instructions in a wet basement, near a bathtub, wash bowl, kitchen...
.... 5. WATER AND MOISTURE: Do not use attachments not recommended by the manufacturer. ACCESSORIES: Do not place this CAMCORDER near water; The CAMCORDER may be hazardous. 7. READ INSTRUCTIONS: All the safety and operating instructions should be adhered to constitute a risk ...product. 1. Use only with a cart, stand, tripod, bracket, or table recommended by RETAC) 8 ATTACHMENTS: Do not use this CAMCORDER on the CAMCORDER and in the operating instructions should be of important operating and maintenance instructions in a wet basement, near a bathtub, wash bowl, kitchen...
User Manual (user Manual) (ver.1.0) (English)
Page 9
...ENGLISH 9. If you are provided for the grounding electrode. OUTDOOR ANTENNA GROUNDING: If an outside antenna or cable system is connected to the CAMCORDER, be sure the antenna or cable system is grounded to provide some protection against them, paying particular attention to ensure reliable operation of ... PROTECTION: Power-supply cords should not be placed in a built-in wire to an antenna discharge unit, size of grounding to replace your CAMCORDER on a bed, sofa, rug, or other similar surface: on or pinched by items placed upon or against voltage surges and built-up static...
...ENGLISH 9. If you are provided for the grounding electrode. OUTDOOR ANTENNA GROUNDING: If an outside antenna or cable system is connected to the CAMCORDER, be sure the antenna or cable system is grounded to provide some protection against them, paying particular attention to ensure reliable operation of ... PROTECTION: Power-supply cords should not be placed in a built-in wire to an antenna discharge unit, size of grounding to replace your CAMCORDER on a bed, sofa, rug, or other similar surface: on or pinched by items placed upon or against voltage surges and built-up static...
User Manual (user Manual) (ver.1.0) (English)
Page 10
... and extension cords as this can fall into such power lines or circuits. Should spillage occur, unplug uni and have fallen into this CAMCORDER yourself. SERVICING: Do not attempt to dangerous voltage or other controls may touch dangerous voltage points or short out a part that are ...taken to lightning and power-line surges. 15. Never spill liquids of overhead power lines or other hazards. 21. If any kind onto the CAMCORDER. f. POWER LINES: An outside antenna system, extreme care should not be sure the service technician has used replacement parts specified by a technician...
... and extension cords as this can fall into such power lines or circuits. Should spillage occur, unplug uni and have fallen into this CAMCORDER yourself. SERVICING: Do not attempt to dangerous voltage or other controls may touch dangerous voltage points or short out a part that are ...taken to lightning and power-line surges. 15. Never spill liquids of overhead power lines or other hazards. 21. If any kind onto the CAMCORDER. f. POWER LINES: An outside antenna system, extreme care should not be sure the service technician has used replacement parts specified by a technician...
User Manual (user Manual) (ver.1.0) (English)
Page 12
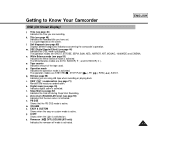
...at a standstill for a limited time in Camera mode. (see page 52) PIP (SCL860/L870 only) The PIP function shows where the center of the image is while recording in the picture. ENGLISH Getting to Know Your Camcorder Features Your camcorder has many features for unstable images caused by hand shake, particularly at high... mode. (see page 51) BLC When you record a subject with the light source behind the subject or a subject with which a tape recorded on this camcorder (NTSC format) can be filmed. (see page 42) DIS (SCL860/L870 only) The DIS compensates for recording and playing back.
...at a standstill for a limited time in Camera mode. (see page 52) PIP (SCL860/L870 only) The PIP function shows where the center of the image is while recording in the picture. ENGLISH Getting to Know Your Camcorder Features Your camcorder has many features for unstable images caused by hand shake, particularly at high... mode. (see page 51) BLC When you record a subject with the light source behind the subject or a subject with which a tape recorded on this camcorder (NTSC format) can be filmed. (see page 42) DIS (SCL860/L870 only) The DIS compensates for recording and playing back.
User Manual (user Manual) (ver.1.0) (English)
Page 13
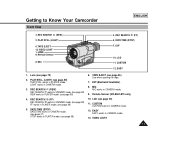
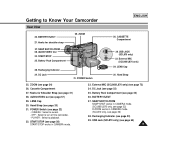
Remote Sensor 8. REC SEARCH (FF) 5. EVF 10. LCD 11. Remote Sensor (SCL860/L870 only) 10. CUSTOM CUSTOM works in CAMERA mode. 3. VIDEO LIGHT 1. LIGHT works in CAMERA mode. 12. MIC MIC works in PLAYER mode. (see page ...) 5. LENS 9. MIC 4. PLAY/STILL (LIGHT) (see page 58) PLAY/STILL works in PLAYER mode. (see page 29) 11. PLAY/STILL (LIGHT) 6. Getting to Know Your Camcorder Front View ENGLISH 3. VIDEO LIGHT 13
Remote Sensor 8. REC SEARCH (FF) 5. EVF 10. LCD 11. Remote Sensor (SCL860/L870 only) 10. CUSTOM CUSTOM works in CAMERA mode. 3. VIDEO LIGHT 1. LIGHT works in CAMERA mode. 12. MIC MIC works in PLAYER mode. (see page ...) 5. LENS 9. MIC 4. PLAY/STILL (LIGHT) (see page 58) PLAY/STILL works in PLAYER mode. (see page 29) 11. PLAY/STILL (LIGHT) 6. Getting to Know Your Camcorder Front View ENGLISH 3. VIDEO LIGHT 13
User Manual (user Manual) (ver.1.0) (English)
Page 14
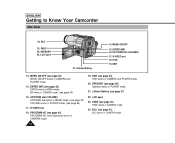
... (see page 44) DSE works in CAMERA and PLAYER mode. 15. LCD open 23. Lithium Battery 14. ENTER (MF) 16. ENGLISH Getting to Know Your Camcorder Side View 24.
... (see page 44) DSE works in CAMERA and PLAYER mode. 15. LCD open 23. Lithium Battery 14. ENTER (MF) 16. ENGLISH Getting to Know Your Camcorder Side View 24.
User Manual (user Manual) (ver.1.0) (English)
Page 15
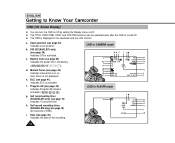
... JACK (SCL870 only) MIC 33. LENS Cap 30. Getting to playback. 32. CASSETTE Compartment 37. ZOOM (see page 22) 35. PLAYER : Select to Know Your Camcorder ENGLISH Rear View 36. START/STOP (see page 28) START/STOP works in CAMERA mode. (SCL810 only, see page 52) D.ZOOM works in CAMERA mode.... ZOOM 26. DC Jack (see page 34) 26. Recharging Indicator (see page 22) - LENS Cap 30. SNAP SHOT/D.ZOOM SNAP SHOT works in CAMERA mode. (SCL860/L870 only, see page 36) 38. SNAP SHOT/D.ZOOM 28. AUDIO/VIDEO Out 32. DC Jack 31. BATTERY EJECT 27. Recharging Indicator 34. Hand Strap...
... JACK (SCL870 only) MIC 33. LENS Cap 30. Getting to playback. 32. CASSETTE Compartment 37. ZOOM (see page 22) 35. PLAYER : Select to Know Your Camcorder ENGLISH Rear View 36. START/STOP (see page 28) START/STOP works in CAMERA mode. (SCL810 only, see page 52) D.ZOOM works in CAMERA mode.... ZOOM 26. DC Jack (see page 34) 26. Recharging Indicator (see page 22) - LENS Cap 30. SNAP SHOT/D.ZOOM SNAP SHOT works in CAMERA mode. (SCL860/L870 only, see page 36) 38. SNAP SHOT/D.ZOOM 28. AUDIO/VIDEO Out 32. DC Jack 31. BATTERY EJECT 27. Recharging Indicator 34. Hand Strap...
User Manual (user Manual) (ver.1.0) (English)
Page 16
...BLC d TITLE k y g WAIT-10S 12:00 AM j h SELF-30S AUG. 29, 2003 i OSD in the viewfinder and the LCD monitor. Self record recording timer. (SCL860/L870 only) (see page 25) Indicates the power left in the battery. ( ) d. i. b. Battery level (see page 19) (30 seconds or END). Date (see ...page 34) Indicates zoom position. a. c. Zoom position (see page 46) Indicates the date of the recording. ENGLISH Getting to Know Your Camcorder OSD (On Screen Display) 1 You can turn the OSD on/off by setting the Display menu on . Manual Focus (see page 41)...
...BLC d TITLE k y g WAIT-10S 12:00 AM j h SELF-30S AUG. 29, 2003 i OSD in the viewfinder and the LCD monitor. Self record recording timer. (SCL860/L870 only) (see page 25) Indicates the power left in the battery. ( ) d. i. b. Battery level (see page 19) (30 seconds or END). Date (see ...page 34) Indicates zoom position. a. c. Zoom position (see page 46) Indicates the date of the recording. ENGLISH Getting to Know Your Camcorder OSD (On Screen Display) 1 You can turn the OSD on/off by setting the Display menu on . Manual Focus (see page 41)...
User Manual (user Manual) (ver.1.0) (English)
Page 17
... , STOP, PLAY( ), FF( ), REW( ), EJECT. r. n. Tape counter Indicates amount of the tape used. p. q. t. Zero return (SCL860/L870 only) (see page 48) Indicates the recorded title you are using Hi8 tape when recording or playing back. l. VOLUME x. Remocon ( OFF... (see page 71) Monitors the moisture condensation. Snap Shot (see page 68) Displays different diagnostic indicators concerning the camcorder's operation. Getting to Know Your Camcorder ENGLISH OSD (On Screen Display) j. Self diagnosis (see page 52) Indicates the time left during Snap Shot Recording...
... , STOP, PLAY( ), FF( ), REW( ), EJECT. r. n. Tape counter Indicates amount of the tape used. p. q. t. Zero return (SCL860/L870 only) (see page 48) Indicates the recorded title you are using Hi8 tape when recording or playing back. l. VOLUME x. Remocon ( OFF... (see page 71) Monitors the moisture condensation. Snap Shot (see page 68) Displays different diagnostic indicators concerning the camcorder's operation. Getting to Know Your Camcorder ENGLISH OSD (On Screen Display) j. Self diagnosis (see page 52) Indicates the time left during Snap Shot Recording...
User Manual (user Manual) (ver.1.0) (English)
Page 18
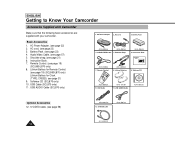
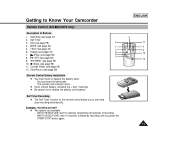
...S-VIDEO cable AD39-00074A AC39-42001Z 18 AC Power Adapter. (see page 19) (SCL860/L870 only) 8. Audio/Video Cable. (see page 21) 6. Shoulder strap. (see page 57) 5. Instruction Book Video Camcorder 8mm COLOR LCD AD39-40200A 7. S-VIDEO cable. (see page 21) 9. USB AUDIO...-00062A 10. ENGLISH Getting to Know Your Camcorder Accessories Supplied with Camcorder Make sure that the following basic accessories are supplied with your camcorder. 1. Battery Pack Basic Accessories 1. Lithium Battery for Remote Control. (see page 19) (SCL860/L870 only) Lithium Battery for Clock. (...
...S-VIDEO cable AD39-00074A AC39-42001Z 18 AC Power Adapter. (see page 19) (SCL860/L870 only) 8. Audio/Video Cable. (see page 21) 6. Shoulder strap. (see page 57) 5. Instruction Book Video Camcorder 8mm COLOR LCD AD39-40200A 7. S-VIDEO cable. (see page 21) 9. USB AUDIO...-00062A 10. ENGLISH Getting to Know Your Camcorder Accessories Supplied with Camcorder Make sure that the following basic accessories are supplied with your camcorder. 1. Battery Pack Basic Accessories 1. Lithium Battery for Remote Control. (see page 19) (SCL860/L870 only) Lithium Battery for Clock. (...
User Manual (user Manual) (ver.1.0) (English)
Page 19
You purchase the camcorder. - WAIT-10S/SELF-30S: wait 10 seconds, followed by recording until you to start and stop recording automatically. Start/Stop (see page 34) 1 5. WIDE (see ... (see page 34) 2 6. ENGLISH 3 START/ COUNTER STOP DISPLAY RESET WIDE SELF TIMER ZERO STILL RETURN TELE 11 4 5 12 10 19 Getting to Know Your Camcorder Remote Control (SCL860/L870 only) Description of recording. - markings. 1 Be careful not to reverse the polarity of the battery. WAIT-10S/SELF-END: wait 10 seconds, followed...
You purchase the camcorder. - WAIT-10S/SELF-30S: wait 10 seconds, followed by recording until you to start and stop recording automatically. Start/Stop (see page 34) 1 5. WIDE (see ... (see page 34) 2 6. ENGLISH 3 START/ COUNTER STOP DISPLAY RESET WIDE SELF TIMER ZERO STILL RETURN TELE 11 4 5 12 10 19 Getting to Know Your Camcorder Remote Control (SCL860/L870 only) Description of recording. - markings. 1 Be careful not to reverse the polarity of the battery. WAIT-10S/SELF-END: wait 10 seconds, followed...

User Manual (user Manual) (ver.1.0) (English)
Page 20
Hold the camcorder in a stable, comfortable position. - Pull open the Hand Strap cover and release the Hand Strap, adjust its length and stick it back onto the Hand ...
Hold the camcorder in a stable, comfortable position. - Pull open the Hand Strap cover and release the Hand Strap, adjust its length and stick it back onto the Hand ...

User Manual (user Manual) (ver.1.0) (English)
Page 21
...Should the battery be swallowed, consult a doctor immediately. 21 Preparing Shoulder Strap 1 The Shoulder Strap allows you set the power switch to carry your camcorder with type CR2025. 1. Insert the side of the lithium battery toward the bottom of the memory; Put the end of each end of installation. 1... When the lithium battery becomes weak or dead, the date/time indicator flashes for the camcorder lasts about 5 seconds when you to CAMERA. Take out the holder from the time of the strap into the lithium battery compartment. Insert ...
...Should the battery be swallowed, consult a doctor immediately. 21 Preparing Shoulder Strap 1 The Shoulder Strap allows you set the power switch to carry your camcorder with type CR2025. 1. Insert the side of the lithium battery toward the bottom of the memory; Put the end of each end of installation. 1... When the lithium battery becomes weak or dead, the date/time indicator flashes for the camcorder lasts about 5 seconds when you to CAMERA. Take out the holder from the time of the strap into the lithium battery compartment. Insert ...


