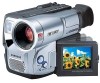
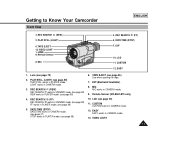
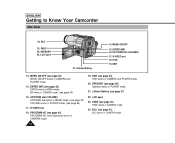
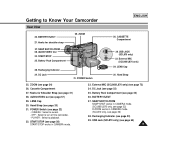
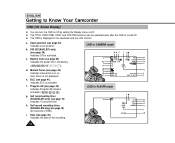
User Manual (user Manual) (ver.1.0) (English)
Page 3
ENGLISH Contents (continued) Program AE (Automatic Exposure) ...42 DSE (Digital Special Effects) in CAMERA mode ...44 Setting and Recording DATE/TIME ...46 Selecting and Recording a Title ...48 Fade In and Out ...50 PIP (SCL860/L870 only)...51 Snap Shot (SCL860/L870 only) ...52 White Balance ...53 Demonstration ...54 Setting the Date/Title color...55...
User Manual (user Manual) (ver.1.0) (English)
Page 6
Dropping the battery pack might damage it will automatically turn off when you are not operating it. 1 When your camcorder is in CAMERA mode, if it is left in STANDBY for the camcorder lasts about 8~10 months under normal operation from time of installation. 1 ...charged before recording outdoors. 1 To preserve battery power, keep your camcorder turned off to protect against unexpected battery discharge. 1 It is a good idea to CAMERA. In this case, replace the lithium battery with as chemical waste. 6 The batteries have to be swallowed, consult a doctor immediately. 1 The lithium ...
User Manual (user Manual) (ver.1.0) (English)
Page 12
...will automatically select the Hi-8 format for record or playback. 12 Snap Shot (SCL860/L870 only) The Snap Shot function lets you record an object at a standstill for a limited time in Camera mode. (see page 52) PIP (SCL860/L870 only) The PIP function shows where the center of the image is a... features for recording and playing back. ENGLISH Getting to be viewed on this camcorder (NTSC format) can be filmed. (see page 42) DIS (SCL860/L870 only) The DIS compensates for unstable images caused by hand shake, particularly at close range. When a Hi8 cassette is an enhanced 8mm format....
User Manual (user Manual) (ver.1.0) (English)
Page 13
...29) 11. LIGHT works in PLAYER mode. (see page 58) 6. DATE/TIME (STOP) DATE/TIME works in CAMERA mode. (see page 59) 5. CUSTOM CUSTOM works in PLAYER mode. (see page 47) STOP works in CAMERA mode. 3. PLAY/STILL (LIGHT) 6. VIDEO LIGHT 1. REC SEARCH (FF) REC SEARCH works in STANDBY mode..... 9. EVF 10. REC SEARCH (REW) REC SEARCH works in STANDBY mode. (see page 28) FF works in CAMERA mode. 12. Remote Sensor (SCL860/L870 only) 10. CUSTOM 12. LCD (see page 72) 2. VIDEO LIGHT 13 LENS 9. Remote Sensor 8. DATE/TIME (STOP) 7. TAPE EJECT (see page 59) 4....
User Manual (user Manual) (ver.1.0) (English)
Page 14
... Your Camcorder Side View 24. FADE 20. ENTER (MF) (see page 60) Speaker works in PLAYER mode. 21. SPEAKER (see page 30) ENTER works in CAMERA mode. 24. Lithium Battery (see page 50) FADE works in MENU mode. FADE (see page 21) 22. S-VIDEO out 18. DSE (see page 60) 17.... UP/DOWN dial (VOLUME) UP/DOWN dial works in MENU mode. (see page 30) VOLUME works in PLAYER mode. (see page 44) DSE works in CAMERA and PLAYER mode. 15. BLC 23. LCD Open 21. Lithium Battery 14. UP/DOWN Dial (VOLUME) 17. MENU ON/OFF (see page 40) 16. MF...
User Manual (user Manual) (ver.1.0) (English)
Page 15
... off the camcorder. - CASSETTE Compartment 37. START/STOP 35. Hand Strap 25. External MIC (SCL860/L870 only) (see page 36) 38. SNAP SHOT/D.ZOOM SNAP SHOT works in CAMERA mode. (SCL860/L870 only, see page 52) D.ZOOM works in CAMERA mode. 33. AUDIO/VIDEO out (see page 34) 26. OFF : Select to Know Your...
User Manual (user Manual) (ver.1.0) (English)
Page 16
... only) (see page 19) (30 seconds or END). Self record recording timer. (SCL860/L870 only) (see page 19) Indicates 10 second timer. i. Battery level (see page 46) Indicates the date of the recording. Program AE (...) Indicates the power left in PLAYER mode c r q Hi8 PLAY p 0:00:25 o Z.RTN u TITLE CINEMA v TAPE! a. b. DIS (SCL860/L870 only) (see page 41) Indicates BLC is activated. Manual Focus (see page 34) Indicates zoom position. OSD in CAMERA mode b a t r sq c Hi8 REC p W T 880 x 0:00:00 o m CINEMA XX EASY x f OFF z n e BLC d TITLE k y...
User Manual (user Manual) (ver.1.0) (English)
Page 20
... Hand Strap, adjust its length and stick it back onto the Hand Strap cover. 2. Press the Zoom and the red Record button without having to CAMERA mode. 1 CAMERA 2. Press Self Timer button until the appropriate indicator is very important to adjust the hand strap for 10 seconds, recording starts. 3 : If you have...
User Manual (user Manual) (ver.1.0) (English)
Page 21
..., replace the lithium battery with complete safety. 1. Note: If the holder is removed. 1 The lithium battery for the camcorder lasts about 5 seconds when you to CAMERA. Insert the side of the lithium battery toward the bottom of the memory; Insert each strap through the buckle, adjust the length of the children...
User Manual (user Manual) (ver.1.0) (English)
Page 22
Using the AC Power Adapter : used for outdoor recording. Connect the AC cord to the CAMERA mode. To set the camcorder to a wall socket. Connect the AC Power Adapter to connect power source. - Note: The plug and wall socket type may ... the LCD monitor and make sure that the Lens Cap is open. To use the AC Power Adapter 2 1 CAMERA 3 1. Hold down the tab of the camcorder. 4. c. Using the Battery Pack: used next to CAMERA mode. ENGLISH Preparing Connecting the Power Source 1 There are two ways to the AC cord. 2. a. Make sure that...
User Manual (user Manual) (ver.1.0) (English)
Page 27
... recording, press the red START/STOP button. s Make sure the battery level indicates that there is enough remaining power for recording. (see page 37) a. CAMERA s Did you set the power switch to record appears in the OSD (if the red tab of the cassette is opened, STANDBY will not be... in the LCD monitor. s Make sure the image you open the LENS CAP? Recording starts and REC should be displayed) s Did you want to CAMERA position? REC X:XX:XX 27 Basic Recording Making Your First Recording Please make sure that beginners, who are using the camcorder for the first time...
User Manual (user Manual) (ver.1.0) (English)
Page 28
ENGLISH Basic Recording b. REC SEARCH 1 You can view a recorded picture with the REC SEARCH , function in reverse for 3 seconds and return to CAMERA. To stop recording, press the red START/STOP button again. This Auto Power Off feature is left in STANDBY mode for as long as you ...
User Manual (user Manual) (ver.1.0) (English)
Page 30
Press the MENU ON/OFF button, the MENU list will move to adjust the LCD brightness. Turn the UP/DOWN dial to CAMERA mode. (see page 22) 3. LCD ADJUST [17] BRIGHT COLOR [17] EXIT: MENU 7. Press ENTER. Set the power switch to LCD ADJUST. Press ENTER. LCD ADJUST [...
User Manual (user Manual) (ver.1.0) (English)
Page 34
... in telephoto zoom, move it further for a high-speed zoom. T (Telephoto) side: Subject appears closer. 3. ENGLISH Advanced Recording Zooming In and Out 1 Zoom works in CAMERA mode only. 1 Zooming is a recording technique that is at least 1 mm away from TELE/WIDE to WIDE/TELE) 1 Use these features for different shots; please...
User Manual (user Manual) (ver.1.0) (English)
Page 35
... ENGLISH Digital Zoom 1 Digital Zoom works in the MENU list. (see page 36) 35 Make sure that you do not want to use the DIS (SCL860/L870) feature with the DIGITAL ZOOM for picture stability. (see page 36) 3. This is on. (see page 39) W T MENU LCD ADJUST DIS ON D.ZOOM ON... DISPLAY ON WHITE BAL ..........AUTO WL REMOCON ....ON NEXT: MENU W T 880 x 1. If you use the DIGITAL ZOOM, set the DIGITAL ZOOM function to OFF in CAMERA mode only. 1 Zooms more than 22x are performed digitally. 1 The picture quality deteriorates as to 880x maximum ZOOM. Set the power switch to...
User Manual (user Manual) (ver.1.0) (English)
Page 36
... ON/OFF button. Press ENTER. ZOOM ON/OFF button. Turn the UP/DOWN dial to CAMERA mode. (see page 22) 2. Press the MENU ON/OFF button to CAMERA mode. 2. ENGLISH Advanced Recording Setting the DIGITAL ZOOM ON/OFF (SCL860/L870 only) 1 The DIGITAL ZOOM feature is explained on the screen, and DIGITAL ZOOM...
User Manual (user Manual) (ver.1.0) (English)
Page 37
...mode. s Battery level, recording mode, counter, date/time, DIS ( ) will appear on SCL860/L870 only) 3. By pressing the EASY button, all the functions of the camera will be set to off . Press the START/STOP button to CAMERA mode (see page 22). 2. ENGLISH STBY X:XX:XX EASY JAN. 31, 2003 Note:...as the camcorder starts to the settings that were set . (DIS ( ) will begin using the EASY mode. s The camera will return to run. s The EASY mode only operates in the camera (provided a good lithium battery has been installed). 37 s The word "EASY" will be displayed on the LCD at ...
User Manual (user Manual) (ver.1.0) (English)
Page 38
... start recording. Turn the UP/DOWN dial until CUSTOM SET is set as follows; Press the START/STOP button to CAMERA mode. 2. s The CUSTOM settings will be stored in the camera (provided a good lithium battery has been installed). 38 Press the MENU ON/OFF button, to the settings that were... 6. s Date/Time and Title will only appear if these , you want . 5. s Set the status of each item to what you want to use . s The camera will begin using the new CUSTOM settings. 8. s If you must first switch the EASY or CUSTOM mode off , press the CUSTOM button once. Example: When...
User Manual (user Manual) (ver.1.0) (English)
Page 39
... not operate in the DSE mode. 3. s The DIS setting will appear. 3. Advanced Recording ENGLISH DIS (Digital Image Stabilizer, SCL860/L870 only) 1 The DIS function works in CAMERA mode only. 1 DIS (Digital Image Stabilizer) is a handshake compensation function that compensates for any shaking or moving of the hand... holding the camcorder (within reasonable limits). 1 It provides more stable pictures when: s Recording in EASY mode. Set the power switch to CAMERA mode. (See page 22) s Open the LCD monitor and adjust it to see comfortably. 2. Press the MENU ON/OFF button. The ...
User Manual (user Manual) (ver.1.0) (English)
Page 40
...Focus mode. Very shiny or glossy surfaces like an athlete or crowd. 1. d. Press the MF button. A picture containing several objects, some close to CAMERA mode. (see page 22) 2. b. A person enveloped in fog or surrounded by adjusting the focus manually. ENGLISH Advanced Recording MF/AF (Manual Focus/Auto... Focus) 1 The MF/AF function works in the CAMERA mode only. 1 In most situations, it is set automatically when you switch on the creative side of your recording. 1 Manual focusing ...