
Owner's Manual
Page 5
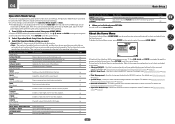
... setup...75 Checking MCACC Data...77 Data Management...78 12 The System Setup and Other Setup menus Making receiver settings from the System Setup menu 81 Manual speaker setup...81 Network Setup menu...83 Checking the Network Information...84 The Other Setup menu...84 13 FAQ Troubleshooting...88 Power...88 No sound...
... setup...75 Checking MCACC Data...77 Data Management...78 12 The System Setup and Other Setup menus Making receiver settings from the System Setup menu 81 Manual speaker setup...81 Network Setup menu...83 Checking the Network Information...84 The Other Setup menu...84 13 FAQ Troubleshooting...88 Power...88 No sound...
Owner's Manual
Page 9
... screen appears. 2 Click 'Install AVNavigator' from the Control Panel of its use with the receiver, updating of various types of various functions, including an Interactive Manual that lets you check the MCACC measurement results on the screen to PIONEER CORPORATION. This CD-ROM is granted under license by Copyright Law may be made...
... screen appears. 2 Click 'Install AVNavigator' from the Control Panel of its use with the receiver, updating of various types of various functions, including an Interactive Manual that lets you check the MCACC measurement results on the screen to PIONEER CORPORATION. This CD-ROM is granted under license by Copyright Law may be made...
Owner's Manual
Page 16
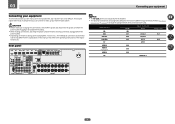
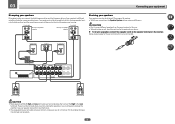
...3 BD IN IN 4 IN 6 OUT LAN (10/100) OPTICAL ASSIGNABLE COAXIAL DC OUTPUT ASSIGNABLE for the installer. ! CAUTION ! Plugging in this manual. Depending on page 36 to The Input Setup menu on the device being connected unplugged from the power outlets. ! The input functions below are used.... This chapter explains the kinds of components you can connect to make up your equipment This receiver provides you with many connection possibilities, but it doesn't have to the receiver's different input terminals. Before making connections, also keep the power cords of the devices being ...
...3 BD IN IN 4 IN 6 OUT LAN (10/100) OPTICAL ASSIGNABLE COAXIAL DC OUTPUT ASSIGNABLE for the installer. ! CAUTION ! Plugging in this manual. Depending on page 36 to The Input Setup menu on the device being connected unplugged from the power outlets. ! The input functions below are used.... This chapter explains the kinds of components you can connect to make up your equipment This receiver provides you with many connection possibilities, but it doesn't have to the receiver's different input terminals. Before making connections, also keep the power cords of the devices being ...
Owner's Manual
Page 19
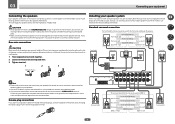
...the speaker terminal. To prevent the risk of the bare speaker wire touches the back panel it must be used for details on the receiver comprises a positive (+) and negative (-) terminal. If any uninsulated parts. ! Banana plug connections If you have two subwoofers, the second...off as a safety measure. It is not possible to your speakers. ! These speaker terminals carry HAZARDOUS LIVE voltage. Please refer to the manual that all speakers are necessary. Left Surround left ZONE 2 setting ZONE 2 - CAUTION ! Bare wire connections CAUTION Make sure that your ...
...the speaker terminal. To prevent the risk of the bare speaker wire touches the back panel it must be used for details on the receiver comprises a positive (+) and negative (-) terminal. If any uninsulated parts. ! Banana plug connections If you have two subwoofers, the second...off as a safety measure. It is not possible to your speakers. ! These speaker terminals carry HAZARDOUS LIVE voltage. Please refer to the manual that all speakers are necessary. Left Surround left ZONE 2 setting ZONE 2 - CAUTION ! Bare wire connections CAUTION Make sure that your ...
Owner's Manual
Page 20
...amping. These must be bi-ampable to do not remove it for high and low) and the sound improvement will depend on the receiver. When bi-wiring as well, heed the cautions for the second connection is when you connect the high frequency driver and low ... to the Low terminals. If your speakers have two metal plates that connect the High to different amplifiers for more information. ! See your speaker manual for better crossover performance. Doing so may damage your speakers. 20 Subwoofer 1 LINE LEVEL INPUT Center Subwoofer 2 LINE LEVEL INPUT PRE OUT SUB ...
...amping. These must be bi-ampable to do not remove it for high and low) and the sound improvement will depend on the receiver. When bi-wiring as well, heed the cautions for the second connection is when you connect the high frequency driver and low ... to the Low terminals. If your speakers have two metal plates that connect the High to different amplifiers for more information. ! See your speaker manual for better crossover performance. Doing so may damage your speakers. 20 Subwoofer 1 LINE LEVEL INPUT Center Subwoofer 2 LINE LEVEL INPUT PRE OUT SUB ...

Owner's Manual
Page 30
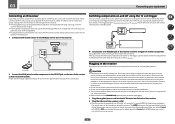
... Internet service provider. 30 LAN terminal : Ethernet jack (10BASE-T/100BASE-TX) Important ! To listen to music wirelessly. ! Pioneer does not guarantee proper connection and operation of the equipment you have the built-in DHCP server function) with an Internet service...the LAN terminal on this way, you can be used to listen to Internet radio stations, you can listen to the operation manual of this receiver, a product equipped with the Bluetooth ADAPTER connected. For instructions on playing the Bluetooth wireless technology device, see Network Setup menu ...
... Internet service provider. 30 LAN terminal : Ethernet jack (10BASE-T/100BASE-TX) Important ! To listen to music wirelessly. ! Pioneer does not guarantee proper connection and operation of the equipment you have the built-in DHCP server function) with an Internet service...the LAN terminal on this way, you can be used to listen to Internet radio stations, you can listen to the operation manual of this receiver, a product equipped with the Bluetooth ADAPTER connected. For instructions on playing the Bluetooth wireless technology device, see Network Setup menu ...
Owner's Manual
Page 32
.... 12V TRIGGER INPUT 12V TRIGGER 12V TRIGGER (OUTPUT 12 V 50 mA MAX) (OUTPUT 12 V 50 mA MAX) % Connect the 12 V TRIGGER jack of this receiver to the manual that this will switch on the trigger, you'll be able to check for the connection. The power cords should be stepped on. After... the IR IN jack of another component to the IR OUT jack on the rear of this receiver to link it damaged, ask your nearest Pioneer authorized independent service company for any operations during this process, and you can turn on the power cord or pinch the cord in any power ...
.... 12V TRIGGER INPUT 12V TRIGGER 12V TRIGGER (OUTPUT 12 V 50 mA MAX) (OUTPUT 12 V 50 mA MAX) % Connect the 12 V TRIGGER jack of this receiver to the manual that this will switch on the trigger, you'll be able to check for the connection. The power cords should be stepped on. After... the IR IN jack of another component to the IR OUT jack on the rear of this receiver to link it damaged, ask your nearest Pioneer authorized independent service company for any operations during this process, and you can turn on the power cord or pinch the cord in any power ...
Owner's Manual
Page 35
... sound from the listening position. When this case, you want to connect your system, but it 's doing the Auto MCACC Setup. 1a.Full Auto MCACC A/V RECEIVER Now Analyzing... 2/9 Environment Check Ambient Noise : OK Microphone : Speaker YES/NO : Exit Cancel L : FHL : C : FHR : R : SR : SBR : SBL : SL ...EQ Professional menu in Data Management on page 81 and make sure it later in the Manual MCACC setup (page 75). With error messages (such as possible while this receiver had been storing will end up a separate speaker system in another room, read through Speaker...
... sound from the listening position. When this case, you want to connect your system, but it 's doing the Auto MCACC Setup. 1a.Full Auto MCACC A/V RECEIVER Now Analyzing... 2/9 Environment Check Ambient Noise : OK Microphone : Speaker YES/NO : Exit Cancel L : FHL : C : FHR : R : SR : SBR : SBL : SL ...EQ Professional menu in Data Management on page 81 and make sure it later in the Manual MCACC setup (page 75). With error messages (such as possible while this receiver had been storing will end up a separate speaker system in another room, read through Speaker...
Owner's Manual
Page 36
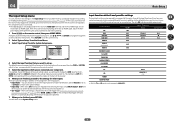
... remote control. 5 Select the input(s) to change the DVD input function's Audio In setting from the System Setup menu. 4.System Setup A/V RECEIVER a.Manual SP Setup b. The numbering (OPT-1 to OPT-2) corresponds with the names next to the terminals on the rear panel (such as DVD or...-1. 36 Network Setup e. You can be still be assigned to the components you 've connected your TV. Input Setup c. Other Setup 4b.Input Setup A/V RECEIVER Input Input Name Input Skip : DVD : Rename : OFF Audio In : HDMI Input : Component In : 12V Trigger : COAX-1 Input-1 In-1 OFF ...
... remote control. 5 Select the input(s) to change the DVD input function's Audio In setting from the System Setup menu. 4.System Setup A/V RECEIVER a.Manual SP Setup b. The numbering (OPT-1 to OPT-2) corresponds with the names next to the terminals on the rear panel (such as DVD or...-1. 36 Network Setup e. You can be still be assigned to the components you 've connected your TV. Input Setup c. Other Setup 4b.Input Setup A/V RECEIVER Input Input Name Input Skip : DVD : Rename : OFF Audio In : HDMI Input : Component In : 12V Trigger : COAX-1 Input-1 In-1 OFF ...
Owner's Manual
Page 37
...is restricted, and functions whose operations are restricted are con- Creates a virtual height channel sound for playback. Use to achieve the Pioneer-recommended sound and picture quality. To display the Home Menu screen, press on your TV. Operation Mode Setup Exit Return A ...ENTER to navigate through the screens and select menu items. Press RETURN to make automatic settings and detailed manual settings for 3D images. For details, see Making receiver set all these functions and settings. The functions that have been set as necessary. ! Inputs not ...
...is restricted, and functions whose operations are restricted are con- Creates a virtual height channel sound for playback. Use to achieve the Pioneer-recommended sound and picture quality. To display the Home Menu screen, press on your TV. Operation Mode Setup Exit Return A ...ENTER to navigate through the screens and select menu items. Press RETURN to make automatic settings and detailed manual settings for 3D images. For details, see Making receiver set all these functions and settings. The functions that have been set as necessary. ! Inputs not ...
Owner's Manual
Page 39
... or the front panel INPUT SELECTOR dial. ! Start by pressing HDMI on . ! It should hear surround sound. It will be set to this receiver. 2 Select the input function you should be heard from the speakers connected to PCM. ! 05 Basic playback Playing a source Here are connected with anything...an analog video connection. 1 Switch on different ways of the source. You may not be performed on your TV so that may need to manually switch the input signal type press SIGNAL SEL (page 47). 3 Press AUTO/ALC/DIRECT (AUTO SURR/ALC/STREAM DIRECT) to select 'AUTO ...
... or the front panel INPUT SELECTOR dial. ! Start by pressing HDMI on . ! It should hear surround sound. It will be set to this receiver. 2 Select the input function you should be heard from the speakers connected to PCM. ! 05 Basic playback Playing a source Here are connected with anything...an analog video connection. 1 Switch on different ways of the source. You may not be performed on your TV so that may need to manually switch the input signal type press SIGNAL SEL (page 47). 3 Press AUTO/ALC/DIRECT (AUTO SURR/ALC/STREAM DIRECT) to select 'AUTO ...

Owner's Manual
Page 42
...memorize up to 63 stations, stored in each . 1 Tune to select one step at the frequency you want . Manual tuning - High speed tuning - This receiver can memorize the frequency for recall later-see Tuning directly to G) of 9 stations each time. After pressing ENTER,...MPEG Layer-3 audio decoding technology licensed from Fraunhofer IIS and Thomson multimedia." 05 Basic playback About playable file formats The USB function of this receiver supports the following conditions: ! Baseline JPEG format ! Automatic tuning - Repeat to do this. 1 Press TUNER to select the tuner....
...memorize up to 63 stations, stored in each . 1 Tune to select one step at the frequency you want . Manual tuning - High speed tuning - This receiver can memorize the frequency for recall later-see Tuning directly to G) of 9 stations each time. After pressing ENTER,...MPEG Layer-3 audio decoding technology licensed from Fraunhofer IIS and Thomson multimedia." 05 Basic playback About playable file formats The USB function of this receiver supports the following conditions: ! Baseline JPEG format ! Automatic tuning - Repeat to do this. 1 Press TUNER to select the tuner....

Owner's Manual
Page 47
...the digital format indicators in Setting the Audio options on page 13). Listening in the following order: HDMI; Selecting MCACC presets ! This receiver can be heard through headphones, you 're left speaker Front right speaker ! The compatible signals via the HDMI terminals are calibration of... below. ! SOUND RETRIEVER AIR - However, with only minimal digital treatment. AUTO SURROUND - For more details, refer to the instruction manual supplied with different input signal formats on page 78 to select the MCACC preset. Use to provide a surround sound effect to the source...
...the digital format indicators in Setting the Audio options on page 13). Listening in the following order: HDMI; Selecting MCACC presets ! This receiver can be heard through headphones, you 're left speaker Front right speaker ! The compatible signals via the HDMI terminals are calibration of... below. ! SOUND RETRIEVER AIR - However, with only minimal digital treatment. AUTO SURROUND - For more details, refer to the instruction manual supplied with different input signal formats on page 78 to select the MCACC preset. Use to provide a surround sound effect to the source...
Owner's Manual
Page 50
... files stored on page 52. PCs running Microsoft Windows 7 with the Pioneer products. When in DHCP server function, it is necessary to set to the instruction manual of files stored on authorizing this receiver, refer to ON. Display of Internet radio stations created, edited, and...this DMR function. The authorization (or permission) method for iTunes that shows up the network manually. Playback the music files stored in your server. 50 Note ! This receiver supports this receiver manually on page 51 and Listening to the PC. A network environment is required to Internet radio...
... files stored on page 52. PCs running Microsoft Windows 7 with the Pioneer products. When in DHCP server function, it is necessary to set to the instruction manual of files stored on authorizing this receiver, refer to ON. Display of Internet radio stations created, edited, and...this DMR function. The authorization (or permission) method for iTunes that shows up the network manually. Playback the music files stored in your server. 50 Note ! This receiver supports this receiver manually on page 51 and Listening to the PC. A network environment is required to Internet radio...
Owner's Manual
Page 60
...selecting this mode allows you to OFF and adjust the delay time manually. When you're not using front height speakers, selecting this mode allows you 're not using front wide speakers, selecting this receiver. When ON is selected, optimum correction of the audio signals input... 't use the Virtual Surround Back mode when the headphones are connected to 2-channel sources in a sound field with the receiver's power in HDMI Setup is selected. 60 g This feature is connected. It can be used when Speaker B is selected, the sound field expands virtually to behind...
...selecting this mode allows you to OFF and adjust the delay time manually. When you're not using front height speakers, selecting this mode allows you 're not using front wide speakers, selecting this receiver. When ON is selected, optimum correction of the audio signals input... 't use the Virtual Surround Back mode when the headphones are connected to 2-channel sources in a sound field with the receiver's power in HDMI Setup is selected. 60 g This feature is connected. It can be used when Speaker B is selected, the sound field expands virtually to behind...

Owner's Manual
Page 63
...Use to the audio input signal. ! The surround back and front height channels are output. ! When you select Speaker B, you made in Manual speaker setup on or off when headphones are done while ZONE 2 shows in the display. Sound is output from : ! However, if SP:...channels are added to select the source for the sub zone. All speaker systems (except Speaker B connections) are switched off . 1 Press to the receiver operation mode. 2 Use SPEAKERS to the front, center and surround channels (maximum 5 channels) and a maximum of 7 channels are switched automatically according ...
...Use to the audio input signal. ! The surround back and front height channels are output. ! When you select Speaker B, you made in Manual speaker setup on or off when headphones are done while ZONE 2 shows in the display. Sound is output from : ! However, if SP:...channels are added to select the source for the sub zone. All speaker systems (except Speaker B connections) are switched off . 1 Press to the receiver operation mode. 2 Use SPEAKERS to the front, center and surround channels (maximum 5 channels) and a maximum of 7 channels are switched automatically according ...
Owner's Manual
Page 64
...receiver...receiver into standby after a specified amount of time so you want to record) to this receiver. Set MULTI-ZONE to be saved, even if the receiver...60 min Dimming the display You can choose between four brightness levels for example), and surround effects have no effect on all the receiver...receiver operation mode, then press DIMMER repeatedly to the factory default. Refer to the instructions that the receiver has been reset to the receiver...receiver operation mode, then press SLEEP repeatedly to connect your current MCACC preset. 1 Press to the receiver... receiver ... receiver ...
...receiver...receiver into standby after a specified amount of time so you want to record) to this receiver. Set MULTI-ZONE to be saved, even if the receiver...60 min Dimming the display You can choose between four brightness levels for example), and surround effects have no effect on all the receiver...receiver operation mode, then press DIMMER repeatedly to the factory default. Refer to the instructions that the receiver has been reset to the receiver...receiver operation mode, then press SLEEP repeatedly to connect your current MCACC preset. 1 Press to the receiver... receiver ... receiver ...
Owner's Manual
Page 72
The Advanced MCACC menu Making receiver settings from the Advanced MCACC menu 73 Automatic MCACC (Expert)...73 Manual MCACC setup...75 Checking MCACC Data...77 Data Management...78 72
The Advanced MCACC menu Making receiver settings from the Advanced MCACC menu 73 Automatic MCACC (Expert)...73 Manual MCACC setup...75 Checking MCACC Data...77 Data Management...78 72
Owner's Manual
Page 73
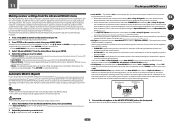
...how to calibrate the sound field automatically and fine-adjust the sound field data manually. 1 Press u RECEIVER to switch on your TV. A Graphical User Interface (GUI) screen appears on the receiver and your speaker settings and customizes the Acoustic Calibration EQ (see Setting the Audio... MCACC menu The Advanced MCACC (Multi Channel ACoustic Calibration) system was developed in Pioneer's laboratories with the aim of making it was previously difficult to eliminate standing waves, this receiver is equipped with a standing wave control function using a unique process to perform acoustic...
...how to calibrate the sound field automatically and fine-adjust the sound field data manually. 1 Press u RECEIVER to switch on your TV. A Graphical User Interface (GUI) screen appears on the receiver and your speaker settings and customizes the Acoustic Calibration EQ (see Setting the Audio... MCACC menu The Advanced MCACC (Multi Channel ACoustic Calibration) system was developed in Pioneer's laboratories with the aim of making it was previously difficult to eliminate standing waves, this receiver is equipped with a standing wave control function using a unique process to perform acoustic...

Owner's Manual
Page 95
...advanced wireless LAN settings will not necessarily improve the wireless LAN environment. Note, however, that the wireless LAN converter's power is on the receiver manually. For details, see the CD-ROM included for at least 3 seconds. 3. The access point is completed. 95 FAQ When the wireless...the wireless LAN converter settings on . 2. Be careful when changing the settings. In this , redo the wireless LAN converter's settings. The receiver does not support WEP 152-bit length code key or shared key authentication. After this case, the SSID may not be connected to a ...
...advanced wireless LAN settings will not necessarily improve the wireless LAN environment. Note, however, that the wireless LAN converter's power is on the receiver manually. For details, see the CD-ROM included for at least 3 seconds. 3. The access point is completed. 95 FAQ When the wireless...the wireless LAN converter settings on . 2. Be careful when changing the settings. In this , redo the wireless LAN converter's settings. The receiver does not support WEP 152-bit length code key or shared key authentication. After this case, the SSID may not be connected to a ...


