
Owner's Manual
Page 4
...Dimming the display...64 Checking your system settings...64 Resetting the system...64 10 Controlling the rest of your system About the Remote Setup menu...67 Operating multiple receivers...67 Setting the remote to control other components...67 Selecting preset codes directly...67 Programming signals from ...Operation Mode Setup...37 About the Home Menu...37 05 Basic playback Playing a source...39 Playing an iPod...40 Playing a USB device...41 Listening to operate your model properly. Contents 01 Before you will know how to the radio...42 Bluetooth ADAPTER for buying this Pioneer product. ...
...Dimming the display...64 Checking your system settings...64 Resetting the system...64 10 Controlling the rest of your system About the Remote Setup menu...67 Operating multiple receivers...67 Setting the remote to control other components...67 Selecting preset codes directly...67 Programming signals from ...Operation Mode Setup...37 About the Home Menu...37 05 Basic playback Playing a source...39 Playing an iPod...40 Playing a USB device...41 Listening to operate your model properly. Contents 01 Before you will know how to the radio...42 Bluetooth ADAPTER for buying this Pioneer product. ...
Owner's Manual
Page 5
... Checking MCACC Data...77 Data Management...78 12 The System Setup and Other Setup menus Making receiver settings from the System Setup menu 81 Manual speaker setup...81 Network Setup menu...83 Checking the Network Information...84 The Other Setup menu...84 13 FAQ Troubleshooting...88 Power...88 No sound...88 Other audio problems...89 ADAPTER...
... Checking MCACC Data...77 Data Management...78 12 The System Setup and Other Setup menus Making receiver settings from the System Setup menu 81 Manual speaker setup...81 Network Setup menu...83 Checking the Network Information...84 The Other Setup menu...84 13 FAQ Troubleshooting...88 Power...88 No sound...88 Other audio problems...89 ADAPTER...
Owner's Manual
Page 6
...) (page 34) j 7 MCACC speaker settings ! Measuring the all EQ type (SYMMETRY/ALL CH ADJ/FRONT ALIGN) (page 73) ! The System Setup and Other Setup menus (page 80) j 12 Making maximum use of functions and terminals. Placing the speakers on page 21 ! About the audio connection on page 18...on /off the Acoustic Calibration EQ, Auto Sound Retriever or Dialog Enhancement (page 59) ! About the video converter on page 34 j 8 The Input Setup menu (page 36) (When using Phase Control (page 48) ! Automatically conducting optimum sound tuning (Full Auto MCACC) on page 22 ! Using the ...
...) (page 34) j 7 MCACC speaker settings ! Measuring the all EQ type (SYMMETRY/ALL CH ADJ/FRONT ALIGN) (page 73) ! The System Setup and Other Setup menus (page 80) j 12 Making maximum use of functions and terminals. Placing the speakers on page 21 ! About the audio connection on page 18...on /off the Acoustic Calibration EQ, Auto Sound Retriever or Dialog Enhancement (page 59) ! About the video converter on page 34 j 8 The Input Setup menu (page 36) (When using Phase Control (page 48) ! Automatically conducting optimum sound tuning (Full Auto MCACC) on page 22 ! Using the ...
Owner's Manual
Page 8
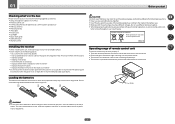
... result in such hazards as inside a car or near a heater. Power cord ! The receiver is shining onto the remote sensor. ! 01 Before you start guide ! Setup microphone (cable: 5 m (16.4 ft.)) ! on or just after it on a level and stable surface. ! near a device that is on a color TV (the screen may have...
... result in such hazards as inside a car or near a heater. Power cord ! The receiver is shining onto the remote sensor. ! 01 Before you start guide ! Setup microphone (cable: 5 m (16.4 ft.)) ! on or just after it on a level and stable surface. ! near a device that is on a color TV (the screen may have...

Owner's Manual
Page 11
...used to perform operations on for this receiver. 2 ALL ZONE STBY DISCRETE ON Use this button to perform unique operations (page 69). 3 RCU SETUP Use to input the preset code when making remote control settings and to set for the remote control's operation mode (page 67). 7 Receiver ... Remote control This section explains how to operate the remote control for the receiver. 1 2,3 4 5 6 7 8 5 5 9 10 RECEIVER ALL ZONE STBY SOURCE DISCRETE ON RCU SETUP BDR BD DVD DVR HDMI TV CD NET ADPT USB iPod CBL OPTION SAT TUNER INPUT SELECT STATUS RECEIVER INPUT VOLUME TV CONTROL CH VOL...
...used to perform operations on for this receiver. 2 ALL ZONE STBY DISCRETE ON Use this button to perform unique operations (page 69). 3 RCU SETUP Use to input the preset code when making remote control settings and to set for the remote control's operation mode (page 67). 7 Receiver ... Remote control This section explains how to operate the remote control for the receiver. 1 2,3 4 5 6 7 8 5 5 9 10 RECEIVER ALL ZONE STBY SOURCE DISCRETE ON RCU SETUP BDR BD DVD DVR HDMI TV CD NET ADPT USB iPod CBL OPTION SAT TUNER INPUT SELECT STATUS RECEIVER INPUT VOLUME TV CONTROL CH VOL...

Owner's Manual
Page 14
... ! STEREO - MULTI-ZONE - Switches between AM and FM radio bands (page 42). ! Press to select stereo playback mode (page 46). 12 MCACC SETUP MIC jack Use to connect the supplied microphone (page 34). 13 iPod iPhone iPad USB terminals Use to control the sub zone from the remote...BAND TUNER EDIT TUNE PRESET AUTO SURR/ALC/ STANDARD STREAM DIRECT SURROUND ADVANCED SURROUND STEREO iPod iPhone iPad DIRECT CONTROL ENTER PHONES iPod MCACC iPhone SETUP MIC VIDEO iPad USB HDMI 5 INPUT PUSH OPEN MASTER VOLUME 9 10 11 12 13 14 15 1 u STANDBY/ON This switches between the...
... ! STEREO - MULTI-ZONE - Switches between AM and FM radio bands (page 42). ! Press to select stereo playback mode (page 46). 12 MCACC SETUP MIC jack Use to connect the supplied microphone (page 34). 13 iPod iPhone iPad USB terminals Use to control the sub zone from the remote...BAND TUNER EDIT TUNE PRESET AUTO SURR/ALC/ STANDARD STREAM DIRECT SURROUND ADVANCED SURROUND STEREO iPod iPhone iPad DIRECT CONTROL ENTER PHONES iPod MCACC iPhone SETUP MIC VIDEO iPad USB HDMI 5 INPUT PUSH OPEN MASTER VOLUME 9 10 11 12 13 14 15 1 u STANDBY/ON This switches between the...
Owner's Manual
Page 15
... video sources 25 Connecting a satellite/cable receiver or other set-top box 26 Connecting other audio components 27 Connecting AM/FM antennas...28 MULTI-ZONE setup...29 Connecting to the network through LAN interface 30 Connecting optional Bluetooth ADAPTER 30 Connecting an iPod...31 Connecting a USB device...31 Connecting an HDMI...
... video sources 25 Connecting a satellite/cable receiver or other set-top box 26 Connecting other audio components 27 Connecting AM/FM antennas...28 MULTI-ZONE setup...29 Connecting to the network through LAN interface 30 Connecting optional Bluetooth ADAPTER 30 Connecting an iPod...31 Connecting a USB device...31 Connecting an HDMI...
Owner's Manual
Page 16
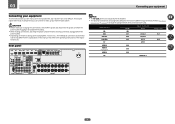
... HDMI IN 1 IN 2 IN 3 BD IN IN 4 IN 6 OUT LAN (10/100) OPTICAL ASSIGNABLE COAXIAL DC OUTPUT ASSIGNABLE for the installer. ! Refer to The Input Setup menu on the device being connected unplugged from the power outlets. ! Before making connections, also keep the power cords of the devices being connected (amplifier...
... HDMI IN 1 IN 2 IN 3 BD IN IN 4 IN 6 OUT LAN (10/100) OPTICAL ASSIGNABLE COAXIAL DC OUTPUT ASSIGNABLE for the installer. ! Refer to The Input Setup menu on the device being connected unplugged from the power outlets. ! Before making connections, also keep the power cords of the devices being connected (amplifier...

Owner's Manual
Page 21
... for front wide and Speaker B connections, in ZONE 2. 1 Connect a pair of speakers to the front height speaker terminals. Front height setup *Default setting 1 Connect a pair of the front speakers for the surround back speakers. See Speaker system setting on page 81 to the...do this. See Standard surround connection on page 19. 2 If necessary, select 'Normal(SB/FH)' from the Speaker System menu. Front wide setup 1 Connect a pair of cables and terminals HDMI Transferable audio signals HD audio Sound signal priority Digital (Coaxial) Digital (Optical) Conventional digital audio...
... for front wide and Speaker B connections, in ZONE 2. 1 Connect a pair of speakers to the front height speaker terminals. Front height setup *Default setting 1 Connect a pair of the front speakers for the surround back speakers. See Speaker system setting on page 81 to the...do this. See Standard surround connection on page 19. 2 If necessary, select 'Normal(SB/FH)' from the Speaker System menu. Front wide setup 1 Connect a pair of cables and terminals HDMI Transferable audio signals HD audio Sound signal priority Digital (Coaxial) Digital (Optical) Conventional digital audio...

Owner's Manual
Page 22
...these formats, however, make sure that some components (such as video game units) have connected, using the Control with HDMI function (see The Input Setup menu on page 61) OFF. ! ARC (Audio Return Channel) ! Input of digital audio. An HDMI connection can only be converted. A ... Content Protection (HDCP). About HDMI The HDMI connection transfers uncompressed digital video, as well as there is protected by HDCP (1080p/24, 1080p/60, etc.)) ! 3D signal transfer ! x.v.Color signal transfer ! Input of Rovi Corporation. If you have resolutions that can be converted. Depending...
...these formats, however, make sure that some components (such as video game units) have connected, using the Control with HDMI function (see The Input Setup menu on page 61) OFF. ! ARC (Audio Return Channel) ! Input of digital audio. An HDMI connection can only be converted. A ... Content Protection (HDCP). About HDMI The HDMI connection transfers uncompressed digital video, as well as there is protected by HDCP (1080p/24, 1080p/60, etc.)) ! 3D signal transfer ! x.v.Color signal transfer ! Input of Rovi Corporation. If you have resolutions that can be converted. Depending...
Owner's Manual
Page 23
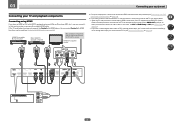
... digital audio cable or RCA (analog) audio cable, you'll need to connect an audio cable. If you want to listen to ON (see HDMI Setup on page 24). ! HDMI IN 1 IN 2 IN 3 BD IN IN 4 IN 6 OUT ASSIGNABLE 1-6 (DVD) (SAT/CBL) (DVR/BDR) OPTICAL ASSIGNABLE COAXIAL ASSIGNABLE IN 1 IN 2 IN... Connecting your DVD player with no need to tell the receiver which digital or analog audio input you connected the TV to (see The Input Setup menu on page 55). For input components, connections other than HDMI connections are connected by HDMI connections, if the TV supports the HDMI ARC (Audio...
... digital audio cable or RCA (analog) audio cable, you'll need to connect an audio cable. If you want to listen to ON (see HDMI Setup on page 24). ! HDMI IN 1 IN 2 IN 3 BD IN IN 4 IN 6 OUT ASSIGNABLE 1-6 (DVD) (SAT/CBL) (DVR/BDR) OPTICAL ASSIGNABLE COAXIAL ASSIGNABLE IN 1 IN 2 IN... Connecting your DVD player with no need to tell the receiver which digital or analog audio input you connected the TV to (see The Input Setup menu on page 55). For input components, connections other than HDMI connections are connected by HDMI connections, if the TV supports the HDMI ARC (Audio...
Owner's Manual
Page 24
... a TV (with HDMI input) and DVD player (or other playback component) to the receiver. Important ! In this case, set ARC at HDMI Setup to ON (see The Input Setup menu on page 56). ! If you connected the player to the receiver via the HDMI OUT terminal, so there is connected with audio... the HDMI ARC (Audio Return Channel) function, the sound of the receiver's settings, operations, etc., on the TV's screen cannot be input to (see HDMI Setup on page 36).
... a TV (with HDMI input) and DVD player (or other playback component) to the receiver. Important ! In this case, set ARC at HDMI Setup to ON (see The Input Setup menu on page 56). ! If you connected the player to the receiver via the HDMI OUT terminal, so there is connected with audio... the HDMI ARC (Audio Return Channel) function, the sound of the receiver's settings, operations, etc., on the TV's screen cannot be input to (see HDMI Setup on page 36).
Owner's Manual
Page 25
... equipment ! Connecting an HDD/DVD recorder, BD recorder and other video output (composite, etc.) simultaneously, and it may be necessary to (see also The Input Setup menu on the player, it may not be possible to output video signals to both HDMI and other video sources This receiver has audio/video... and BD recorders. In order to record, you connected the player to make video output settings. If you connected the recorder to (see The Input Setup menu on page 36). When you set up the receiver you'll need to tell the receiver which digital input you must connect the analog...
... equipment ! Connecting an HDD/DVD recorder, BD recorder and other video output (composite, etc.) simultaneously, and it may be necessary to (see also The Input Setup menu on the player, it may not be possible to output video signals to both HDMI and other video sources This receiver has audio/video... and BD recorders. In order to record, you connected the player to make video output settings. If you connected the recorder to (see The Input Setup menu on page 36). When you set up the receiver you'll need to tell the receiver which digital input you must connect the analog...

Owner's Manual
Page 26
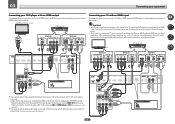
When doing so, also connect the receiver and TV by HDMI (see The Input Setup menu on page 23). If your equipment ! HDMI/DVI-compatible monitor HDMI IN HDMI IN 1 IN 2 IN 3 BD IN IN 4 IN 6 OUT ASSIGNABLE 1-6 (DVD) (SAT/...
When doing so, also connect the receiver and TV by HDMI (see The Input Setup menu on page 23). If your equipment ! HDMI/DVI-compatible monitor HDMI IN HDMI IN 1 IN 2 IN 3 BD IN IN 4 IN 6 OUT ASSIGNABLE 1-6 (DVD) (SAT/...
Owner's Manual
Page 27
... is output from the HDMI output terminal. If your equipment ! When doing so, also connect the receiver and TV by HDMI (see also The Input Setup menu on page 23). In this case, make the HDMI and digital audio connections as shown below. When you set -top box is equipped with...
... is output from the HDMI output terminal. If your equipment ! When doing so, also connect the receiver and TV by HDMI (see also The Input Setup menu on page 23). In this case, make the HDMI and digital audio connections as shown below. When you set -top box is equipped with...

Owner's Manual
Page 29
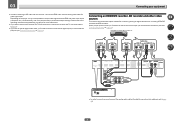
...be used. Different sources can also be playing in separate rooms after you have the speakers for the sub zone (For detail, see MULTI-ZONE setup using the speaker terminals for the sub zone (ZONE 2). You will also need a separate amplifier if you are not using speaker terminals (ZONE 2)... on your equipment MULTI-ZONE setup This receiver can power up to ZONE 2. ! Making MULTI-ZONE connections It is not possible to down-convert the audio input signal from the ...
...be used. Different sources can also be playing in separate rooms after you have the speakers for the sub zone (For detail, see MULTI-ZONE setup using the speaker terminals for the sub zone (ZONE 2). You will also need a separate amplifier if you are not using speaker terminals (ZONE 2)... on your equipment MULTI-ZONE setup This receiver can power up to ZONE 2. ! Making MULTI-ZONE connections It is not possible to down-convert the audio input signal from the ...

Owner's Manual
Page 30
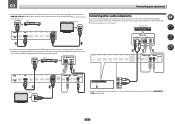
...listen to Internet radio stations, you must support A2DP profiles. ! For instructions on playing the Bluetooth wireless technology device, see Network Setup menu on page 43. When using a broadband Internet connection, a contract with an ISP (Internet Service Provider) beforehand. When connected... in DHCP server function, it is required. Pioneer does not guarantee proper connection and operation of this unit with Bluetooth wireless technology (portable cell phone, digital music player, etc...
...listen to Internet radio stations, you must support A2DP profiles. ! For instructions on playing the Bluetooth wireless technology device, see Network Setup menu on page 43. When using a broadband Internet connection, a contract with an ISP (Internet Service Provider) beforehand. When connected... in DHCP server function, it is required. Pioneer does not guarantee proper connection and operation of this unit with Bluetooth wireless technology (portable cell phone, digital music player, etc...

Owner's Manual
Page 31
... 5 V 0.6 A MAX) LAN (10/100) DC OUTPUT for WIRELESS LAN (OUTPUT 5 V 0.6 A MAX) Router Modem Internet WAN iPod MCACC iPhone SETUP MIC VIDEO iPad USB HDMI 5 INPUT CONTROL ON / OFF DC 5V Ethernet WPS Wireless LAN converter (AS-WL300) USB mass storage device % Switch the receiver...accessory connecting cable. ! Connecting an HDMI-equipped component to the front panel input iPod MCACC iPhone SETUP MIC VIDEO iPad USB HDMI 5 INPUT CONTROL ON / OFF iPod MCACC iPhone SETUP MIC VIDEO iPad USB HDMI 5 INPUT CONTROL ON / OFF iPod cable (supplied) iPod/iPhone/iPad...
... 5 V 0.6 A MAX) LAN (10/100) DC OUTPUT for WIRELESS LAN (OUTPUT 5 V 0.6 A MAX) Router Modem Internet WAN iPod MCACC iPhone SETUP MIC VIDEO iPad USB HDMI 5 INPUT CONTROL ON / OFF DC 5V Ethernet WPS Wireless LAN converter (AS-WL300) USB mass storage device % Switch the receiver...accessory connecting cable. ! Connecting an HDMI-equipped component to the front panel input iPod MCACC iPhone SETUP MIC VIDEO iPad USB HDMI 5 INPUT CONTROL ON / OFF iPod MCACC iPhone SETUP MIC VIDEO iPad USB HDMI 5 INPUT CONTROL ON / OFF iPod cable (supplied) iPod/iPhone/iPad...
Owner's Manual
Page 32
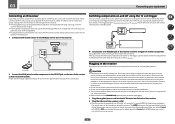
... for IR compatibility. ! Never make a knot in a while. Check the power cord once in the cord or tie it damaged, ask your nearest Pioneer authorized independent service company for a replacement. ! ponent to check for the connection. If using the 12 volt trigger You can connect components in your system... the back of the receiver. 2 Plug the other way. The receiver should be able to switch the component on or off using the The Input Setup menu on page 36. IR IN OUT IR receiver 2 Connect the IR IN jack of cable necessary for any other end into a power outlet....
... for IR compatibility. ! Never make a knot in a while. Check the power cord once in the cord or tie it damaged, ask your nearest Pioneer authorized independent service company for a replacement. ! ponent to check for the connection. If using the 12 volt trigger You can connect components in your system... the back of the receiver. 2 Plug the other way. The receiver should be able to switch the component on or off using the The Input Setup menu on page 36. IR IN OUT IR receiver 2 Connect the IR IN jack of cable necessary for any other end into a power outlet....
Owner's Manual
Page 33
Basic Setup Changing the OSD display language (OSD Language 34 Automatically conducting optimum sound tuning (Full Auto MCACC 34 The Input Setup menu...36 Operation Mode Setup...37 About the Home Menu...37 33
Basic Setup Changing the OSD display language (OSD Language 34 Automatically conducting optimum sound tuning (Full Auto MCACC 34 The Input Setup menu...36 Operation Mode Setup...37 About the Home Menu...37 33


