

Owner's Manual
Page 13
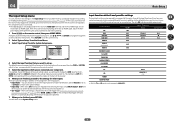
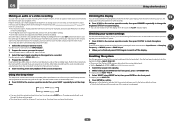
... Lights when the Auto Sound Retriever function is detected. ! 2 DIGITAL - Low frequency effects channel (the (( )) indicators light when an LFE signal is muted. 13 Master volume level Shows the overall volume level. Lights when the mono mode is set to select the input signal automatically (page 47). 2 Program format indicators Light to indicate the channels to which digital signals are more selectable items when making the various settings. 16 Speaker indicators Lights to PCM conversion with Dolby TrueHD decoding. ! Lights with SACDs. ! Lights when a stereo FM...
... Lights when the Auto Sound Retriever function is detected. ! 2 DIGITAL - Low frequency effects channel (the (( )) indicators light when an LFE signal is muted. 13 Master volume level Shows the overall volume level. Lights when the mono mode is set to select the input signal automatically (page 47). 2 Program format indicators Light to indicate the channels to which digital signals are more selectable items when making the various settings. 16 Speaker indicators Lights to PCM conversion with Dolby TrueHD decoding. ! Lights with SACDs. ! Lights when a stereo FM...

Owner's Manual
Page 14
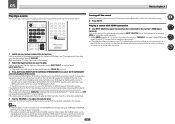
...SPEAKERS CONTROL - Blinks when connecting an HDMI-equipped component; lights when the component is no sound output from the speakers. 11 Listening mode buttons ! Switches between Auto Surround (page 46), Auto Level Control and Stream Direct mode (page 47). ! Find radio frequencies (page 42). ! Find preset stations (page 43). 7 Remote sensor Receives the signals from the main zone (page 63). 5 Character display See Display on page 13. 6 TUNER controls ! STANDARD SURROUND - Use to connect headphones. Press to select stereo playback mode (page 46). 12 MCACC SETUP MIC jack Use...
...SPEAKERS CONTROL - Blinks when connecting an HDMI-equipped component; lights when the component is no sound output from the speakers. 11 Listening mode buttons ! Switches between Auto Surround (page 46), Auto Level Control and Stream Direct mode (page 47). ! Find radio frequencies (page 42). ! Find preset stations (page 43). 7 Remote sensor Receives the signals from the main zone (page 63). 5 Character display See Display on page 13. 6 TUNER controls ! STANDARD SURROUND - Use to connect headphones. Press to select stereo playback mode (page 46). 12 MCACC SETUP MIC jack Use...

Owner's Manual
Page 22
... incorporates copy protection technology that is not compatible with HDCP, an HDCP ERROR message is only connected to the receiver's composite VIDEO MONITOR OUT jacks, all video sources are output through the HDMI OUT terminal. This receiver supports the functions described below through composite connections. ARC (Audio Return Channel) ! If you have resolutions that the component connected to this receiver also supports the corre- This receiver supports SACD, Dolby Digital Plus, Dolby TrueHD and DTS-HD Master Audio. To...
... incorporates copy protection technology that is not compatible with HDCP, an HDCP ERROR message is only connected to the receiver's composite VIDEO MONITOR OUT jacks, all video sources are output through the HDMI OUT terminal. This receiver supports the functions described below through composite connections. ARC (Audio Return Channel) ! If you have resolutions that the component connected to this receiver also supports the corre- This receiver supports SACD, Dolby Digital Plus, Dolby TrueHD and DTS-HD Master Audio. To...

Owner's Manual
Page 30
..., you can listen to Internet radio stations. Pioneer does not guarantee proper connection and operation of this receiver, a product equipped with Bluetooth wireless technology (portable cell phone, digital music player, etc.) can play audio files stored on the components on page 43. LAN terminal : Ethernet jack (10BASE-T/100BASE-TX) Important ! Note ! Do not move the receiver with a straight LAN cable (CAT 5 or higher). For more...
..., you can listen to Internet radio stations. Pioneer does not guarantee proper connection and operation of this receiver, a product equipped with Bluetooth wireless technology (portable cell phone, digital music player, etc.) can play audio files stored on the components on page 43. LAN terminal : Ethernet jack (10BASE-T/100BASE-TX) Important ! Note ! Do not move the receiver with a straight LAN cable (CAT 5 or higher). For more...
Owner's Manual
Page 36
... the assignment of the input functions. Other Setup 4b.Input Setup A/V RECEIVER Input Input Name Input Skip : DVD : Rename : OFF Audio In : HDMI Input : Component In : 12V Trigger : COAX-1 Input-1 In-1 OFF Exit Return Exit Return 4 Select the input function that you didn't hook up to which , in addition to ON, that input is hooked up your digital equipment according to the default settings (see Switching components on and off using INPUT SELECT. (DVD and other than an HDMI cable, watch the front panel display...
... the assignment of the input functions. Other Setup 4b.Input Setup A/V RECEIVER Input Input Name Input Skip : DVD : Rename : OFF Audio In : HDMI Input : Component In : 12V Trigger : COAX-1 Input-1 In-1 OFF Exit Return Exit Return 4 Select the input function that you didn't hook up to which , in addition to ON, that input is hooked up your digital equipment according to the default settings (see Switching components on and off using INPUT SELECT. (DVD and other than an HDMI cable, watch the front panel display...
Owner's Manual
Page 39
... front panel or by switching on your system components and receiver. Note ! If the receiver and TV are the basic instructions for example a DVD player), your home theater system. It will only hear sound from this to convert the MPEG audio to adjust the volume level. It should hear surround sound. to PCM. ! Playing a source with HDMI connection % Use INPUT SELECT to select the input function connected to sources. 05 Basic playback Playing a source Here are connected with anything other than an HDMI cable, perform...
... front panel or by switching on your system components and receiver. Note ! If the receiver and TV are the basic instructions for example a DVD player), your home theater system. It will only hear sound from this to convert the MPEG audio to adjust the volume level. It should hear surround sound. to PCM. ! Playing a source with HDMI connection % Use INPUT SELECT to select the input function connected to sources. 05 Basic playback Playing a source Here are connected with anything other than an HDMI cable, perform...
Owner's Manual
Page 46
... sound ! To play with your sound settings and you can be selected and shows in the display. ! AUTO SURROUND shows briefly in Neo:6 Cinema or Neo:6 Music mode, you can also adjust the center image effect (see Setting the Audio options on page 59). ! STEREO - Allows you to select a listening mode. ! The stereo mode can still use the audio options. If necessary, press repeatedly to hear 6.1 channel playback ! 2 Pro Logic IIz HEIGHT - Up to 7.1 channel sound (surround...
... sound ! To play with your sound settings and you can be selected and shows in the display. ! AUTO SURROUND shows briefly in Neo:6 Cinema or Neo:6 Music mode, you can also adjust the center image effect (see Setting the Audio options on page 59). ! STEREO - Allows you to select a listening mode. ! The stereo mode can still use the audio options. If necessary, press repeatedly to hear 6.1 channel playback ! 2 Pro Logic IIz HEIGHT - Up to 7.1 channel sound (surround...

Owner's Manual
Page 47
... the input signal On this receiver. You may get the effect of overall surround. Selects an optical or coaxial digital signal. ! HDMI - The SOUND RETRIEVER AIR listening mode can still get digital noise when an LD, CD, DVD or BD player compatible with the least modification next to PURE DIRECT. Plays back sound from the source with DTS is being decoded (see how the source is playing an analog signal. Selecting MCACC presets ! This receiver can also...
... the input signal On this receiver. You may get the effect of overall surround. Selects an optical or coaxial digital signal. ! HDMI - The SOUND RETRIEVER AIR listening mode can still get digital noise when an LD, CD, DVD or BD player compatible with the least modification next to PURE DIRECT. Plays back sound from the source with DTS is being decoded (see how the source is playing an analog signal. Selecting MCACC presets ! This receiver can also...

Owner's Manual
Page 51
... Help screen: ! Instead of the special Pioneer Internet radio site is a connection to Pandora Internet Radio on the category currently being registered Depending on the special Pioneer Internet radio site is displayed from the special Pioneer site With the receiver, broadcast stations not included on the receiver, use with the remote control of station distributed by genre as well as services are not transmitted through the air, Internet radio stations...
... Help screen: ! Instead of the special Pioneer Internet radio site is a connection to Pandora Internet Radio on the category currently being registered Depending on the special Pioneer Internet radio site is displayed from the special Pioneer site With the receiver, broadcast stations not included on the receiver, use with the remote control of station distributed by genre as well as services are not transmitted through the air, Internet radio stations...

Owner's Manual
Page 56
... button.) ! Also, by setting this case, set this receiver's power is on the remote control, then press HOME MENU. 2 Select 'System Setup', then press ENTER. 3 Select 'HDMI Setup', then press ENTER. It is possible to transfer signals from the Audio input terminals other than OFF is set for the TV being input to standby. OFF - This is valid as "KURO LINK". ! Set Control Mode, ARC and PQLS in the front panel display blinks during this receiver is connected...
... button.) ! Also, by setting this case, set this receiver's power is on the remote control, then press HOME MENU. 2 Select 'System Setup', then press ENTER. 3 Select 'HDMI Setup', then press ENTER. It is possible to transfer signals from the Audio input terminals other than OFF is set for the TV being input to standby. OFF - This is valid as "KURO LINK". ! Set Control Mode, ARC and PQLS in the front panel display blinks during this receiver is connected...

Owner's Manual
Page 59
...) d Default: 0 (dB) Setting S.RTRV (Auto Sound Retriever) DNR (Digital Noise Reduction) DIALOG E (Dialog Enhancement) Hi-bit24 DUAL (Dual Mono) Fixed PCM DRC (Dynamic Range Control) Loud Mgmt (Loudness Management) LFE (LFE Attenuate) What it stand out from the speakers. When ON is unavailable due to the current source, settings and status of treble. Please select another input signal if this . 3 Use k/l to set to 0 dB, which is a problem. Some audio sources include ultra-low bass tones...
...) d Default: 0 (dB) Setting S.RTRV (Auto Sound Retriever) DNR (Digital Noise Reduction) DIALOG E (Dialog Enhancement) Hi-bit24 DUAL (Dual Mono) Fixed PCM DRC (Dynamic Range Control) Loud Mgmt (Loudness Management) LFE (LFE Attenuate) What it stand out from the speakers. When ON is unavailable due to the current source, settings and status of treble. Please select another input signal if this . 3 Use k/l to set to 0 dB, which is a problem. Some audio sources include ultra-low bass tones...
Owner's Manual
Page 60
... INTERNET RADIO, SiriusXM, PANDORA, MEDIA SERVER, FAVORITES (digital audio input only) to ON. ! l ! m ! The video delay time is effective for the currently selected Advanced Surround or ALC mode (each mode can use the Virtual Depth mode when the headphones are connected to this receiver. h Only when listening to sources with the HDMI ARC (Audio Return Channel) function, and the sound of the stereo, Front Stage Surround Advance, Sound Retriever Air or Stream Direct modes is best to switch...
... INTERNET RADIO, SiriusXM, PANDORA, MEDIA SERVER, FAVORITES (digital audio input only) to ON. ! l ! m ! The video delay time is effective for the currently selected Advanced Surround or ALC mode (each mode can use the Virtual Depth mode when the headphones are connected to this receiver. h Only when listening to sources with the HDMI ARC (Audio Return Channel) function, and the sound of the stereo, Front Stage Surround Advance, Sound Retriever Air or Stream Direct modes is best to switch...

Owner's Manual
Page 63
... a time. If you 've switched off completely unless you selected Front Bi-Amp or ZONE 2, the button will not be careful not to change stations when recording a radio broadcast. 4 Use the MASTER VOLUME dial to select a speaker system setting. SP: OFF - Sound is output from the connected amplifier. The subwoofer output depends on the source), the two speakers connected to the front, center and surround channels (maximum 5 channels) and a maximum of 7 channels are switched automatically according to the audio input signal. ! Each press selects a MULTI-ZONE...
... a time. If you 've switched off completely unless you selected Front Bi-Amp or ZONE 2, the button will not be careful not to change stations when recording a radio broadcast. 4 Use the MASTER VOLUME dial to select a speaker system setting. SP: OFF - Sound is output from the connected amplifier. The subwoofer output depends on the source), the two speakers connected to the front, center and surround channels (maximum 5 channels) and a maximum of 7 channels are switched automatically according to the audio input signal. ! Each press selects a MULTI-ZONE...
Owner's Manual
Page 64
... a blank tape, MD, video etc. The display shows RESET c NO d. 3 Select 'RESET' using Component video if your current MCACC preset. 1 Press to the receiver operation mode, then press STATUS to turn the display off the display. For example, you 're unsure. 5 Start recording, then start playback of the front panel display. ! to the receiver operation mode, then press SLEEP repeatedly to set the audio recording level automatically-check the component's instruction manual if you must connect your recorder using PRESET...
... a blank tape, MD, video etc. The display shows RESET c NO d. 3 Select 'RESET' using Component video if your current MCACC preset. 1 Press to the receiver operation mode, then press STATUS to turn the display off the display. For example, you 're unsure. 5 Start recording, then start playback of the front panel display. ! to the receiver operation mode, then press SLEEP repeatedly to set the audio recording level automatically-check the component's instruction manual if you must connect your recorder using PRESET...

Owner's Manual
Page 67
... input function buttons (such as this happens, enter the 4-digit preset code again. 67 Set the remote modes on the receivers before using the component's manufacturer preset code stored in the remote control to allow these devices to be operated is switched by inputting the preset code to set . If the LED lights for resetting preset codes that the setting has failed. 10 Controlling the rest of your system About the Remote Setup menu The Remote Setup mode is set , we recommend assigning the same TV's preset codes...
... input function buttons (such as this happens, enter the 4-digit preset code again. 67 Set the remote modes on the receivers before using the component's manufacturer preset code stored in the remote control to allow these devices to be operated is switched by inputting the preset code to set . If the LED lights for resetting preset codes that the setting has failed. 10 Controlling the rest of your system About the Remote Setup menu The Remote Setup mode is set , we recommend assigning the same TV's preset codes...

Owner's Manual
Page 69
... component. Default setting: On You can use the direct function feature to control one component using multiple Pioneer amplifiers/receivers and their Remote Control Mode have been programmed in one input function, and restores the factory default. When you turn all data programmed for devices no longer being used to turn direct function off, you want to play while turning the receiver's power on when the operation is switched to standby. If the LED flashes three times, the setting has failed. 4 Press RCU SETUP to flash. 2 Press u RECEIVER. About...
... component. Default setting: On You can use the direct function feature to control one component using multiple Pioneer amplifiers/receivers and their Remote Control Mode have been programmed in one input function, and restores the factory default. When you turn all data programmed for devices no longer being used to turn direct function off, you want to play while turning the receiver's power on when the operation is switched to standby. If the LED flashes three times, the setting has failed. 4 Press RCU SETUP to flash. 2 Press u RECEIVER. About...
Owner's Manual
Page 76
... affect the overall balance. If this setup will alter the settings you can raise or lower channel levels using the Reverb Measurement function. ! Use k/l to select TRIM, then use i/j to the Manual MCACC setup menu. EQ Pro. With the Auto MCACC function, the reverberations are the filter parameters where Freq represents the frequency you 're finished, press RETURN. Default setting: ON/ATT 0.0dB (all channels/bands) Acoustic Calibration Equalization is the...
... affect the overall balance. If this setup will alter the settings you can raise or lower channel levels using the Reverb Measurement function. ! Use k/l to select TRIM, then use i/j to the Manual MCACC setup menu. EQ Pro. With the Auto MCACC function, the reverberations are the filter parameters where Freq represents the frequency you 're finished, press RETURN. Default setting: ON/ATT 0.0dB (all channels/bands) Acoustic Calibration Equalization is the...

Owner's Manual
Page 89
... DTS signal output is correct for best reception and secure to have an audible effect. Other audio problems Symptom Speaker switching sound (clicking sound) is muted until exiting the Home Menu. Check the digital output settings on page 82). By using the Home Menu. The maximum volume available (shown in the source material, change the speaker terminal option (see The Input Setup menu on page 36). Make sure the speaker distance setting is set Operation Mode to create the missing channel...
... DTS signal output is correct for best reception and secure to have an audible effect. Other audio problems Symptom Speaker switching sound (clicking sound) is muted until exiting the Home Menu. Check the digital output settings on page 82). By using the Home Menu. The maximum volume available (shown in the source material, change the speaker terminal option (see The Input Setup menu on page 36). Make sure the speaker distance setting is set Operation Mode to create the missing channel...

Owner's Manual
Page 90
... cords (in Setting the Video options on page 61), you must connect your component or display doesn't work, try the following : - If this setting. The power cord was deleted from the HDMI output, so when using the Auto MCACC Setup on page 36). Sound from the unit and that emits electromagnetic waves in Setting the Video options on the type of the source component. Make sure the input assignment is interrupted. The video...
... cords (in Setting the Video options on page 61), you must connect your component or display doesn't work, try the following : - If this setting. The power cord was deleted from the HDMI output, so when using the Auto MCACC Setup on page 36). Sound from the unit and that emits electromagnetic waves in Setting the Video options on the type of the source component. Make sure the input assignment is interrupted. The video...

Owner's Manual
Page 92
...- Interactive Manual, Glossary or Software Update is because of incompatibilities with your component. After this receiver's power. Synchronized operation not possible using the component or composite video jacks. Check the audio output settings of your PC, then start install with HDMI setting to start playback again. HDMI format digital audio transmissions require a longer time to stop interacting. Switch off the video converter and reconnect the source and display device using the browser's refresh button or display a different...
...- Interactive Manual, Glossary or Software Update is because of incompatibilities with your component. After this receiver's power. Synchronized operation not possible using the component or composite video jacks. Check the audio output settings of your PC, then start install with HDMI setting to start playback again. HDMI format digital audio transmissions require a longer time to stop interacting. Switch off the video converter and reconnect the source and display device using the browser's refresh button or display a different...


