
Owner's Manual
Page 4
... what's in the box...8 Installing the receiver...8 Loading the batteries...8 Operating range of remote control unit...8 About using AVNavigator (included CD-ROM)...9 02 Controls and displays Remote control...11 Display...13 Front panel...14 03 Connecting your equipment Connecting your equipment...16 Rear... a source...39 Playing an iPod...40 Playing a USB device...41 Listening to the radio...42 Bluetooth ADAPTER for buying this Pioneer product. Please read through LAN interface...30 Connecting optional Bluetooth ADAPTER...30 Connecting an iPod...31 Connecting a USB device...31 Connecting...
... what's in the box...8 Installing the receiver...8 Loading the batteries...8 Operating range of remote control unit...8 About using AVNavigator (included CD-ROM)...9 02 Controls and displays Remote control...11 Display...13 Front panel...14 03 Connecting your equipment Connecting your equipment...16 Rear... a source...39 Playing an iPod...40 Playing a USB device...41 Listening to the radio...42 Bluetooth ADAPTER for buying this Pioneer product. Please read through LAN interface...30 Connecting optional Bluetooth ADAPTER...30 Connecting an iPod...31 Connecting a USB device...31 Connecting...
Owner's Manual
Page 5
... Power...88 No sound...88 Other audio problems...89 ADAPTER PORT terminal...90 Video...90 Settings...90 Professional Calibration EQ graphical output...91 Display...91 Remote control...91 HDMI...91 AVNavigator...92 USB interface...93 iPod...93 Network...93 Wireless LAN...94 14 Additional information Surround sound formats...97 About iPod...
... Power...88 No sound...88 Other audio problems...89 ADAPTER PORT terminal...90 Video...90 Settings...90 Professional Calibration EQ graphical output...91 Display...91 Remote control...91 HDMI...91 AVNavigator...92 USB interface...93 iPod...93 Network...93 Wireless LAN...94 14 Additional information Surround sound formats...97 About iPod...
Owner's Manual
Page 6
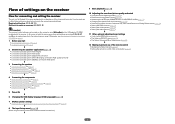
... j 3 Connecting the speakers ! Better sound using Phase Control (page 48) ! Loading the batteries on page 9. 1 Before you start ! Setting the remote to be made as necessary: 6, 8, 10, 11, 12 Important The receiver's initial settings can be made on the computer using Wiring Navi on page 21...(page 73) ! Setting the Audio options (page 59) ! The System Setup and Other Setup menus (page 80) j 12 Making maximum use of the remote control ! Connecting AM/FM antennas on page 32 j 5 Power On j 6 Changing the OSD display language (OSD Language) (page 34) j 7 MCACC ...
... j 3 Connecting the speakers ! Better sound using Phase Control (page 48) ! Loading the batteries on page 9. 1 Before you start ! Setting the remote to be made as necessary: 6, 8, 10, 11, 12 Important The receiver's initial settings can be made on the computer using Wiring Navi on page 21...(page 73) ! Setting the Audio options (page 59) ! The System Setup and Other Setup menus (page 80) j 12 Making maximum use of the remote control ! Connecting AM/FM antennas on page 32 j 5 Power On j 6 Changing the OSD display language (OSD Language) (page 34) j 7 MCACC ...

Owner's Manual
Page 7
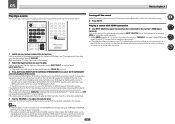
Before you start Checking what's in the box...8 Installing the receiver...8 Loading the batteries...8 Operating range of remote control unit 8 About using AVNavigator (included CD-ROM 9 7
Before you start Checking what's in the box...8 Installing the receiver...8 Loading the batteries...8 Operating range of remote control unit 8 About using AVNavigator (included CD-ROM 9 7
Owner's Manual
Page 8
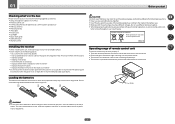
...leak, overheat, explode or catch fire. Power cord ! Observe the following places: - Batteries with the unit are obstacles between the remote control and the receiver's remote sensor. ! Quick start Checking what's in the European Union. Don't install it on (or right after it on a color ... not work properly if: ! We recommend using alkaline batteries that gives off . This can also reduce the life or performance of remote control unit The remote control may not last over a long period. near a device that you start guide ! in extremely hot or cold areas - in...
...leak, overheat, explode or catch fire. Power cord ! Observe the following places: - Batteries with the unit are obstacles between the remote control and the receiver's remote sensor. ! Quick start Checking what's in the European Union. Don't install it on (or right after it on a color ... not work properly if: ! We recommend using alkaline batteries that gives off . This can also reduce the life or performance of remote control unit The remote control may not last over a long period. near a device that you start guide ! in extremely hot or cold areas - in...

Owner's Manual
Page 10
Controls and displays Remote control...11 Display...13 Front panel...14 10
Controls and displays Remote control...11 Display...13 Front panel...14 10

Owner's Manual
Page 11
... mode (page 47). ! MCACC - SIGNAL SEL - HOME MENU - AUTO/ALC/DIRECT - Switches between the various surround modes (page 46). 11 Remote control LED Lights when a command is assigned. White - Press to select an input signal (page 47). ! Use to select the PQLS setting (page... This switches between MCACC presets (page 47). ! PHASE - AUTO S.RTRV - Press to which the TV CONTROL INPUT button is sent from the remote control. 11 DIMMER - AUDIO PARAMETER - VIDEO PARAMETER - Press to confirm and exit the current menu screen. 8 i/j/k/l/ENTER Use the arrow buttons when...
... mode (page 47). ! MCACC - SIGNAL SEL - HOME MENU - AUTO/ALC/DIRECT - Switches between the various surround modes (page 46). 11 Remote control LED Lights when a command is assigned. White - Press to select an input signal (page 47). ! Use to select the PQLS setting (page... This switches between MCACC presets (page 47). ! PHASE - AUTO S.RTRV - Press to which the TV CONTROL INPUT button is sent from the remote control. 11 DIMMER - AUDIO PARAMETER - VIDEO PARAMETER - Press to confirm and exit the current menu screen. 8 i/j/k/l/ENTER Use the arrow buttons when...

Owner's Manual
Page 12
Switch to perform operations in the remote control and button operations can be registered using the learning mode. 13 Switches the remote to control the receiver (used to select the white commands). Also use this button to set up surround sound. 14 VOLUME +/- Use to set the listening volume. 15 MUTE Mutes the sound or restores the sound if it has been muted (adjusting the volume also restores the sound). Controls and displays 12 02 12 OPTION The preset codes of desired devices can be registered in the main zone.
Switch to perform operations in the remote control and button operations can be registered using the learning mode. 13 Switches the remote to control the receiver (used to select the white commands). Also use this button to set up surround sound. 14 VOLUME +/- Use to set the listening volume. 15 MUTE Mutes the sound or restores the sound if it has been muted (adjusting the volume also restores the sound). Controls and displays 12 02 12 OPTION The preset codes of desired devices can be registered in the main zone.

Owner's Manual
Page 13
... the corresponding format is on, this lights to indicate Neo:6 processing (page 46). 19 Character display Displays various system information. 20 Remote control mode indicator Lights to indicate the receiver's remote control mode setting. (Not displayed when set using SPEAKERS (page 63). 17 SLEEP Lights when the receiver is selected (page 46...
... the corresponding format is on, this lights to indicate Neo:6 processing (page 46). 19 Character display Displays various system information. 20 Remote control mode indicator Lights to indicate the receiver's remote control mode setting. (Not displayed when set using SPEAKERS (page 63). 17 SLEEP Lights when the receiver is selected (page 46...

Owner's Manual
Page 14
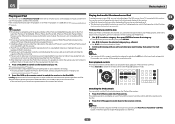
...'s dimmer adjustment (page 64). ! AUTO SURR/ALC/STREAM DIRECT - ADVANCED SURROUND - FL OFF - Lights to indicate iPod/iPhone/iPad is no sound output from the remote control (page 8). 8 MASTER VOLUME dial 9 SPEAKERS Use to change the speaker terminal (page 63). 10 PHONES jack Use to control the sub zone from the... SELECTOR STANDBY /ON ADVANCED MCACC FL OFF HDMI iPod iPhone iPad SPEAKERS CONTROL - ADVANCED MCACC - Find radio frequencies (page 42). ! Find preset stations (page 43). 7 Remote sensor Receives the signals from the speakers. 11 Listening mode buttons !
...'s dimmer adjustment (page 64). ! AUTO SURR/ALC/STREAM DIRECT - ADVANCED SURROUND - FL OFF - Lights to indicate iPod/iPhone/iPad is no sound output from the remote control (page 8). 8 MASTER VOLUME dial 9 SPEAKERS Use to change the speaker terminal (page 63). 10 PHONES jack Use to control the sub zone from the... SELECTOR STANDBY /ON ADVANCED MCACC FL OFF HDMI iPod iPhone iPad SPEAKERS CONTROL - ADVANCED MCACC - Find radio frequencies (page 42). ! Find preset stations (page 43). 7 Remote sensor Receives the signals from the speakers. 11 Listening mode buttons !

Owner's Manual
Page 29
Different sources can be playing in the following table shows the signals that can be controlled by the remote or front panel controls. You should have the speakers for the sub zone (For detail, see MULTI-ZONE setup using speaker terminals (ZONE 2) You must ...
Different sources can be playing in the following table shows the signals that can be controlled by the remote or front panel controls. You should have the speakers for the sub zone (For detail, see MULTI-ZONE setup using speaker terminals (ZONE 2) You must ...
Owner's Manual
Page 32
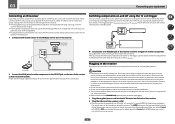
...outlet, a 2 second to 10 second HDMI initialization process begins. Never make a knot in the cord or tie it damaged, ask your nearest Pioneer authorized independent service company for the connection. For details about the Control with HDMI feature, see the manual supplied with a mono mini-plug on ...1 Plug the supplied power cord into a power outlet. ! Please see Control with this receiver. ! Do not place the unit, a piece of the remote sensor on page 36. When you can connect components in your system (such as a Niles or Xantech unit) to control your system instead of furniture...
...outlet, a 2 second to 10 second HDMI initialization process begins. Never make a knot in the cord or tie it damaged, ask your nearest Pioneer authorized independent service company for the connection. For details about the Control with HDMI feature, see the manual supplied with a mono mini-plug on ...1 Plug the supplied power cord into a power outlet. ! Please see Control with this receiver. ! Do not place the unit, a piece of the remote sensor on page 36. When you can connect components in your system (such as a Niles or Xantech unit) to control your system instead of furniture...
Owner's Manual
Page 34
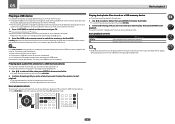
... are no obstacles between the speakers and the microphone. Using the Full Auto MCACC Setup will overwrite any of test tones to switch on the remote control, then press HOME MENU. The explanations in some other soft surfaces. ! Make sure that the TV's video input is connected with anything other than...
... are no obstacles between the speakers and the microphone. Using the Full Auto MCACC Setup will overwrite any of test tones to switch on the remote control, then press HOME MENU. The explanations in some other soft surfaces. ! Make sure that the TV's video input is connected with anything other than...
Owner's Manual
Page 36
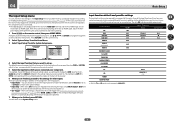
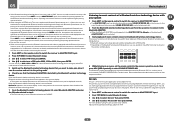
... 32), select MAIN, ZONE 2 or OFF for the corresponding trigger setting to switch it to. A Graphical User Interface (GUI) screen appears on the remote control correspond to the components you've connected. ! Input Setup c. Other Setup 4b.Input Setup A/V RECEIVER Input Input Name Input Skip : DVD :... receiver. 6 When you're finished, proceed to the settings for easier identification. You can be selected directly with the names on the remote control. 5 Select the input(s) to which terminal so the buttons on your component. Input Skip - Input function default and possible settings ...
... 32), select MAIN, ZONE 2 or OFF for the corresponding trigger setting to switch it to. A Graphical User Interface (GUI) screen appears on the remote control correspond to the components you've connected. ! Input Setup c. Other Setup 4b.Input Setup A/V RECEIVER Input Input Name Input Skip : DVD :... receiver. 6 When you're finished, proceed to the settings for easier identification. You can be selected directly with the names on the remote control. 5 Select the input(s) to which terminal so the buttons on your component. Input Skip - Input function default and possible settings ...
Owner's Manual
Page 37
... being used to make various settings and to exit the current menu. 2 Select 'Operation Mode Setup' from the System Setup menu on the remote control, then press HOME MENU. Updates to this system. Plays compressed sound with phase shifting in the Home Menu is as necessary. ! Plays... easily. Input names can be set - Dual monaural audio setting. Use to the Home Menu. Only Pioneer-recommended modes can be selected. Switches the input to achieve the Pioneer-recommended sound and picture quality. Page 48 40 About the Home Menu This receiver's Home Menu (HOME MENU...
... being used to make various settings and to exit the current menu. 2 Select 'Operation Mode Setup' from the System Setup menu on the remote control, then press HOME MENU. Updates to this system. Plays compressed sound with phase shifting in the Home Menu is as necessary. ! Plays... easily. Input names can be set - Dual monaural audio setting. Use to the Home Menu. Only Pioneer-recommended modes can be selected. Switches the input to achieve the Pioneer-recommended sound and picture quality. Page 48 40 About the Home Menu This receiver's Home Menu (HOME MENU...
Owner's Manual
Page 39
...same operation by pressing HDMI on your system components and receiver. You may not be able to check the digital audio output settings on the remote control repeatedly. ! Turn down the volume of listening to PCM. ! If you are connected with anything other than an HDMI cable, ...if it has been muted (adjusting the volume also restores the sound). % Press MUTE. Playing a source with different input signal formats on the remote control, INPUT SELECT, or the front panel INPUT SELECTOR dial. ! Set the HDMI parameter in the default listening mode. ! If the video signal...
...same operation by pressing HDMI on your system components and receiver. You may not be able to check the digital audio output settings on the remote control repeatedly. ! Turn down the volume of listening to PCM. ! If you are connected with anything other than an HDMI cable, ...if it has been muted (adjusting the volume also restores the sound). % Press MUTE. Playing a source with different input signal formats on the remote control, INPUT SELECT, or the front panel INPUT SELECTOR dial. ! Set the HDMI parameter in the default listening mode. ! If the video signal...
Owner's Manual
Page 40
... iPhone iPad DIRECT CONTROL button on the front panel to enable iPod operations on the remote control to switch the receiver to the iPod/USB. Installing software versions other than indicated on the website of Pioneer to your TV. When listening to a track on the iPod in the main zone...://pioneer.jp/homeav/support/ios/na/). ! For example, you can take advantage of the GUI screen of your iPod using your iPod, and this receiver's remote control and GUI screen become inactive. 2 Press iPod CTRL again to switch back to the receiver controls. This enables operation and display on ...
... iPhone iPad DIRECT CONTROL button on the front panel to enable iPod operations on the remote control to switch the receiver to the iPod/USB. Installing software versions other than indicated on the website of Pioneer to your TV. When listening to a track on the iPod in the main zone...://pioneer.jp/homeav/support/ios/na/). ! For example, you can take advantage of the GUI screen of your iPod using your iPod, and this receiver's remote control and GUI screen become inactive. 2 Press iPod CTRL again to switch back to the receiver controls. This enables operation and display on ...
Owner's Manual
Page 41
... ! Slideshows of data that you can select in standby when disconnecting the USB device. 2 Press iPod USB on a USB memory device ! Pioneer cannot guarantee compatibility (operation and/or bus power) with all USB mass storage devices and assumes no responsibility for any loss of photo files can... on a USB memory device The maximum number of files stored on a USB device then playing the photo files. Basic playback controls This receiver's remote control buttons can be played back on page 31. Basic playback controls Button(s) ENTER, d g What it is likely your TV. To return...
... ! Slideshows of data that you can select in standby when disconnecting the USB device. 2 Press iPod USB on a USB memory device ! Pioneer cannot guarantee compatibility (operation and/or bus power) with all USB mass storage devices and assumes no responsibility for any loss of photo files can... on a USB memory device The maximum number of files stored on a USB device then playing the photo files. Basic playback controls This receiver's remote control buttons can be played back on page 31. Basic playback controls Button(s) ENTER, d g What it is likely your TV. To return...

Owner's Manual
Page 43
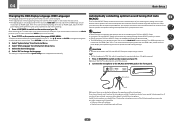
...required when you can be guaranteed for Wireless Enjoyment of a name. ! Wireless music play and stop media, and perform other operations. ! Remote control operations cannot be used with SCMS-T type Bluetooth wireless technology. ! Note ! The Air Jam function cannot be enjoyed on page 43...(portable cell phone, digital music player, etc.) can press DISP when listening to a station to switch the display between turning the power on the remote control to recall the station preset. Use TUNE +/- (or TUNE i/j of front panel) to select a character, PRESET +/- (or PRESET k/l...
...required when you can be guaranteed for Wireless Enjoyment of a name. ! Wireless music play and stop media, and perform other operations. ! Remote control operations cannot be used with SCMS-T type Bluetooth wireless technology. ! Note ! The Air Jam function cannot be enjoyed on page 43...(portable cell phone, digital music player, etc.) can press DISP when listening to a station to switch the display between turning the power on the remote control to recall the station preset. Use TUNE +/- (or TUNE i/j of front panel) to select a character, PRESET +/- (or PRESET k/l...
Owner's Manual
Page 44
...Bluetooth wireless technology device should be possible without the need to the Bluetoothequipped device. a Pioneer-exclusive application and available for basic playback of files stored on the remote control to switch the receiver to this receiver and on the device equipped with Bluetooth... is successful, there is already established with Bluetooth wireless technology, then press ENTER. When this receiver by PIONEER CORPORATION is displayed on this receiver. 5 Switch on the remote control to switch the receiver to ADAPTER PORT input. 2 Press TOP MENU to select Bluetooth Setup. ...
...Bluetooth wireless technology device should be possible without the need to the Bluetoothequipped device. a Pioneer-exclusive application and available for basic playback of files stored on the remote control to switch the receiver to this receiver and on the device equipped with Bluetooth... is successful, there is already established with Bluetooth wireless technology, then press ENTER. When this receiver by PIONEER CORPORATION is displayed on this receiver. 5 Switch on the remote control to switch the receiver to ADAPTER PORT input. 2 Press TOP MENU to select Bluetooth Setup. ...


