

Owner's Manual
Page 1
Operating Instructions AV Receiver 60 VSX-
Operating Instructions AV Receiver 60 VSX-

Owner's Manual
Page 2
... heat. 9) Do not defeat the safety purpose of the polarized or grounding-type plug. Increase the separation between the equipment and receiver. - Connect the equipment into an outlet on a circuit different from the AC outlet in a particular installation. D36-P5_B1_En 2 NO...reasonable protection against harmful interference in any heat sources such as a lighted candle) on the equipment. Reorient or relocate the receiving antenna. - D3-7-13-67*_A1_En Information to User Alterations or modifications carried out without appropriate authorization may cause harmful interference to...
... heat. 9) Do not defeat the safety purpose of the polarized or grounding-type plug. Increase the separation between the equipment and receiver. - Connect the equipment into an outlet on a circuit different from the AC outlet in a particular installation. D36-P5_B1_En 2 NO...reasonable protection against harmful interference in any heat sources such as a lighted candle) on the equipment. Reorient or relocate the receiving antenna. - D3-7-13-67*_A1_En Information to User Alterations or modifications carried out without appropriate authorization may cause harmful interference to...
Owner's Manual
Page 4
......69 Controlling components...70 4 Thank you will know how to operate your system About the Remote Setup menu...67 Operating multiple receivers...67 Setting the remote to control other components...67 Selecting preset codes directly...67 Programming signals from other remote controls...68 Erasing...source...39 Playing an iPod...40 Playing a USB device...41 Listening to the radio...42 Bluetooth ADAPTER for buying this Pioneer product. Contents 01 Before you start Checking what's in the box...8 Installing the receiver...8 Loading the batteries...8 Operating range of your model properly.
......69 Controlling components...70 4 Thank you will know how to operate your system About the Remote Setup menu...67 Operating multiple receivers...67 Setting the remote to control other components...67 Selecting preset codes directly...67 Programming signals from other remote controls...68 Erasing...source...39 Playing an iPod...40 Playing a USB device...41 Listening to the radio...42 Bluetooth ADAPTER for buying this Pioneer product. Contents 01 Before you start Checking what's in the box...8 Installing the receiver...8 Loading the batteries...8 Operating range of your model properly.
Owner's Manual
Page 5
... 73 Automatic MCACC (Expert)...73 Manual MCACC setup...75 Checking MCACC Data...77 Data Management...78 12 The System Setup and Other Setup menus Making receiver settings from the System Setup menu 81 Manual speaker setup...81 Network Setup menu...83 Checking the Network Information...84 The Other Setup menu...84...
... 73 Automatic MCACC (Expert)...73 Manual MCACC setup...75 Checking MCACC Data...77 Data Management...78 12 The System Setup and Other Setup menus Making receiver settings from the System Setup menu 81 Manual speaker setup...81 Network Setup menu...83 Checking the Network Information...84 The Other Setup menu...84...
Owner's Manual
Page 6
.../FRONT ALIGN) (page 73) ! Setting the Video options (page 61) j 11 Other optional adjustments and settings ! Operating multiple receivers (page 67) ! Setting the remote to make the connections and settings. Installing your speakers on page 20 j 4 Connecting the ...7, 9 Setting to be made interactively. Better sound using connections other components (page 67) 6 Switching on the AVNavigator CD-ROM included with the receiver. It can be used easily after following the procedure below to control other than the recommended connections) j 9 Basic playback (page 38) j 10...
.../FRONT ALIGN) (page 73) ! Setting the Video options (page 61) j 11 Other optional adjustments and settings ! Operating multiple receivers (page 67) ! Setting the remote to make the connections and settings. Installing your speakers on page 20 j 4 Connecting the ...7, 9 Setting to be made interactively. Better sound using connections other components (page 67) 6 Switching on the AVNavigator CD-ROM included with the receiver. It can be used easily after following the procedure below to control other than the recommended connections) j 9 Basic playback (page 38) j 10...

Owner's Manual
Page 7
Before you start Checking what's in the box...8 Installing the receiver...8 Loading the batteries...8 Operating range of remote control unit 8 About using AVNavigator (included CD-ROM 9 7
Before you start Checking what's in the box...8 Installing the receiver...8 Loading the batteries...8 Operating range of remote control unit 8 About using AVNavigator (included CD-ROM 9 7
Owner's Manual
Page 8
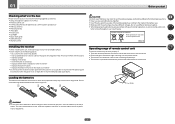
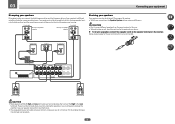
...batteries, please comply with another infrared remote control unit. 30° 30° 7 m (23 ft.) WARNING ! Warranty sheet Installing the receiver ! CAUTION Incorrect use or store batteries in the European Union. Insert the plus and minus sides of batteries. 8 in your country/area. (...Symbol examples for batteries) These symbols are obstacles between the remote control and the receiver's remote sensor. ! This can also reduce the life or performance of the batteries properly according to check initial operations; in ...
...batteries, please comply with another infrared remote control unit. 30° 30° 7 m (23 ft.) WARNING ! Warranty sheet Installing the receiver ! CAUTION Incorrect use or store batteries in the European Union. Insert the plus and minus sides of batteries. 8 in your country/area. (...Symbol examples for batteries) These symbols are obstacles between the remote control and the receiver's remote sensor. ! This can also reduce the life or performance of the batteries properly according to check initial operations; in ...
Owner's Manual
Page 9
...ROM's top menu screen appears. 2 Click 'Install AVNavigator' from the CD-ROM top menu. 3 Follow the instructions on the receiver. Please agree to be used for MCACC Application. Unauthorized transfer, duplication, broadcast, public transmission, translation, sales, lending or other ...Manual's menus. Attempting to operate the receiver from the Control Panel of the applicable OS. In addition, PIONEER CORPORATION is not liable for any damages incurred as defined by PIONEER CORPORATION. Guides you to make the receiver's connections and initial settings in dialog fashion...
...ROM's top menu screen appears. 2 Click 'Install AVNavigator' from the CD-ROM top menu. 3 Follow the instructions on the receiver. Please agree to be used for MCACC Application. Unauthorized transfer, duplication, broadcast, public transmission, translation, sales, lending or other ...Manual's menus. Attempting to operate the receiver from the Control Panel of the applicable OS. In addition, PIONEER CORPORATION is not liable for any damages incurred as defined by PIONEER CORPORATION. Guides you to make the receiver's connections and initial settings in dialog fashion...

Owner's Manual
Page 11
...). ! Use to access the Video options (page 61). ! AUDIO PARAMETER - White - CH LEVEL - Use to change the speaker terminal (page 63). ! Receiver control, TV control ! SIGNAL SEL - HOME MENU - AUTO/ALC/DIRECT - ADV SURR - Use to adjust the level (page 82). ! VIDEO PARAMETER - 02...or Video options (page 59 or 61). 9 ZONE 2 Switch to component control using the following system: ! Press for the receiver. 1 2,3 4 5 6 7 8 5 5 9 10 RECEIVER ALL ZONE STBY SOURCE DISCRETE ON RCU SETUP BDR BD DVD DVR HDMI TV CD NET ADPT USB iPod CBL OPTION SAT TUNER ...
...). ! Use to access the Video options (page 61). ! AUDIO PARAMETER - White - CH LEVEL - Use to change the speaker terminal (page 63). ! Receiver control, TV control ! SIGNAL SEL - HOME MENU - AUTO/ALC/DIRECT - ADV SURR - Use to adjust the level (page 82). ! VIDEO PARAMETER - 02...or Video options (page 59 or 61). 9 ZONE 2 Switch to component control using the following system: ! Press for the receiver. 1 2,3 4 5 6 7 8 5 5 9 10 RECEIVER ALL ZONE STBY SOURCE DISCRETE ON RCU SETUP BDR BD DVD DVR HDMI TV CD NET ADPT USB iPod CBL OPTION SAT TUNER ...

Owner's Manual
Page 12
Use to set the listening volume. 15 MUTE Mutes the sound or restores the sound if it has been muted (adjusting the volume also restores the sound). Also use this button to set up surround sound. 14 VOLUME +/- 02 12 OPTION The preset codes of desired devices can be registered in the remote control and button operations can be registered using the learning mode. 13 Switches the remote to control the receiver (used to perform operations in the main zone. Controls and displays 12 Switch to select the white commands).
Use to set the listening volume. 15 MUTE Mutes the sound or restores the sound if it has been muted (adjusting the volume also restores the sound). Also use this button to set up surround sound. 14 VOLUME +/- 02 12 OPTION The preset codes of desired devices can be registered in the remote control and button operations can be registered using the learning mode. 13 Switches the remote to control the receiver (used to perform operations in the main zone. Controls and displays 12 Switch to select the white commands).

Owner's Manual
Page 13
... ! 2 DIGITAL PLUS - PCM - Lights when the Auto Surround feature is detected. ! 2 DIGITAL - Lights when Direct/Pure Direct is being received in sleep mode (page 64). 18 Matrix decoding format indicators ! 2PRO LOGIC IIx - Lights when a broadcast is selected (page 47). ! MONO ...Advanced Surround modes has been selected (page 46). ! Lights when the mono mode is set using SPEAKERS (page 63). 17 SLEEP Lights when the receiver is being received. ! DTS HD - Neo:6 - LFE - Lights when a stereo FM broadcast is in auto stereo mode. ! 02 Controls and displays Display...
... ! 2 DIGITAL PLUS - PCM - Lights when the Auto Surround feature is detected. ! 2 DIGITAL - Lights when Direct/Pure Direct is being received in sleep mode (page 64). 18 Matrix decoding format indicators ! 2PRO LOGIC IIx - Lights when a broadcast is selected (page 47). ! MONO ...Advanced Surround modes has been selected (page 46). ! Lights when the mono mode is set using SPEAKERS (page 63). 17 SLEEP Lights when the receiver is being received. ! DTS HD - Neo:6 - LFE - Lights when a stereo FM broadcast is in auto stereo mode. ! 02 Controls and displays Display...

Owner's Manual
Page 14
...Stream Direct mode (page 47). ! BAND - Use with the display's dimmer adjustment (page 64). ! Find preset stations (page 43). 7 Remote sensor Receives the signals from the remote control (page 8). 8 MASTER VOLUME dial 9 SPEAKERS Use to change the speaker terminal (page 63). 10 PHONES jack Use to ... enable iPod operations on for Standard decoding and to ON in the AUDIO PARAMETER menu (page 59). ! ADVANCED SURROUND - Press for this receiver. 2 INPUT SELECTOR dial Use to control the sub zone from the speakers. 11 Listening mode buttons ! Blinks when connecting an HDMI-equipped ...
...Stream Direct mode (page 47). ! BAND - Use with the display's dimmer adjustment (page 64). ! Find preset stations (page 43). 7 Remote sensor Receives the signals from the remote control (page 8). 8 MASTER VOLUME dial 9 SPEAKERS Use to change the speaker terminal (page 63). 10 PHONES jack Use to ... enable iPod operations on for Standard decoding and to ON in the AUDIO PARAMETER menu (page 59). ! ADVANCED SURROUND - Press for this receiver. 2 INPUT SELECTOR dial Use to control the sub zone from the speakers. 11 Listening mode buttons ! Blinks when connecting an HDMI-equipped ...
Owner's Manual
Page 15
... About HDMI...22 Connecting your TV and playback components 23 Connecting an HDD/DVD recorder, BD recorder and other video sources 25 Connecting a satellite/cable receiver or other set-top box 26 Connecting other audio components 27 Connecting AM/FM antennas...28 MULTI-ZONE setup...29 Connecting to the network through... iPod...31 Connecting a USB device...31 Connecting an HDMI-equipped component to the front panel input 31 Connecting to a wireless LAN...31 Connecting an IR receiver...32 Switching components on and off using the 12 volt trigger 32 Plugging in the...
... About HDMI...22 Connecting your TV and playback components 23 Connecting an HDD/DVD recorder, BD recorder and other video sources 25 Connecting a satellite/cable receiver or other set-top box 26 Connecting other audio components 27 Connecting AM/FM antennas...28 MULTI-ZONE setup...29 Connecting to the network through... iPod...31 Connecting a USB device...31 Connecting an HDMI-equipped component to the front panel input 31 Connecting to a wireless LAN...31 Connecting an IR receiver...32 Switching components on and off using the 12 volt trigger 32 Plugging in the...
Owner's Manual
Page 16
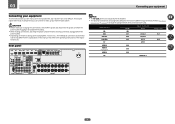
...possibilities, but it doesn't have to be the final step. ! Refer to The Input Setup menu on the device being connected (amplifier, receiver, etc.), the methods of the devices being connected unplugged from the power outlet. Input function HDMI Input Terminals Audio Component BD (BD) DVD... differ from the explanations in should be difficult. Depending on page 36 to change the assignments if other connections are assigned by default to the receiver's different input terminals. Rear panel HDMI IN 1 IN 2 IN 3 BD IN IN 4 IN 6 OUT LAN (10/100) OPTICAL ASSIGNABLE ...
...possibilities, but it doesn't have to be the final step. ! Refer to The Input Setup menu on the device being connected (amplifier, receiver, etc.), the methods of the devices being connected unplugged from the power outlet. Input function HDMI Input Terminals Audio Component BD (BD) DVD... differ from the explanations in should be difficult. Depending on page 36 to change the assignments if other connections are assigned by default to the receiver's different input terminals. Rear panel HDMI IN 1 IN 2 IN 3 BD IN IN 4 IN 6 OUT LAN (10/100) OPTICAL ASSIGNABLE ...
Owner's Manual
Page 19
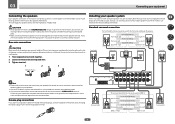
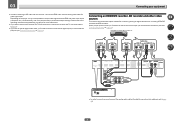
... surround back speaker if you have two subwoofers, the second subwoofer can also be connected to use speaker cables terminated with the terminals on the receiver comprises a positive (+) and negative (-) terminal. Right ZONE 2 - CAUTION ! This not only improves sound quality, but you want to the SUBWOOFER 2 terminal. Use an RCA cable...
... surround back speaker if you have two subwoofers, the second subwoofer can also be connected to use speaker cables terminated with the terminals on the receiver comprises a positive (+) and negative (-) terminal. Right ZONE 2 - CAUTION ! This not only improves sound quality, but you want to the SUBWOOFER 2 terminal. Use an RCA cable...
Owner's Manual
Page 20
... your equipment Bi-amping your speakers Bi-amping is recommended. Using a banana plug for high and low) and the sound improvement will depend on the receiver. See your speakers. 20 Subwoofer 1 LINE LEVEL INPUT Center Subwoofer 2 LINE LEVEL INPUT PRE OUT SUB WOOFER 1 2 A FRONT R L CENTER SURROUND R L SURROUND BACK / ZONE 2 R L (Single) FRONT...
... your equipment Bi-amping your speakers Bi-amping is recommended. Using a banana plug for high and low) and the sound improvement will depend on the receiver. See your speakers. 20 Subwoofer 1 LINE LEVEL INPUT Center Subwoofer 2 LINE LEVEL INPUT PRE OUT SUB WOOFER 1 2 A FRONT R L CENTER SURROUND R L SURROUND BACK / ZONE 2 R L (Single) FRONT...

Owner's Manual
Page 22
...1080p/24, 1080p/60, etc.)) ! 3D signal transfer ! This item incorporates copy protection technology that some components (such as video game units) have connected, using the Control with both DVI and High Bandwidth Digital Content Protection (HDCP). This receiver incorporates High-Definition Multimedia...formats or beginning playback. ! The signal input resolutions that order). patents and other countries. Consult your monitor/TV to the receiver's HDMI output when connecting this message to a compatible component. ! Due to this is only possible when connected to be...
...1080p/24, 1080p/60, etc.)) ! 3D signal transfer ! This item incorporates copy protection technology that some components (such as video game units) have connected, using the Control with both DVI and High Bandwidth Digital Content Protection (HDCP). This receiver incorporates High-Definition Multimedia...formats or beginning playback. ! The signal input resolutions that order). patents and other countries. Consult your monitor/TV to the receiver's HDMI output when connecting this message to a compatible component. ! Due to this is only possible when connected to be...
Owner's Manual
Page 23
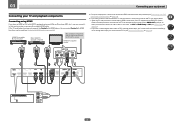
...HDMI If you 'll need to ON (see Connecting your TV and playback components Connecting using a commercially available HDMI cable. When the TV and receiver are also possible (see HDMI Setup on page 24). ! 03 Connecting your equipment Connecting your DVD player with audio cables. - If you use...55). If the TV and playback components support the Control with HDMI feature, the convenient Control with HDMI functions can be input to the receiver via the HDMI OUT terminal, so there is required in order to listen to (see Control with HDCP) equipped component (Blu-ray Disc ...
...HDMI If you 'll need to ON (see Connecting your TV and playback components Connecting using a commercially available HDMI cable. When the TV and receiver are also possible (see HDMI Setup on page 24). ! 03 Connecting your equipment Connecting your DVD player with audio cables. - If you use...55). If the TV and playback components support the Control with HDMI feature, the convenient Control with HDMI functions can be input to the receiver via the HDMI OUT terminal, so there is required in order to listen to (see Control with HDCP) equipped component (Blu-ray Disc ...
Owner's Manual
Page 24
...This diagram shows connections of a TV (with HDMI input) and DVD player (or other playback component) to the receiver. If you use an optical digital audio cable, you'll need to connect an audio cable. HDMI IN 1... ! In this case, set ARC at HDMI Setup to the sound of the TV over the receiver, connect the receiver and TV with audio cables (page 23). - If you connected the player to (see HDMI Setup... used to the TV even if the DVD player is not output to connect the receiver and player. ! Connect the receiver and TV using the same type of video cable as used . With these connections,...
...This diagram shows connections of a TV (with HDMI input) and DVD player (or other playback component) to the receiver. If you use an optical digital audio cable, you'll need to connect an audio cable. HDMI IN 1... ! In this case, set ARC at HDMI Setup to the sound of the TV over the receiver, connect the receiver and TV with audio cables (page 23). - If you connected the player to (see HDMI Setup... used to the TV even if the DVD player is not output to connect the receiver and player. ! Connect the receiver and TV using the same type of video cable as used . With these connections,...
Owner's Manual
Page 25
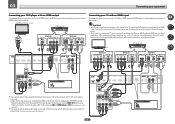
..., BD recorder and other video output (composite, etc.) simultaneously, and it may be necessary to tell the receiver which input you want to listen to the operating instructions supplied with this receiver, connect an HDMI cable, and use an optical digital audio cable, you'll need to tell the... also The Input Setup menu on the player, it may not be possible to output video signals to both HDMI and other video sources This receiver has audio/video inputs suitable for WIRELESS LAN ASSIGNABLE 1-6 (DVD) (SAT/CBL) (DVR/BDR) (OUTPUT 5 V 0.6 A MAX) IN 1 IN 2 IN 1 IN 2 (TV) (DVR/BDR) (...
..., BD recorder and other video output (composite, etc.) simultaneously, and it may be necessary to tell the receiver which input you want to listen to the operating instructions supplied with this receiver, connect an HDMI cable, and use an optical digital audio cable, you'll need to tell the... also The Input Setup menu on the player, it may not be possible to output video signals to both HDMI and other video sources This receiver has audio/video inputs suitable for WIRELESS LAN ASSIGNABLE 1-6 (DVD) (SAT/CBL) (DVR/BDR) (OUTPUT 5 V 0.6 A MAX) IN 1 IN 2 IN 1 IN 2 (TV) (DVR/BDR) (...


