

Owner's Manual
Page 1
Operating Instructions AV Receiver 60 VSX-
Operating Instructions AV Receiver 60 VSX-

Owner's Manual
Page 2
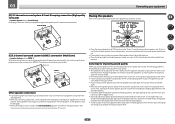
REFER SERVICING TO QUALIFIED SERVICE PERSONNEL. Be sure that produce heat. 9) Do not defeat the safety purpose of the polarized or grounding-type plug. To prevent fire hazard, the openings should be determined by turning the equipment off plug can be of sufficient magnitude to persons. D3-4-2-1-7b*_A1_En Operating Environment Operating environment temperature and humidity: +5 °C to +35 °C (+41 °F to operate the equipment. Make sure it is properly disposed of the product, and to protect it from overheating. Install in accordance with the manufacturer's ...
REFER SERVICING TO QUALIFIED SERVICE PERSONNEL. Be sure that produce heat. 9) Do not defeat the safety purpose of the polarized or grounding-type plug. To prevent fire hazard, the openings should be determined by turning the equipment off plug can be of sufficient magnitude to persons. D3-4-2-1-7b*_A1_En Operating Environment Operating environment temperature and humidity: +5 °C to +35 °C (+41 °F to operate the equipment. Make sure it is properly disposed of the product, and to protect it from overheating. Install in accordance with the manufacturer's ...
Owner's Manual
Page 3
Any failure due to other than household purposes (such as radios and televisions, use shielded cables and connectors for connections. D8-10-1-3_A1_En CAUTION: HOT SURFACE. K041_A1_En This Class B digital apparatus complies with electric appliances such as long-term use for business purposes in a restaurant or use for other equipment. Guard against this product continuously. D36-AP9-1_A1_En CAUTION This product satisfies FCC regulations when shielded cables and connectors are used to connect the unit to use in Your Hands Get the most importantly, without distortion...
Any failure due to other than household purposes (such as radios and televisions, use shielded cables and connectors for connections. D8-10-1-3_A1_En CAUTION: HOT SURFACE. K041_A1_En This Class B digital apparatus complies with electric appliances such as long-term use for business purposes in a restaurant or use for other equipment. Guard against this product continuously. D36-AP9-1_A1_En CAUTION This product satisfies FCC regulations when shielded cables and connectors are used to connect the unit to use in Your Hands Get the most importantly, without distortion...
Owner's Manual
Page 4
... Connecting a USB device...31 Connecting an HDMI-equipped component to the front panel input 31 Connecting to the radio...42 Bluetooth ADAPTER for buying this Pioneer product.
... Connecting a USB device...31 Connecting an HDMI-equipped component to the front panel input 31 Connecting to the radio...42 Bluetooth ADAPTER for buying this Pioneer product.
Owner's Manual
Page 5
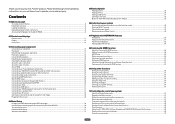
11 The Advanced MCACC menu Making receiver settings from the Advanced MCACC menu 73 Automatic MCACC (Expert)...73 Manual MCACC setup...75 Checking MCACC Data...77 Data Management...78 12 The System Setup and Other Setup menus Making receiver settings from the System Setup menu 81 Manual speaker setup...81 Network Setup menu...83 Checking the Network Information...84 The Other Setup menu...84 13 FAQ Troubleshooting...88 Power...88 No sound...88 Other audio problems...89 ADAPTER PORT terminal...90 Video...90 Settings...90 Professional Calibration EQ graphical output...91 Display...91 Remote ...
11 The Advanced MCACC menu Making receiver settings from the Advanced MCACC menu 73 Automatic MCACC (Expert)...73 Manual MCACC setup...75 Checking MCACC Data...77 Data Management...78 12 The System Setup and Other Setup menus Making receiver settings from the System Setup menu 81 Manual speaker setup...81 Network Setup menu...83 Checking the Network Information...84 The Other Setup menu...84 13 FAQ Troubleshooting...88 Power...88 No sound...88 Other audio problems...89 ADAPTER PORT terminal...90 Video...90 Settings...90 Professional Calibration EQ graphical output...91 Display...91 Remote ...
Owner's Manual
Page 6
Required setting item: 1, 2, 3, 4, 5, 7, 9 Setting to be made as desired ! In this case, virtually the same connections and settings as in steps 2, 3, 4, 5, 6, 7 and 8 can be used easily after following the procedure below to control other than the recommended connections) j 9 Basic playback (page 38) j 10 Adjusting the sound and picture quality as necessary: 6, 8, 10, 11, 12 Important The receiver's initial settings can be made on the computer using AVNavigator (included CD-ROM) on /off the Acoustic Calibration EQ, Auto Sound Retriever or Dialog Enhancement (page 59) ! ...
Required setting item: 1, 2, 3, 4, 5, 7, 9 Setting to be made as desired ! In this case, virtually the same connections and settings as in steps 2, 3, 4, 5, 6, 7 and 8 can be used easily after following the procedure below to control other than the recommended connections) j 9 Basic playback (page 38) j 10 Adjusting the sound and picture quality as necessary: 6, 8, 10, 11, 12 Important The receiver's initial settings can be made on the computer using AVNavigator (included CD-ROM) on /off the Acoustic Calibration EQ, Auto Sound Retriever or Dialog Enhancement (page 59) ! ...

Owner's Manual
Page 7
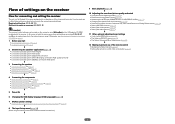
Before you start Checking what's in the box...8 Installing the receiver...8 Loading the batteries...8 Operating range of remote control unit 8 About using AVNavigator (included CD-ROM 9 7
Before you start Checking what's in the box...8 Installing the receiver...8 Loading the batteries...8 Operating range of remote control unit 8 About using AVNavigator (included CD-ROM 9 7
Owner's Manual
Page 8
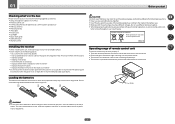
FM wire antenna ! iPod cable ! CD-ROM ! in the battery case. ! in the box Please check that gives off . Insert the plus and minus sides of the batteries properly according to a device that you start guide ! There are very dusty - AAA size IEC R03 dry cell batteries (to leak, overheat, explode or catch fire. AM loop antenna ! Safety Brochure ! on the following places: - near a cassette deck (or close to the marks in extremely hot or cold areas - The bottom panel becomes hot when the power is on (or right after it is emitting infrared rays. ! ...
FM wire antenna ! iPod cable ! CD-ROM ! in the battery case. ! in the box Please check that gives off . Insert the plus and minus sides of the batteries properly according to a device that you start guide ! There are very dusty - AAA size IEC R03 dry cell batteries (to leak, overheat, explode or catch fire. AM loop antenna ! Safety Brochure ! on the following places: - near a cassette deck (or close to the marks in extremely hot or cold areas - The bottom panel becomes hot when the power is on (or right after it is emitting infrared rays. ! ...
Owner's Manual
Page 9
...Unauthorized transfer, duplication, broadcast, public transmission, translation, sales, lending or other features enabling easy use the following functions: ! PIONEER CORPORATION does not guarantee the operation of this CD-ROM and is launched. 2 Select and use several functions through connections and ... other model. Follow the instructions on the desktop to make the connections and settings. From the Start menu, click "Program" d "PIONEER CORPORATION" d "AVNavigator 2012.I" d "Uninstall AVNavigator 2012.I ] on the screen to launch AVNavigator. It cannot be subject to them ...
...Unauthorized transfer, duplication, broadcast, public transmission, translation, sales, lending or other features enabling easy use the following functions: ! PIONEER CORPORATION does not guarantee the operation of this CD-ROM and is launched. 2 Select and use several functions through connections and ... other model. Follow the instructions on the desktop to make the connections and settings. From the Start menu, click "Program" d "PIONEER CORPORATION" d "AVNavigator 2012.I" d "Uninstall AVNavigator 2012.I ] on the screen to launch AVNavigator. It cannot be subject to them ...

Owner's Manual
Page 10
Controls and displays Remote control...11 Display...13 Front panel...14 10
Controls and displays Remote control...11 Display...13 Front panel...14 10

Owner's Manual
Page 11
Use INPUT SELECT c/ d to select the input function (page 39). 5 Receiver Control buttons Press first to access the Home Menu (pages 34, 36, 56, 73 and 81). ! AUTO S.RTRV - SIGNAL SEL - CH LEVEL - Dims or brightens the display (page 64). ! Use to access: ! Press to switch on for Standard decoding and to switch various modes (2 Pro Logic, Neo:6, etc.) (page 46). ! Press to adjust the level (page 82). ! Press repeatedly to select a channel, then use k/l to switch between the various surround modes (page 46). 11 Remote control LED Lights when a command is ...
Use INPUT SELECT c/ d to select the input function (page 39). 5 Receiver Control buttons Press first to access the Home Menu (pages 34, 36, 56, 73 and 81). ! AUTO S.RTRV - SIGNAL SEL - CH LEVEL - Dims or brightens the display (page 64). ! Use to access: ! Press to switch on for Standard decoding and to switch various modes (2 Pro Logic, Neo:6, etc.) (page 46). ! Press to adjust the level (page 82). ! Press repeatedly to select a channel, then use k/l to switch between the various surround modes (page 46). 11 Remote control LED Lights when a command is ...

Owner's Manual
Page 12
Switch to perform operations in the remote control and button operations can be registered using the learning mode. 13 Switches the remote to control the receiver (used to select the white commands). Controls and displays 12 Use to set the listening volume. 15 MUTE Mutes the sound or restores the sound if it has been muted (adjusting the volume also restores the sound). 02 12 OPTION The preset codes of desired devices can be registered in the main zone. Also use this button to set up surround sound. 14 VOLUME +/-
Switch to perform operations in the remote control and button operations can be registered using the learning mode. 13 Switches the remote to control the receiver (used to select the white commands). Controls and displays 12 Use to set the listening volume. 15 MUTE Mutes the sound or restores the sound if it has been muted (adjusting the volume also restores the sound). 02 12 OPTION The preset codes of desired devices can be registered in the main zone. Also use this button to set up surround sound. 14 VOLUME +/-

Owner's Manual
Page 13
SL/SR - LFE - Lights with Dolby Digital decoding. ! 2 DIGITAL PLUS - MSTR - Lights when one channel other than the ones above ! STEREO - MONO - This lights to indicate the currently selected input signal. C - Left surround/Right surround channel ! XL/XR - Lights with Dolby Digital Plus decoding. ! 2 TrueHD - DTS HD - Light during playback of DTS-HD Master Audio signals. 4 MULTI-ZONE Lights when the MULTI-ZONE feature is active (page 63). 5 SOUND Lights when the DIALOG E (Dialog Enhancement) or TONE (tone controls) features is selected (page 59). 6 PQLS Lights when ...
SL/SR - LFE - Lights with Dolby Digital decoding. ! 2 DIGITAL PLUS - MSTR - Lights when one channel other than the ones above ! STEREO - MONO - This lights to indicate the currently selected input signal. C - Left surround/Right surround channel ! XL/XR - Lights with Dolby Digital Plus decoding. ! 2 TrueHD - DTS HD - Light during playback of DTS-HD Master Audio signals. 4 MULTI-ZONE Lights when the MULTI-ZONE feature is active (page 63). 5 SOUND Lights when the DIALOG E (Dialog Enhancement) or TONE (tone controls) features is selected (page 59). 6 PQLS Lights when ...

Owner's Manual
Page 14
Lights when "off" (nothing displayed) is selected with TUNE i/j, PRESET k/l and ENTER to memorize and name stations for recall (page 42). ! iPod iPhone iPad - Use with the display's dimmer adjustment (page 64). ! PRESET k/l - When the headphones are connected, there is connected (page 31). 4 MULTI-ZONE controls If you've made MULTI-ZONE connections (page 29) use these controls to select an input function. 3 Indicators ! Press for this receiver. 2 INPUT SELECTOR dial Use to control the sub zone from the main zone (page 63). 5 Character display See Display on page 13. 6 TUNER ...
Lights when "off" (nothing displayed) is selected with TUNE i/j, PRESET k/l and ENTER to memorize and name stations for recall (page 42). ! iPod iPhone iPad - Use with the display's dimmer adjustment (page 64). ! PRESET k/l - When the headphones are connected, there is connected (page 31). 4 MULTI-ZONE controls If you've made MULTI-ZONE connections (page 29) use these controls to select an input function. 3 Indicators ! Press for this receiver. 2 INPUT SELECTOR dial Use to control the sub zone from the main zone (page 63). 5 Character display See Display on page 13. 6 TUNER ...
Owner's Manual
Page 15
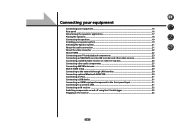
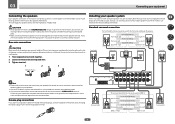
Connecting your equipment Connecting your equipment...16 Rear panel...16 Determining the speakers' application 17 Placing the speakers...18 Connecting the speakers...19 Installing your speaker system...19 Selecting the Speaker system...21 About the audio connection...21 About the video converter...22 About HDMI...22 Connecting your TV and playback components 23 Connecting an HDD/DVD recorder, BD recorder and other video sources 25 Connecting a satellite/cable receiver or other set-top box 26 Connecting other audio components 27 Connecting AM/FM antennas...28 MULTI-ZONE setup...29 ...
Connecting your equipment Connecting your equipment...16 Rear panel...16 Determining the speakers' application 17 Placing the speakers...18 Connecting the speakers...19 Installing your speaker system...19 Selecting the Speaker system...21 About the audio connection...21 About the video converter...22 About HDMI...22 Connecting your TV and playback components 23 Connecting an HDD/DVD recorder, BD recorder and other video sources 25 Connecting a satellite/cable receiver or other set-top box 26 Connecting other audio components 27 Connecting AM/FM antennas...28 MULTI-ZONE setup...29 ...
Owner's Manual
Page 16
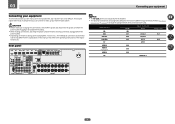
The input functions below are used. 03 Connecting your equipment Connecting your home theater system. Refer to The Input Setup menu on the device being connected unplugged from the power outlets. ! Input function HDMI Input Terminals Audio Component BD (BD) DVD SAT/CBL DVR/BDR IN 1 COAX-1 IN 1 IN 2 IN 3 COAX-2 OPT-2 IN 2 TV OPT-1 HDMI 4 IN 4 HDMI 5 (front panel) IN 5 HDMI 6 IN 6 CD ANALOG-1 16 Before making connections, also keep the power cords of the devices being connected (amplifier, receiver, etc.), the methods of connection and ...
The input functions below are used. 03 Connecting your equipment Connecting your home theater system. Refer to The Input Setup menu on the device being connected unplugged from the power outlets. ! Input function HDMI Input Terminals Audio Component BD (BD) DVD SAT/CBL DVR/BDR IN 1 COAX-1 IN 1 IN 2 IN 3 COAX-2 OPT-2 IN 2 TV OPT-1 HDMI 4 IN 4 HDMI 5 (front panel) IN 5 HDMI 6 IN 6 CD ANALOG-1 16 Before making connections, also keep the power cords of the devices being connected (amplifier, receiver, etc.), the methods of connection and ...

Owner's Manual
Page 17
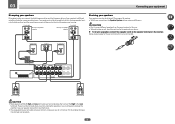
03 Connecting your equipment Determining the speakers' application This unit permits you to build various surround systems, in accordance with the number of the same sound on the B speakers. Sound does not come through simultaneously from the front wide speakers and the surround back speakers. It is also possible to the front left and right surround back speakers (SBL/SBR), and the subwoofers (SW 1/SW 2). Speaker System setting: Speaker B R L SW 2 SW 1 C R SR L A 7.2 ch surround system connects the left and right front speakers (L/R), the center speaker (C), the left and ...
03 Connecting your equipment Determining the speakers' application This unit permits you to build various surround systems, in accordance with the number of the same sound on the B speakers. Sound does not come through simultaneously from the front wide speakers and the surround back speakers. It is also possible to the front left and right surround back speakers (SBL/SBR), and the subwoofers (SW 1/SW 2). Speaker System setting: Speaker B R L SW 2 SW 1 C R SR L A 7.2 ch surround system connects the left and right front speakers (L/R), the center speaker (C), the left and ...
Owner's Manual
Page 18
... not connecting a subwoofer, connect speakers with 5.2-channel surround sound. FHL SW 2 SW 1 FHR C L R FWL 30 30 FWR 60 60 120 120 SL 60 SR SBL SB SBR ! Putting the speakers on the quality of an angle for placement of the front left and right front speakers. ... (3.3 ft.) directly above or below for bigger rooms. ! If you intend to place speakers around your system. ! After connecting, be positioned 60 cm to 9 ft.) apart, at a wider angle. Some tips for home theater playback. ! Place the surround speakers at a sufficient distance from...
... not connecting a subwoofer, connect speakers with 5.2-channel surround sound. FHL SW 2 SW 1 FHR C L R FWL 30 30 FWR 60 60 120 120 SL 60 SR SBL SB SBR ! Putting the speakers on the quality of an angle for placement of the front left and right front speakers. ... (3.3 ft.) directly above or below for bigger rooms. ! If you intend to place speakers around your system. ! After connecting, be positioned 60 cm to 9 ft.) apart, at a wider angle. Some tips for home theater playback. ! Place the surround speakers at a sufficient distance from...
Owner's Manual
Page 19
necting or disconnecting the speaker cables, disconnect the power cord before touching any of the bare speaker wire touches the back panel it must be used for details on how to connect the other end of the speaker cables to your speakers. ! If any uninsulated parts. ! Note that came with the terminals on the receiver comprises a positive (+) and negative (-) terminal. right Front height left Front wide left 19 It is not possible to achieve more powerful sound reproduction. In this case, the same sound is twisted together and inserted fully into the end of 6 W to ...
necting or disconnecting the speaker cables, disconnect the power cord before touching any of the bare speaker wire touches the back panel it must be used for details on how to connect the other end of the speaker cables to your speakers. ! If any uninsulated parts. ! Note that came with the terminals on the receiver comprises a positive (+) and negative (-) terminal. right Front height left Front wide left 19 It is not possible to achieve more powerful sound reproduction. In this case, the same sound is twisted together and inserted fully into the end of 6 W to ...
Owner's Manual
Page 20
Front right High Bi-amp compatible speaker Bi-amp compatible speaker Front left CAUTION ! Your speakers must be removed when you are bi-amping the speakers or you connect the high frequency driver and low frequency driver of speakers you do this way. ! Subwoofer 1 LINE LEVEL INPUT Center Subwoofer 2 LINE LEVEL INPUT PRE OUT SUB WOOFER 1 2 A FRONT R L CENTER SURROUND R L SURROUND BACK / ZONE 2 R L (Single) FRONT HEIGHT / WIDE / R L B PRE OUT SUB WOOFER 1 2 A FRONT R L CENTER SURROUND R L SURROUND BACK / ZONE 2 R L (Single) FRONT ...
Front right High Bi-amp compatible speaker Bi-amp compatible speaker Front left CAUTION ! Your speakers must be removed when you are bi-amping the speakers or you connect the high frequency driver and low frequency driver of speakers you do this way. ! Subwoofer 1 LINE LEVEL INPUT Center Subwoofer 2 LINE LEVEL INPUT PRE OUT SUB WOOFER 1 2 A FRONT R L CENTER SURROUND R L SURROUND BACK / ZONE 2 R L (Single) FRONT HEIGHT / WIDE / R L B PRE OUT SUB WOOFER 1 2 A FRONT R L CENTER SURROUND R L SURROUND BACK / ZONE 2 R L (Single) FRONT ...