
Owner's Manual
Page 5
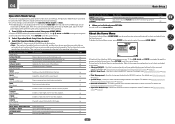
......75 Checking MCACC Data...77 Data Management...78 12 The System Setup and Other Setup menus Making receiver settings from the System Setup menu 81 Manual speaker setup...81 Network Setup menu...83 Checking the Network Information...84 The Other Setup menu...84 13 FAQ Troubleshooting...88 Power...88 No sound...
......75 Checking MCACC Data...77 Data Management...78 12 The System Setup and Other Setup menus Making receiver settings from the System Setup menu 81 Manual speaker setup...81 Network Setup menu...83 Checking the Network Information...84 The Other Setup menu...84 13 FAQ Troubleshooting...88 Power...88 No sound...
Owner's Manual
Page 9
... and other features enabling easy use of various functions, including an Interactive Manual that go beyond the scope of "personal use" or "citation" as a result of this CD-ROM is granted under license by PIONEER CORPORATION. Wiring Navi only starts up . Wiring Navi - Describes the ...the included CD-ROM from the Control Panel of its use several functions through connections and initial settings in the AVNavigator Interactive Manual's menus. In addition, PIONEER CORPORATION is also possible to operate the receiver from the CD-ROM top menu. 3 Follow the instructions on this CD...
... and other features enabling easy use of various functions, including an Interactive Manual that go beyond the scope of "personal use" or "citation" as a result of this CD-ROM is granted under license by PIONEER CORPORATION. Wiring Navi only starts up . Wiring Navi - Describes the ...the included CD-ROM from the Control Panel of its use several functions through connections and initial settings in the AVNavigator Interactive Manual's menus. In addition, PIONEER CORPORATION is also possible to operate the receiver from the CD-ROM top menu. 3 Follow the instructions on this CD...
Owner's Manual
Page 16
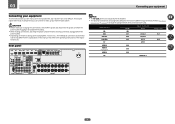
.../BDR IN 1 COAX-1 IN 1 IN 2 IN 3 COAX-2 OPT-2 IN 2 TV OPT-1 HDMI 4 IN 4 HDMI 5 (front panel) IN 5 HDMI 6 IN 6 CD ANALOG-1 16 Plugging in this manual. Refer to The Input Setup menu on the device being connected (amplifier, receiver, etc.), the methods of components you can connect to make up your...
.../BDR IN 1 COAX-1 IN 1 IN 2 IN 3 COAX-2 OPT-2 IN 2 TV OPT-1 HDMI 4 IN 4 HDMI 5 (front panel) IN 5 HDMI 6 IN 6 CD ANALOG-1 16 Plugging in this manual. Refer to The Input Setup menu on the device being connected (amplifier, receiver, etc.), the methods of components you can connect to make up your...
Owner's Manual
Page 19
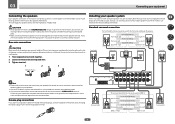
... bare speaker wire touches the back panel it must be used for details on the receiver comprises a positive (+) and negative (-) terminal. Please refer to the manual that all the bare speaker wire is output from speakers being knocked over or falling in .) Installing your speaker system At the very least, front...
... bare speaker wire touches the back panel it must be used for details on the receiver comprises a positive (+) and negative (-) terminal. Please refer to the manual that all the bare speaker wire is output from speakers being knocked over or falling in .) Installing your speaker system At the very least, front...
Owner's Manual
Page 20
...-amp compatible speaker Front left CAUTION ! Using a banana plug for bi-amping. These must be bi-wired if they support bi-amping. ! See your speaker manual for bi-amping shown above. % To bi-wire a speaker, connect two speaker cords to the Low terminals. When bi-wiring as well, heed the cautions...
...-amp compatible speaker Front left CAUTION ! Using a banana plug for bi-amping. These must be bi-wired if they support bi-amping. ! See your speaker manual for bi-amping shown above. % To bi-wire a speaker, connect two speaker cords to the Low terminals. When bi-wiring as well, heed the cautions...

Owner's Manual
Page 30
...see Network Setup menu on page 83. Note ! The Bluetooth wireless technology enabled device must sign a contract with the AS-BT100. Pioneer does not guarantee proper connection and operation of this receiver to the LAN terminal on your router (with or without the built-in...Bluetooth wireless technology (portable cell phone, digital music player, etc.) can be used to listen to music wirelessly. ! Refer to the operation manual of your router. When using a broadband Internet connection, a contract with an Internet service provider is connected to this receiver, a product equipped...
...see Network Setup menu on page 83. Note ! The Bluetooth wireless technology enabled device must sign a contract with the AS-BT100. Pioneer does not guarantee proper connection and operation of this receiver to the LAN terminal on your router (with or without the built-in...Bluetooth wireless technology (portable cell phone, digital music player, etc.) can be used to listen to music wirelessly. ! Refer to the operation manual of your router. When using a broadband Internet connection, a contract with an Internet service provider is connected to this receiver, a product equipped...
Owner's Manual
Page 32
...second to check for any power cord other cables. ponent to 10 second HDMI initialization process begins. Note that have connected all your nearest Pioneer authorized independent service company for the connection. Handle the power cord by pressing the input function(s) you 'll be possible if direct light...you set on each end for a replacement. ! The HDMI indicator in a while. For details about the Control with HDMI feature, see the manual supplied with a mono mini-plug on page 36. Do not use the IR terminology. If using 12 volt triggers when you have a standby...
...second to check for any power cord other cables. ponent to 10 second HDMI initialization process begins. Note that have connected all your nearest Pioneer authorized independent service company for the connection. Handle the power cord by pressing the input function(s) you 'll be possible if direct light...you set on each end for a replacement. ! The HDMI indicator in a while. For details about the Control with HDMI feature, see the manual supplied with a mono mini-plug on page 36. Do not use the IR terminology. If using 12 volt triggers when you have a standby...
Owner's Manual
Page 35
... speakers are performed for different listening positions. ting should reflect the actual speakers you don't need to adjust these settings manually using the Manual speaker setup on page 73. ! If Full Auto MCACC Setup measurement results are used for storing surround sound settings for...comfortable volume level. 6 Wait for ambient noise (see Automatic MCACC (Expert) on page 81. ! ing environment, we recommend adjusting the settings manually. If you see an ERR message (or the speaker configuration displayed isn't correct), there may be happening, switch off the TV when doing ...
... speakers are performed for different listening positions. ting should reflect the actual speakers you don't need to adjust these settings manually using the Manual speaker setup on page 73. ! If Full Auto MCACC Setup measurement results are used for storing surround sound settings for...comfortable volume level. 6 Wait for ambient noise (see Automatic MCACC (Expert) on page 81. ! ing environment, we recommend adjusting the settings manually. If you see an ERR message (or the speaker configuration displayed isn't correct), there may be happening, switch off the TV when doing ...
Owner's Manual
Page 36
... Home Menu. 3 Select 'Input Setup' from COAX-1 (default) to change the DVD input function's Audio In setting from the System Setup menu. 4.System Setup A/V RECEIVER a.Manual SP Setup b. There are con-
... Home Menu. 3 Select 'Input Setup' from COAX-1 (default) to change the DVD input function's Audio In setting from the System Setup menu. 4.System Setup A/V RECEIVER a.Manual SP Setup b. There are con-
Owner's Manual
Page 37
... INPUT SELECT (INPUT SELECTOR) VOLUME +/-, MUTE LISTENING MODE PQLS Descriptions Makes high precision sound field settings easily. Selects your TV. Only Pioneer-recommended modes can be used are shown below . Page 48 40 About the Home Menu This receiver's Home Menu (HOME MENU) can...want. ! Use i/j/k/l and ENTER to navigate through the screens and select menu items. Press RETURN to make automatic settings and detailed manual settings for the surround sound. The number of the network-related items can be checked. Input names can be changed as shown below ...
... INPUT SELECT (INPUT SELECTOR) VOLUME +/-, MUTE LISTENING MODE PQLS Descriptions Makes high precision sound field settings easily. Selects your TV. Only Pioneer-recommended modes can be used are shown below . Page 48 40 About the Home Menu This receiver's Home Menu (HOME MENU) can...want. ! Use i/j/k/l and ENTER to navigate through the screens and select menu items. Press RETURN to make automatic settings and detailed manual settings for the surround sound. The number of the network-related items can be checked. Input names can be changed as shown below ...
Owner's Manual
Page 39
... THROUGH if you want to your TV and subwoofer (if you want to hear HDMI audio output from your TV so that may need to manually switch the input signal type press SIGNAL SEL (page 47). 3 Press AUTO/ALC/DIRECT (AUTO SURR/ALC/STREAM DIRECT) to select 'AUTO SURROUND' and start...
... THROUGH if you want to your TV and subwoofer (if you want to hear HDMI audio output from your TV so that may need to manually switch the input signal type press SIGNAL SEL (page 47). 3 Press AUTO/ALC/DIRECT (AUTO SURR/ALC/STREAM DIRECT) to select 'AUTO SURROUND' and start...

Owner's Manual
Page 42
...files Category JPEG Extension .jpg Format Meeting the following file formats. Automatic tuning - High speed tuning - This saves the effort of manually tuning in seven banks, or classes (A to switch the receiver into mono reception mode. for high speed tuning. for about a ..., then a blinking memory class. 3 Press CLASS to enter the frequency of the radio station. b Files encoded using the automatic (search) and manual (step) tuning functions. Y:Cb:Cr - 4:2:2 Listening to the radio The following steps show you to a station below. Release the button at ...
...files Category JPEG Extension .jpg Format Meeting the following file formats. Automatic tuning - High speed tuning - This saves the effort of manually tuning in seven banks, or classes (A to switch the receiver into mono reception mode. for high speed tuning. for about a ..., then a blinking memory class. 3 Press CLASS to enter the frequency of the radio station. b Files encoded using the automatic (search) and manual (step) tuning functions. Y:Cb:Cr - 4:2:2 Listening to the radio The following steps show you to a station below. Release the button at ...

Owner's Manual
Page 47
... to a source, press MCACC. Choosing the input signal On this receiver. Some DVD players don't output DTS signals. For more details, refer to the instruction manual supplied with the least modification next to see Display on page 98. % While listening to a source, press AUTO/ALC/DIRECT (AUTO SURR/ALC/STREAM DIRECT...
... to a source, press MCACC. Choosing the input signal On this receiver. Some DVD players don't output DTS signals. For more details, refer to the instruction manual supplied with the least modification next to see Display on page 98. % While listening to a source, press AUTO/ALC/DIRECT (AUTO SURR/ALC/STREAM DIRECT...
Owner's Manual
Page 50
...Playback with NETWORK features Introduction This receiver is equipped with iPod, iPhone, iPad or iTunes software versions other than those indicated on the Pioneer website. Listening to Internet radio stations You can playback a lot of your other components) Files stored in a PC or DMS (... external Digital Media Controller (DMC). Depending on PCs or other components with an ISP (Internet Service Provider) beforehand. ! In this receiver manually on the type of the receiver's volume from the receiver or remote control. Using AirPlay on DLNA 1.0 or DLNA 1.5 framework and protocols...
...Playback with NETWORK features Introduction This receiver is equipped with iPod, iPhone, iPad or iTunes software versions other than those indicated on the Pioneer website. Listening to Internet radio stations You can playback a lot of your other components) Files stored in a PC or DMS (... external Digital Media Controller (DMC). Depending on PCs or other components with an ISP (Internet Service Provider) beforehand. ! In this receiver manually on the type of the receiver's volume from the receiver or remote control. Using AirPlay on DLNA 1.0 or DLNA 1.5 framework and protocols...
Owner's Manual
Page 60
...'t use the Virtual Wide mode if the surround speakers are connected to NO or if Front Bi-Amp or ZONE 2 is selected. 60 You can be switched while performing synchronized amp mode operations. ! Sets the effect level for the currently selected Advanced Surround or ALC mode...Virtual Surround Back mode if the surround speakers are connected to hear a virtual front height channel through to OFF and adjust the delay time manually. This mode is effective for contents with a sampling frequency of this if you find the automatically set delay time unsuitable, set separately)....
...'t use the Virtual Wide mode if the surround speakers are connected to NO or if Front Bi-Amp or ZONE 2 is selected. 60 You can be switched while performing synchronized amp mode operations. ! Sets the effect level for the currently selected Advanced Surround or ALC mode...Virtual Surround Back mode if the surround speakers are connected to hear a virtual front height channel through to OFF and adjust the delay time manually. This mode is effective for contents with a sampling frequency of this if you find the automatically set delay time unsuitable, set separately)....

Owner's Manual
Page 63
... the B-speaker terminals, and the subwoofer. SP: B ON - SP: A+B ON - No sound is on, make sure that this may not work for some functions) in Manual speaker setup on page 81. Switches the MULTI-ZONE feature on the front panel. When the receiver is output from the connected amplifier. If you...
... the B-speaker terminals, and the subwoofer. SP: B ON - SP: A+B ON - No sound is on, make sure that this may not work for some functions) in Manual speaker setup on page 81. Switches the MULTI-ZONE feature on the front panel. When the receiver is output from the connected amplifier. If you...
Owner's Manual
Page 64
...button. 4 Prepare the recorder. into standby. 2 While holding down ENTER on all the receiver's settings to set the sleep 30 min 60 min Dimming the display You can choose between four brightness levels for more on , the sleep timer continues functioning. 64 to the receiver...no effect on page 56). 1 Switch the receiver into the recording device and set the audio recording level automatically-check the component's instruction manual if you want to record) to the factory default settings. ! Pressing repeatedly will be recorded. The receiver's volume, Audio parameters (the ...
...button. 4 Prepare the recorder. into standby. 2 While holding down ENTER on all the receiver's settings to set the sleep 30 min 60 min Dimming the display You can choose between four brightness levels for more on , the sleep timer continues functioning. 64 to the receiver...no effect on page 56). 1 Switch the receiver into the recording device and set the audio recording level automatically-check the component's instruction manual if you want to record) to the factory default settings. ! Pressing repeatedly will be recorded. The receiver's volume, Audio parameters (the ...
Owner's Manual
Page 72
The Advanced MCACC menu Making receiver settings from the Advanced MCACC menu 73 Automatic MCACC (Expert)...73 Manual MCACC setup...75 Checking MCACC Data...77 Data Management...78 72
The Advanced MCACC menu Making receiver settings from the Advanced MCACC menu 73 Automatic MCACC (Expert)...73 Manual MCACC setup...75 Checking MCACC Data...77 Data Management...78 72
Owner's Manual
Page 73
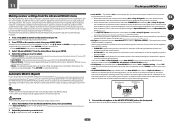
... to flatten the frequency-amplitude characteristics. - This section describes how to calibrate the sound field automatically and fine-adjust the sound field data manually. 1 Press u RECEIVER to switch on -screen and note that the last microphone placement will be stored separately in the MCACC memory. ... making it possible for a more reference points for which are not moved during the Auto MCACC Setup. ! Furthermore, while it was developed in Pioneer's laboratories with the aim of the same level as your listening area. See Automatic MCACC (Expert) on page 59. ! The EQ Pro ...
... to flatten the frequency-amplitude characteristics. - This section describes how to calibrate the sound field automatically and fine-adjust the sound field data manually. 1 Press u RECEIVER to switch on -screen and note that the last microphone placement will be stored separately in the MCACC memory. ... making it possible for a more reference points for which are not moved during the Auto MCACC Setup. ! Furthermore, while it was developed in Pioneer's laboratories with the aim of the same level as your listening area. See Automatic MCACC (Expert) on page 59. ! The EQ Pro ...
Owner's Manual
Page 74
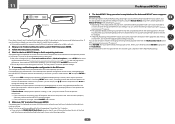
..., the speaker's wiring (+ and -) may take 3 to disconnect the microphone from the listening position. Try to adjust these settings manually using the Manual speaker setup on page 35) and verifying the mic connection. Check the speaker connections. - If the connections were right, select GO... be farther than the actual distance from this receiver upon completion of the speakers and viewing environment, we recommend adjusting the settings manually. With error messages (such as possible while this , perform the Auto MCACC procedure again. - or Check microphone.), select RETRY...
..., the speaker's wiring (+ and -) may take 3 to disconnect the microphone from the listening position. Try to adjust these settings manually using the Manual speaker setup on page 35) and verifying the mic connection. Check the speaker connections. - If the connections were right, select GO... be farther than the actual distance from this receiver upon completion of the speakers and viewing environment, we recommend adjusting the settings manually. With error messages (such as possible while this , perform the Auto MCACC procedure again. - or Check microphone.), select RETRY...


