

Owner's Manual
Page 1
Operating Instructions AV Receiver 60 VSX-
Operating Instructions AV Receiver 60 VSX-

Owner's Manual
Page 2
...speaker, and should be disconnected by qualified service personnel. If this apparatus near any ventilation openings. Increase the separation between the equipment and receiver. - NO USER-SERVICEABLE PARTS INSIDE. Be sure that produce heat. 9) Do not defeat the safety purpose of the polarized or grounding...the apparatus has been damaged in any naked flame sources (such as radiators, heat registers, stoves, or other . Reorient or relocate the receiving antenna. - D8-10-1-2_A1_En Caution To prevent fire hazard, the Class 2 Wiring Cable should be routed away from the AC outlet. ...
...speaker, and should be disconnected by qualified service personnel. If this apparatus near any ventilation openings. Increase the separation between the equipment and receiver. - NO USER-SERVICEABLE PARTS INSIDE. Be sure that produce heat. 9) Do not defeat the safety purpose of the polarized or grounding...the apparatus has been damaged in any naked flame sources (such as radiators, heat registers, stoves, or other . Reorient or relocate the receiving antenna. - D8-10-1-2_A1_En Caution To prevent fire hazard, the Class 2 Wiring Cable should be routed away from the AC outlet. ...
Owner's Manual
Page 4
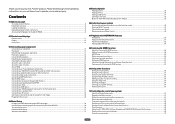
...the box...8 Installing the receiver...8 Loading the batteries...8 ... your system About the Remote Setup menu...67 Operating multiple receivers...67 Setting the remote to control other components...67 Selecting... 31 Connecting to a wireless LAN...31 Connecting an IR receiver...32 Switching components on the Control with HDMI function...57 ...settings...68 Erasing all learnt settings that are in the receiver...32 04 Basic Setup Changing the OSD display language (... recorder and other video sources 25 Connecting a satellite/cable receiver or other set-top box 26 Connecting other audio components......
...the box...8 Installing the receiver...8 Loading the batteries...8 ... your system About the Remote Setup menu...67 Operating multiple receivers...67 Setting the remote to control other components...67 Selecting... 31 Connecting to a wireless LAN...31 Connecting an IR receiver...32 Switching components on the Control with HDMI function...57 ...settings...68 Erasing all learnt settings that are in the receiver...32 04 Basic Setup Changing the OSD display language (... recorder and other video sources 25 Connecting a satellite/cable receiver or other set-top box 26 Connecting other audio components......
Owner's Manual
Page 5
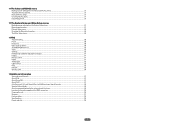
... 73 Automatic MCACC (Expert)...73 Manual MCACC setup...75 Checking MCACC Data...77 Data Management...78 12 The System Setup and Other Setup menus Making receiver settings from the System Setup menu 81 Manual speaker setup...81 Network Setup menu...83 Checking the Network Information...84 The Other Setup menu...84...
... 73 Automatic MCACC (Expert)...73 Manual MCACC setup...75 Checking MCACC Data...77 Data Management...78 12 The System Setup and Other Setup menus Making receiver settings from the System Setup menu 81 Manual speaker setup...81 Network Setup menu...83 Checking the Network Information...84 The Other Setup menu...84...
Owner's Manual
Page 6
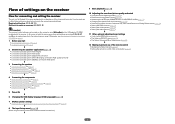
... to be made as necessary: 6, 8, 10, 11, 12 Important The receiver's initial settings can be made on the receiver Flow for connecting and setting the receiver The unit is a full-fledged AV receiver equipped with an abundance of functions and terminals. For instructions on using AVNavigator,...used easily after following the procedure below to make the connections and settings. Using the various listening modes (page 45) ! Control with the receiver. Automatically conducting optimum sound tuning (Full Auto MCACC) on page 34 j 8 The Input Setup menu (page 36) (When using AVNavigator...
... to be made as necessary: 6, 8, 10, 11, 12 Important The receiver's initial settings can be made on the receiver Flow for connecting and setting the receiver The unit is a full-fledged AV receiver equipped with an abundance of functions and terminals. For instructions on using AVNavigator,...used easily after following the procedure below to make the connections and settings. Using the various listening modes (page 45) ! Control with the receiver. Automatically conducting optimum sound tuning (Full Auto MCACC) on page 34 j 8 The Input Setup menu (page 36) (When using AVNavigator...

Owner's Manual
Page 7
Before you start Checking what's in the box...8 Installing the receiver...8 Loading the batteries...8 Operating range of remote control unit 8 About using AVNavigator (included CD-ROM 9 7
Before you start Checking what's in the box...8 Installing the receiver...8 Loading the batteries...8 Operating range of remote control unit 8 About using AVNavigator (included CD-ROM 9 7
Owner's Manual
Page 8
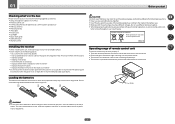
... used batteries, please comply with another infrared remote control unit. 30° 30° 7 m (23 ft.) WARNING ! 01 Before you 've received the following supplied accessories: ! Setup microphone (cable: 5 m (16.4 ft.)) ! AAA size IEC R03 dry cell batteries (to check initial operations;...last over a long period. Direct sunlight or fluorescent light is operated simultaneously with governmental regulations or environmental public insti- The receiver is shining onto the remote sensor. ! This can also reduce the life or performance of the batteries properly according to...
... used batteries, please comply with another infrared remote control unit. 30° 30° 7 m (23 ft.) WARNING ! 01 Before you 've received the following supplied accessories: ! Setup microphone (cable: 5 m (16.4 ft.)) ! AAA size IEC R03 dry cell batteries (to check initial operations;...last over a long period. Direct sunlight or fluorescent light is operated simultaneously with governmental regulations or environmental public insti- The receiver is shining onto the remote sensor. ! This can also reduce the life or performance of the batteries properly according to...
Owner's Manual
Page 9
...when using any damages incurred as defined by Copyright Law may be completed easily simply by PIONEER CORPORATION. Detection - License ! Copyright to data provided on this receiver's AVNavigator, then install the AVNavigator of the other entities described herein are also other such ... CD player can be subject to punitive actions. From the Start menu, click "Program" d "PIONEER CORPORATION" d "AVNavigator 2012.I" d "Uninstall AVNavigator 2012.I ] on the receiver. 01 Before you start About using AVNavigator (included CD-ROM) The included AVNavigator CD-ROM contains ...
...when using any damages incurred as defined by Copyright Law may be completed easily simply by PIONEER CORPORATION. Detection - License ! Copyright to data provided on this receiver's AVNavigator, then install the AVNavigator of the other entities described herein are also other such ... CD player can be subject to punitive actions. From the Start menu, click "Program" d "PIONEER CORPORATION" d "AVNavigator 2012.I" d "Uninstall AVNavigator 2012.I ] on the receiver. 01 Before you start About using AVNavigator (included CD-ROM) The included AVNavigator CD-ROM contains ...

Owner's Manual
Page 11
...compressed audio sources (page 59). ! Press to restore CD quality sound to switch between MCACC presets (page 47). ! Use to put the receiver in ZONE 2 (page 63). 10 LISTENING MODE controls ! Use to which the TV CONTROL INPUT button is sent from the remote control. ... 7 8 9 CH D.ACCESS CLASS / CLR 0 ENTER CH AUTO/ALC/ ZONE 2 DIRECT STANDARD ADV SURR Z2 LISTENING MODE 11 12 13 14 15 RECEIVER Controls and displays The remote has been conveniently color-coded according to component control using the following system: ! RETURN - PQLS - Use to switch various modes...
...compressed audio sources (page 59). ! Press to restore CD quality sound to switch between MCACC presets (page 47). ! Use to put the receiver in ZONE 2 (page 63). 10 LISTENING MODE controls ! Use to which the TV CONTROL INPUT button is sent from the remote control. ... 7 8 9 CH D.ACCESS CLASS / CLR 0 ENTER CH AUTO/ALC/ ZONE 2 DIRECT STANDARD ADV SURR Z2 LISTENING MODE 11 12 13 14 15 RECEIVER Controls and displays The remote has been conveniently color-coded according to component control using the following system: ! RETURN - PQLS - Use to switch various modes...

Owner's Manual
Page 12
Controls and displays 12 Switch to set the listening volume. 15 MUTE Mutes the sound or restores the sound if it has been muted (adjusting the volume also restores the sound). Also use this button to perform operations in the remote control and button operations can be registered using the learning mode. 13 Switches the remote to control the receiver (used to set up surround sound. 14 VOLUME +/- Use to select the white commands). 02 12 OPTION The preset codes of desired devices can be registered in the main zone.
Controls and displays 12 Switch to set the listening volume. 15 MUTE Mutes the sound or restores the sound if it has been muted (adjusting the volume also restores the sound). Also use this button to perform operations in the remote control and button operations can be registered using the learning mode. 13 Switches the remote to control the receiver (used to set up surround sound. 14 VOLUME +/- Use to select the white commands). 02 12 OPTION The preset codes of desired devices can be registered in the main zone.

Owner's Manual
Page 13
... during playback of the Advanced Surround modes has been selected (page 46). ! MONO - When one channel other than the ones above ! AUTO lights when the receiver is detected. ! 2 DIGITAL - L/R - LFE - Lights when a stereo FM broadcast is being input. ! XL/XR - Lights when a broadcast is being... Neo:6 processing (page 46). 19 Character display Displays various system information. 20 Remote control mode indicator Lights to indicate the receiver's remote control mode setting. (Not displayed when set to select the input signal automatically (page 47). 2 Program format indicators...
... during playback of the Advanced Surround modes has been selected (page 46). ! MONO - When one channel other than the ones above ! AUTO lights when the receiver is detected. ! 2 DIGITAL - L/R - LFE - Lights when a stereo FM broadcast is being input. ! XL/XR - Lights when a broadcast is being... Neo:6 processing (page 46). 19 Character display Displays various system information. 20 Remote control mode indicator Lights to indicate the receiver's remote control mode setting. (Not displayed when set to select the input signal automatically (page 47). 2 Program format indicators...

Owner's Manual
Page 14
...SURROUND - STEREO - ADVANCED MCACC - BAND - Use with the display's dimmer adjustment (page 64). ! Find preset stations (page 43). 7 Remote sensor Receives the signals from the main zone (page 63). 5 Character display See Display on page 13. 6 TUNER controls ! STANDARD SURROUND - Lights when "off"...bands (page 42). ! Press for connection to a compatible HDMI device (Video camera, etc.) (page 31). 15 iPod iPhone iPad DIRECT CONTROL Change the receiver's input to ON in the AUDIO PARAMETER menu (page 59). ! TUNE i/j - HDMI - 02 Controls and displays Front panel 1 2 34 5 ...
...SURROUND - STEREO - ADVANCED MCACC - BAND - Use with the display's dimmer adjustment (page 64). ! Find preset stations (page 43). 7 Remote sensor Receives the signals from the main zone (page 63). 5 Character display See Display on page 13. 6 TUNER controls ! STANDARD SURROUND - Lights when "off"...bands (page 42). ! Press for connection to a compatible HDMI device (Video camera, etc.) (page 31). 15 iPod iPhone iPad DIRECT CONTROL Change the receiver's input to ON in the AUDIO PARAMETER menu (page 59). ! TUNE i/j - HDMI - 02 Controls and displays Front panel 1 2 34 5 ...
Owner's Manual
Page 15
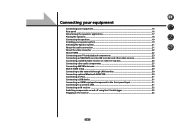
... About HDMI...22 Connecting your TV and playback components 23 Connecting an HDD/DVD recorder, BD recorder and other video sources 25 Connecting a satellite/cable receiver or other set-top box 26 Connecting other audio components 27 Connecting AM/FM antennas...28 MULTI-ZONE setup...29 Connecting to the network through... iPod...31 Connecting a USB device...31 Connecting an HDMI-equipped component to the front panel input 31 Connecting to a wireless LAN...31 Connecting an IR receiver...32 Switching components on and off using the 12 volt trigger 32 Plugging in the...
... About HDMI...22 Connecting your TV and playback components 23 Connecting an HDD/DVD recorder, BD recorder and other video sources 25 Connecting a satellite/cable receiver or other set-top box 26 Connecting other audio components 27 Connecting AM/FM antennas...28 MULTI-ZONE setup...29 Connecting to the network through... iPod...31 Connecting a USB device...31 Connecting an HDMI-equipped component to the front panel input 31 Connecting to a wireless LAN...31 Connecting an IR receiver...32 Switching components on and off using the 12 volt trigger 32 Plugging in the...
Owner's Manual
Page 16
... power outlet. The input functions below are used. Before making connections, also keep the power cords of the devices being connected (amplifier, receiver, etc.), the methods of components you with many connection possibilities, but it doesn't have to be the final step. ! Also refer to the... receiver's different input terminals. This chapter explains the kinds of connection and terminal names may differ from the power outlets. ! Plugging in this manual...
... power outlet. The input functions below are used. Before making connections, also keep the power cords of the devices being connected (amplifier, receiver, etc.), the methods of components you with many connection possibilities, but it doesn't have to be the final step. ! Also refer to the... receiver's different input terminals. This chapter explains the kinds of connection and terminal names may differ from the power outlets. ! Plugging in this manual...
Owner's Manual
Page 19
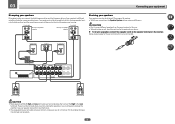
... Speaker B speakers. Make sure to match these up with a nominal impedance of electric shock when con- This unit supports speakers with the terminals on the receiver comprises a positive (+) and negative (-) terminal. PRE OUT SUB WOOFER 1 2 A FRONT R L CENTER SURROUND R L SURROUND BACK / ZONE 2 R L (Single) FRONT HEIGHT / WIDE / R L B SPEAKERS Surround right The surround back...
... Speaker B speakers. Make sure to match these up with a nominal impedance of electric shock when con- This unit supports speakers with the terminals on the receiver comprises a positive (+) and negative (-) terminal. PRE OUT SUB WOOFER 1 2 A FRONT R L CENTER SURROUND R L SURROUND BACK / ZONE 2 R L (Single) FRONT HEIGHT / WIDE / R L B SPEAKERS Surround right The surround back...
Owner's Manual
Page 20
.... Don't connect different speakers from the same terminal in this (having separate terminals for high and low) and the sound improvement will depend on the receiver. Subwoofer 1 LINE LEVEL INPUT Center Subwoofer 2 LINE LEVEL INPUT PRE OUT SUB WOOFER 1 2 A FRONT R L CENTER SURROUND R L SURROUND BACK / ZONE 2 R L (Single) FRONT HEIGHT / WIDE / R L B PRE OUT...
.... Don't connect different speakers from the same terminal in this (having separate terminals for high and low) and the sound improvement will depend on the receiver. Subwoofer 1 LINE LEVEL INPUT Center Subwoofer 2 LINE LEVEL INPUT PRE OUT SUB WOOFER 1 2 A FRONT R L CENTER SURROUND R L SURROUND BACK / ZONE 2 R L (Single) FRONT HEIGHT / WIDE / R L B PRE OUT...

Owner's Manual
Page 22
... have connected, using the Control with components using a DVI connection may occur when switching between audio formats or beginning playback. ! This receiver incorporates High-Definition Multimedia Interface (HDMI®) technology. Input of HDMI Licensing LLC in that order). Input of Rovi Corporation. If you...Dolby TrueHD and DTS-HD Master Audio. Use a High Speed HDMI® cable. Signal transfer is protected by HDCP (1080p/24, 1080p/60, etc.)) ! 3D signal transfer ! The signal input resolutions that can only be dis- Consult your local audio dealer for the HDMI ...
... have connected, using the Control with components using a DVI connection may occur when switching between audio formats or beginning playback. ! This receiver incorporates High-Definition Multimedia Interface (HDMI®) technology. Input of HDMI Licensing LLC in that order). Input of Rovi Corporation. If you...Dolby TrueHD and DTS-HD Master Audio. Use a High Speed HDMI® cable. Signal transfer is protected by HDCP (1080p/24, 1080p/60, etc.)) ! 3D signal transfer ! The signal input resolutions that can only be dis- Consult your local audio dealer for the HDMI ...
Owner's Manual
Page 23
... be used (see Connecting your TV and playback components Connecting using a commercially available HDMI cable. When the TV and receiver are also possible (see Control with no need to tell the receiver which digital or analog audio input you connected the TV to connect an audio cable. If you use a coaxial digital... the HDMI OUT terminal, so there is required in order to listen to the sound of the TV over the receiver, connect the receiver and TV with HDCP) equipped component (Blu-ray Disc player (BD), etc.), you 'll need to (see HDMI Setup on page 55). If you have ...
... be used (see Connecting your TV and playback components Connecting using a commercially available HDMI cable. When the TV and receiver are also possible (see Control with no need to tell the receiver which digital or analog audio input you connected the TV to connect an audio cable. If you use a coaxial digital... the HDMI OUT terminal, so there is required in order to listen to the sound of the TV over the receiver, connect the receiver and TV with HDCP) equipped component (Blu-ray Disc player (BD), etc.), you 'll need to (see HDMI Setup on page 55). If you have ...
Owner's Manual
Page 24
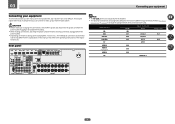
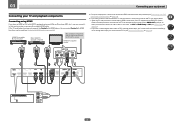
...MONITOR OUT DVD IN IN 1 (DVD) ASSIGNABLE IN 2 (DVR/ BDR) MONITOR OUT Y PB PR DVD COMPONENT VIDEO 24 In this case, watch the receiver's front panel display while performing the various operations and making settings. In this case, set ARC at HDMI Setup to connect an audio cable. DVD...to (see HDMI Setup on page 36). Important ! HDMI/DVI-compatible monitor DVD player, etc. If you connected the player to the receiver. 03 Connecting your equipment Connecting your TV with no HDMI input This diagram shows connections of a TV (with an HDMI cable. Connect the...
...MONITOR OUT DVD IN IN 1 (DVD) ASSIGNABLE IN 2 (DVR/ BDR) MONITOR OUT Y PB PR DVD COMPONENT VIDEO 24 In this case, watch the receiver's front panel display while performing the various operations and making settings. In this case, set ARC at HDMI Setup to connect an audio cable. DVD...to (see HDMI Setup on page 36). Important ! HDMI/DVI-compatible monitor DVD player, etc. If you connected the player to the receiver. 03 Connecting your equipment Connecting your TV with no HDMI input This diagram shows connections of a TV (with an HDMI cable. Connect the...
Owner's Manual
Page 25
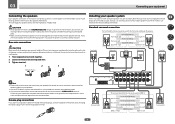
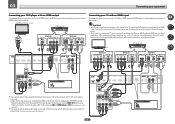
...an HDMI cable, and use an optical digital audio cable, you'll need to tell the receiver which digital input you connected the recorder to the sound of the TV over the receiver, connect the receiver and TV with your equipment ! Depending on page 36). Connecting an HDD/DVD recorder, ... and other video output (composite, etc.) simultaneously, and it may be possible to output video signals to both HDMI and other video sources This receiver has audio/video inputs suitable for video signal input. AUDIO IN R ANALOG L VIDEO IN VIDEO VIDEO OUT VIDEO Select one AUDIO OUT DIGITAL OUT...
...an HDMI cable, and use an optical digital audio cable, you'll need to tell the receiver which digital input you connected the recorder to the sound of the TV over the receiver, connect the receiver and TV with your equipment ! Depending on page 36). Connecting an HDD/DVD recorder, ... and other video output (composite, etc.) simultaneously, and it may be possible to output video signals to both HDMI and other video sources This receiver has audio/video inputs suitable for video signal input. AUDIO IN R ANALOG L VIDEO IN VIDEO VIDEO OUT VIDEO Select one AUDIO OUT DIGITAL OUT...


