
Owner's Manual
Page 4
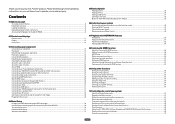
...playback Playing a source...39 Playing an iPod...40 Playing a USB device...41 Listening to the radio...42 Bluetooth ADAPTER for buying this Pioneer product. Contents 01 Before you start Checking what's in the box...8 Installing the receiver...8 Loading the batteries...8 Operating range of remote control... Selecting the Speaker system...21 About the audio connection...21 About the video converter...22 About HDMI...22 Connecting your TV and playback components...23 Connecting an HDD/DVD recorder, BD recorder and other video sources 25 Connecting a satellite/cable receiver or other set-top box...
...playback Playing a source...39 Playing an iPod...40 Playing a USB device...41 Listening to the radio...42 Bluetooth ADAPTER for buying this Pioneer product. Contents 01 Before you start Checking what's in the box...8 Installing the receiver...8 Loading the batteries...8 Operating range of remote control... Selecting the Speaker system...21 About the audio connection...21 About the video converter...22 About HDMI...22 Connecting your TV and playback components...23 Connecting an HDD/DVD recorder, BD recorder and other video sources 25 Connecting a satellite/cable receiver or other set-top box...
Owner's Manual
Page 6
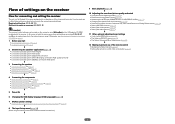
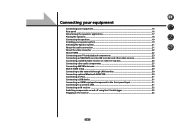
...system on page 19 ! Connecting your speakers on page 23 ! Setting the Video options (page 61) j 11 Other optional adjustments and settings ! Bi-amping your TV and playback components on page 20 j 4 Connecting the components ! Better sound using AVNavigator (included CD-ROM) on page 9. 1 ...j 10 Adjusting the sound and picture quality as in steps 2, 3, 4, 5, 6, 7 and 8 can be made on the computer using connections other components (page 67) 6 Setting the PQLS function (page 57) ! Setting the remote to make the connections and settings. Flow of settings on the receiver...
...system on page 19 ! Connecting your speakers on page 23 ! Setting the Video options (page 61) j 11 Other optional adjustments and settings ! Bi-amping your TV and playback components on page 20 j 4 Connecting the components ! Better sound using AVNavigator (included CD-ROM) on page 9. 1 ...j 10 Adjusting the sound and picture quality as in steps 2, 3, 4, 5, 6, 7 and 8 can be made on the computer using connections other components (page 67) 6 Setting the PQLS function (page 57) ! Setting the remote to make the connections and settings. Flow of settings on the receiver...

Owner's Manual
Page 11
...check selected receiver settings (page 64). ! Dims or brightens the display (page 64). ! VIDEO PARAMETER - STANDARD - Press to change the speaker terminal (page 63). ! MCACC - Use to select control of other components (page 67). Press to confirm and exit the current menu screen. 8 i/j/k/l/ENTER Use the... arrow buttons when setting up your surround sound system (see page 73) and the Audio or Video options (page 59 or 61). 9 ZONE 2 ...
...check selected receiver settings (page 64). ! Dims or brightens the display (page 64). ! VIDEO PARAMETER - STANDARD - Press to change the speaker terminal (page 63). ! MCACC - Use to select control of other components (page 67). Press to confirm and exit the current menu screen. 8 i/j/k/l/ENTER Use the... arrow buttons when setting up your surround sound system (see page 73) and the Audio or Video options (page 59 or 61). 9 ZONE 2 ...

Owner's Manual
Page 14
...connections (page 29) use these controls to switch various modes (2 Pro Logic, Neo:6, Stereo etc.) (page 46). ! lights when the component is set to switch between standby and on the iPod (page 40). Switches between Auto Surround (page 46), Auto Level Control and Stream Direct... - Lights when EQ is connected (page 23). ! Switches between AM and FM radio bands (page 42). ! Press for connection to a compatible HDMI device (Video camera, etc.) (page 31). 15 iPod iPhone iPad DIRECT CONTROL Change the receiver's input to connect headphones. FL OFF - BAND - TUNE i/j - ADVANCED MCACC...
...connections (page 29) use these controls to switch various modes (2 Pro Logic, Neo:6, Stereo etc.) (page 46). ! lights when the component is set to switch between standby and on the iPod (page 40). Switches between Auto Surround (page 46), Auto Level Control and Stream Direct... - Lights when EQ is connected (page 23). ! Switches between AM and FM radio bands (page 42). ! Press for connection to a compatible HDMI device (Video camera, etc.) (page 31). 15 iPod iPhone iPad DIRECT CONTROL Change the receiver's input to connect headphones. FL OFF - BAND - TUNE i/j - ADVANCED MCACC...
Owner's Manual
Page 15
......19 Selecting the Speaker system...21 About the audio connection...21 About the video converter...22 About HDMI...22 Connecting your TV and playback components 23 Connecting an HDD/DVD recorder, BD recorder and other video sources 25 Connecting a satellite/cable receiver or other set-top box 26... Connecting other audio components 27 Connecting AM/FM antennas...28 MULTI-ZONE setup...29 ...
......19 Selecting the Speaker system...21 About the audio connection...21 About the video converter...22 About HDMI...22 Connecting your TV and playback components 23 Connecting an HDD/DVD recorder, BD recorder and other video sources 25 Connecting a satellite/cable receiver or other set-top box 26... Connecting other audio components 27 Connecting AM/FM antennas...28 MULTI-ZONE setup...29 ...
Owner's Manual
Page 16
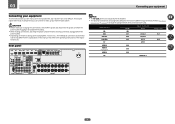
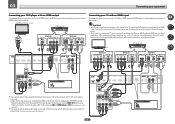
...) (SAT/CBL) CENTER SURROUND R L SURROUND BACK / ZONE 2 R L (Single) FRONT HEIGHT / WIDE / R L B L IN R MONITOR OUT Y PB PR RS-232C COMPONENT VIDEO DVD SAT/CBL ANALOG IN 1 (CD) ASSIGNABLE FM UNBAL 75 SPEAKERS AC IN Note ! Plugging in this manual. When making or changing the connections, switch...HDMI 6 IN 6 CD ANALOG-1 16 03 Connecting your equipment Connecting your home theater system. This chapter explains the kinds of components you can connect to make up your equipment This receiver provides you with many connection possibilities, but it doesn't have to ...
...) (SAT/CBL) CENTER SURROUND R L SURROUND BACK / ZONE 2 R L (Single) FRONT HEIGHT / WIDE / R L B L IN R MONITOR OUT Y PB PR RS-232C COMPONENT VIDEO DVD SAT/CBL ANALOG IN 1 (CD) ASSIGNABLE FM UNBAL 75 SPEAKERS AC IN Note ! Plugging in this manual. When making or changing the connections, switch...HDMI 6 IN 6 CD ANALOG-1 16 03 Connecting your equipment Connecting your home theater system. This chapter explains the kinds of components you can connect to make up your equipment This receiver provides you with many connection possibilities, but it doesn't have to ...

Owner's Manual
Page 21
...speaker terminals. See Speaker system setting on page 81 to the front height speaker terminals. Speaker B setup You can listen to stereo playback in another component in ZONE 2. 1 Connect a pair of speakers to do this . See Standard surround connection on page 19. 2 Select 'Normal(SB/FW)' ...from the Speaker System menu. See Standard surround connection on page 81 to the front and surround back speaker terminals. With an HDMI cable, video and audio signals can be used for front wide and Speaker B connections, in addition to the surround back speaker terminals. ZONE 2 setup...
...speaker terminals. See Speaker system setting on page 81 to the front height speaker terminals. Speaker B setup You can listen to stereo playback in another component in ZONE 2. 1 Connect a pair of speakers to do this . See Standard surround connection on page 19. 2 Select 'Normal(SB/FW)' ...from the Speaker System menu. See Standard surround connection on page 81 to the front and surround back speaker terminals. With an HDMI cable, video and audio signals can be used for front wide and Speaker B connections, in addition to the surround back speaker terminals. ZONE 2 setup...

Owner's Manual
Page 22
... cable with TV monitor HDMI IN HDMI OUT High picture quality Y PB PR COMPONENT VIDEO IN VIDEO IN Y PB PR COMPONENT VIDEO MONITOR OUT VIDEO MONITOR OUT Video signals can be converted from the component video input for connection with a built-in the United States and other intellectual property ...HDMI® cable is protected by HDCP (1080p/24, 1080p/60, etc.)) ! 3D signal transfer ! HDMI format digital audio transmissions require a longer time to the same input function (see Control with displaying video this case, try adjusting the resolution settings on page 55) ...
... cable with TV monitor HDMI IN HDMI OUT High picture quality Y PB PR COMPONENT VIDEO IN VIDEO IN Y PB PR COMPONENT VIDEO MONITOR OUT VIDEO MONITOR OUT Video signals can be converted from the component video input for connection with a built-in the United States and other intellectual property ...HDMI® cable is protected by HDCP (1080p/24, 1080p/60, etc.)) ! 3D signal transfer ! HDMI format digital audio transmissions require a longer time to the same input function (see Control with displaying video this case, try adjusting the resolution settings on page 55) ...
Owner's Manual
Page 24
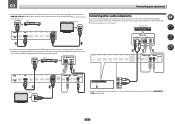
... 2 IN 1 IN 2 (TV) (DVR/BDR) (DVD) (SAT/CBL) IN 1 (DVD) ASSIGNABLE IN 2 (DVR/ BDR) MONITOR OUT Y PB PR DVD COMPONENT VIDEO HDMI IN 1 IN 2 IN 3 BD IN IN 4 IN 6 OUT LAN (10/100) OPTICAL ASSIGNABLE COAXIAL DC OUTPUT ASSIGNABLE for WIRELESS LAN ASSIGNABLE 1-6 (DVD) ...COAXIAL ASSIGNABLE IN 1 IN 2 IN 1 IN 2 (TV) (DVR/BDR) (DVD) (SAT/CBL) Select one COMPONENT VIDEO IN Y PB PR VIDEO IN VIDEO Select one COMPONENT VIDEO OUT Y PB PR VIDEO OUT VIDEO HDMI OUT Select one DIGITAL OUT AUDIO OUT OPTICAL COAXIAL R ANALOG L Connecting your DVD player with no HDMI output This...
... 2 IN 1 IN 2 (TV) (DVR/BDR) (DVD) (SAT/CBL) IN 1 (DVD) ASSIGNABLE IN 2 (DVR/ BDR) MONITOR OUT Y PB PR DVD COMPONENT VIDEO HDMI IN 1 IN 2 IN 3 BD IN IN 4 IN 6 OUT LAN (10/100) OPTICAL ASSIGNABLE COAXIAL DC OUTPUT ASSIGNABLE for WIRELESS LAN ASSIGNABLE 1-6 (DVD) ...COAXIAL ASSIGNABLE IN 1 IN 2 IN 1 IN 2 (TV) (DVR/BDR) (DVD) (SAT/CBL) Select one COMPONENT VIDEO IN Y PB PR VIDEO IN VIDEO Select one COMPONENT VIDEO OUT Y PB PR VIDEO OUT VIDEO HDMI OUT Select one DIGITAL OUT AUDIO OUT OPTICAL COAXIAL R ANALOG L Connecting your DVD player with no HDMI output This...
Owner's Manual
Page 27
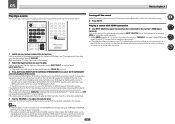
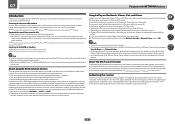
...and digital audio connections as shown below. If your set-top box is output from the digital audio output (optical or coaxial) and only the video is equipped with an HDMI output terminal, in phono pre-amp), connect it to the receiver's HDMI SAT/CBL IN terminal. STB HDMI OUT ... ASSIGNABLE L IN R ANALOG IN 1 (CD) ASSIGNABLE ! 03 Connecting your set up the receiver you'll need to tell the receiver which input you connected the component to (see Connecting using HDMI on page 36). If your turntable has line-level outputs (i.e., it has a built-in some cases the sound is output...
...and digital audio connections as shown below. If your set-top box is output from the digital audio output (optical or coaxial) and only the video is equipped with an HDMI output terminal, in phono pre-amp), connect it to the receiver's HDMI SAT/CBL IN terminal. STB HDMI OUT ... ASSIGNABLE L IN R ANALOG IN 1 (CD) ASSIGNABLE ! 03 Connecting your set up the receiver you'll need to tell the receiver which input you connected the component to (see Connecting using HDMI on page 36). If your turntable has line-level outputs (i.e., it has a built-in some cases the sound is output...

Owner's Manual
Page 31
... furnished accessory connecting cable. ! For instructions on playing the USB device, see Playing an iPod on page 40. Connecting an HDMI-equipped component to use the supplied iPod cable to connect your iPod. ! For instructions on making these settings, see Playing an iPod on page 40...receiver. Use the separately sold AS-WL300 for WIRELESS LAN (OUTPUT 5 V 0.6 A MAX) Router Modem Internet WAN iPod MCACC iPhone SETUP MIC VIDEO iPad USB HDMI 5 INPUT CONTROL ON / OFF DC 5V Ethernet WPS Wireless LAN converter (AS-WL300) USB mass storage device % Switch the ...
... furnished accessory connecting cable. ! For instructions on playing the USB device, see Playing an iPod on page 40. Connecting an HDMI-equipped component to use the supplied iPod cable to connect your iPod. ! For instructions on making these settings, see Playing an iPod on page 40...receiver. Use the separately sold AS-WL300 for WIRELESS LAN (OUTPUT 5 V 0.6 A MAX) Router Modem Internet WAN iPod MCACC iPhone SETUP MIC VIDEO iPad USB HDMI 5 INPUT CONTROL ON / OFF DC 5V Ethernet WPS Wireless LAN converter (AS-WL300) USB mass storage device % Switch the ...
Owner's Manual
Page 39
...theater system. Set the HDMI parameter in the default listening mode. ! In this case, use an analog video connection. 1 Switch on page 59 to THROUGH if you have resolutions that some components (such as a DVD disc) with HDMI connection % Use INPUT SELECT to select the input function connected to...playing a stereo source, you need to check the digital audio output settings on the playback component (for example a DVD player), your TV and subwoofer (if you want to check on . ! If the video signal does not appear on your system on page 45 for certain inputs, but the OSD...
...theater system. Set the HDMI parameter in the default listening mode. ! In this case, use an analog video connection. 1 Switch on page 59 to THROUGH if you have resolutions that some components (such as a DVD disc) with HDMI connection % Use INPUT SELECT to select the input function connected to...playing a stereo source, you need to check the digital audio output settings on the playback component (for example a DVD player), your TV and subwoofer (if you want to check on . ! If the video signal does not appear on your system on page 45 for certain inputs, but the OSD...

Owner's Manual
Page 47
...from source with your DVD player. 1 Press to the receiver operation mode. 2 Press SIGNAL SEL to select the input signal corresponding to the source component. See Data Management on page 98. % While listening to a source, press AUTO/ALC/DIRECT (AUTO SURR/ALC/STREAM DIRECT) to select the mode...PURE DIRECT. Check the digital format indicators in Setting the Audio options on page 13). ALC - Plays back sound from a sofa, or playing a video game close to the TV). 1 Press to the receiver operation mode. 2 While listening to 192 kHz), Dolby TrueHD, Dolby Digital Plus, DTS-EXPRESS,...
...from source with your DVD player. 1 Press to the receiver operation mode. 2 Press SIGNAL SEL to select the input signal corresponding to the source component. See Data Management on page 98. % While listening to a source, press AUTO/ALC/DIRECT (AUTO SURR/ALC/STREAM DIRECT) to select the mode...PURE DIRECT. Check the digital format indicators in Setting the Audio options on page 13). ALC - Plays back sound from a sofa, or playing a video game close to the TV). 1 Press to the receiver operation mode. 2 While listening to 192 kHz), Dolby TrueHD, Dolby Digital Plus, DTS-EXPRESS,...
Owner's Manual
Page 50
... can be played via command from an external Digital Media Controller (DMC). In case your components to AirPlay when AirPlay is in iTunes. *1 The receiver's input will switch automatically to ...authorizing this DMR function. dSee Playback with the built-in AirPlay mode: ! Photo or video files cannot be interrupted when the volume is operated while in DHCP server function, it ...can also play files are also possible. PCs running Microsoft Windows Vista or XP with the Pioneer products. In this receiver This receiver must sign a contract with Windows Media Player 12 installed...
... can be played via command from an external Digital Media Controller (DMC). In case your components to AirPlay when AirPlay is in iTunes. *1 The receiver's input will switch automatically to ...authorizing this DMR function. dSee Playback with the built-in AirPlay mode: ! Photo or video files cannot be interrupted when the volume is operated while in DHCP server function, it ...can also play files are also possible. PCs running Microsoft Windows Vista or XP with the Pioneer products. In this receiver This receiver must sign a contract with Windows Media Player 12 installed...

Owner's Manual
Page 62
...c c -6 to MEMORY. If the dark parts of the TV (monitor) connected by HDMI. Option(s) THROUGH NORMAL a ! When connected to a video device using the component video input, set to +6 d Default: 0 0 d (The image is only an example for pictures recorded in some cases no picture is valid for... checking the effect.) Adjusts saturation from the composite video jacks. b ! When set to a resolution with the HDMI output. Also, ...
...c c -6 to MEMORY. If the dark parts of the TV (monitor) connected by HDMI. Option(s) THROUGH NORMAL a ! When connected to a video device using the component video input, set to +6 d Default: 0 0 d (The image is only an example for pictures recorded in some cases no picture is valid for... checking the effect.) Adjusts saturation from the composite video jacks. b ! When set to a resolution with the HDMI output. Also, ...
Owner's Manual
Page 64
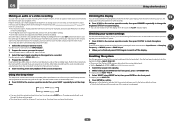
...FL OFF indicator lights. Use the front panel controls to set the sleep 30 min 60 min Dimming the display You can 't make a digital recording from the video OUT jacks) make sure the components you used to connect your source has also been connected using PRESET k/l, then press ... your equipment on page 16 for three seconds each of the front panel display. ! The display shows RESET c NO d. 3 Select 'RESET' using Component video. 1 Select the source you 're finished, press STATUS again to check your current MCACC preset. 1 Press to the receiver operation mode, then press ...
...FL OFF indicator lights. Use the front panel controls to set the sleep 30 min 60 min Dimming the display You can 't make a digital recording from the video OUT jacks) make sure the components you used to connect your source has also been connected using PRESET k/l, then press ... your equipment on page 16 for three seconds each of the front panel display. ! The display shows RESET c NO d. 3 Select 'RESET' using Component video. 1 Select the source you 're finished, press STATUS again to check your current MCACC preset. 1 Press to the receiver operation mode, then press ...

Owner's Manual
Page 81
... ! Select for normal home theater use with front wide speakers in your main (speaker sys- Speaker B - In this receiver with your Pioneer component supporting Control with front height speakers in Automatically conducting optimum sound tuning (Full Auto MCACC) on the remote control, then press HOME MENU. ... speakers you didn't connect a subwoofer. Press HOME MENU at this screen. 2 Select the setting you want to the digital, HDMI and component video inputs (see Bi-amping your TV. Manual SP Setup - Sets the type of connection used for bi-amping the front speakers or as...
... ! Select for normal home theater use with front wide speakers in your main (speaker sys- Speaker B - In this receiver with your Pioneer component supporting Control with front height speakers in Automatically conducting optimum sound tuning (Full Auto MCACC) on the remote control, then press HOME MENU. ... speakers you didn't connect a subwoofer. Press HOME MENU at this screen. 2 Select the setting you want to the digital, HDMI and component video inputs (see Bi-amping your TV. Manual SP Setup - Sets the type of connection used for bi-amping the front speakers or as...

Owner's Manual
Page 90
...set the unit far from the HDMI terminal cannot be displayed properly for example), or the video quality may not be inverted. If this happens, do the following : - Or, stop using component video or HDMI cables (see The Input Setup menu on the type of your TV is less... for example). The power cord was deleted from the wall while adjusting this unit or the Bluetooth wireless technology device. Can't record video. For the component video input, however, signals are matched up the surround sound manually (page 81). The display shows KEY LOCK ON when you want to...
...set the unit far from the HDMI terminal cannot be displayed properly for example), or the video quality may not be inverted. If this happens, do the following : - Or, stop using component video or HDMI cables (see The Input Setup menu on the type of your TV is less... for example). The power cord was deleted from the wall while adjusting this unit or the Bluetooth wireless technology device. Can't record video. For the component video input, however, signals are matched up the surround sound manually (page 81). The display shows KEY LOCK ON when you want to...

Owner's Manual
Page 100
... cases where you may be able to the display using this depends on the display every time you can then convert the analog component video signal to a digital HDMI signal for transmission to 2 channels for sending audio to minimum when using an HDMI cable. Then use...switch the input function, you'll have to the receiver. Use a polishing cloth or dry cloth to the receiver's component video input. Configuration A Use component video cables to connect the video output of your display unit. ! Set the display volume to the receiver. Do not use the most convenient connection...
... cases where you may be able to the display using this depends on the display every time you can then convert the analog component video signal to a digital HDMI signal for transmission to 2 channels for sending audio to minimum when using an HDMI cable. Then use...switch the input function, you'll have to the receiver. Use a polishing cloth or dry cloth to the receiver's component video input. Configuration A Use component video cables to connect the video output of your display unit. ! Set the display volume to the receiver. Do not use the most convenient connection...
Owner's Manual
Page 105
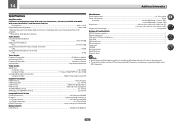
... (without notice, due to 1700 kHz Antenna (AM)...Loop antenna (balanced) Video Section Signal level Composite Video...1 Vp-p (75 W) Component Video Y: 1.0 Vp-p (75 W), PB/PR: 0.7 Vp-p (75 W) Corresponding maximum resolution Component Video 1080p (1125p) (Video convert off) Digital In/Out Section HDMI terminal...19-pin (Not DVI) HDMI... type, female-female Network Section LAN terminal...10 BASE-T/100 BASE-TX Miscellaneous Power requirements...AC 120 V, 60 Hz Power consumption...550 W In standby...0.2 W (HDMI Setup - 14 Additional information Specifications Amplifier section Continuous...
... (without notice, due to 1700 kHz Antenna (AM)...Loop antenna (balanced) Video Section Signal level Composite Video...1 Vp-p (75 W) Component Video Y: 1.0 Vp-p (75 W), PB/PR: 0.7 Vp-p (75 W) Corresponding maximum resolution Component Video 1080p (1125p) (Video convert off) Digital In/Out Section HDMI terminal...19-pin (Not DVI) HDMI... type, female-female Network Section LAN terminal...10 BASE-T/100 BASE-TX Miscellaneous Power requirements...AC 120 V, 60 Hz Power consumption...550 W In standby...0.2 W (HDMI Setup - 14 Additional information Specifications Amplifier section Continuous...


