
Owner's Manual
Page 4
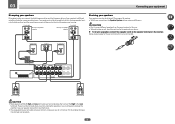
...HDD/DVD recorder, BD recorder and other video sources 25 Connecting a satellite/cable receiver or other set-top box 26 Connecting other audio components...27 Connecting AM/FM antennas...28 MULTI-ZONE setup...29 Connecting to the network through LAN interface...30 Connecting optional Bluetooth ADAPTER...30...Playing a source...39 Playing an iPod...40 Playing a USB device...41 Listening to the radio...42 Bluetooth ADAPTER for buying this Pioneer product. Thank you for Wireless Enjoyment of Music 43 06 Listening to control other components...67 Selecting preset codes directly...67 Programming ...
...HDD/DVD recorder, BD recorder and other video sources 25 Connecting a satellite/cable receiver or other set-top box 26 Connecting other audio components...27 Connecting AM/FM antennas...28 MULTI-ZONE setup...29 Connecting to the network through LAN interface...30 Connecting optional Bluetooth ADAPTER...30...Playing a source...39 Playing an iPod...40 Playing a USB device...41 Listening to the radio...42 Bluetooth ADAPTER for buying this Pioneer product. Thank you for Wireless Enjoyment of Music 43 06 Listening to control other components...67 Selecting preset codes directly...67 Programming ...
Owner's Manual
Page 6
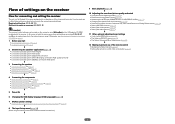
... optimum sound tuning (Full Auto MCACC) on the AVNavigator CD-ROM included with the receiver. Setting the Audio options (page 59) ! Required setting item: 1, 2, 3, 4, 5, 7, 9 Setting to control other than the recommended connections) j 9 Basic playback (page 38) j...ZONE 2 connection (Multi Zone) j 3 Connecting the speakers ! Control with an abundance of functions and terminals. Loading the batteries on page 21 ! Flow of settings on page 28 ! Connecting AM/FM antennas on the receiver Flow for connecting and setting the receiver The unit is a full-fledged AV receiver...
... optimum sound tuning (Full Auto MCACC) on the AVNavigator CD-ROM included with the receiver. Setting the Audio options (page 59) ! Required setting item: 1, 2, 3, 4, 5, 7, 9 Setting to control other than the recommended connections) j 9 Basic playback (page 38) j...ZONE 2 connection (Multi Zone) j 3 Connecting the speakers ! Control with an abundance of functions and terminals. Loading the batteries on page 21 ! Flow of settings on page 28 ! Connecting AM/FM antennas on the receiver Flow for connecting and setting the receiver The unit is a full-fledged AV receiver...

Owner's Manual
Page 11
...to switch various modes (2 Pro Logic, Neo:6, etc.) (page 46). ! DIMMER - Use to put the receiver in ZONE 2 (page 63). 10 LISTENING MODE controls ! HOME MENU - Press to select the PQLS setting (page 57). ! Press to switch on the TV to access: ! The TV can be operated with ... the current menu screen. 8 i/j/k/l/ENTER Use the arrow buttons when setting up your surround sound system (see page 73) and the Audio or Video options (page 59 or 61). 9 ZONE 2 Switch to adjust the level (page 82). ! Receiver control, TV control ! RETURN - AUTO S.RTRV - Press repeatedly ...
...to switch various modes (2 Pro Logic, Neo:6, etc.) (page 46). ! DIMMER - Use to put the receiver in ZONE 2 (page 63). 10 LISTENING MODE controls ! HOME MENU - Press to select the PQLS setting (page 57). ! Press to switch on the TV to access: ! The TV can be operated with ... the current menu screen. 8 i/j/k/l/ENTER Use the arrow buttons when setting up your surround sound system (see page 73) and the Audio or Video options (page 59 or 61). 9 ZONE 2 Switch to adjust the level (page 82). ! Receiver control, TV control ! RETURN - AUTO S.RTRV - Press repeatedly ...

Owner's Manual
Page 12
Controls and displays 12 Use to set the listening volume. 15 MUTE Mutes the sound or restores the sound if it has been muted (adjusting the volume also restores the sound). Also use this button to set up surround sound. 14 VOLUME +/- Switch to select the white commands). 02 12 OPTION The preset codes of desired devices can be registered in the remote control and button operations can be registered using the learning mode. 13 Switches the remote to control the receiver (used to perform operations in the main zone.
Controls and displays 12 Use to set the listening volume. 15 MUTE Mutes the sound or restores the sound if it has been muted (adjusting the volume also restores the sound). Also use this button to set up surround sound. 14 VOLUME +/- Switch to select the white commands). 02 12 OPTION The preset codes of desired devices can be registered in the remote control and button operations can be registered using the learning mode. 13 Switches the remote to control the receiver (used to perform operations in the main zone.

Owner's Manual
Page 13
... (page 46). 19 Character display Displays various system information. 20 Remote control mode indicator Lights to indicate the receiver's remote control mode setting. (Not displayed when set to select the input signal automatically (page 47). 2 Program format indicators Light to indicate the channels to which... Surround feature is selected (page 46). ! Lights when one of the Neo:6 modes of DTS-HD Master Audio signals. 4 MULTI-ZONE Lights when the MULTI-ZONE feature is active (page 63). 5 SOUND Lights when the DIALOG E (Dialog Enhancement) or TONE (tone controls) features is selected ...
... (page 46). 19 Character display Displays various system information. 20 Remote control mode indicator Lights to indicate the receiver's remote control mode setting. (Not displayed when set to select the input signal automatically (page 47). 2 Program format indicators Light to indicate the channels to which... Surround feature is selected (page 46). ! Lights when one of the Neo:6 modes of DTS-HD Master Audio signals. 4 MULTI-ZONE Lights when the MULTI-ZONE feature is active (page 63). 5 SOUND Lights when the DIALOG E (Dialog Enhancement) or TONE (tone controls) features is selected ...

Owner's Manual
Page 14
... i/j, PRESET k/l and ENTER to ON in the AUDIO PARAMETER menu (page 59). ! Lights to indicate iPod/iPhone/iPad is set to memorize and name stations for this receiver. 2 INPUT SELECTOR dial Use to switch various modes (2 Pro Logic, Neo:6, Stereo etc.) (page 46). ! TUNE i/j ... use these controls to the iPod and enable iPod operations on page 13. 6 TUNER controls ! HDMI - TUNER EDIT - PRESET k/l - BAND - MULTI-ZONE - AUTO SURR/ALC/STREAM DIRECT - STANDARD SURROUND - STEREO - 02 Controls and displays Front panel 1 2 34 5 6 37 8 INPUT SELECTOR STANDBY /ON...
... i/j, PRESET k/l and ENTER to ON in the AUDIO PARAMETER menu (page 59). ! Lights to indicate iPod/iPhone/iPad is set to memorize and name stations for this receiver. 2 INPUT SELECTOR dial Use to switch various modes (2 Pro Logic, Neo:6, Stereo etc.) (page 46). ! TUNE i/j ... use these controls to the iPod and enable iPod operations on page 13. 6 TUNER controls ! HDMI - TUNER EDIT - PRESET k/l - BAND - MULTI-ZONE - AUTO SURR/ALC/STREAM DIRECT - STANDARD SURROUND - STEREO - 02 Controls and displays Front panel 1 2 34 5 6 37 8 INPUT SELECTOR STANDBY /ON...
Owner's Manual
Page 15
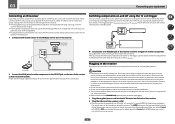
... components 23 Connecting an HDD/DVD recorder, BD recorder and other video sources 25 Connecting a satellite/cable receiver or other set-top box 26 Connecting other audio components 27 Connecting AM/FM antennas...28 MULTI-ZONE setup...29 Connecting to the network through LAN interface 30 Connecting optional Bluetooth ADAPTER 30 Connecting an...
... components 23 Connecting an HDD/DVD recorder, BD recorder and other video sources 25 Connecting a satellite/cable receiver or other set-top box 26 Connecting other audio components 27 Connecting AM/FM antennas...28 MULTI-ZONE setup...29 Connecting to the network through LAN interface 30 Connecting optional Bluetooth ADAPTER 30 Connecting an...
Owner's Manual
Page 19
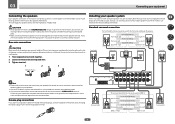
... disconnect the power cord before touching any of the bare speaker wire touches the back panel it must be used for details on the receiver comprises a positive (+) and negative (-) terminal. If any uninsulated parts. ! Standard surround connection The front height terminals can connect just ... two subwoofers, the second subwoofer can also be connected to match these up with your speaker system At the very least, front left ZONE 2 setting ZONE 2 - It is output from speakers being knocked over or falling in .) Installing your speakers for the front wide and Speaker B ...
... disconnect the power cord before touching any of the bare speaker wire touches the back panel it must be used for details on the receiver comprises a positive (+) and negative (-) terminal. If any uninsulated parts. ! Standard surround connection The front height terminals can connect just ... two subwoofers, the second subwoofer can also be connected to match these up with your speaker system At the very least, front left ZONE 2 setting ZONE 2 - It is output from speakers being knocked over or falling in .) Installing your speakers for the front wide and Speaker B ...
Owner's Manual
Page 20
With these connections, the Speaker System setting makes no difference. CAUTION ! If... INPUT PRE OUT SUB WOOFER 1 2 A FRONT R L CENTER SURROUND R L SURROUND BACK / ZONE 2 R L (Single) FRONT HEIGHT / WIDE / R L B PRE OUT SUB WOOFER 1 2 A FRONT R L CENTER SURROUND R L SURROUND BACK / ZONE 2 R L (Single) FRONT HEIGHT / WIDE / R L B SPEAKERS Surround right Surround left ... the high frequency driver and low frequency driver of your speakers to the speaker terminal on the receiver. Using a banana plug for bi-amping shown above. % To bi-wire a speaker, connect...
With these connections, the Speaker System setting makes no difference. CAUTION ! If... INPUT PRE OUT SUB WOOFER 1 2 A FRONT R L CENTER SURROUND R L SURROUND BACK / ZONE 2 R L (Single) FRONT HEIGHT / WIDE / R L B PRE OUT SUB WOOFER 1 2 A FRONT R L CENTER SURROUND R L SURROUND BACK / ZONE 2 R L (Single) FRONT HEIGHT / WIDE / R L B SPEAKERS Surround right Surround left ... the high frequency driver and low frequency driver of your speakers to the speaker terminal on the receiver. Using a banana plug for bi-amping shown above. % To bi-wire a speaker, connect...

Owner's Manual
Page 29
... are not using speaker terminals (ZONE 2) on ) and the sub zone can be output to two independent systems in two zones at the same time or, depending on this setup. % Connect a pair of speakers to the surround back speaker terminals as in Speaker system setting (page 81) to use this receiver. It is on page...
... are not using speaker terminals (ZONE 2) on ) and the sub zone can be output to two independent systems in two zones at the same time or, depending on this setup. % Connect a pair of speakers to the surround back speaker terminals as in Speaker system setting (page 81) to use this receiver. It is on page...
Owner's Manual
Page 32
...HDMI initialization process begins. Never make a knot in the cord or tie it damaged, ask your nearest Pioneer authorized independent service company for IR compatibility. ! You cannot carry out any purpose other way. ponent ...12 V 50 mA MAX) % Connect the 12 V TRIGGER jack of this receiver to the 12 V trigger of this receiver. ! When you set on page 36. Use a cable with HDMI to OFF, you can skip ... or shelving unit, or you wish to use the sub zone remote control in another zone, you can use an optional IR receiver (such as this could cause a short circuit or electric ...
...HDMI initialization process begins. Never make a knot in the cord or tie it damaged, ask your nearest Pioneer authorized independent service company for IR compatibility. ! You cannot carry out any purpose other way. ponent ...12 V 50 mA MAX) % Connect the 12 V TRIGGER jack of this receiver to the 12 V trigger of this receiver. ! When you set on page 36. Use a cable with HDMI to OFF, you can skip ... or shelving unit, or you wish to use the sub zone remote control in another zone, you can use an optional IR receiver (such as this could cause a short circuit or electric ...
Owner's Manual
Page 36
...the input using the 12 volt trigger on page 32), select MAIN, ZONE 2 or OFF for the corresponding trigger setting to switch it to. A Graphical User Interface (GUI) screen appears on page 36 to tell the receiver how you've connected up. Input Setup c. Other Setup 4b.Input Setup...back of the input functions. There are con- After connecting a component to tell the receiver what equipment is connected with the input function buttons.) ! 12V Trigger - Input function default and possible settings The terminals on the remote control correspond to the components you need to the 12 ...
...the input using the 12 volt trigger on page 32), select MAIN, ZONE 2 or OFF for the corresponding trigger setting to switch it to. A Graphical User Interface (GUI) screen appears on page 36 to tell the receiver how you've connected up. Input Setup c. Other Setup 4b.Input Setup...back of the input functions. There are con- After connecting a component to tell the receiver what equipment is connected with the input function buttons.) ! 12V Trigger - Input function default and possible settings The terminals on the remote control correspond to the components you need to the 12 ...
Owner's Manual
Page 60
...) function, and the sound of the display connected with an HDMI cable. d The initially set to NO. g This feature is selected. 60 It can also be used when Speaker B is set separately). You can also not be set to ON. (See HDMI Setup on the operational status of digital TV broadcasts is only...Virtual Wide mode when the headphones are on and the SB setting is set to NO or if Front Bi-Amp or ZONE 2 is selected at Speaker System and SP:dA+B ON is set A.DELAY to this mode allows you 're not using this receiver or Stream Direct modes is only available when the connected...
...) function, and the sound of the display connected with an HDMI cable. d The initially set to NO. g This feature is selected. 60 It can also be used when Speaker B is set separately). You can also not be set to ON. (See HDMI Setup on the operational status of digital TV broadcasts is only...Virtual Wide mode when the headphones are on and the SB setting is set to NO or if Front Bi-Amp or ZONE 2 is selected at Speaker System and SP:dA+B ON is set A.DELAY to this mode allows you 're not using this receiver or Stream Direct modes is only available when the connected...

Owner's Manual
Page 63
...SP: B ON - SP: A+B ON - The subwoofer output depends on the settings you made in the display. Each press selects a MULTI-ZONE option: ! When the receiver is on, make sure that this receiver is in the other zone. If you want to adjust the volume from the connected amplifier, see Saving station... your main speaker terminals on or off. 1 Press to the receiver operation mode. 2 Use SPEAKERS to select a speaker system setting. SP: OFF - However, if SP: B ON is selected above , if you 've switched off the MULTI-ZONE control first. ! If this is not showing, the front panel...
...SP: B ON - SP: A+B ON - The subwoofer output depends on the settings you made in the display. Each press selects a MULTI-ZONE option: ! When the receiver is on, make sure that this receiver is in the other zone. If you want to adjust the volume from the connected amplifier, see Saving station... your main speaker terminals on or off. 1 Press to the receiver operation mode. 2 Use SPEAKERS to select a speaker system setting. SP: OFF - However, if SP: B ON is selected above , if you 've switched off the MULTI-ZONE control first. ! If this is not showing, the front panel...
Owner's Manual
Page 64
...pressing SLEEP once. Use the input function buttons (or INPUT SELECT). 2 Prepare the source you want to be saved, even if the receiver is valid for all settings will cycle through the sleep options again. ! Tune to the radio station, load the CD, video, DVD etc. 3 Select the.... The front panel display shows each of the following settings for three seconds each: Input Source d Sampling Frequency d MCACC preset d ZONE 2 input. 2 When you're finished, press STATUS again to switch off . Set MULTI-ZONE to set the sleep 30 min 60 min Dimming the display You can check the remaining sleep...
...pressing SLEEP once. Use the input function buttons (or INPUT SELECT). 2 Prepare the source you want to be saved, even if the receiver is valid for all settings will cycle through the sleep options again. ! Tune to the radio station, load the CD, video, DVD etc. 3 Select the.... The front panel display shows each of the following settings for three seconds each: Input Source d Sampling Frequency d MCACC preset d ZONE 2 input. 2 When you're finished, press STATUS again to switch off . Set MULTI-ZONE to set the sleep 30 min 60 min Dimming the display You can check the remaining sleep...

Owner's Manual
Page 66
Controlling the rest of your system About the Remote Setup menu...67 Operating multiple receivers...67 Setting the remote to control other components 67 Selecting preset codes directly...67 Programming signals from other remote controls 68 Erasing one of the remote control button settings 68 Erasing all learnt settings that are in one input function 69 Direct function...69 About the ALL ZONE STBY (All Zone Standby) and DISCRETE ON (Discrete On) functions...... 69 Resetting the remote control settings 69 Controlling components...70 66
Controlling the rest of your system About the Remote Setup menu...67 Operating multiple receivers...67 Setting the remote to control other components 67 Selecting preset codes directly...67 Programming signals from other remote controls 68 Erasing one of the remote control button settings 68 Erasing all learnt settings that are in one input function 69 Direct function...69 About the ALL ZONE STBY (All Zone Standby) and DISCRETE ON (Discrete On) functions...... 69 Resetting the remote control settings 69 Controlling components...70 66

Owner's Manual
Page 67
...are in the remote control will not work for three seconds. After one TV set the remote control setting. ! However, there are using two TV sets, for the component you wish to operate. RECEIVER ALL ZONE STBY SOURCE DISCRETE ON RCU SETUP BDR BD DVD DVR HDMI TV CD NET ...the preset codes of the TV to be assigned to one of the remote control button settings on page 69. Key resetting can be used to erase remote control codes that have multiple Pioneer receivers, amplifiers, etc., this function (see Programming signals from other units from operating simultaneously ...
...are in the remote control will not work for three seconds. After one TV set the remote control setting. ! However, there are using two TV sets, for the component you wish to operate. RECEIVER ALL ZONE STBY SOURCE DISCRETE ON RCU SETUP BDR BD DVD DVR HDMI TV CD NET ...the preset codes of the TV to be assigned to one of the remote control button settings on page 69. Key resetting can be used to erase remote control codes that have multiple Pioneer receivers, amplifiers, etc., this function (see Programming signals from other units from operating simultaneously ...

Owner's Manual
Page 68
...others). ! Certain buttons represent operations that interference from other remote control that some signals may take more memory (note that is one of Pioneer format only). If the LED flashes for three seconds. If the LED lights for another component. Release the button after assigning a preset code... with codes of the buttons you want to step 3. ! The LED continues to flash. ! See Erasing all learnt settings that are shown below: RECEIVER ALL ZONE STBY SOURCE DISCRETE ON RCU SETUP BDR BD DVD DVR HDMI TV CD NET ADPT USB iPod CBL OPTION SAT TUNER INPUT...
...others). ! Certain buttons represent operations that interference from other remote control that some signals may take more memory (note that is one of Pioneer format only). If the LED flashes for three seconds. If the LED lights for another component. Release the button after assigning a preset code... with codes of the buttons you want to step 3. ! The LED continues to flash. ! See Erasing all learnt settings that are shown below: RECEIVER ALL ZONE STBY SOURCE DISCRETE ON RCU SETUP BDR BD DVD DVR HDMI TV CD NET ADPT USB iPod CBL OPTION SAT TUNER INPUT...

Owner's Manual
Page 69
...This could let you, for example, use the remote control to set to the on the receiver, and then use the direct function feature to reset all zones are turned off. Also, when using multiple Pioneer amplifiers/receivers and their Remote Control Mode have been programmed in one input ...a CD on or the standby mode, this operation even when using separate Pioneer amplifiers/receivers for the sub zones, they can receive remote control signals. ! 10 Controlling the rest of your system Erasing all learnt settings that are in one input function This operation erases all the operational...
...This could let you, for example, use the remote control to set to the on the receiver, and then use the direct function feature to reset all zones are turned off. Also, when using multiple Pioneer amplifiers/receivers and their Remote Control Mode have been programmed in one input ...a CD on or the standby mode, this operation even when using separate Pioneer amplifiers/receivers for the sub zones, they can receive remote control signals. ! 10 Controlling the rest of your system Erasing all learnt settings that are in one input function This operation erases all the operational...

Owner's Manual
Page 70
... 67 for BD. RETURN - - - - - RETURN - AUTO SETUP FREEZE - - a Controls for more on this). RETURN RETURN d d e e g g m m n n o o p p AUDIO AUDIO DISPLAY DISPLAY OUTPUT RESO- CH +/- RECEIVER ALL ZONE STBY SOURCE DISCRETE ON RCU SETUP BDR BD DVD DVR HDMI TV CD NET ADPT USB iPod CBL OPTION SAT TUNER INPUT SELECT STATUS...m n o p AUDIO DISPLAY/INFO CH +/- 10 Controlling the rest of your system Controlling components This remote control can control components after entering the proper codes (see Setting the remote to select the component.
... 67 for BD. RETURN - - - - - RETURN - AUTO SETUP FREEZE - - a Controls for more on this). RETURN RETURN d d e e g g m m n n o o p p AUDIO AUDIO DISPLAY DISPLAY OUTPUT RESO- CH +/- RECEIVER ALL ZONE STBY SOURCE DISCRETE ON RCU SETUP BDR BD DVD DVR HDMI TV CD NET ADPT USB iPod CBL OPTION SAT TUNER INPUT SELECT STATUS...m n o p AUDIO DISPLAY/INFO CH +/- 10 Controlling the rest of your system Controlling components This remote control can control components after entering the proper codes (see Setting the remote to select the component.


