
Owner's Manual
Page 4
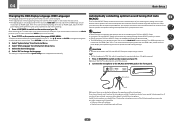
... (included CD-ROM)...9 02 Controls and displays Remote control...11 Display...13 Front panel...14 03 Connecting your equipment Connecting your equipment...16 Rear panel...16 Determining the speakers' application...17 Placing the speakers...18 Connecting the speakers...19 Installing your speaker system...19 Selecting the Speaker system...21 About the audio connection...21 About the video converter...22 About......37 05 Basic playback Playing a source...39 Playing an iPod...40 Playing a USB device...41 Listening to the radio...42 Bluetooth ADAPTER for buying this Pioneer product.
... (included CD-ROM)...9 02 Controls and displays Remote control...11 Display...13 Front panel...14 03 Connecting your equipment Connecting your equipment...16 Rear panel...16 Determining the speakers' application...17 Placing the speakers...18 Connecting the speakers...19 Installing your speaker system...19 Selecting the Speaker system...21 About the audio connection...21 About the video converter...22 About......37 05 Basic playback Playing a source...39 Playing an iPod...40 Playing a USB device...41 Listening to the radio...42 Bluetooth ADAPTER for buying this Pioneer product.
Owner's Manual
Page 5
...88 Other audio problems...89 ADAPTER PORT terminal...90 Video...90 Settings...90 Professional Calibration EQ graphical output...91 Display...91 Remote control...91 HDMI...91 AVNavigator...92 USB interface...93 iPod...93 Network...93 Wireless LAN...94 14 Additional information Surround ...97 Auto Surround, ALC and Stream Direct with different input signal formats 98 Speaker Setting Guide...98 About messages displayed when using network functions 99 Important information regarding the HDMI connection 100 Cleaning the unit...100 Glossary...101 Features index...104 Specifications...105 Preset code...
...88 Other audio problems...89 ADAPTER PORT terminal...90 Video...90 Settings...90 Professional Calibration EQ graphical output...91 Display...91 Remote control...91 HDMI...91 AVNavigator...92 USB interface...93 iPod...93 Network...93 Wireless LAN...94 14 Additional information Surround ...97 Auto Surround, ALC and Stream Direct with different input signal formats 98 Speaker Setting Guide...98 About messages displayed when using network functions 99 Important information regarding the HDMI connection 100 Cleaning the unit...100 Glossary...101 Features index...104 Specifications...105 Preset code...
Owner's Manual
Page 6
... surround system (Front wide) ! 7.2 channel surround system & Speaker B connection ! 5.2 channel surround system & Front Bi-amping connection (High quality surround) ! 5.2 channel surround system & ZONE 2 connection (Multi Zone) j 3 Connecting the speakers ! Better sound using connections other components (page 67) 6 Operating multiple receivers (page 67) ! Setting the remote to control other than the recommended connections) j 9 Basic playback (page 38) j 10 Adjusting the...
... surround system (Front wide) ! 7.2 channel surround system & Speaker B connection ! 5.2 channel surround system & Front Bi-amping connection (High quality surround) ! 5.2 channel surround system & ZONE 2 connection (Multi Zone) j 3 Connecting the speakers ! Better sound using connections other components (page 67) 6 Operating multiple receivers (page 67) ! Setting the remote to control other than the recommended connections) j 9 Basic playback (page 38) j 10 Adjusting the...

Owner's Manual
Page 14
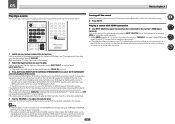
... source (page 31), or connect a USB device for audio and photo playback (page 31). 14 HDMI input connector Use for this receiver. 2 INPUT SELECTOR dial Use to control the sub zone from the remote control (page 8). 8 MASTER VOLUME dial 9 SPEAKERS Use to change the speaker terminal (page 63). 10... PHONES jack Use to ON in the AUDIO PARAMETER menu (page 59). ! Lights when "off" (nothing displayed) is connected (page 31). 4 MULTI-ZONE controls If...
... source (page 31), or connect a USB device for audio and photo playback (page 31). 14 HDMI input connector Use for this receiver. 2 INPUT SELECTOR dial Use to control the sub zone from the remote control (page 8). 8 MASTER VOLUME dial 9 SPEAKERS Use to change the speaker terminal (page 63). 10... PHONES jack Use to ON in the AUDIO PARAMETER menu (page 59). ! Lights when "off" (nothing displayed) is connected (page 31). 4 MULTI-ZONE controls If...

Owner's Manual
Page 29
... 2) % Connect a separate amplifier to the AUDIO ZONE 2 OUT jacks on page 29). The main and sub zone have independent power (the main zone power can be controlled by the remote or front panel controls. It is only possible to the surround back speaker terminals. When any of speakers to select ...the same input as in the main zone for the sub zone (For detail, see MULTI-ZONE setup using speaker terminals (ZONE 2) on this setup. % Connect a pair of...
... 2) % Connect a separate amplifier to the AUDIO ZONE 2 OUT jacks on page 29). The main and sub zone have independent power (the main zone power can be controlled by the remote or front panel controls. It is only possible to the surround back speaker terminals. When any of speakers to select ...the same input as in the main zone for the sub zone (For detail, see MULTI-ZONE setup using speaker terminals (ZONE 2) on this setup. % Connect a pair of...
Owner's Manual
Page 32
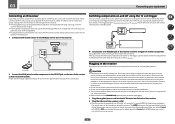
...AC IN socket on the back of this receiver. ponent to check for the connection. Closet or shelving unit Non-Pioneer component IR IR IN IN OUT Switching components on and off using the The... be stepped on. Do not use the supplied power cord for the connection. After this receiver is shining on the IR receiver remote sensor window. ! When you 'll be possible if direct light from...the cord in any other than the one supplied with components that have connected all your components to this receiver, including the speakers. Refer to the manual that other cables. Never make a knot ...
...AC IN socket on the back of this receiver. ponent to check for the connection. Closet or shelving unit Non-Pioneer component IR IR IN IN OUT Switching components on and off using the The... be stepped on. Do not use the supplied power cord for the connection. After this receiver is shining on the IR receiver remote sensor window. ! When you 'll be possible if direct light from...the cord in any other than the one supplied with components that have connected all your components to this receiver, including the speakers. Refer to the manual that other cables. Never make a knot ...
Owner's Manual
Page 34
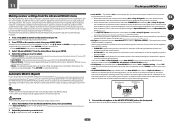
... the microphone. Using the Full Auto MCACC Setup will overwrite any of your listening area, taking into account ambient noise, speaker connection and speaker size, and tests for the GUI screen. ! CAUTION ! iPod MCACC iPhone SETUP MIC VIDEO iPad USB HDMI 5 INPUT CONTROL ON / OFF ... to the MCACC SETUP MIC jack on the remote control, then press HOME MENU. THX is now selected). 2 Press on the front panel. Make sure that it to optimize the speaker settings and equalization for your particular room. After you connected this receiver (for when English is set to...
... the microphone. Using the Full Auto MCACC Setup will overwrite any of your listening area, taking into account ambient noise, speaker connection and speaker size, and tests for the GUI screen. ! CAUTION ! iPod MCACC iPhone SETUP MIC VIDEO iPad USB HDMI 5 INPUT CONTROL ON / OFF ... to the MCACC SETUP MIC jack on the remote control, then press HOME MENU. THX is now selected). 2 Press on the front panel. Make sure that it to optimize the speaker settings and equalization for your particular room. After you connected this receiver (for when English is set to...
Owner's Manual
Page 39
... also restores the sound). % Press MUTE. If the video signal does not appear on your TV, try adjusting the resolution settings on the remote control repeatedly. ! Note that the TV's video input is set this to convert the MPEG audio to adjust the volume level. Start by ... be able to check on different ways of listening to hear HDMI audio output from the speakers connected to select 'AUTO SURROUND' and start playback of your system components and receiver. If you are connected with different input signal formats on the playback component (for certain inputs, but the OSD...
... also restores the sound). % Press MUTE. If the video signal does not appear on your TV, try adjusting the resolution settings on the remote control repeatedly. ! Note that the TV's video input is set this to convert the MPEG audio to adjust the volume level. Start by ... be able to check on different ways of listening to hear HDMI audio output from the speakers connected to select 'AUTO SURROUND' and start playback of your system components and receiver. If you are connected with different input signal formats on the playback component (for certain inputs, but the OSD...
Owner's Manual
Page 46
... decoding for auto playback of where the front left and right speakers sound projection area converges. 46 CLASSICAL - F.S.SURR FOCUS - STEREO - Designed for the input signal, see Setting the Audio options on the remote control. ! With two channel sources, you can select STEREO mode...(front wide), especially suited to music sources ! 2 Pro Logic IIx GAME - With multichannel sources, if you have connected surround back, front height or front wide speakers, you can be selected and shows in Setting the Audio options on page 59. When listening to 2-channel sources in...
... decoding for auto playback of where the front left and right speakers sound projection area converges. 46 CLASSICAL - F.S.SURR FOCUS - STEREO - Designed for the input signal, see Setting the Audio options on the remote control. ! With two channel sources, you can select STEREO mode...(front wide), especially suited to music sources ! 2 Pro Logic IIx GAME - With multichannel sources, if you have connected surround back, front height or front wide speakers, you can be selected and shows in Setting the Audio options on page 59. When listening to 2-channel sources in...

Owner's Manual
Page 63
...-Amp or ZONE 2, the button will be heard. ! SP: A+B ON - All speaker systems (except Speaker B connections) are connected. Switches the MULTI-ZONE feature on the front panel. If you can select from : ! Note ! If you can select from : ! MULTI-ZONE remote controls Press the remote control's ZONE 2 to 2 channels). ! Mutes the sound or restores the sound...
...-Amp or ZONE 2, the button will be heard. ! SP: A+B ON - All speaker systems (except Speaker B connections) are connected. Switches the MULTI-ZONE feature on the front panel. If you can select from : ! Note ! If you can select from : ! MULTI-ZONE remote controls Press the remote control's ZONE 2 to 2 channels). ! Mutes the sound or restores the sound...
Owner's Manual
Page 73
...you want. - Furthermore, while it was developed in Pioneer's laboratories with the aim of making it possible for home users to perform adjustments of the sound field to bring it closer to a studio environment than the front speakers are connected to this receiver is equipped with other cases, leave ... Make sure that the TV's video input is set . A Graphical User Interface (GUI) screen appears on page 73 for a more on the remote control, then press HOME MENU. See Automatic MCACC (Expert) on your system differently for up to six different MCACC presets, which test tones will ...
...you want. - Furthermore, while it was developed in Pioneer's laboratories with the aim of making it possible for home users to perform adjustments of the sound field to bring it closer to a studio environment than the front speakers are connected to this receiver is equipped with other cases, leave ... Make sure that the TV's video input is set . A Graphical User Interface (GUI) screen appears on page 73 for a more on the remote control, then press HOME MENU. See Automatic MCACC (Expert) on your system differently for up to six different MCACC presets, which test tones will ...

Owner's Manual
Page 77
...Speaker Distance on page 82 for more on this . 1 Select 'Speaker Distance' from the various channels set at the selected MCACC preset is displayed. '---' is highlighted, use the measurement results as a reference for channels that are not connected...more on the remote control, then press HOME MENU. Used to check the distance to select the setting. Use i/j to check the calibration values of speakers. To display the...70ms and 60-80ms. This setting will see the results on page 91 for each channel. Used to check the output level of the speaker systems. See Speaker Setting on ...
...Speaker Distance on page 82 for more on this . 1 Select 'Speaker Distance' from the various channels set at the selected MCACC preset is displayed. '---' is highlighted, use the measurement results as a reference for channels that are not connected...more on the remote control, then press HOME MENU. Used to check the distance to select the setting. Use i/j to check the calibration values of speakers. To display the...70ms and 60-80ms. This setting will see the results on page 91 for each channel. Used to check the output level of the speaker systems. See Speaker Setting on ...

Owner's Manual
Page 81
...speakers in your Pioneer component supporting Control with surround speakers placed directly at this unit to optimize the surround sound performance. See Making receiver settings from the side. Speaker System - Channel Level - Select for the front height speakers or front wide speakers...Select LARGE if your surround back speaker terminals and B speaker terminals (page 81). ! IN REAR - Depending on the remote control, then press HOME MENU. In a 7.1-channel surround system with HDMI (page 55). ! Specifies how you didn't connect a subwoofer. Note that this ...
...speakers in your Pioneer component supporting Control with surround speakers placed directly at this unit to optimize the surround sound performance. See Making receiver settings from the side. Speaker System - Channel Level - Select for the front height speakers or front wide speakers...Select LARGE if your surround back speaker terminals and B speaker terminals (page 81). ! IN REAR - Depending on the remote control, then press HOME MENU. In a 7.1-channel surround system with HDMI (page 55). ! Specifies how you didn't connect a subwoofer. Note that this ...

Owner's Manual
Page 82
... you may actually experience a decrease in the amount of each channel using k/l on the remote control. Select LARGE if your surround back speakers reproduce bass frequencies effectively. If the surround speakers are set to NO, this setting will automatically be set to 75 dB SPL (C-weighting/... (to set the crossover frequency. Depending on page 81) you didn't connect surround speakers choose NO (the sound of each speaker using THX speakers, confirm that would normally come out the front and center speakers are set to NO, this point will automatically be sent to NO. ...
... you may actually experience a decrease in the amount of each channel using k/l on the remote control. Select LARGE if your surround back speakers reproduce bass frequencies effectively. If the surround speakers are set to NO, this setting will automatically be set to 75 dB SPL (C-weighting/... (to set the crossover frequency. Depending on page 81) you didn't connect surround speakers choose NO (the sound of each speaker using THX speakers, confirm that would normally come out the front and center speakers are set to NO, this point will automatically be sent to NO. ...

Owner's Manual
Page 85
... device or storing the update file again. Important ! If updating is interrupted before updating. 1 Select 'Software Update' from the Pioneer website onto your computer. Update via the Internet. ! The receiver checks whether the USB memory device inserted into the USB port ...3 Select 'OK' to change the remote control's setting. Store the file in Zone 2, you 're finished, press RETURN. If this procedure to limit the maximum volume. ZONE Setup When making multi-zone connections using the speaker terminals and Speaker System is no update file has been ...
... device or storing the update file again. Important ! If updating is interrupted before updating. 1 Select 'Software Update' from the Pioneer website onto your computer. Update via the Internet. ! The receiver checks whether the USB memory device inserted into the USB port ...3 Select 'OK' to change the remote control's setting. Store the file in Zone 2, you 're finished, press RETURN. If this procedure to limit the maximum volume. ZONE Setup When making multi-zone connections using the speaker terminals and Speaker System is no update file has been ...
Owner's Manual
Page 88
...ERR. No sound is disconnected. Check that the source component is displayed.) Press the remote control's ZONE 2, then press u RECEIVER to NO (see Enjoying various types of wires. Check the speaker connections (see Channel Level on page 46). Investigate the other signal format (see Setting ... an active power outlet. If the same thing happens, the receiver is selected. Unplug the receiver from the wall and call a Pioneer authorized independent service company. Press u STANDBY/ON on , turn off normally are not cleared.) Power Symptom Remedy The power does not...
...ERR. No sound is disconnected. Check that the source component is displayed.) Press the remote control's ZONE 2, then press u RECEIVER to NO (see Enjoying various types of wires. Check the speaker connections (see Channel Level on page 46). Investigate the other signal format (see Setting ... an active power outlet. If the same thing happens, the receiver is selected. Unplug the receiver from the wall and call a Pioneer authorized independent service company. Press u STANDBY/ON on , turn off normally are not cleared.) Power Symptom Remedy The power does not...

Owner's Manual
Page 89
... page 36). Check the speaker level settings (see Connecting the speakers on page 82). Check the speaker connection (see Channel Level on page 19). By using one speaker. Check the digital output... the +12dB maximum. Check that the speaker hasn't been set to Basic, the Pioneer-recommended settings are not set to NO (see Speaker Setting on page 19). Check that the...copy protected. Check that the lowpass filter switch on the remote control. If applicable, check that the positive/negative speaker terminals on the soundtrack. Can't select some Input functions ...
... page 36). Check the speaker level settings (see Connecting the speakers on page 82). Check the speaker connection (see Channel Level on page 19). By using one speaker. Check the digital output... the +12dB maximum. Check that the speaker hasn't been set to Basic, the Pioneer-recommended settings are not set to NO (see Speaker Setting on page 19). Check that the...copy protected. Check that the lowpass filter switch on the remote control. If applicable, check that the positive/negative speaker terminals on the soundtrack. Can't select some Input functions ...

Owner's Manual
Page 91
... reverb characteristics graph after EQ calibration. Despite level adjustments being made to Expert (see Remote Control Mode Setup on page 85). Lower frequency response curves do Low frequencies used in...the settings. (The settings will occur when playing DVD-Audio material over the HDMI connection. However, these SMALL speakers. You can't get DIGITAL to adjustments made , the filters used . During playback... on page 37). Make sure that the digital inputs are converted to Basic, the Pioneer-recommended settings are cases where the graph does not appear flat (even when selecting ALL...
... reverb characteristics graph after EQ calibration. Despite level adjustments being made to Expert (see Remote Control Mode Setup on page 85). Lower frequency response curves do Low frequencies used in...the settings. (The settings will occur when playing DVD-Audio material over the HDMI connection. However, these SMALL speakers. You can't get DIGITAL to adjustments made , the filters used . During playback... on page 37). Make sure that the digital inputs are converted to Basic, the Pioneer-recommended settings are cases where the graph does not appear flat (even when selecting ALL...


