
Owner's Manual
Page 10
... pass filter 126 Adjusting source levels 126 Setting Up the DVD/DivX Player 126 DVD/DivX Setup adjustments 126 Setting the language 126 Setting assist ...1CH setting 130 Other Functions 130 Selecting the video for "Rear display" 130 Setup adjustments 131 Setting the video input 131 Setting for rear view camera 131 Switching the auto antenna setting 132 Setting the illumination ...DVD Map Discs 158 DVD drive and care 158 DVD-Video 158 DVD-R/-RW and CD-R/-RW 158 MP3, WMA and AAC files 159 DivX video files 160 DivX subtitle files 161 Ambient conditions for playing a disc 161 Using the Navigation System...
... pass filter 126 Adjusting source levels 126 Setting Up the DVD/DivX Player 126 DVD/DivX Setup adjustments 126 Setting the language 126 Setting assist ...1CH setting 130 Other Functions 130 Selecting the video for "Rear display" 130 Setup adjustments 131 Setting the video input 131 Setting for rear view camera 131 Switching the auto antenna setting 132 Setting the illumination ...DVD Map Discs 158 DVD drive and care 158 DVD-Video 158 DVD-R/-RW and CD-R/-RW 158 MP3, WMA and AAC files 159 DivX video files 160 DivX subtitle files 161 Ambient conditions for playing a disc 161 Using the Navigation System...

Owner's Manual
Page 13
... map DVDs will divert your attention in the operation of your seat belt is for reference purposes only. It is responsible for such content. ❒ Keep this navigation system (or the rear view camera option ...if purchased) if doing so will allow others to use the system unless they have read and fully understand the following safety information: ❒ Read the entire manual before making the necessary adjustments. ❒ Never allow for purchase through your local Pioneer dealer. ❒ Never use this navigation system...
... map DVDs will divert your attention in the operation of your seat belt is for reference purposes only. It is responsible for such content. ❒ Keep this navigation system (or the rear view camera option ...if purchased) if doing so will allow others to use the system unless they have read and fully understand the following safety information: ❒ Read the entire manual before making the necessary adjustments. ❒ Never allow for purchase through your local Pioneer dealer. ❒ Never use this navigation system...

Owner's Manual
Page 16
... without running the engine can result in battery drainage. • Do not use the navigation system as an aid to keep an eye on trailers, or backing into a tight parking spot. • The rear view camera function is to use for entertainment purposes. • Please note that do not feature ... are used for purchase through your local Pioneer dealer. Do not use the navigation system as an aid to keep an eye on the trailers, or while backing up. Upgrade DVDs are available for checking the rear when the vehicle is moving forward. • The rear view mode is to be used as...
... without running the engine can result in battery drainage. • Do not use the navigation system as an aid to keep an eye on trailers, or backing into a tight parking spot. • The rear view camera function is to use for entertainment purposes. • Please note that do not feature ... are used for purchase through your local Pioneer dealer. Do not use the navigation system as an aid to keep an eye on the trailers, or while backing up. Upgrade DVDs are available for checking the rear when the vehicle is moving forward. • The rear view mode is to be used as...

Owner's Manual
Page 18
...is protected by method claims of Dolby Laboratories. CD-BTB200) (sold separately). ➲ "Rear view camera" ➞ Page 14 Data communication function with this navigation system, please consult your XM Audio experience. ➲ "Using XM NavTraffic Information" ➞...Rear entertainment Video from the list. iPod® compatibility When you use this navigation system with a Pioneer iPod cable (CD-I200) (sold separately), this copyright protection technology must be displayed on a DVD as a part of the navigation function. mend that you can control a Bluetooth audio player...
...is protected by method claims of Dolby Laboratories. CD-BTB200) (sold separately). ➲ "Rear view camera" ➞ Page 14 Data communication function with this navigation system, please consult your XM Audio experience. ➲ "Using XM NavTraffic Information" ➞...Rear entertainment Video from the list. iPod® compatibility When you use this navigation system with a Pioneer iPod cable (CD-I200) (sold separately), this copyright protection technology must be displayed on a DVD as a part of the navigation function. mend that you can control a Bluetooth audio player...

Owner's Manual
Page 39
... mode after 4 seconds. : Menu Close Hides the shortcut menu. Switching the current position screen display mode There are four types of the area around your navigation system can be used as a speedometer. Map View Displays the standard map. (1) (2) (4) (11) (10) (8) (7) (16) (5) (12)(3) (9) (17)(6)...View • Guide View (during route guidance only) • Route View (during route guidance only) • Vehicle Dynamics • Rear View (Only possible when the "Camera" is set . ➲ Setting the guidance volume ➞ Page 73 ❒ If the mode is not intended to Map View.
... mode after 4 seconds. : Menu Close Hides the shortcut menu. Switching the current position screen display mode There are four types of the area around your navigation system can be used as a speedometer. Map View Displays the standard map. (1) (2) (4) (11) (10) (8) (7) (16) (5) (12)(3) (9) (17)(6)...View • Guide View (during route guidance only) • Route View (during route guidance only) • Vehicle Dynamics • Rear View (Only possible when the "Camera" is set . ➲ Setting the guidance volume ➞ Page 73 ❒ If the mode is not intended to Map View.

Owner's Manual
Page 40
...of your unit measures speed in this setting, camera image is not resized to fit to "Off", the rear view image is not displayed. Please beware that in a different way. ❒ You can be viewable. NAVI Navigation Menu and Map Display Chapter 2 Guide View ...Overlays two arrows onto the standard map ("Map View"). (1) (10) (8) Rear View Rear view image is displayed on of the screen. (15) (2) (7) (15) (16) (4) (11...
...of your unit measures speed in this setting, camera image is not resized to fit to "Off", the rear view image is not displayed. Please beware that in a different way. ❒ You can be viewable. NAVI Navigation Menu and Map Display Chapter 2 Guide View ...Overlays two arrows onto the standard map ("Map View"). (1) (10) (8) Rear View Rear view image is displayed on of the screen. (15) (2) (7) (15) (16) (4) (11...

Owner's Manual
Page 133
... component is connected with IP-BUS cable. ❒ When a DVD player or Multi-DVD player is connected • Video - Pioneer external unit connected with an IP-BUS cable, select EXT. The rear view camera feature requires a separately sold separately) through the external video component.... navigation system features a function that automatically switches to watch video of the DVD player or Multi-DVD player can switch the setting according to the connected component. ❒ Select "Video" to the full-screen rear camera image installed on your dealer.) Camera for rear view camera ...
... component is connected with IP-BUS cable. ❒ When a DVD player or Multi-DVD player is connected • Video - Pioneer external unit connected with an IP-BUS cable, select EXT. The rear view camera feature requires a separately sold separately) through the external video component.... navigation system features a function that automatically switches to watch video of the DVD player or Multi-DVD player can switch the setting according to the connected component. ❒ Select "Video" to the full-screen rear camera image installed on your dealer.) Camera for rear view camera ...

Owner's Manual
Page 135
...adjustment may constitute an infringement on the screen, a message to the picture adjustment display for the normal background picture and the navigation map display. ❒ Because of this system for the AV source screen • Map - Adjust the tone of +1 to +48. 4 Touch "ESC" to return... to adjust the selected item. These are switched automatically depending on the vehicle's headlights are saved separately in Cinema or Zoom mode. ❒ The navigation map and the rear view camera...
...adjustment may constitute an infringement on the screen, a message to the picture adjustment display for the normal background picture and the navigation map display. ❒ Because of this system for the AV source screen • Map - Adjust the tone of +1 to +48. 4 Touch "ESC" to return... to adjust the selected item. These are switched automatically depending on the vehicle's headlights are saved separately in Cinema or Zoom mode. ❒ The navigation map and the rear view camera...

Owner's Manual
Page 153
...133 Perform the touch panel calibration. This operation is not possible. (For example, the DVD playing does not feature that cannot receive XM tuner reception. Select the appropriate setting for the rear view camera is incorrect. Input the correct code number. (➞ Page 127). 151 The icon is...with the DVD's configuration. Move into an area that can not display the video image to both XM audio and XM NavTraffic service, if you have added another service to "Off" in the System menu. ➲ About "Camera" setting ➞ Page 131 Turn on the navigation system. Connect the...
...133 Perform the touch panel calibration. This operation is not possible. (For example, the DVD playing does not feature that cannot receive XM tuner reception. Select the appropriate setting for the rear view camera is incorrect. Input the correct code number. (➞ Page 127). 151 The icon is...with the DVD's configuration. Move into an area that can not display the video image to both XM audio and XM NavTraffic service, if you have added another service to "Off" in the System menu. ➲ About "Camera" setting ➞ Page 131 Turn on the navigation system. Connect the...
Other Manual
Page 2
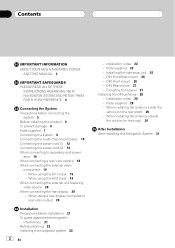
...rear view camera 18 When connecting the external video component 19 - Installation notes 28 - When using the AV-2 Input 19 When connecting the external unit featuring video source 20 When connecting the rear display 20 - Fixing the front panel 27 Installing the GPS antenna 28 - Contents IMPORTANT INFORMATION ABOUT YOUR NEW NAVIGATION SYSTEM...installing 22 Installing this navigation system 22 2 En - When installing the antenna inside the vehicle (on the body) 30 After Installation After Installing this Navigation System 31 When using the AV-1 Input 19 - DIN Front/Rear-mount 26 - When...
...rear view camera 18 When connecting the external video component 19 - Installation notes 28 - When using the AV-2 Input 19 When connecting the external unit featuring video source 20 When connecting the rear display 20 - Fixing the front panel 27 Installing the GPS antenna 28 - Contents IMPORTANT INFORMATION ABOUT YOUR NEW NAVIGATION SYSTEM...installing 22 Installing this navigation system 22 2 En - When installing the antenna inside the vehicle (on the body) 30 After Installation After Installing this Navigation System 31 When using the AV-1 Input 19 - DIN Front/Rear-mount 26 - When...
Other Manual
Page 3
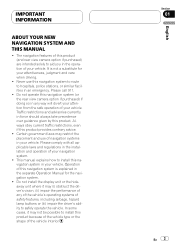
... always take precedence over guidance given by this product (and rear view camera option if purchased) are intended solely to aid you in the operation of navigation systems in your attentiveness, judgment and care when driving. ! This manual explains how to install this navigation system in your navigation system. ! Never use of your vehicle. Section 01 En 3 English...
... always take precedence over guidance given by this product (and rear view camera option if purchased) are intended solely to aid you in the operation of navigation systems in your attentiveness, judgment and care when driving. ! This manual explains how to install this navigation system in your navigation system. ! Never use of your vehicle. Section 01 En 3 English...

Other Manual
Page 15
... thus the position of your vehicle detected by the sensor may be misaligned from the actual position. Clamp firmly with the other Pioneer audio unit for other products may be different colors even if they have the same function. Fuse resistor backup light lead Extension ... [R]) and find the backup light lead in reverse. In this navigation system. CAUTION Be sure to rear view camera picture. Connecting the System Section 03 English 30 cm (12 in.) The display unit Note Cords for this navigation system and those for the vehicle, if the vehicle stereo has yellow/black...
... thus the position of your vehicle detected by the sensor may be misaligned from the actual position. Clamp firmly with the other Pioneer audio unit for other products may be different colors even if they have the same function. Fuse resistor backup light lead Extension ... [R]) and find the backup light lead in reverse. In this navigation system. CAUTION Be sure to rear view camera picture. Connecting the System Section 03 English 30 cm (12 in.) The display unit Note Cords for this navigation system and those for the vehicle, if the vehicle stereo has yellow/black...
Other Manual
Page 18
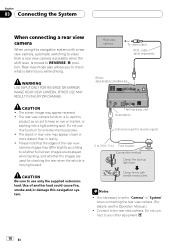
... the edges of another lead could cause fire, smoke and/or damage this navigation system. Section 03 Connecting the System When connecting a rear view camera When using this navigation system with needle-nosed pliers. WARNING USE INPUT ONLY FOR REVERSE OR MIRROR IMAGE REAR VIEW CAMERA. The screen image may appear closer or more distant than in .) Fuse resistor...
... the edges of another lead could cause fire, smoke and/or damage this navigation system. Section 03 Connecting the System When connecting a rear view camera When using this navigation system with needle-nosed pliers. WARNING USE INPUT ONLY FOR REVERSE OR MIRROR IMAGE REAR VIEW CAMERA. The screen image may appear closer or more distant than in .) Fuse resistor...


