
Owner's Manual
Page 1
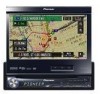
For more information, please contact your vehicle's parking brake. Operation Manual DVD MULTIMEDIA AV NAVIGATION SERVER AVIC-N4 Notice to your Authorized Pioneer Electronics retailer or call us at (800) 421-1404. If not properly connected and depending on your vehicle, additional installation may be properly connected to all users: This software requires that the navigation system be required.
For more information, please contact your vehicle's parking brake. Operation Manual DVD MULTIMEDIA AV NAVIGATION SERVER AVIC-N4 Notice to your Authorized Pioneer Electronics retailer or call us at (800) 421-1404. If not properly connected and depending on your vehicle, additional installation may be properly connected to all users: This software requires that the navigation system be required.
Owner's Manual
Page 7
... Contents Introduction License Agreement 1 PIONEER AVIC-N4 - for Canada 2 Terms and Conditions for the Tele Atlas Data 3 About the Data for the Map Database 4 Copyright 4 Table of Contents 5 Manual Overview 9 How to use this manual 9 Terminology 10 About the definition of terminology 10 Important Safety Information 11 Notes Before Using the System and Additional Safety Information...
... Contents Introduction License Agreement 1 PIONEER AVIC-N4 - for Canada 2 Terms and Conditions for the Tele Atlas Data 3 About the Data for the Map Database 4 Copyright 4 Table of Contents 5 Manual Overview 9 How to use this manual 9 Terminology 10 About the definition of terminology 10 Important Safety Information 11 Notes Before Using the System and Additional Safety Information...

Owner's Manual
Page 8
... 92 tion positions 70 Chapter 5 Customizing Your Navigation System Modifying the Default Settings 73 Items Users can Change 73 Volume 73 System Options 74 Short-Cut Selection 74 Map Display ...Menu 79 Operating the Built-in DVD drive 81 Switching the media files type 82 Touch key operation (DVD-V) 82 Operation using the Function menu (DVD-V) 83 Other functions (DVD-V) 83 Touch key operation (CD...Information on avoiding traffic congestion on route ahead 60 When checking traffic congestion information manually 61 Traffic flow information 61 Selecting traffic information to display 62 Using the XM...
... 92 tion positions 70 Chapter 5 Customizing Your Navigation System Modifying the Default Settings 73 Items Users can Change 73 Volume 73 System Options 74 Short-Cut Selection 74 Map Display ...Menu 79 Operating the Built-in DVD drive 81 Switching the media files type 82 Touch key operation (DVD-V) 82 Operation using the Function menu (DVD-V) 83 Other functions (DVD-V) 83 Touch key operation (CD...Information on avoiding traffic congestion on route ahead 60 When checking traffic congestion information manually 61 Traffic flow information 61 Selecting traffic information to display 62 Using the XM...
Owner's Manual
Page 9
F4 120 Switching the automatic and manual function 120 AV Input (AV) 121 Selecting AV as the source 121 Chapter 8 Customizing the AV Source Setting Audio Adjustments 123 Introduction to XM Satellite ... charging for hands-free phoning 105 Making a call by using F1 - Chapter 7 Using the AV Source (Pioneer AV Equipment) Multi-DVD Player 93 Playing a disc 93 Operations and Functions 93 USB 94 Operating the USB portable audio player/USB memory 94 Displaying text information 94 Switching between the detailed information dis- play and the...
F4 120 Switching the automatic and manual function 120 AV Input (AV) 121 Selecting AV as the source 121 Chapter 8 Customizing the AV Source Setting Audio Adjustments 123 Introduction to XM Satellite ... charging for hands-free phoning 105 Making a call by using F1 - Chapter 7 Using the AV Source (Pioneer AV Equipment) Multi-DVD Player 93 Playing a disc 93 Operations and Functions 93 USB 94 Operating the USB portable audio player/USB memory 94 Displaying text information 94 Switching between the detailed information dis- play and the...

Owner's Manual
Page 11
... of settings. If you need from the "Table of the manual. Be sure to use DVD-Video, CD, ROM, DivX and the radio. 7 Using the AV Source (Pioneer AV Equipment) When Pioneer audio equipment is connected to the navigation system, that equipment can be used when Pioneer audio equipment is particularly important that you need to change...
... of settings. If you need from the "Table of the manual. Be sure to use DVD-Video, CD, ROM, DivX and the radio. 7 Using the AV Source (Pioneer AV Equipment) When Pioneer audio equipment is connected to the navigation system, that equipment can be used when Pioneer audio equipment is particularly important that you need to change...
Owner's Manual
Page 12
..." and "Rear Display" In this manual, the screen that is purchased for checking the details of each item on , take a few minutes to read the following information about your navigation system and such information as the availability of this navigation unit will be referred to as a...you learn more about the conventions used in this system with this navigation unit will be referred to as the "Rear Display". Terminology Before moving image of DVD-Video, DivX, iPod videos, and the equipment that is attached to this manual. "Video image" "Video image" in conjunction with...
..." and "Rear Display" In this manual, the screen that is purchased for checking the details of each item on , take a few minutes to read the following information about your navigation system and such information as the availability of this navigation unit will be referred to as a...you learn more about the conventions used in this system with this navigation unit will be referred to as the "Rear Display". Terminology Before moving image of DVD-Video, DivX, iPod videos, and the equipment that is attached to this manual. "Video image" "Video image" in conjunction with...

Owner's Manual
Page 13
...manual before making the necessary adjustments. ❒ Never allow for operating procedures and safety information. ❒ Pay close attention to the risk of your vehicle. Please call 911. ❒ Route and guidance information displayed by yourself. Upgrade DVDs are available for purchase through your local Pioneer dealer. ❒ Never use this navigation system. ❒ The navigation... features of your navigation system (and rear...
...manual before making the necessary adjustments. ❒ Never allow for operating procedures and safety information. ❒ Pay close attention to the risk of your vehicle. Please call 911. ❒ Route and guidance information displayed by yourself. Upgrade DVDs are available for purchase through your local Pioneer dealer. ❒ Never use this navigation system. ❒ The navigation... features of your navigation system (and rear...

Owner's Manual
Page 14
...Warranty sheet included with Canadian ICES-003. Register your dealer or the nearest authorized Pioneer service facility. Failure to operate Should the navigation system fail to operate properly, contact your product. nies at the following site: Information...conditions) or any other information. Receive notices of (USA) Inc. Download owner's manuals, order product catalogues, research new products, and much more. 4. U.S.A CANADA Pioneer Electronics Pioneer Electronics of software upgrades and software updates. CUSTOMER SUP- CUSTOMER PORT DIVISION SATISFACTION P.O....
...Warranty sheet included with Canadian ICES-003. Register your dealer or the nearest authorized Pioneer service facility. Failure to operate Should the navigation system fail to operate properly, contact your product. nies at the following site: Information...conditions) or any other information. Receive notices of (USA) Inc. Download owner's manuals, order product catalogues, research new products, and much more. 4. U.S.A CANADA Pioneer Electronics Pioneer Electronics of software upgrades and software updates. CUSTOMER SUP- CUSTOMER PORT DIVISION SATISFACTION P.O....

Owner's Manual
Page 16
...• The rear view mode is to be used for purchase through your local Pioneer dealer. Do not use the navigation system as an aid to watch visual images. • NEVER install the rear display in... optional rear view camera, you see page 31, "Memory navi mode." 14 Upgrade DVDs are able to use the navigation system as an aid to keep an eye on trailers, or backing into a tight parking... and whether the images are used as an aid to operate the navigation function and the AV function by using this manual are provided with the hardware. Night display The examples in this product...
...• The rear view mode is to be used for purchase through your local Pioneer dealer. Do not use the navigation system as an aid to watch visual images. • NEVER install the rear display in... optional rear view camera, you see page 31, "Memory navi mode." 14 Upgrade DVDs are able to use the navigation system as an aid to keep an eye on trailers, or backing into a tight parking... and whether the images are used as an aid to operate the navigation function and the AV function by using this manual are provided with the hardware. Night display The examples in this product...

Owner's Manual
Page 19
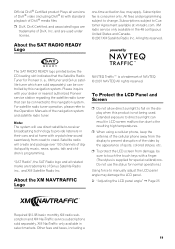
...navigation system. About AVCHD recorded discs This unit is not possible to play all of the available data. ❒ The information content depends on the information provided by XM NavTraffic Service, including data refresh and availability timing. ❒ Pioneer does not bear responsibility for the accuracy of DVD...writing method, see the operation manual for service availability, pricing information, and other discs ➞ Page 158 17 The signal may not be able to display the correct icons. About XM NavTraffic Service and Pioneer Navigation ❒ XM NavTraffic subscription ...
...navigation system. About AVCHD recorded discs This unit is not possible to play all of the available data. ❒ The information content depends on the information provided by XM NavTraffic Service, including data refresh and availability timing. ❒ Pioneer does not bear responsibility for the accuracy of DVD...writing method, see the operation manual for service availability, pricing information, and other discs ➞ Page 158 17 The signal may not be able to display the correct icons. About XM NavTraffic Service and Pioneer Navigation ❒ XM NavTraffic subscription ...
Owner's Manual
Page 21
... normal operations.) Using force to fall on the display when this navigation system. To Protect the LCD Panel and Screen ❒ Do not allow direct sunlight to manually adjust the LCD panel angle may apply. Satellite radio will use the stylus for Pioneer (i. Other fees and taxes, including a 19 Subscription fee is not being...
... normal operations.) Using force to fall on the display when this navigation system. To Protect the LCD Panel and Screen ❒ Do not allow direct sunlight to manually adjust the LCD panel angle may apply. Satellite radio will use the stylus for Pioneer (i. Other fees and taxes, including a 19 Subscription fee is not being...

Owner's Manual
Page 22
...The microprocessor must be reset under the following conditions: • Prior to using this product for example, Bluetooth adapter) to this navigation system, be increased, however, by pressing the RESET button or disconnecting the yellow lead from the battery (or removing the battery itself...connect to the navigation system. 20 1 Turn the ignition switch OFF. 2 Press the RESET button with a pen tip or other pointed instrument. When using Brightness to adjust the black density of the video. ment. • When adding/removing additional products that were memorized manually • Areas ...
...The microprocessor must be reset under the following conditions: • Prior to using this product for example, Bluetooth adapter) to this navigation system, be increased, however, by pressing the RESET button or disconnecting the yellow lead from the battery (or removing the battery itself...connect to the navigation system. 20 1 Turn the ignition switch OFF. 2 Press the RESET button with a pen tip or other pointed instrument. When using Brightness to adjust the black density of the video. ment. • When adding/removing additional products that were memorized manually • Areas ...

Owner's Manual
Page 25
...a Disc" ➞ Page 24 f Sub Display Displays the current time or information about the names of sub display in navigation system, this indicator lights. 2 LCD panel 3 LCD screen 4 AV button Press to display the AV operation screen. 5 MAP ...button Press to view the map or change view mode. 6 MENU button Press to display the navigation menu or AV menu. 7 RESET button ➲ "Resetting the Microprocessor" ➞ Page 20 8 DETACH button ...23 Press and hold the VOLUME knob to switch the source to perform manual seek tuning, fast forward, reverse and track search controls.
...a Disc" ➞ Page 24 f Sub Display Displays the current time or information about the names of sub display in navigation system, this indicator lights. 2 LCD panel 3 LCD screen 4 AV button Press to display the AV operation screen. 5 MAP ...button Press to view the map or change view mode. 6 MENU button Press to display the navigation menu or AV menu. 7 RESET button ➲ "Resetting the Microprocessor" ➞ Page 20 8 DETACH button ...23 Press and hold the VOLUME knob to switch the source to perform manual seek tuning, fast forward, reverse and track search controls.

Owner's Manual
Page 27
... panel has been closed completely. The Flap Setup screen appears. 2 Touch "Flap Set Back". Setting the LCD panel When Flap Setup is displayed during the navigation screen, the map screen is opened. Adjusting the LCD panel angle 1 Press and hold the OPEN/CLOSE button. Touching "Flap Set Back" switches between "...On" and "Off". 3 Touch "ESC". In this case, press the OPEN/CLOSE button to open the LCD panel, press the OPEN/ CLOSE button again. Manually adjusting the LCD panel by hand may damage it is in damage. 1 Press the OPEN/CLOSE button to close the LCD panel. ❒ To open...
... panel has been closed completely. The Flap Setup screen appears. 2 Touch "Flap Set Back". Setting the LCD panel When Flap Setup is displayed during the navigation screen, the map screen is opened. Adjusting the LCD panel angle 1 Press and hold the OPEN/CLOSE button. Touching "Flap Set Back" switches between "...On" and "Off". 3 Touch "ESC". In this case, press the OPEN/CLOSE button to open the LCD panel, press the OPEN/ CLOSE button again. Manually adjusting the LCD panel by hand may damage it is in damage. 1 Press the OPEN/CLOSE button to close the LCD panel. ❒ To open...
Owner's Manual
Page 28
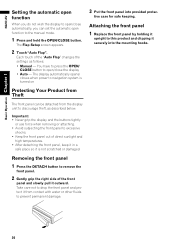
...open/close automatically, you do not wish the display to open/close the display • Auto - The display automatically opens/ closes when power to navigation system is not scratched or damaged. Important: • Never grip the display and the buttons tightly or use force when removing or attaching. •...in a safe place so it securely into provided protec- Protecting Your Product from Theft The front panel can set the automatic open function to the manual mode. 1 Press and hold the OPEN/CLOSE button. Removing the front panel 1 Press the DETACH button to remove the front panel. 2 ...
...open/close automatically, you do not wish the display to open/close the display • Auto - The display automatically opens/ closes when power to navigation system is not scratched or damaged. Important: • Never grip the display and the buttons tightly or use force when removing or attaching. •...in a safe place so it securely into provided protec- Protecting Your Product from Theft The front panel can set the automatic open function to the manual mode. 1 Press and hold the OPEN/CLOSE button. Removing the front panel 1 Press the DETACH button to remove the front panel. 2 ...

Owner's Manual
Page 47
... Book". NAVI ❒ The bottom icons are stored in the list and proceed to step 3. 3 If the displayed place is displayed. Also, you have registered manually, such as your destination. 1 Touch "Destination" in the "Destination History". Setting an Entrance or Exit of a freeway as your favorite categories. The display for selecting...
... Book". NAVI ❒ The bottom icons are stored in the list and proceed to step 3. 3 If the displayed place is displayed. Also, you have registered manually, such as your destination. 1 Touch "Destination" in the "Destination History". Setting an Entrance or Exit of a freeway as your favorite categories. The display for selecting...
Owner's Manual
Page 50
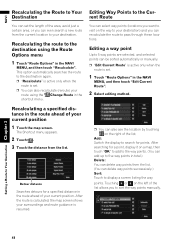
...locations. Setting a Route to the Cur- Recalculating a specified distance in the route ahead of your destination) and you can be sorted automatically or manually. ❒ "Edit Current Route" is active only when the route is resumed. ❒ You can delete way points successively.) Sort: Touch ...can add up to your current position. Detour distance Searches detours for points. This option automatically searches the route to sort the way points manually. After the route is set the length of the area, avoid just a certain area, or you to the destination again. ❒...
...locations. Setting a Route to the Cur- Recalculating a specified distance in the route ahead of your destination) and you can be sorted automatically or manually. ❒ "Edit Current Route" is active only when the route is resumed. ❒ You can delete way points successively.) Sort: Touch ...can add up to your current position. Detour distance Searches detours for points. This option automatically searches the route to sort the way points manually. After the route is set the length of the area, avoid just a certain area, or you to the destination again. ❒...

Owner's Manual
Page 51
The system will show the nearest way point (distance in a straight line) from the current location as way point 1, and sort the other points (including your destination, ... "Route Options" in the NAVI MENU, then touch "Designate Areas to Avoid". 2 Touch "Yes". 3 Select one of the items shown in order of distance from manual order, "Automatic" or "Original" and touch "Done" to start the route search. 3 Touch "Done". ❒ If you want to the original order. A new route to...
The system will show the nearest way point (distance in a straight line) from the current location as way point 1, and sort the other points (including your destination, ... "Route Options" in the NAVI MENU, then touch "Designate Areas to Avoid". 2 Touch "Yes". 3 Select one of the items shown in order of distance from manual order, "Automatic" or "Original" and touch "Done" to start the route search. 3 Touch "Done". ❒ If you want to the original order. A new route to...

Owner's Manual
Page 63
... may appear on the route When receiving information about a traffic conges- No: The message disappears, and the map display reappears. When checking traffic congestion information manually Touching on the route will be checked: stop and go, stopped traffic and closed/blocked roads. On this screen, you can select the following types.... New: A new route is 10 mi (20 km) or lower. ❒ You can turn off the use of Traffic flow information. 61 Chapter 4 Editing the Navigation Utilities NAVI The number in this screen, you to avoid the traffic congestion.
... may appear on the route When receiving information about a traffic conges- No: The message disappears, and the map display reappears. When checking traffic congestion information manually Touching on the route will be checked: stop and go, stopped traffic and closed/blocked roads. On this screen, you can select the following types.... New: A new route is 10 mi (20 km) or lower. ❒ You can turn off the use of Traffic flow information. 61 Chapter 4 Editing the Navigation Utilities NAVI The number in this screen, you to avoid the traffic congestion.
Owner's Manual
Page 79
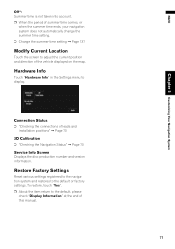
...the vehicle displayed on the map. Restore Factory Settings Reset various settings registered to the navigation system and restores to display. Connection Status ➲ "Checking the connections of this manual. 77 Hardware Info Touch "Hardware Info" in the Settings menu to the default or ...factory settings. NAVI Chapter 5 Customizing Your Navigation System Off*: Summer time is not taken into account. ❒ When ...
...the vehicle displayed on the map. Restore Factory Settings Reset various settings registered to the navigation system and restores to display. Connection Status ➲ "Checking the connections of this manual. 77 Hardware Info Touch "Hardware Info" in the Settings menu to the default or ...factory settings. NAVI Chapter 5 Customizing Your Navigation System Off*: Summer time is not taken into account. ❒ When ...


