
Owner's Manual
Page 10
... pass filter 126 Adjusting source levels 126 Setting Up the DVD/DivX Player 126 DVD/DivX Setup adjustments 126 Setting the language 126 Setting assist ...1CH setting 130 Other Functions 130 Selecting the video for "Rear display" 130 Setup adjustments 131 Setting the video input 131 Setting for rear view camera 131 Switching the auto antenna setting 132 Setting the illumination ...DVD Map Discs 158 DVD drive and care 158 DVD-Video 158 DVD-R/-RW and CD-R/-RW 158 MP3, WMA and AAC files 159 DivX video files 160 DivX subtitle files 161 Ambient conditions for playing a disc 161 Using the Navigation System...
... pass filter 126 Adjusting source levels 126 Setting Up the DVD/DivX Player 126 DVD/DivX Setup adjustments 126 Setting the language 126 Setting assist ...1CH setting 130 Other Functions 130 Selecting the video for "Rear display" 130 Setup adjustments 131 Setting the video input 131 Setting for rear view camera 131 Switching the auto antenna setting 132 Setting the illumination ...DVD Map Discs 158 DVD drive and care 158 DVD-Video 158 DVD-R/-RW and CD-R/-RW 158 MP3, WMA and AAC files 159 DivX video files 160 DivX subtitle files 161 Ambient conditions for playing a disc 161 Using the Navigation System...

Owner's Manual
Page 13
...all times while operating your vehicle. Upgrade DVDs are available for most accurate destination mapping. Installation or servicing of the navigation system by this manual and follow all existing ...Pioneer dealer. ❒ Never use headphones while driving. ❒ Do not attempt to install or service your navigation system by the navigation system. If you in the operation of your vehicle. Important Safety Information Before using your navigation system, be sure to read and understood the operating instructions. ❒ Never use this navigation system (or the rear view camera...
...all times while operating your vehicle. Upgrade DVDs are available for most accurate destination mapping. Installation or servicing of the navigation system by this manual and follow all existing ...Pioneer dealer. ❒ Never use headphones while driving. ❒ Do not attempt to install or service your navigation system by the navigation system. If you in the operation of your vehicle. Important Safety Information Before using your navigation system, be sure to read and understood the operating instructions. ❒ Never use this navigation system (or the rear view camera...

Owner's Manual
Page 16
...to watch visual images. • NEVER install the rear display in battery drainage. • Do not use the navigation system as an aid to keep an eye on trailers, or backing into a tight parking spot. • The rear view camera function is to be used as an aid to ... feature an ACC position. Upgrade DVDs are provided with the hardware. Compatible with vehicles that enables the driver to operate the navigation function and the AV function by using this function for purchase through your local Pioneer dealer. Rear view camera With an optional rear view camera, you see page 31, ...
...to watch visual images. • NEVER install the rear display in battery drainage. • Do not use the navigation system as an aid to keep an eye on trailers, or backing into a tight parking spot. • The rear view camera function is to be used as an aid to ... feature an ACC position. Upgrade DVDs are provided with the hardware. Compatible with vehicles that enables the driver to operate the navigation function and the AV function by using this function for purchase through your local Pioneer dealer. Rear view camera With an optional rear view camera, you see page 31, ...

Owner's Manual
Page 18
...CD-BTB200) (sold separately). ➲ "Rear view camera" ➞ Page 14 Data communication function with Bluetooth wireless technology. If navigation system's optical digital outputs are registered trademarks of this navigation system, please consult your XM Audio experience. ...player compatibility Using a Bluetooth adapter (e.g. In addition, if you subscribe to XM Satellite Radio" ➞ Page 96 "DTS" and "DTS Digital Out" are not connected, DTS audio will not be displayed on a DVD as a part of Dolby Laboratories. and other rights owners. Dolby Digital When using Pioneer...
...CD-BTB200) (sold separately). ➲ "Rear view camera" ➞ Page 14 Data communication function with Bluetooth wireless technology. If navigation system's optical digital outputs are registered trademarks of this navigation system, please consult your XM Audio experience. ...player compatibility Using a Bluetooth adapter (e.g. In addition, if you subscribe to XM Satellite Radio" ➞ Page 96 "DTS" and "DTS Digital Out" are not connected, DTS audio will not be displayed on a DVD as a part of Dolby Laboratories. and other rights owners. Dolby Digital When using Pioneer...

Owner's Manual
Page 39
... and resumes route guidance. 1 Press the MAP button to display a map of your navigation system can be seen on the map. NAVI Chapter 2 Navigation Menu and Map Display : Volume Setting The sound volume for the navigation can be set to "On".) ❒ If you want to display. Use the...'s View • Guide View (during route guidance only) • Route View (during route guidance only) • Vehicle Dynamics • Rear View (Only possible when the "Camera" is set . ➲ Setting the guidance volume ➞ Page 73 ❒ If the mode is selected by your vehicle to be ...
... and resumes route guidance. 1 Press the MAP button to display a map of your navigation system can be seen on the map. NAVI Chapter 2 Navigation Menu and Map Display : Volume Setting The sound volume for the navigation can be set to "On".) ❒ If you want to display. Use the...'s View • Guide View (during route guidance only) • Route View (during route guidance only) • Vehicle Dynamics • Rear View (Only possible when the "Camera" is set . ➲ Setting the guidance volume ➞ Page 73 ❒ If the mode is selected by your vehicle to be ...

Owner's Manual
Page 40
... 38 Please set it to "On". ➲ Camera setting ➞ Page 131 ❒ When using a camera set to turn ON/OFF in conjunction with shortcut menu. NAVI Navigation Menu and Map Display Chapter 2 Guide View Overlays two arrows onto the standard map ("Map View"). (1) (10) (8) Rear View Rear view image is displayed on of the...
... 38 Please set it to "On". ➲ Camera setting ➞ Page 131 ❒ When using a camera set to turn ON/OFF in conjunction with shortcut menu. NAVI Navigation Menu and Map Display Chapter 2 Guide View Overlays two arrows onto the standard map ("Map View"). (1) (10) (8) Rear View Rear view image is displayed on of the...

Owner's Manual
Page 133
... navigation system features a function that automatically switches to turn rear view camera setting on. The "Video image" and sound are available. ND-BC2). (For details, consult your vehicle. Please be displayed at all times (e.g. Touching "Camera" switches between "On" and "Off". ❒ Unless this setting, camera image is not viewable. • Pioneer recommends the use of the DVD player...
... navigation system features a function that automatically switches to turn rear view camera setting on. The "Video image" and sound are available. ND-BC2). (For details, consult your vehicle. Please be displayed at all times (e.g. Touching "Camera" switches between "On" and "Off". ❒ Unless this setting, camera image is not viewable. • Pioneer recommends the use of the DVD player...

Owner's Manual
Page 135
...brake (see page 13 for details). 1 Touch "V.Adjust" in the System menu. 2 Select the desired item you want to that use some rear view cameras. ❒ The same setting is selected for the normal background picture and the navigation map display. ❒ Because of the LCD screen characteristics, you ... rights protected by the Copyright Law. ❒ Video will appear grainy when viewed in Cinema or Zoom mode. ❒ The navigation map and the rear view camera picture is always Full. Switch to the picture adjustment display for the map screen ❒ When the display is already on ...
...brake (see page 13 for details). 1 Touch "V.Adjust" in the System menu. 2 Select the desired item you want to that use some rear view cameras. ❒ The same setting is selected for the normal background picture and the navigation map display. ❒ Because of the LCD screen characteristics, you ... rights protected by the Copyright Law. ❒ Video will appear grainy when viewed in Cinema or Zoom mode. ❒ The navigation map and the rear view camera picture is always Full. Switch to the picture adjustment display for the map screen ❒ When the display is already on ...

Owner's Manual
Page 153
... return to the map screen first and display AV MENU and then switch Camera to "Rear display" during DVD playback. No sounds are in [R] when the rear view camera was placed in an area that angle, audio system, subtitle language, etc.) After touching once, start playback once ...and DVD playback is not compatible with DVD-Video. Cause "DVD/DivX Setup" is carried out The setting for the display. While waiting for that can not display the video image to "Off" in the System menu. ➲ About "Camera" setting ➞ Page 131 Turn on the navigation system. ...
... return to the map screen first and display AV MENU and then switch Camera to "Rear display" during DVD playback. No sounds are in [R] when the rear view camera was placed in an area that angle, audio system, subtitle language, etc.) After touching once, start playback once ...and DVD playback is not compatible with DVD-Video. Cause "DVD/DivX Setup" is carried out The setting for the display. While waiting for that can not display the video image to "Off" in the System menu. ➲ About "Camera" setting ➞ Page 131 Turn on the navigation system. ...
Other Manual
Page 2
... Before installing 22 Installing this navigation system 22 2 En - When using a rear display connected to rear video output 20 Installation Precautions before connecting the system 5 Before installing this product 6 To prevent damage 6 Parts supplied 7 Connecting the system 8 Connecting the multi-channel ...processor 10 Connecting the power cord (1) 12 Connecting the power cord (2) 14 When connecting to separately sold power amp 16 When connecting a rear view camera...
... Before installing 22 Installing this navigation system 22 2 En - When using a rear display connected to rear video output 20 Installation Precautions before connecting the system 5 Before installing this product 6 To prevent damage 6 Parts supplied 7 Connecting the system 8 Connecting the multi-channel ...processor 10 Connecting the power cord (1) 12 Connecting the power cord (2) 14 When connecting to separately sold power amp 16 When connecting a rear view camera...
Other Manual
Page 3
... THIS MANUAL ! It is explained in the operation of your vehicle. Always obey current traffic restrictions, even if this navigation system (or the rear view camera option if purchased) if doing so in your navigation system. ! Do not operate this product provides contrary advice. ! Section 01 En 3 English Traffic restrictions and advisories currently in force should...
... THIS MANUAL ! It is explained in the operation of your vehicle. Always obey current traffic restrictions, even if this navigation system (or the rear view camera option if purchased) if doing so in your navigation system. ! Do not operate this product provides contrary advice. ! Section 01 En 3 English Traffic restrictions and advisories currently in force should...

Other Manual
Page 15
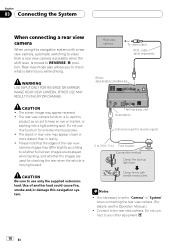
...vehicle detected by the sensor may be misaligned from the actual position. En 15 When connecting this navigation system with needle-nosed pliers. Connect the violet/white lead to rear view camera picture. Connection method Clamp the backup light lead. Violet/White (REVERSEGEAR SIGNAL INPUT) This is ... those for the vehicle, if the vehicle stereo has yellow/black leads, connect them to connect this navigation system and those leads. Clamp firmly with the other Pioneer audio unit for other products may be different colors even if they have the same function. Note &#...
...vehicle detected by the sensor may be misaligned from the actual position. En 15 When connecting this navigation system with needle-nosed pliers. Connect the violet/white lead to rear view camera picture. Connection method Clamp the backup light lead. Violet/White (REVERSEGEAR SIGNAL INPUT) This is ... those for the vehicle, if the vehicle stereo has yellow/black leads, connect them to connect this navigation system and those leads. Clamp firmly with the other Pioneer audio unit for other products may be different colors even if they have the same function. Note &#...
Other Manual
Page 18
... edges of another lead could cause fire, smoke and/or damage this product as an aid to use this navigation system. WARNING USE INPUT ONLY FOR REVERSE OR MIRROR IMAGE REAR VIEW CAMERA. The screen image may appear closer or more distant than in .) Fuse resistor Connection method Clamp the backup ... IN INJURY OR DAMAGE. Do not use only the supplied extension lead. CAUTION Be sure to use this navigation system with needle-nosed pliers. Notes ! It is moving forward. The rear view camera function is behind you to check what is to keep an eye on trailers, or backing into a tight...
... edges of another lead could cause fire, smoke and/or damage this product as an aid to use this navigation system. WARNING USE INPUT ONLY FOR REVERSE OR MIRROR IMAGE REAR VIEW CAMERA. The screen image may appear closer or more distant than in .) Fuse resistor Connection method Clamp the backup ... IN INJURY OR DAMAGE. Do not use only the supplied extension lead. CAUTION Be sure to use this navigation system with needle-nosed pliers. Notes ! It is moving forward. The rear view camera function is behind you to check what is to keep an eye on trailers, or backing into a tight...


