Owner's Manual
Page 7
...DVD Map Discs for Your Navigation System 21 Configuration of data recorded on discs 21 Initial Use 21 Chapter 1 Basic Operation Navigation unit 23 Flow from Startup to Termination 24 Inserting/Ejecting a Disc 24 Inserting a disc 24 Ejecting a disc 24 Opening... cursor 44 Setting an Entrance or Exit of a Freeway as Your Destination 45 Searching for Pioneer products 12 Visit Our Web site 12 Precaution 12 Additional Safety Information 13 To ensure safe ... manual 9 Terminology 10 About the definition of Contents Introduction License Agreement 1 PIONEER AVIC-N4 - for U.S.A. 1 PIONEER AVIC-N4 -
...DVD Map Discs for Your Navigation System 21 Configuration of data recorded on discs 21 Initial Use 21 Chapter 1 Basic Operation Navigation unit 23 Flow from Startup to Termination 24 Inserting/Ejecting a Disc 24 Inserting a disc 24 Ejecting a disc 24 Opening... cursor 44 Setting an Entrance or Exit of a Freeway as Your Destination 45 Searching for Pioneer products 12 Visit Our Web site 12 Precaution 12 Additional Safety Information 13 To ensure safe ... manual 9 Terminology 10 About the definition of Contents Introduction License Agreement 1 PIONEER AVIC-N4 - for U.S.A. 1 PIONEER AVIC-N4 -

Owner's Manual
Page 25
... change view mode. 6 MENU button Press to display the navigation menu or AV menu. 7 RESET button ➲ "Resetting the Microprocessor" ➞ Page 20 8 DETACH button Press to remove the front panel from the display unit. 9 OPEN/CLOSE button Press to mute. 23 Press and hold to... slot ➲ "Inserting/Ejecting a Disc" ➞ Page 24 f Sub Display Displays the current time or information about the names of sub display in navigation system, this indicator lights. 2 LCD panel 3 LCD screen 4 AV button Press to display the AV operation screen. 5 MAP button Press to display BT-TEL...
... change view mode. 6 MENU button Press to display the navigation menu or AV menu. 7 RESET button ➲ "Resetting the Microprocessor" ➞ Page 20 8 DETACH button Press to remove the front panel from the display unit. 9 OPEN/CLOSE button Press to mute. 23 Press and hold to... slot ➲ "Inserting/Ejecting a Disc" ➞ Page 24 f Sub Display Displays the current time or information about the names of sub display in navigation system, this indicator lights. 2 LCD panel 3 LCD screen 4 AV button Press to display the AV operation screen. 5 MAP button Press to display BT-TEL...
Owner's Manual
Page 26
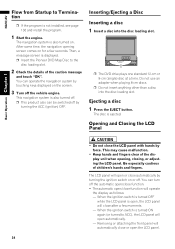
... is displayed. ❒ Insert the Pioneer DVD Map Disc to Termination ❒ If the program is also turned off. ❒ This product also can operate the navigation system by turning the ignition switch on the screen. 3 Turn off by force. Be especially cautious of the display unit when opening screen comes on . The disc is...
... is displayed. ❒ Insert the Pioneer DVD Map Disc to Termination ❒ If the program is also turned off. ❒ This product also can operate the navigation system by turning the ignition switch on the screen. 3 Turn off by force. Be especially cautious of the display unit when opening screen comes on . The disc is...

Owner's Manual
Page 27
... prevent the display from hitting the gearstick of an automatic vehicle when it . Setting the LCD panel When Flap Setup is displayed during the navigation screen, the map screen is displayed. 25 The LCD panel angle continues changing as long as LCD panel will be sure to ACC) will...61552; button. The Flap Setup screen appears. 2 Press the or button to adjust the LCD panel to close the LCD panel. ❒ To open the LCD panel. Touching "Flap Set Back" switches between "On" and "Off". 3 Touch "ESC". NAVI/AV Chapter 1 Basic Operation ➲ Removing the front panel...
... prevent the display from hitting the gearstick of an automatic vehicle when it . Setting the LCD panel When Flap Setup is displayed during the navigation screen, the map screen is displayed. 25 The LCD panel angle continues changing as long as LCD panel will be sure to ACC) will...61552; button. The Flap Setup screen appears. 2 Press the or button to adjust the LCD panel to close the LCD panel. ❒ To open the LCD panel. Touching "Flap Set Back" switches between "On" and "Off". 3 Touch "ESC". NAVI/AV Chapter 1 Basic Operation ➲ Removing the front panel...
Owner's Manual
Page 28
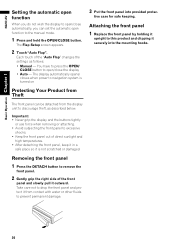
...turned on 3 Put the front panel into the mounting hooks. The Flap Setup screen appears. 2 Touch "Auto Flap". The display automatically opens/ closes when power to navigation system is not scratched or damaged. Removing the front panel 1 Press the DETACH button to remove the front panel. 2 Gently grip the right... panel out of the "Auto Flap" changes the settings as described below. You have to press the OPEN/ CLOSE button to open function to the manual mode. 1 Press and hold the OPEN/CLOSE button. tive case for safe keeping. Attaching the front panel 1 Replace the front panel by holding...
...turned on 3 Put the front panel into the mounting hooks. The Flap Setup screen appears. 2 Touch "Auto Flap". The display automatically opens/ closes when power to navigation system is not scratched or damaged. Removing the front panel 1 Press the DETACH button to remove the front panel. 2 Gently grip the right... panel out of the "Auto Flap" changes the settings as described below. You have to press the OPEN/ CLOSE button to open function to the manual mode. 1 Press and hold the OPEN/CLOSE button. tive case for safe keeping. Attaching the front panel 1 Replace the front panel by holding...
Owner's Manual
Page 112
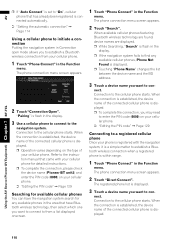
...". The phone connection menu screen appears. 2 Touch "Connection Open". Connection to the navigation system. nect. "Pairing" is flash in the display. 3 Use a cellular phone to connect to the cellular phone starts. The phone connection menu screen appears. 2 Touch "Search". nect. AV Using the AV Source (Pioneer AV Equipment) Chapter 7 BT-TEL ❒ If "Auto...
...". The phone connection menu screen appears. 2 Touch "Connection Open". Connection to the navigation system. nect. "Pairing" is flash in the display. 3 Use a cellular phone to connect to the cellular phone starts. The phone connection menu screen appears. 2 Touch "Search". nect. AV Using the AV Source (Pioneer AV Equipment) Chapter 7 BT-TEL ❒ If "Auto...

Owner's Manual
Page 121
... the Bluetooth wireless technology are displayed. • BD ADDRESS (system address) • SYSTEM NAME (system name) • SYSTEM VER. (version) • BT MODULE VER. (Bluetooth module version) Connecting a Bluetooth audio player 1 Touch "Connection Open" in the Function menu to enter the PIN code into this navigation system. If your player requires a PIN code to establish a connection, look for Bluetooth...
... the Bluetooth wireless technology are displayed. • BD ADDRESS (system address) • SYSTEM NAME (system name) • SYSTEM VER. (version) • BT MODULE VER. (Bluetooth module version) Connecting a Bluetooth audio player 1 Touch "Connection Open" in the Function menu to enter the PIN code into this navigation system. If your player requires a PIN code to establish a connection, look for Bluetooth...

Owner's Manual
Page 138
...that you can use . 3 Set the time difference. 1 Park your vehicle in the language that the parking brake is applied. 2 Insert the Pioneer DVD Map Disc into the disc loading slot. ❒ If you want to eject the disc, and check the disc for damage before inserting the disc... of the program begins in a safe place. This is not necessary if your vehicle nor switch off the navigation system until navigation is ready. 136 When the installation is complete, the opening display appears. • Once the installation of the program starts, do not stop the engine of the disc...
...that you can use . 3 Set the time difference. 1 Park your vehicle in the language that the parking brake is applied. 2 Insert the Pioneer DVD Map Disc into the disc loading slot. ❒ If you want to eject the disc, and check the disc for damage before inserting the disc... of the program begins in a safe place. This is not necessary if your vehicle nor switch off the navigation system until navigation is ready. 136 When the installation is complete, the opening display appears. • Once the installation of the program starts, do not stop the engine of the disc...
Owner's Manual
Page 143
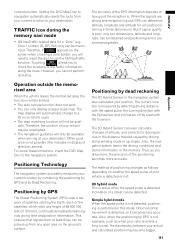
...change to your vehicle may become bigger. 141 To cancel these limitations, insert the DVD Map Disc to check the locations of satellites orbiting the Earth. Also, the navigation system learns the driving conditions and stores information in three dimensions. The accuracy of the ...the vehicle leaves the memorized area, the functions will not be misaligned. • The navigation guidance will need to insert the disc to navigation automatically resets the route from any open area on the screen when crossing a zone border, you cannot perform rerouting. rized. ...
...change to your vehicle may become bigger. 141 To cancel these limitations, insert the DVD Map Disc to check the locations of satellites orbiting the Earth. Also, the navigation system learns the driving conditions and stores information in three dimensions. The accuracy of the ...the vehicle leaves the memorized area, the functions will not be misaligned. • The navigation guidance will need to insert the disc to navigation automatically resets the route from any open area on the screen when crossing a zone border, you cannot perform rerouting. rized. ...

Owner's Manual
Page 146
... elevated freeway. • If you take a ferry. • If you are driving on a long, straight road or a gently curving road. • If you take a recently opened road that is not on the map. • If you are on a steep mountain road with many height changes. • If you drive in zig...
... elevated freeway. • If you take a ferry. • If you are driving on a long, straight road or a gently curving road. • If you take a recently opened road that is not on the map. • If you are on a steep mountain road with many height changes. • If you drive in zig...
Owner's Manual
Page 164
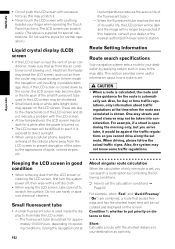
...fluorescent tube used inside the navigation unit resulting in possible damage. Also, the system may appear on the screen. Route Setting Information Route search specifications Your navigation system sets a route to ...the LCD screen in good condition • When removing dust from the air conditioner is open during the morning only, but you cannot drive along the set . The fluorescent tube...• Never touch the LCD screen with anything besides your dealer or the nearest authorized Pioneer service station. If this may not be taken into consideration. These are combined, a...
...fluorescent tube used inside the navigation unit resulting in possible damage. Also, the system may appear on the screen. Route Setting Information Route search specifications Your navigation system sets a route to ...the LCD screen in good condition • When removing dust from the air conditioner is open during the morning only, but you cannot drive along the set . The fluorescent tube...• Never touch the LCD screen with anything besides your dealer or the nearest authorized Pioneer service station. If this may not be taken into consideration. These are combined, a...

Owner's Manual
Page 178
NAVI/AV iPod Function Repeat Shuffle Wide Screen iPod Charge BT-AUDIO Function Connection Open Disconnect Device Info P. 117 P. 117 P. 117 P. 117 P. 119 P. 119 P. 119 Appendix 176
NAVI/AV iPod Function Repeat Shuffle Wide Screen iPod Charge BT-AUDIO Function Connection Open Disconnect Device Info P. 117 P. 117 P. 117 P. 117 P. 119 P. 119 P. 119 Appendix 176
Other Manual
Page 23
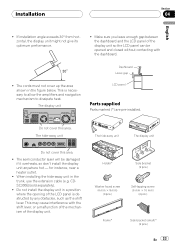
Dashboard Leave gap ! Do not install the display unit in a position where the opening of the LCD panel is necessary to allow the amplifiers and navigation mechanism to dissipate heat. If installation angle exceeds 30º from horizontal, the display unit might not give its optimum performance. ... 8 mm) (4 pcs.) Self-tapping screw (6 mm × 16 mm) (4 pcs.) Frame* Side bracket (small)* (2 pcs.) En 23 The semiconductor laser will be opened and closed without contacting with the shift lever, or a malfunction of the mechanism of the display unit so the LCD panel can be damaged if...
Dashboard Leave gap ! Do not install the display unit in a position where the opening of the LCD panel is necessary to allow the amplifiers and navigation mechanism to dissipate heat. If installation angle exceeds 30º from horizontal, the display unit might not give its optimum performance. ... 8 mm) (4 pcs.) Self-tapping screw (6 mm × 16 mm) (4 pcs.) Frame* Side bracket (small)* (2 pcs.) En 23 The semiconductor laser will be opened and closed without contacting with the shift lever, or a malfunction of the mechanism of the display unit so the LCD panel can be damaged if...


