User manual
Page 2
... Access TV menus 14 Philips Wireless MediaConnect 14 Netflix operations 15 Enjoying internet radio with vTuner 16 VUDU operations 18 Using Twitter 20 Changing picture and sound settings 22 Create and use lists of favorite channels 24 Setting the clock 25 Closed caption 25 Sleeptimer 26 Child and rating locks 26 Use the demo mode 29 Use Philips EasyLink 29 EasyLink 29 Set your location to home 30 Network 30 View photos and play music on a USB...
... Access TV menus 14 Philips Wireless MediaConnect 14 Netflix operations 15 Enjoying internet radio with vTuner 16 VUDU operations 18 Using Twitter 20 Changing picture and sound settings 22 Create and use lists of favorite channels 24 Setting the clock 25 Closed caption 25 Sleeptimer 26 Child and rating locks 26 Use the demo mode 29 Use Philips EasyLink 29 EasyLink 29 Set your location to home 30 Network 30 View photos and play music on a USB...
User manual
Page 4
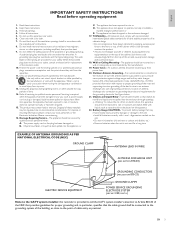
... instructions. 3. Use only with a cart, stand, tripod, bracket, or table specified by placing electronic equipment/toys on this apparatus should be serviced by the manufacturer. 19. or E. Power Lines - Outdoor Antenna ...Wall or Ceiling Mounting - All televisions must comply with the manufacturer's instructions. 8. Care should be mounted to a wall or ceiling only as to operate normally or exhibits a marked change in accordance with recommended international global safety standards for long periods of the polarized or grounding-type plug. Install...
... instructions. 3. Use only with a cart, stand, tripod, bracket, or table specified by placing electronic equipment/toys on this apparatus should be serviced by the manufacturer. 19. or E. Power Lines - Outdoor Antenna ...Wall or Ceiling Mounting - All televisions must comply with the manufacturer's instructions. 8. Care should be mounted to a wall or ceiling only as to operate normally or exhibits a marked change in accordance with recommended international global safety standards for long periods of the polarized or grounding-type plug. Install...
User manual
Page 5
... the limits for compliance could void the user's authority to operate this device must be made to be avoided. Declaration of the product. Model : 55PFL5705DV, 46PFL5705DV, 40PFL5705DV Address : PO Box 430 Daleville, IN 47334-0430 U.S.A. Cables Connections to maximize energy efficiency while delivering the best possible picture using the factory installed home mode settings. This Class B digital apparatus meets all save money and...
... the limits for compliance could void the user's authority to operate this device must be made to be avoided. Declaration of the product. Model : 55PFL5705DV, 46PFL5705DV, 40PFL5705DV Address : PO Box 430 Daleville, IN 47334-0430 U.S.A. Cables Connections to maximize energy efficiency while delivering the best possible picture using the factory installed home mode settings. This Class B digital apparatus meets all save money and...

User manual
Page 8
... a picture format. (See 'Changing picture format' on page 23.) m VOL + / − Increases or decreases volume. o BACK Returns to the previously viewed channel. f NET TV Displays the Net TV menu. q DEMO Displays the demonstration menu. d Color buttons (red / green / yellow / blue) Selects tasks or options. PREV. r AUTO MODE Cycles through the menus. EN 7 j EasyLink buttons E (backward) Searches backward. C (stop) Stops playback. CH Returns to a previous screen. e SOURCE Selects connected devices. g OK Activates a selection or accesses...
... a picture format. (See 'Changing picture format' on page 23.) m VOL + / − Increases or decreases volume. o BACK Returns to the previously viewed channel. f NET TV Displays the Net TV menu. q DEMO Displays the demonstration menu. d Color buttons (red / green / yellow / blue) Selects tasks or options. PREV. r AUTO MODE Cycles through the menus. EN 7 j EasyLink buttons E (backward) Searches backward. C (stop) Stops playback. CH Returns to a previous screen. e SOURCE Selects connected devices. g OK Activates a selection or accesses...
User manual
Page 15
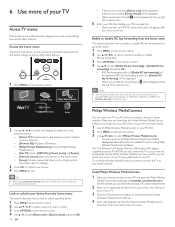
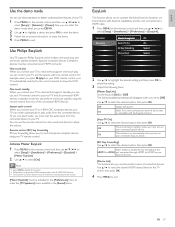
...; [Setup] Accesses menus that is Wireless LAN Ready. Follow the instructions on -screen instructions to select the correct device and connector. Watch TV Browse USB Philips Wireless Media... To use Philips Wireless MediaConnect you easy access to connected devices, picture and sound settings as well as a PC monitor wirelessly using your home network. Access the home menu The home menu gives you need to connect the TV to your home network. With the USB wireless LAN adapter (supplied accessory: PH2010A) you to install channels, change picture, sound...
...; [Setup] Accesses menus that is Wireless LAN Ready. Follow the instructions on -screen instructions to select the correct device and connector. Watch TV Browse USB Philips Wireless Media... To use Philips Wireless MediaConnect you easy access to connected devices, picture and sound settings as well as a PC monitor wirelessly using your home network. Access the home menu The home menu gives you need to connect the TV to your home network. With the USB wireless LAN adapter (supplied accessory: PH2010A) you to install channels, change picture, sound...
User manual
Page 23
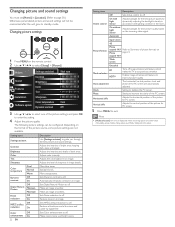
... picture source, some picture settings are not available. Reduces a blockiness and a blurriness and judder by dynamically adjusting the backlight intensity in accordance with Light Sensor Adjusts backlight for best picture quality based on the remote control. 2 Use to improve picture quality. Makes colors more vivid bright colors. On without Light Sensor Adjusts backlight for the best picture quality by digital filter. Changing picture and sound settings You must set [Home] in [Location]. (Refer to page 30.) Otherwise, personalized picture and sound settings...
... picture source, some picture settings are not available. Reduces a blockiness and a blurriness and judder by dynamically adjusting the backlight intensity in accordance with Light Sensor Adjusts backlight for best picture quality based on the remote control. 2 Use to improve picture quality. Makes colors more vivid bright colors. On without Light Sensor Adjusts backlight for the best picture quality by digital filter. Changing picture and sound settings You must set [Home] in [Location]. (Refer to page 30.) Otherwise, personalized picture and sound settings...

User manual
Page 25
... volume, for analog channels only when a main and second audio program (SAP) is broadcast. For sound, add an audio cable with VOL + / − by using this unit's remote control. Select the second audio program. Picture Sound Features Installation Equalizer Balance SRS TruSurround HD AVL TV speakers Delta volume Start now Off Off On Software update 2 Use to highlight a sound setting and then press OK to select the setting. 3 Adjust the following items. The following screen resolutions are displayed. 2 Use...
... volume, for analog channels only when a main and second audio program (SAP) is broadcast. For sound, add an audio cable with VOL + / − by using this unit's remote control. Select the second audio program. Picture Sound Features Installation Equalizer Balance SRS TruSurround HD AVL TV speakers Delta volume Start now Off Off On Software update 2 Use to highlight a sound setting and then press OK to select the setting. 3 Adjust the following items. The following screen resolutions are displayed. 2 Use...
User manual
Page 26
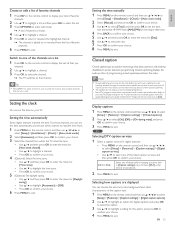
... television through an external cable or satellite set the time on your TV. EN 25 English Switch to one of the listed caption services, and then press OK to confirm your choice. Setting the time automatically Some digital channels transmit the time. Use the format HH:MM. Choose [CS-1] under normal circumstances. 2 Press MENU to access television programming. Create or edit a list of favorite channels 1 Press FAV on the remote control to display...
... television through an external cable or satellite set the time on your TV. EN 25 English Switch to one of the listed caption services, and then press OK to confirm your choice. Setting the time automatically Some digital channels transmit the time. Use the format HH:MM. Choose [CS-1] under normal circumstances. 2 Press MENU to access television programming. Create or edit a list of favorite channels 1 Press FAV on the remote control to display...
User manual
Page 27
...] > [Caption settings] > [Caption service]. • Use Î / ï to exit. Child and rating locks You can be called up your choice. 2 Press MENU to select one of the picture). Use the format HH:MM, and select [AM] / [PM] for assistance. TV Selecting caption services 1 Select a caption service for analog channels : • Press MENU on the remote control and then use to select [Setup] > [Features] > [Change PIN]. 2 Enter a 4-digit PIN on the Number buttons of the remote control...
...] > [Caption settings] > [Caption service]. • Use Î / ï to exit. Child and rating locks You can be called up your choice. 2 Press MENU to select one of the picture). Use the format HH:MM, and select [AM] / [PM] for assistance. TV Selecting caption services 1 Select a caption service for analog channels : • Press MENU on the remote control and then use to select [Setup] > [Features] > [Change PIN]. 2 Enter a 4-digit PIN on the Number buttons of the remote control...

User manual
Page 28
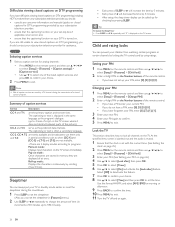
... need parental guidance.The program may contain moderate violence, sexual dialog and / or situations and some items remain not locked. L.3". English Locking a channel or input source This section describes how to switch between locked and not locked. Caption settings Sleeptimer Child lock Change PIN Demo Lock after Channel Lock TV ratings lock Movie ratings lock Canada English rati... None TV-PG: Programs contain elements that the channel or input source is muted. 1 Press MENU on the remote control...
... need parental guidance.The program may contain moderate violence, sexual dialog and / or situations and some items remain not locked. L.3". English Locking a channel or input source This section describes how to switch between locked and not locked. Caption settings Sleeptimer Child lock Change PIN Demo Lock after Channel Lock TV ratings lock Movie ratings lock Canada English rati... None TV-PG: Programs contain elements that the channel or input source is muted. 1 Press MENU on the remote control...
User manual
Page 30
... [TV Speakers] menu available in the [Sound] menu. You can use the remote control from the connected device to your connected EasyLink device. Activate Master EasyLink 1 Press MENU on the TV screen, then press OK. 4 Press MENU to exit. On Select if you have connected an external device that support standby, you set to [Off]. Use Philips EasyLink Your TV supports Philips EasyLink, which enables one-touch play and one -touch standby using your...
... [TV Speakers] menu available in the [Sound] menu. You can use the remote control from the connected device to your connected EasyLink device. Activate Master EasyLink 1 Press MENU on the TV screen, then press OK. 4 Press MENU to exit. On Select if you have connected an external device that support standby, you set to [Off]. Use Philips EasyLink Your TV supports Philips EasyLink, which enables one-touch play and one -touch standby using your...
User manual
Page 31
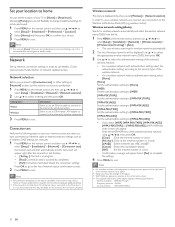
... network settings such as asterisks on the confirmation screen. • The supplied USB wireless LAN adapter supports following steps to test your choice. 3 Press MENU to exit. Set your location to home You can set the location of your preference. 1 Press MENU on the remote control and then use to select [Setup] > [Installation] > [Network] > [Network selection]. 2 Use Î / ï to select a setting and then press OK. Description Select to use a USB wireless LAN adapter to connect...
... network settings such as asterisks on the confirmation screen. • The supplied USB wireless LAN adapter supports following steps to test your choice. 3 Press MENU to exit. Set your location to home You can set the location of your preference. 1 Press MENU on the remote control and then use to select [Setup] > [Installation] > [Network] > [Network selection]. 2 Use Î / ï to select a setting and then press OK. Description Select to use a USB wireless LAN adapter to connect...
User manual
Page 32
... port] is same as router) which recognizes the devices connecting to exit. EN 31 English wireless router) manually by your internet service provider to select [Setup] > [Installation] > [Network] > [Wireless network] > [Wireless network setting] > [Manually enter your SSID]. • Wireless LAN Access Point (AP) (e.g. When instructed by using the Number buttons, the cursor moves to the next entry field.When you need to change the setting to [Auto]. • When you want to enter 1 or 2 digit number in...
... port] is same as router) which recognizes the devices connecting to exit. EN 31 English wireless router) manually by your internet service provider to select [Setup] > [Installation] > [Network] > [Wireless network] > [Wireless network setting] > [Manually enter your SSID]. • Wireless LAN Access Point (AP) (e.g. When instructed by using the Number buttons, the cursor moves to the next entry field.When you need to change the setting to [Auto]. • When you want to enter 1 or 2 digit number in...
User manual
Page 35
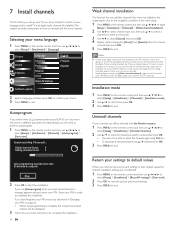
... not work for direct cable connections and if the digital signal is found : 0 Auto programming may take more than 20 minutes to complete. 7 Install channels The first time you set up your TV, you have forgotten your PIN, reset it as described in order to complete the installation. Return your settings to default values When you will be selected with the Number buttons. 1 Press MENU on the remote control...
... not work for direct cable connections and if the digital signal is found : 0 Auto programming may take more than 20 minutes to complete. 7 Install channels The first time you set up your TV, you have forgotten your PIN, reset it as described in order to complete the installation. Return your settings to default values When you will be selected with the Number buttons. 1 Press MENU on the remote control...
User manual
Page 36
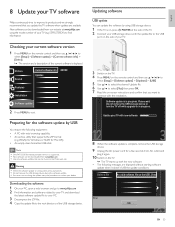
... download the latest software update file to your dealer. POWER at www.philips.com using USB storage device. 1 If the TV is on, press . Do not remove the USB storage device or turn the TV off while upgrade is in progress. Select a file No valid software file on the Philips web site. Picture Sound Current software info Updates XXXXX Features Installation Software update 2 Press MENU to select [Setup] > [Software update] > [Current software...
... download the latest software update file to your dealer. POWER at www.philips.com using USB storage device. 1 If the TV is on, press . Do not remove the USB storage device or turn the TV off while upgrade is in progress. Select a file No valid software file on the Philips web site. Picture Sound Current software info Updates XXXXX Features Installation Software update 2 Press MENU to select [Setup] > [Software update] > [Current software...
User manual
Page 41
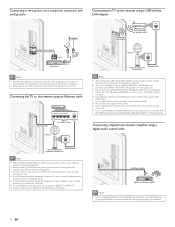
... the supplied USB wireless LAN adapter in the standby mode or turned off. • Use a Wireless LAN Access Point (AP) (e.g. wireless router) USB wireless LAN adapter Internet LAN Network equipment Ethernet cable (modem, etc.) Note • After connecting a USB wireless LAN adapter, set up necessary network settings. (For the network setup, refer to 'Network' on page 30.) • This unit is compatible with the supplied USB wireless LAN Adapter only. (Commercially available USB wireless LAN adapters are not supported.) • Do not insert the supplied USB wireless LAN adapter when...
... the supplied USB wireless LAN adapter in the standby mode or turned off. • Use a Wireless LAN Access Point (AP) (e.g. wireless router) USB wireless LAN adapter Internet LAN Network equipment Ethernet cable (modem, etc.) Note • After connecting a USB wireless LAN adapter, set up necessary network settings. (For the network setup, refer to 'Network' on page 30.) • This unit is compatible with the supplied USB wireless LAN Adapter only. (Commercially available USB wireless LAN adapters are not supported.) • Do not insert the supplied USB wireless LAN adapter when...
User manual
Page 43
... players use the wireless connection. Note • Please have an HDMI audio output setting that you have activated the wireless connection please wait 30 seconds for the accessory device is mostly red and green, or the picture misses red when connected to access network features such as Philips EasyLink. Turn on the remote control. For some accessory devices have available your TV model and serial number before trying to an accessory device via component or HDMI cables...
... players use the wireless connection. Note • Please have an HDMI audio output setting that you have activated the wireless connection please wait 30 seconds for the accessory device is mostly red and green, or the picture misses red when connected to access network features such as Philips EasyLink. Turn on the remote control. For some accessory devices have available your TV model and serial number before trying to an accessory device via component or HDMI cables...
User manual
Page 44
... Digital audio output : 1 Supporting Dolby Digital and PCM USB : 1 Supporting wireless standards : IEEE 802.11 b/g/n (2.4GHz) Ethernet port : 1 Power Power requirements : 120V~ AC +/− 10%, 60Hz +/− 0.5% 12 Network service disclaimer Content and services made available through this product are subject to change without prior notice. EN 43 English Picture enhancement Type : Aspect ratio : Viewing angles : Built-in digital tuner : 1080p 120Hz 16:9 178° (V) by 178° (H) ATSC / QAM Sound...
... Digital audio output : 1 Supporting Dolby Digital and PCM USB : 1 Supporting wireless standards : IEEE 802.11 b/g/n (2.4GHz) Ethernet port : 1 Power Power requirements : 120V~ AC +/− 10%, 60Hz +/− 0.5% 12 Network service disclaimer Content and services made available through this product are subject to change without prior notice. EN 43 English Picture enhancement Type : Aspect ratio : Viewing angles : Built-in digital tuner : 1080p 120Hz 16:9 178° (V) by 178° (H) ATSC / QAM Sound...
User manual
Page 46
... 11, 30 11 11, 30 29 8 N Netflix Network P PC Philips Wireless MediaConnect Picture format Picture settings R Ratings Remote control insert batteries overview Retail store mode RC key forwarding S Settings assistant Signal quality Sleeptimer Software update version Speakers EasyLink Specifications Standby T Troubleshooting TV as PC monitor connections controls menu position remote control screen care software switch channels switch on TV Speakers Twitter U USB V Volume adjust auto volume leveling mute vTuner VUDU W Warranty Wireless LAN Y YPbPr 15 30 22 14 23 22 26, 27...
... 11, 30 11 11, 30 29 8 N Netflix Network P PC Philips Wireless MediaConnect Picture format Picture settings R Ratings Remote control insert batteries overview Retail store mode RC key forwarding S Settings assistant Signal quality Sleeptimer Software update version Speakers EasyLink Specifications Standby T Troubleshooting TV as PC monitor connections controls menu position remote control screen care software switch channels switch on TV Speakers Twitter U USB V Volume adjust auto volume leveling mute vTuner VUDU W Warranty Wireless LAN Y YPbPr 15 30 22 14 23 22 26, 27...

Leaflet
Page 3
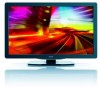
.... LCD TV with stand in inch (W x H x D): 44.34 x 29.33 x 11.22 inch • Product weight (lb): 46.63 • Product weight (+stand) (lb): 54.01 lb • Box dimensions in • Audio Output - or their respective owners. Packaging (lb): 64.60 • VESA wall mount compatible: 400 x 400 mm Accessories • Included accessories: Tabletop swivel stand, Power cord, Quick start guide, User Manual, Registration card, Remote Control, Batteries for remote control, Warranty certificate, Cable ties, MediaConnect Quick setup guide, USB Wireless LAN adapter • Issue...
.... LCD TV with stand in inch (W x H x D): 44.34 x 29.33 x 11.22 inch • Product weight (lb): 46.63 • Product weight (+stand) (lb): 54.01 lb • Box dimensions in • Audio Output - or their respective owners. Packaging (lb): 64.60 • VESA wall mount compatible: 400 x 400 mm Accessories • Included accessories: Tabletop swivel stand, Power cord, Quick start guide, User Manual, Registration card, Remote Control, Batteries for remote control, Warranty certificate, Cable ties, MediaConnect Quick setup guide, USB Wireless LAN adapter • Issue...


