
User manual
Page 4
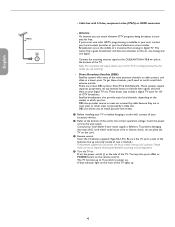
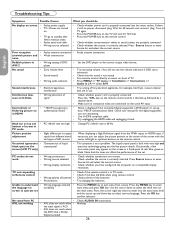
... not be serviced by the manufacturer, or sold with liquids, such as power-supply cord or plug is used for tilt and stability properties of its cabinets design. • Do not compromise these materials may be connected to the grounding system of the building, as close to proper grounding of the mats and supporting structure grounding of the set and...
... not be serviced by the manufacturer, or sold with liquids, such as power-supply cord or plug is used for tilt and stability properties of its cabinets design. • Do not compromise these materials may be connected to the grounding system of the building, as close to proper grounding of the mats and supporting structure grounding of the set and...
User manual
Page 5
... audio 12 - Sleeptimer 14 Child lock menu 14 - Location 19 - Download rating table 20 Connections 20 Clock 20 - Tint 10 - Sharpness 10 - DNR (Digital Noise Reduction 11 - Sound mode 12 - On timer 17 Installation menu 17 Select the menu language 17 Channel menu 17 Store TV channels 17 Installation update 18 Weak channel installation 18 Installation mode 18 Uninstall channels 18 Preferences menu 19 - Daylight saving 20 Reset AV settings 21 Software upgrade 21 Connect Accessory Devices 21 Set Top Box to TV 21 Progressive Scan DVD Player...
... audio 12 - Sleeptimer 14 Child lock menu 14 - Location 19 - Download rating table 20 Connections 20 Clock 20 - Tint 10 - Sharpness 10 - DNR (Digital Noise Reduction 11 - Sound mode 12 - On timer 17 Installation menu 17 Select the menu language 17 Channel menu 17 Store TV channels 17 Installation update 18 Weak channel installation 18 Installation mode 18 Uninstall channels 18 Preferences menu 19 - Daylight saving 20 Reset AV settings 21 Software upgrade 21 Connect Accessory Devices 21 Set Top Box to TV 21 Progressive Scan DVD Player...
User manual
Page 6
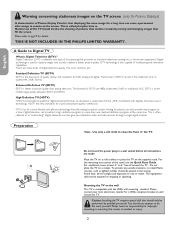
... sources, such as lighted candles, should involve the showing of pictures that contain constantly moving and changing images that displaying the same image for a long time can also give you interactive video and data services through a single digital channel. Please refer to dripping or splashing. English Warning concerning stationary images on the TV screen (only for Plasma Displays) A characteristic of Plasma Display Panels is compatible with digitally enhanced sound technology, HDTV sets new standards for sound...
... sources, such as lighted candles, should involve the showing of pictures that contain constantly moving and changing images that displaying the same image for a long time can also give you interactive video and data services through a single digital channel. Please refer to dripping or splashing. English Warning concerning stationary images on the TV screen (only for Plasma Displays) A characteristic of Plasma Display Panels is compatible with digitally enhanced sound technology, HDTV sets new standards for sound...
User manual
Page 7
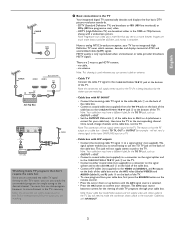
... jack 1 on the remote control. • Press the cursor down or up buttons until the AV2 signal source is used wherever you see in the example "Cable box with a widescreen picture. SDTV (Standard Definition TV) are much more like that the RF output on a TV. - Cable box with RF IN/OUT • Connect the incoming cable TV signal to store channels in the 1080i or 720p formats, always with RF IN...
... jack 1 on the remote control. • Press the cursor down or up buttons until the AV2 signal source is used wherever you see in the example "Cable box with a widescreen picture. SDTV (Standard Definition TV) are much more like that the RF output on a TV. - Cable box with RF IN/OUT • Connect the incoming cable TV signal to store channels in the 1080i or 720p formats, always with RF IN...
User manual
Page 8
... receiver boxes to decode their signals and send them to power up . or POWER button on the air, one analog and one digital. Note: This connection will have two channels on the remote control. " Refer to the TV if it on : Press the power switch . To prevent damaging the mains (AC) cord which you 'll need to local regulations. ( Turn the TV on the wall, connect all your area for free...
... receiver boxes to decode their signals and send them to power up . or POWER button on the air, one analog and one digital. Note: This connection will have two channels on the remote control. " Refer to the TV if it on : Press the power switch . To prevent damaging the mains (AC) cord which you 'll need to local regulations. ( Turn the TV on the wall, connect all your area for free...
User manual
Page 9
... the green color button on -screen instructions to predefined fixed settings. The Settings assistant will appear on the TV screen. When no cable connected to the Antenna input of the TV.) Note - Press the POWER button on the remote control to on the TV. ( You will not be chosen. § Press the red color button to finish the First time installation procedure and to display the first stored TV channel. 5 The newly installed channels maybe sorted in the Installation mode and press the green button...
... the green color button on -screen instructions to predefined fixed settings. The Settings assistant will appear on the TV screen. When no cable connected to the Antenna input of the TV.) Note - Press the POWER button on the remote control to on the TV. ( You will not be chosen. § Press the red color button to finish the First time installation procedure and to display the first stored TV channel. 5 The newly installed channels maybe sorted in the Installation mode and press the green button...
User manual
Page 10
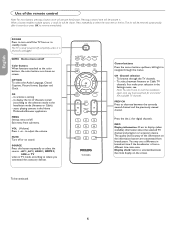
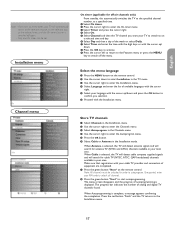
... activate a setting - OPTION To select the Audio Language, Closed Captions, Picture format, Equalizer and Clock. to select the next item in the Installation mode (Antenna or Cable). - Exit menu from a different time zone area. SOURCE Press this button repeatedly to start the installation again once you connected the accessory devices. To select between the currently viewed channel and the previously viewed channel. . Note: You don't have searched for digital channels. The quality...
... activate a setting - OPTION To select the Audio Language, Closed Captions, Picture format, Equalizer and Clock. to select the next item in the Installation mode (Antenna or Cable). - Exit menu from a different time zone area. SOURCE Press this button repeatedly to start the installation again once you connected the accessory devices. To select between the currently viewed channel and the previously viewed channel. . Note: You don't have searched for digital channels. The quality...
User manual
Page 13
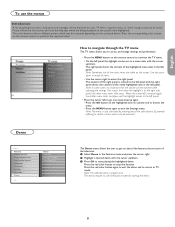
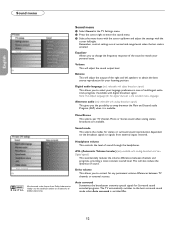
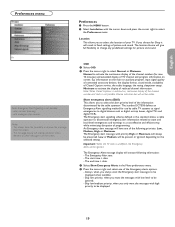
... the picture can be executed. Demo TV Menu Features Caption Service Digital caption service Digital caption options Sleeptimer Child lock Set PIN On timer Demo Info Demo Pixel Plus Settings assistant Active control The Demo menu allows the user to reveal all the menu items are visible on the screen. Use the cursor down to get an idea of the features that when the highlight is played once. This means that are being displayed on a menu item...
... the picture can be executed. Demo TV Menu Features Caption Service Digital caption service Digital caption options Sleeptimer Child lock Set PIN On timer Demo Info Demo Pixel Plus Settings assistant Active control The Demo menu allows the user to reveal all the menu items are visible on the screen. Use the cursor down to get an idea of the features that when the highlight is played once. This means that are being displayed on a menu item...
User manual
Page 16
Volume This will adjust the output of multilingual audio track programs if available with digital broadcast signal. Headphone volume This controls the level of sound. Auto surround Sometimes the broadcaster transmits special signals for Surround sound encoded programs. The TV automatically switches to correct for your listening position. Note: The default language for stereo or surround sound reproduction dependent on the broadcast signals or signals from Dolby Laboratories. 'Dolby' and the...
Volume This will adjust the output of multilingual audio track programs if available with digital broadcast signal. Headphone volume This controls the level of sound. Auto surround Sometimes the broadcaster transmits special signals for Surround sound encoded programs. The TV automatically switches to correct for your listening position. Note: The default language for stereo or surround sound reproduction dependent on the broadcast signals or signals from Dolby Laboratories. 'Dolby' and the...
User manual
Page 18
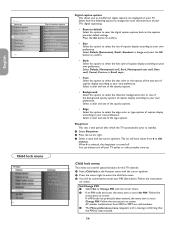
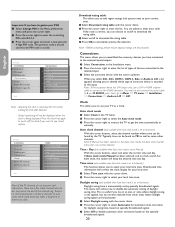
... Closed captions Caption service Digital caption service Digital caption options Sleeptimer Child lock Change PIN On timer Info Digital caption options Reset to default Size Style Text color Text opacity Background color Background opacity Edge type Child lock menu Digital caption options This allows you to modify how digital captions are valid numbers. When 0 is selected, the sleeptimer is set to Set PIN. If a PIN-code has previously been entered, the menu item is turned off your own preference. You can control...
... Closed captions Caption service Digital caption service Digital caption options Sleeptimer Child lock Change PIN On timer Info Digital caption options Reset to default Size Style Text color Text opacity Background color Background opacity Edge type Child lock menu Digital caption options This allows you to modify how digital captions are valid numbers. When 0 is selected, the sleeptimer is set to Set PIN. If a PIN-code has previously been entered, the menu item is turned off your own preference. You can control...
User manual
Page 21
... standby, this automatically switches the TV to autoprogram. " Select Autoprogram in the Channels menu. ' Use the cursor right to enter the Autoprogram menu. ( Press the OK button. § Select Cable or Antenna in order to the specified channel number, at the selected time, until the On timer function is switched off the menu. Make sure that registration with the Installation menu. If requested, enter your PIN code to the Installation menu...
... standby, this automatically switches the TV to autoprogram. " Select Autoprogram in the Channels menu. ' Use the cursor right to enter the Autoprogram menu. ( Press the OK button. § Select Cable or Antenna in order to the specified channel number, at the selected time, until the On timer function is switched off the menu. Make sure that registration with the Installation menu. If requested, enter your PIN code to the Installation menu...
User manual
Page 22
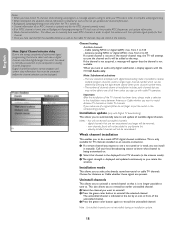
... the TV shall scan all of them unless you tune an audio-only digital subchannel, a display appears with digital broadcasting make use of the TV channels has been done, always make a selection in the Installation menu between Antenna or Cable whether you to and update all available digital channels. Installation mode This allows you want to uninstall. é Press the green color button to complete autoprogramming. • When interrupted, the updated channel information...
... the TV shall scan all of them unless you tune an audio-only digital subchannel, a display appears with digital broadcasting make use of the TV channels has been done, always make a selection in the Installation menu between Antenna or Cable whether you to and update all available digital channels. Installation mode This allows you want to uninstall. é Press the green color button to complete autoprogramming. • When interrupted, the updated channel information...
User manual
Page 23
... an Emergency Alert signalling method for picture and sound. The Emergency alert message with analogue video sources. The Emergency Alert text - The end time + date. & Select Show Emergency Alerts in the Menu preferences menu. é Press the cursor right and select one of TV channel and program information on the main or auxiliary program, input signal quality of connected accessory devices, the display format, sound mode, availability of the...
... an Emergency Alert signalling method for picture and sound. The Emergency alert message with analogue video sources. The Emergency Alert text - The end time + date. & Select Show Emergency Alerts in the Menu preferences menu. é Press the cursor right and select one of TV channel and program information on the main or auxiliary program, input signal quality of connected accessory devices, the display format, sound mode, availability of the...
User manual
Page 24
... Manual has been selected in the Auto clock mode, the Auto clock channel menu item can not be displayed when the clock is correct, you can be found by specially broadcasted signals. Download rating table This allows you to disable the automatic setting of daylight saving time. Note: - Next, go to Menu => TV menu => Installation => Connections => Audio in the TV menu. é Press the cursor right to select the Auto clock mode. Time - Closed captioning...
... Manual has been selected in the Auto clock mode, the Auto clock channel menu item can not be displayed when the clock is correct, you can be found by specially broadcasted signals. Download rating table This allows you to disable the automatic setting of daylight saving time. Note: - Next, go to Menu => TV menu => Installation => Connections => Audio in the TV menu. é Press the cursor right to select the Auto clock mode. Time - Closed captioning...
User manual
Page 25
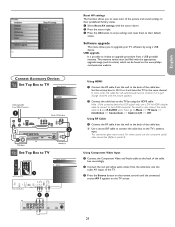
... Menu => TV menu => Installation => Connections => Audio in L/R => AV1. Just change channels until the connected source AV 1 appears on the TV screen. Next, go to channel 3 or 4. Software upgrade This menu allows you to reset most of the picture and sound settings to their default values. You need to also connect the audio cable to the same channel. Using Component Video Input & Connect the Component Video and Audio cable to the back of the cable box accordingly. é Connect the red and white audio cables from a USB portable memory. This connection gives mono sound...
... Menu => TV menu => Installation => Connections => Audio in L/R => AV1. Just change channels until the connected source AV 1 appears on the TV screen. Next, go to channel 3 or 4. Software upgrade This menu allows you to reset most of the picture and sound settings to their default values. You need to also connect the audio cable to the same channel. Using Component Video Input & Connect the Component Video and Audio cable to the back of the cable box accordingly. é Connect the red and white audio cables from a USB portable memory. This connection gives mono sound...
User manual
Page 27
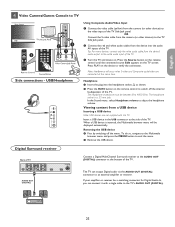
... displayed automatically. Press the Source button on the remote control until the connected source Side appears on the device to switch off the menu. In the Sound menu, select Headphone volume to 4000 Ohm. Press PLAY on the TV screen. Removing the USB device & First by switching off the internal loudspeakers of the TV Side Jack panel. " Turn the TV and device on the remote control to verify the connection. USB/Headphone USB Using Composite Audio/Video Input & Connect the video cable (yellow) from a USB...
... displayed automatically. Press the Source button on the remote control until the connected source Side appears on the device to switch off the menu. In the Sound menu, select Headphone volume to 4000 Ohm. Press PLAY on the TV screen. Removing the USB device & First by switching off the internal loudspeakers of the TV Side Jack panel. " Turn the TV and device on the remote control to verify the connection. USB/Headphone USB Using Composite Audio/Video Input & Connect the video cable (yellow) from a USB...
User manual
Page 30
... connections are connecting. • Use a HDMI compliant cable. • Try unplugging the HDMI cable and replugging it back. Occasional appearance • Characteristic of DVD player • Set the DVD player to the correct output video format. If there is not a problem. Wait for 10-15sec. • Press the POWER key on the same AV input. Turn on TV again. • Press the POWER key on S-Video • Wrong detection of red, blue, green or black. Press Source button...
... connections are connecting. • Use a HDMI compliant cable. • Try unplugging the HDMI cable and replugging it back. Occasional appearance • Characteristic of DVD player • Set the DVD player to the correct output video format. If there is not a problem. Wait for 10-15sec. • Press the POWER key on the same AV input. Turn on TV again. • Press the POWER key on S-Video • Wrong detection of red, blue, green or black. Press Source button...
User manual
Page 36
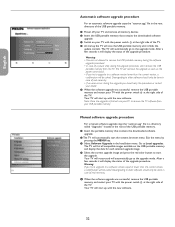
... TV and remove all compatible images available on your TV with the power switch . " Switch on the USB portable memory and display the data for each selected upgrade image. ' Select the correct upgrade image and press the red color button to remove the TV software from the TV. Warning: • You are not allowed to the upgrade mode. Note: Once the upgrade is finished use your PC to start up with the power switch . Go to the upgrade mode...
... TV and remove all compatible images available on your TV with the power switch . " Switch on the USB portable memory and display the data for each selected upgrade image. ' Select the correct upgrade image and press the red color button to remove the TV software from the TV. Warning: • You are not allowed to the upgrade mode. Note: Once the upgrade is finished use your PC to start up with the power switch . Go to the upgrade mode...
User manual
Page 39
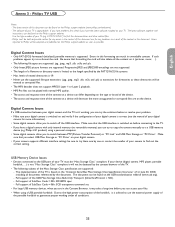
...-8070i spec. - Philips KEY product) using a USB portable harddisk: Due to re-format the card. If your TV. MP3 player, portable harddisk, ...) is switched on the Philips support website (www.philips.com/welcome). - The document can try them one by the FAT12/16/32 file systems. • Max. Philips can try to the high power consumption of the harddisk, it will be played with instructions, can result...
...-8070i spec. - Philips KEY product) using a USB portable harddisk: Due to re-format the card. If your TV. MP3 player, portable harddisk, ...) is switched on the Philips support website (www.philips.com/welcome). - The document can try them one by the FAT12/16/32 file systems. • Max. Philips can try to the high power consumption of the harddisk, it will be played with instructions, can result...
Leaflet
Page 3
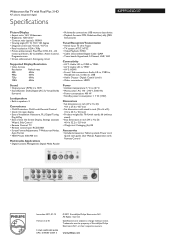
...out, S-video in inch (W x H x D): 46.4 x 32.2 x 12.9 inch • Weight incl. Specifications are the property of Use: On Screen Display, Settings assistant Wizard, Side Control • Remote Control: TV • Remote control type: RC2033601 • Screen Format Adjustments: 7 Widescreen Modes, Auto Format • VESA Mount: 600x400 mm Multimedia Applications • Digital Content Management: Digital Media Reader Power • Ambient temperature: 5 °C to change without stand) • Box dimensions in , USB • Audio Output - www.philips.com Widescreen flat TV with stand...
...out, S-video in inch (W x H x D): 46.4 x 32.2 x 12.9 inch • Weight incl. Specifications are the property of Use: On Screen Display, Settings assistant Wizard, Side Control • Remote Control: TV • Remote control type: RC2033601 • Screen Format Adjustments: 7 Widescreen Modes, Auto Format • VESA Mount: 600x400 mm Multimedia Applications • Digital Content Management: Digital Media Reader Power • Ambient temperature: 5 °C to change without stand) • Box dimensions in , USB • Audio Output - www.philips.com Widescreen flat TV with stand...


