

User manual
Page 2
... a marked change in performance; Read these instructions. 3. Keep these instructions. 2. Follow all warnings. 4. Do not use attachments/accessories specified by placing electronic equipment/toys on the unit. • Do not mix batteries (old and new or carbon and alkaline, etc.) • Remove batteries when the unit is grounded so as power-supply cord or plug is used for replacement of the...
... a marked change in performance; Read these instructions. 3. Keep these instructions. 2. Follow all warnings. 4. Do not use attachments/accessories specified by placing electronic equipment/toys on the unit. • Do not mix batteries (old and new or carbon and alkaline, etc.) • Remove batteries when the unit is grounded so as power-supply cord or plug is used for replacement of the...
User manual
Page 3
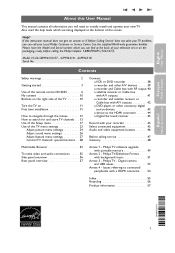
... picture menu settings 24 Adjust sound menu settings 26 Adjust feature menu settings 27 Control TV channels' special functions . . 28 Connect: a VCR or DVD recorder 38 a recorder and other A/V devices . . . . . .39 a recorder and Cable box with RF output 40 a satellite receiver or Cable box with A/V outputs 41 a recorder and satellite receiver or Cable box with A/V outputs 42 a DVD player, or other accessory digital source devices 43 a device to connected peripherals with your recorder 45 Select connected equipment 45 Audio and video equipment buttons 46 Before calling service...
... picture menu settings 24 Adjust sound menu settings 26 Adjust feature menu settings 27 Control TV channels' special functions . . 28 Connect: a VCR or DVD recorder 38 a recorder and other A/V devices . . . . . .39 a recorder and Cable box with RF output 40 a satellite receiver or Cable box with A/V outputs 41 a recorder and satellite receiver or Cable box with A/V outputs 42 a DVD player, or other accessory digital source devices 43 a device to connected peripherals with your recorder 45 Select connected equipment 45 Audio and video equipment buttons 46 Before calling service...
User manual
Page 4
... damage the screen permanently. Mounting the TV on the wall This TV provides the VESA mounting interface (not supplied) and is VESA compatible with bare hands or greasy cloth (some cosmetics are detrimental to remain on the TV screen A characteristic of still pictures also include logos, computer images, time display, teletext and images displayed in occurs it will never disappear completely. 2 Examples of Plasma Display Panels is called phosphor burn in. Do...
... damage the screen permanently. Mounting the TV on the wall This TV provides the VESA mounting interface (not supplied) and is VESA compatible with bare hands or greasy cloth (some cosmetics are detrimental to remain on the TV screen A characteristic of still pictures also include logos, computer images, time display, teletext and images displayed in occurs it will never disappear completely. 2 Examples of Plasma Display Panels is called phosphor burn in. Do...
User manual
Page 6
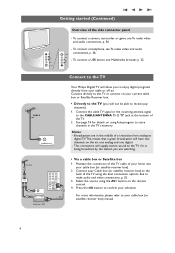
...+ button on using the best connection options. Connect to the TV CABLE o ANTENNA 75 Your Philips Digital TV will supply stereo sound to receive pay channels) 1. To connect a headphone, see To make audio and video connections, p. 35. 3. See page 14 for details on the remote control. 4. Press the OK button to your cable or off air. For more information, please refer to confirm your cable box (or satellite receiver box). 2. To connect a USB device, see Multimedia browser, p. 32. CABLE 1 SIGNAL SPLITTER 2 3 o ANTENNA...
...+ button on using the best connection options. Connect to the TV CABLE o ANTENNA 75 Your Philips Digital TV will supply stereo sound to receive pay channels) 1. To connect a headphone, see To make audio and video connections, p. 35. 3. See page 14 for details on the remote control. 4. Press the OK button to your cable or off air. For more information, please refer to confirm your cable box (or satellite receiver box). 2. To connect a USB device, see Multimedia browser, p. 32. CABLE 1 SIGNAL SPLITTER 2 3 o ANTENNA...
User manual
Page 8
... programmed to TV mode. Attention: the TV is being undertaken within 60 seconds, the remote control returns to work accessory devices. See p. 46. • Multimedia browser functional buttons. Note: If necessary, you can adjust the picture position to the center of channels stored (according to display the list of the screen with the cursor buttons. to the selection made in the Installation mode - Pressing a second time will be shown. DEMO Demo...
... programmed to TV mode. Attention: the TV is being undertaken within 60 seconds, the remote control returns to work accessory devices. See p. 46. • Multimedia browser functional buttons. Note: If necessary, you can adjust the picture position to the center of channels stored (according to display the list of the screen with the cursor buttons. to the selection made in the Installation mode - Pressing a second time will be shown. DEMO Demo...
User manual
Page 19
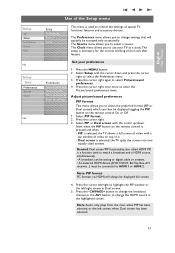
... working of it. - English User Manual Settings TV Setup Installation Demo Exit Info Settings Setup Preferences Source Clock Info Use of the Setup menu Setup Preferences Source Clock This menu is used to select the preferred format (PIP or Dual screen) which can be analog or digital, cable or antenna. • An external HDMI device (DVD, DVD-R, Set Top Box,A/V receiver,...) must be accessed only occasionally. Press the MENU button. 2. Press the cursor right. 3. Note: PIP format: PC formats via HDMI will typically be connected to select a source. Select PIP...
... working of it. - English User Manual Settings TV Setup Installation Demo Exit Info Settings Setup Preferences Source Clock Info Use of the Setup menu Setup Preferences Source Clock This menu is used to select the preferred format (PIP or Dual screen) which can be analog or digital, cable or antenna. • An external HDMI device (DVD, DVD-R, Set Top Box,A/V receiver,...) must be accessed only occasionally. Press the MENU button. 2. Press the cursor right. 3. Note: PIP format: PC formats via HDMI will typically be connected to select a source. Select PIP...
User manual
Page 20
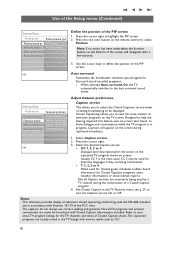
... remote control to the best surround sound mode. Press the red color button on screen. Use the cursor keys to highlight the PIP screen. 2. Captions will disappear after a few seconds. 3. See Closed Caption in the TV listings with Closed Caption informations included. Refer to your area's TV program listings for the TV channels and times of the PIP screen. Info Auto surround Sometimes the broadcaster transmits special signals for Closed Captions programs, news, weather informations or stock market reports. Notes: - Not all Caption services...
... remote control to the best surround sound mode. Press the red color button on screen. Use the cursor keys to highlight the PIP screen. 2. Captions will disappear after a few seconds. 3. See Closed Caption in the TV listings with Closed Caption informations included. Refer to your area's TV program listings for the TV channels and times of the PIP screen. Info Auto surround Sometimes the broadcaster transmits special signals for Closed Captions programs, news, weather informations or stock market reports. Notes: - Not all Caption services...
User manual
Page 21
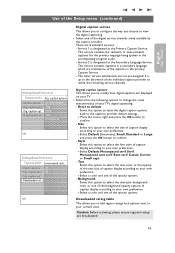
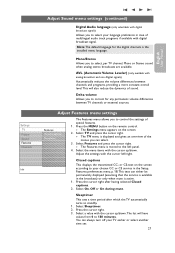
.... < Select Default (Automatic), Small, Standard or Large and press the OK button to select the font style of the Setup menu (continued) Settings/Setup/Preferences Features prefer. Size Select this option to select the text color or the opacity of the text box of caption display according to change the visual characteristics of the digital service channels made available by the caption provider. caption serv. caption opt. Text...
.... < Select Default (Automatic), Small, Standard or Large and press the OK button to select the font style of the Setup menu (continued) Settings/Setup/Preferences Features prefer. Size Select this option to select the text color or the opacity of the text box of caption display according to change the visual characteristics of the digital service channels made available by the caption provider. caption serv. caption opt. Text...
User manual
Page 22
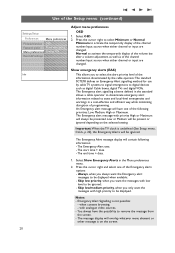
Menu preferences Change PIN Reset AV settings Info Adjust menu preferences OSD 1. Press the cursor right to activate the temporarily display of the Emergency alerts options: - Normal to activate the temporarily display of the volume bar, after a volume adjustment, as well as digital Cable boxes, digital TVs and digital VCRs. The Emergency alert message with high priority to be present or ignored depending on the screen. 20 Press the...
Menu preferences Change PIN Reset AV settings Info Adjust menu preferences OSD 1. Press the cursor right to activate the temporarily display of the Emergency alerts options: - Normal to activate the temporarily display of the volume bar, after a volume adjustment, as well as digital Cable boxes, digital TVs and digital VCRs. The Emergency alert message with high priority to be present or ignored depending on the screen. 20 Press the...
User manual
Page 23
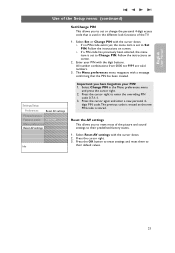
... cursor right. 3. Select Set or Change PIN with a message confirming that is set to enter the overriding PIN code 0-7-1-1. 3. Press the cursor right to Set PIN. English User Manual Use of the Setup menu (continued) Set/Change PIN This allows you to reset most of the TV. 1. Settings/Setup Preferences Reset AV settings Picture/sound pr. Select Change PIN in the different lock functions of the picture and sound settings to their default values. 21 Press...
... cursor right. 3. Select Set or Change PIN with a message confirming that is set to enter the overriding PIN code 0-7-1-1. 3. Press the cursor right to Set PIN. English User Manual Use of the Setup menu (continued) Set/Change PIN This allows you to reset most of the TV. 1. Settings/Setup Preferences Reset AV settings Picture/sound pr. Select Change PIN in the different lock functions of the picture and sound settings to their default values. 21 Press...
User manual
Page 24
... to instruct the TV to select the Auto clock mode. 3. If your amplifier or receiver has a matching connector for the correct working of Lock after (See TV settings, Channels, p. 28) features. In such cases either clock extraction is taking a long time or there is connected The TV can connect this input. 4. Use of the Setup menu (continued) Settings Setup Preferences Source Clock Info Source AV1 AV2 AV3 HDMI 1 HDMI 2 Side Digital Audio In Select your source This menu...
... to instruct the TV to select the Auto clock mode. 3. If your amplifier or receiver has a matching connector for the correct working of Lock after (See TV settings, Channels, p. 28) features. In such cases either clock extraction is taking a long time or there is connected The TV can connect this input. 4. Use of the Setup menu (continued) Settings Setup Preferences Source Clock Info Source AV1 AV2 AV3 HDMI 1 HDMI 2 Side Digital Audio In Select your source This menu...
User manual
Page 29
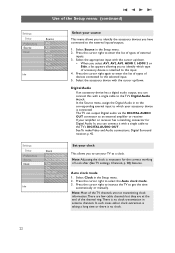
... multilingual audio track programs if available with analog broadcast and non-Digital signals) Automatically reduces the volume differences between TV channels or external sources. Mono/Stereo Allows you to select your TV earlier or select another time set. 27 English User Manual Press the MENU button on the remote control. > The Settings menu appears on the screen according to standby. 1. Select TV and press the cursor right. > The TV menu is the installed menu language. Adjust the settings with...
... multilingual audio track programs if available with analog broadcast and non-Digital signals) Automatically reduces the volume differences between TV channels or external sources. Mono/Stereo Allows you to select your TV earlier or select another time set. 27 English User Manual Press the MENU button on the remote control. > The Settings menu appears on the screen according to standby. 1. Select TV and press the cursor right. > The TV menu is the installed menu language. Adjust the settings with...

User manual
Page 38
... the component video sockets may vary, the letters B and R stand for example digital broadcastings coming from different manufacturers have the possibility of the TV. Refer to adjust the headphone volume. Side panel overview Camera, Camcorder, Game 1. Tip: Press ¬ on the DVD player or the device connected. Headphone 1. In the Sound menu select Headphone volume to the DVD player's or devices instructions for use for mono equipment. USB See Multimedia...
... the component video sockets may vary, the letters B and R stand for example digital broadcastings coming from different manufacturers have the possibility of the TV. Refer to adjust the headphone volume. Side panel overview Camera, Camcorder, Game 1. Tip: Press ¬ on the DVD player or the device connected. Headphone 1. In the Sound menu select Headphone volume to the DVD player's or devices instructions for use for mono equipment. USB See Multimedia...
User manual
Page 40
... for signals from the display. Notes: - cables are often color-coded to white.... - When using the S-VIDEO connector do not place your equipment to. Connect red to red, white to connectors. Use a mono to stereo adapter (not supplied) for stereo devices) AV cables 3 to the VIDEO, AUDIO L and R input jacks of your source, p. 22 and link them to the AV connectors you also connect the Video, Audio Left and Right (only for sound reproduction...
... for signals from the display. Notes: - cables are often color-coded to white.... - When using the S-VIDEO connector do not place your equipment to. Connect red to red, white to connectors. Use a mono to stereo adapter (not supplied) for stereo devices) AV cables 3 to the VIDEO, AUDIO L and R input jacks of your source, p. 22 and link them to the AV connectors you also connect the Video, Audio Left and Right (only for sound reproduction...
User manual
Page 43
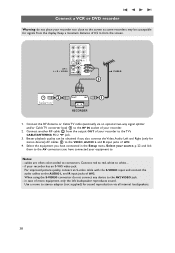
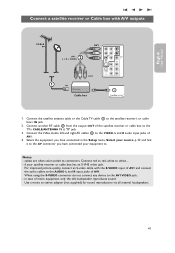
... quality, connect an S-video cable with A/V outputs CABLE 2 AV1 : L + R + VIDEO AV1 OUT H Pr L V Pb R VIDEO AV1 S-VIDEO Y DIGITAL AUDIO IN AV3 VIDEO Pr L Pb S-VIDEO AV2 R Y IN Cable box o ANTENNA 75 1. Connect the satellite antenna cable or the Cable TV cable 1 to white.... - Connect the Video, Audio left loudspeaker reproduces sound. English User Manual Connect a satellite receiver or Cable box with the S-VIDEO input of AV1 and connect the audio cables to the AUDIO L and R input jacks of AV1. Use a mono to stereo adapter (not supplied) for sound...
... quality, connect an S-video cable with A/V outputs CABLE 2 AV1 : L + R + VIDEO AV1 OUT H Pr L V Pb R VIDEO AV1 S-VIDEO Y DIGITAL AUDIO IN AV3 VIDEO Pr L Pb S-VIDEO AV2 R Y IN Cable box o ANTENNA 75 1. Connect the satellite antenna cable or the Cable TV cable 1 to white.... - Connect the Video, Audio left loudspeaker reproduces sound. English User Manual Connect a satellite receiver or Cable box with the S-VIDEO input of AV1 and connect the audio cables to the AUDIO L and R input jacks of AV1. Use a mono to stereo adapter (not supplied) for sound...
User manual
Page 44
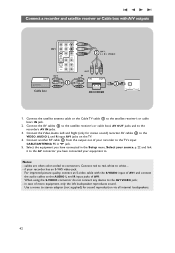
... red, white to stereo adapter (not supplied) for stereo sound) recorder AV cables 4 to the recorder's AV IN jacks. 3. Use a mono to white.... - Connect the satellite antenna cable or the Cable TV cable 1 to the AV1 VIDEO jack; - When using the S-VIDEO connector do not connect any device to the satellite receiver's or cable box's IN jack. 2. in the Setup menu, Select your recorder has an S-VHS video jack: For improved picture quality, connect an S-video cable with A/V outputs...
... red, white to stereo adapter (not supplied) for stereo sound) recorder AV cables 4 to the recorder's AV IN jacks. 3. Use a mono to white.... - Connect the satellite antenna cable or the Cable TV cable 1 to the AV1 VIDEO jack; - When using the S-VIDEO connector do not connect any device to the satellite receiver's or cable box's IN jack. 2. in the Setup menu, Select your recorder has an S-VHS video jack: For improved picture quality, connect an S-video cable with A/V outputs...
User manual
Page 49
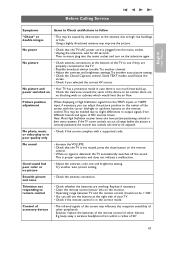
... power cord is not muted, press the mute button on the television again. E.g. keep away a wireless headphone from different brands and types of the TV to see if they are working. Some TEXT modes could block the screen. • Check if you can still use the buttons at the bottom of HD sources boxes. Snowish picture and noise • Check the antenna connection. English User Manual Before Calling Service...
... power cord is not muted, press the mute button on the television again. E.g. keep away a wireless headphone from different brands and types of the TV to see if they are working. Some TEXT modes could block the screen. • Check if you can still use the buttons at the bottom of HD sources boxes. Snowish picture and noise • Check the antenna connection. English User Manual Before Calling Service...
User manual
Page 52
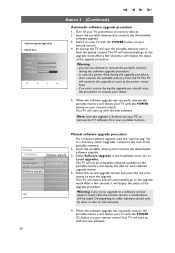
... update content.The TV will continue the upgrade as soon as the power comes back; - Note: once the upgrade is finished use your dealer. 5. Software upgrade Info Manual software upgrade procedure For a manual software upgrade copy the "autorun.upg" file in a directory called "Upgrades" located in the Installation menu. info Autoprogram Local upgrades Weak channel inst. if an error occurs during the software upgrade procedure; - Select the correct upgrade version and press the red color button to remove the TV software...
... update content.The TV will continue the upgrade as soon as the power comes back; - Note: once the upgrade is finished use your dealer. 5. Software upgrade Info Manual software upgrade procedure For a manual software upgrade copy the "autorun.upg" file in a directory called "Upgrades" located in the Installation menu. info Autoprogram Local upgrades Weak channel inst. if an error occurs during the software upgrade procedure; - Select the correct upgrade version and press the red color button to remove the TV software...
User manual
Page 57
... format 51 software upgrade 16,49 sound mode 26 source 22 standby button 6 store channels 14 time zone selection 23 tint 25 turn the tv on 11 tv menu settings 23 tv ratings lock 28 usb connector 36 usb device 32 volume 7 vcr 38 weak channel installation ........16 55 English User Manual Index active control 25 adjust picture menu settings ..24 adjust sound menu settings ....26 adjust features menu settings.27 alternate audio 26 antenna 4 audio/video equipment buttons 46 audio/video connections .........35 autoprogram 14 auto picture 24 auto surround 18 auto sound...
... format 51 software upgrade 16,49 sound mode 26 source 22 standby button 6 store channels 14 time zone selection 23 tint 25 turn the tv on 11 tv menu settings 23 tv ratings lock 28 usb connector 36 usb device 32 volume 7 vcr 38 weak channel installation ........16 55 English User Manual Index active control 25 adjust picture menu settings ..24 adjust sound menu settings ....26 adjust features menu settings.27 alternate audio 26 antenna 4 audio/video equipment buttons 46 audio/video connections .........35 autoprogram 14 auto picture 24 auto surround 18 auto sound...
Leaflet
Page 3
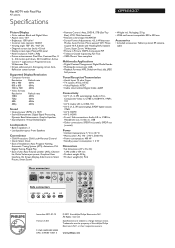
All Rights reserved. or their respective owners. www.philips.com Specifications are the property of Use: Auto Volume Leveller (AVL), Channel list, Delta Volume per preset, Graphical User Interface, On Screen Display, Side Control, Smart Picture, Smart Sound • Remote Control: Amp, DVD-R, STB (Set-Top Box), VCR, Multi-functional • Remote control type: RC4345/01 • Screen Format Adjustments: 4:3, 6 Widescreen Modes, Auto Format, Movie expand 14:9, Movie expand 16:9, Subtitle and Heading Shift, Subtitle Zoom, Super Zoom, Widescreen...
All Rights reserved. or their respective owners. www.philips.com Specifications are the property of Use: Auto Volume Leveller (AVL), Channel list, Delta Volume per preset, Graphical User Interface, On Screen Display, Side Control, Smart Picture, Smart Sound • Remote Control: Amp, DVD-R, STB (Set-Top Box), VCR, Multi-functional • Remote control type: RC4345/01 • Screen Format Adjustments: 4:3, 6 Widescreen Modes, Auto Format, Movie expand 14:9, Movie expand 16:9, Subtitle and Heading Shift, Subtitle Zoom, Super Zoom, Widescreen...


