User manual
Page 1
.... Dear PHILIPS product owner: Thank you 're entitled to us right now! As a member of the PHILIPS "family," you for your PHILIPS purchase is located on the rear of these safety symbols CAUTION RISK OF ELECTRIC SHOCK DO NOT OPEN CAUTION: TO REDUCE THE RISK OF ELECTRIC SHOCK, DO NOT REMOVE COVER (OR BACK). Model No Serial No Visit...
.... Dear PHILIPS product owner: Thank you 're entitled to us right now! As a member of the PHILIPS "family," you for your PHILIPS purchase is located on the rear of these safety symbols CAUTION RISK OF ELECTRIC SHOCK DO NOT OPEN CAUTION: TO REDUCE THE RISK OF ELECTRIC SHOCK, DO NOT REMOVE COVER (OR BACK). Model No Serial No Visit...
User manual
Page 2
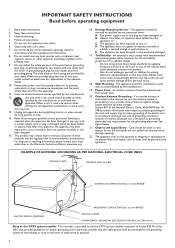
... building, as close to qualified service personnel. Install in performance; Heed all servicing to the point of the cabinet. Do not block any heat sources such as recommended by placing electronic equipment/toys on the top of cable entry as practical. 2 A polarized plug has two blades with a dry cloth. 7. Use only with a cart, stand, tripod, bracket, or table specified by applying...
... building, as close to qualified service personnel. Install in performance; Heed all servicing to the point of the cabinet. Do not block any heat sources such as recommended by placing electronic equipment/toys on the top of cable entry as practical. 2 A polarized plug has two blades with a dry cloth. 7. Use only with a cart, stand, tripod, bracket, or table specified by applying...

User manual
Page 3
... makes it meets safety standards.The weight of the receiver box. Make sure that it possible to daisy chain remote control signals to other end to the PC/MAC IN connector at the rear side of the second monitor. Connect your dealer. Note: Only use the VGA cable supplied with a second monitor. English Unpacking and wall mounting instructions For the unpacking instructions follow the illustrated steps ' to...
... makes it meets safety standards.The weight of the receiver box. Make sure that it possible to daisy chain remote control signals to other end to the PC/MAC IN connector at the rear side of the second monitor. Connect your dealer. Note: Only use the VGA cable supplied with a second monitor. English Unpacking and wall mounting instructions For the unpacking instructions follow the illustrated steps ' to...

User manual
Page 4
... red indicator lights up and the screen comes on the screen.The explanation appears in a grounded socket. é Remote control: remove the cover of the monitor. Nevertheless in many countries batteries may not be inserted in different languages one at the right side of the battery compartment. When the monitor does not receive a supported VGA signal and is not connected to a receiver box, the screen switches to a correct display mode...
... red indicator lights up and the screen comes on the screen.The explanation appears in a grounded socket. é Remote control: remove the cover of the monitor. Nevertheless in many countries batteries may not be inserted in different languages one at the right side of the battery compartment. When the monitor does not receive a supported VGA signal and is not connected to a receiver box, the screen switches to a correct display mode...

User manual
Page 5
... 3 6 9 q B to switch to standby or on again MENU to switch the menu on the monitor. On screen information When the monitor is used in the monitor mode, information about the active source (AV1, AV2, AV3, VGA1, VGA2 or DVI-D), and the supported video,VGA or HD-format of the selected source is displayed on the screen together with the selected picture format and icons informing about selected sound mode and AV or audio mute...
... 3 6 9 q B to switch to standby or on again MENU to switch the menu on the monitor. On screen information When the monitor is used in the monitor mode, information about the active source (AV1, AV2, AV3, VGA1, VGA2 or DVI-D), and the supported video,VGA or HD-format of the selected source is displayed on the screen together with the selected picture format and icons informing about selected sound mode and AV or audio mute...
User manual
Page 6
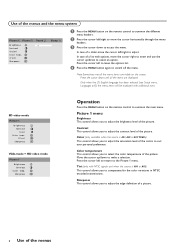
...) This control allows you to adjust the brightness level of the colors to adjust the edge definition of a picture. 6 Use of the picture. Color (only available when the source is AV1 or AV2) This control allows you to select the color temperature of the menus and the menu system Picture 1 Picture 2 Brightness G Contrast H (Color) C Color temp. @ (Tint) è Sharpness à Sound M Setup º & Press the MENU button on the screen. Note...
...) This control allows you to adjust the brightness level of the colors to adjust the edge definition of a picture. 6 Use of the picture. Color (only available when the source is AV1 or AV2) This control allows you to select the color temperature of the menus and the menu system Picture 1 Picture 2 Brightness G Contrast H (Color) C Color temp. @ (Tint) è Sharpness à Sound M Setup º & Press the MENU button on the screen. Note...

User manual
Page 7
... the HD modes. SD video-mode Picture 2 Format q 4:3 Movie expand 16:9 Wide screen Zoom Z Zoom factor  VGA-mode + HD video mode Picture 2 (Format) q 4:3 Wide screen Zoom Z Zoom factor  (Shift) ‹ (Clock frequency) S (Phase) fi (Auto align) X 4:3 VGA-mode SD video-mode 4:3 4:3 Wide screen Movie expand 16:9 Wide screen Picture 2 menu Zoom Select Zoom On to execute. Use the cursor left /right, up /down to adjust. See Connect Peripheral equipment, p. 9.) This control allows...
... the HD modes. SD video-mode Picture 2 Format q 4:3 Movie expand 16:9 Wide screen Zoom Z Zoom factor  VGA-mode + HD video mode Picture 2 (Format) q 4:3 Wide screen Zoom Z Zoom factor  (Shift) ‹ (Clock frequency) S (Phase) fi (Auto align) X 4:3 VGA-mode SD video-mode 4:3 4:3 Wide screen Movie expand 16:9 Wide screen Picture 2 menu Zoom Select Zoom On to execute. Use the cursor left /right, up /down to adjust. See Connect Peripheral equipment, p. 9.) This control allows...

User manual
Page 8
... On or Off. when a receiver box is connected to the monitor and a VGA source is selected. Treble + Sound mode J Setup º Language ‡ Power savings ) AV3 ( VGA2 § US English English Nederlands Deutsch Français Español 8 Use of selectable languages. Sound mode This control allows you to scroll through mode, i.e. Note: Bass, Treble and Sound mode will not be displayed with options. Treble Treble...
... On or Off. when a receiver box is connected to the monitor and a VGA source is selected. Treble + Sound mode J Setup º Language ‡ Power savings ) AV3 ( VGA2 § US English English Nederlands Deutsch Français Español 8 Use of selectable languages. Sound mode This control allows you to scroll through mode, i.e. Note: Bass, Treble and Sound mode will not be displayed with options. Treble Treble...
User manual
Page 9
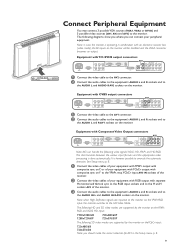
... in the Setup menu, p. 8. 9 See Setup menu, p. 8. & Connect the video cables of your equipment with YPbPr output with composite sync on Y, or of the monitor. " Connect the audio cables to the equipment's AUDIO L and R sockets and to the HD Video Mode. The following SD video modes are supported by the monitor on the YPbPr, RGB and VGA2 HD input: 1920x1080/60I 1280x720/60P 720x480/60P 720x576/50P The following diagrams show you...
... in the Setup menu, p. 8. 9 See Setup menu, p. 8. & Connect the video cables of your equipment with YPbPr output with composite sync on Y, or of the monitor. " Connect the audio cables to the equipment's AUDIO L and R sockets and to the HD Video Mode. The following SD video modes are supported by the monitor on the YPbPr, RGB and VGA2 HD input: 1920x1080/60I 1280x720/60P 720x480/60P 720x576/50P The following diagrams show you...
User manual
Page 10
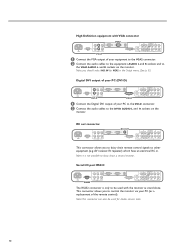
... AV3 AUDIO IN & Connect the Digital DVI output of your equipment to the VGA2 connector. é Connect the audio cables to the equipment's AUDIO L and R sockets and to daisy chain a second monitor. Note: you to daisy chain remote control signals to the DVI-D AUDIO L and R sockets on the monitor. High Definition equipment with the monitor as a replacement of the remote control). Note: This connector can also be used for VGA2 in . Serial I/O port...
... AV3 AUDIO IN & Connect the Digital DVI output of your equipment to the VGA2 connector. é Connect the audio cables to the equipment's AUDIO L and R sockets and to daisy chain a second monitor. Note: you to daisy chain remote control signals to the DVI-D AUDIO L and R sockets on the monitor. High Definition equipment with the monitor as a replacement of the remote control). Note: This connector can also be used for VGA2 in . Serial I/O port...

User manual
Page 11
... the use abrasives solvents as a video game, DVD, or video information channel) which are being influenced by air pressure. The plasma display technology operates with normal viewing. How to transport the monitor if needed. Wall mounting bracket included If this instruction manual does not give an answer or if 'Tips' do not contain the heavy metals mercury and cadmium. No picture or no sound Are the supplied cables connected properly? (The power cable...
... the use abrasives solvents as a video game, DVD, or video information channel) which are being influenced by air pressure. The plasma display technology operates with normal viewing. How to transport the monitor if needed. Wall mounting bracket included If this instruction manual does not give an answer or if 'Tips' do not contain the heavy metals mercury and cadmium. No picture or no sound Are the supplied cables connected properly? (The power cable...
User manual
Page 12
... for commercial or institutional purposes. WHERE IS SERVICE AVAILABLE? Please keep your owner's manual before requesting service. TO GET WARRANTY SERVICE.... Philips is an authorized service center, he sells. (In U.S.A., Puerto Rico and U.S.Virgin Islands, all replaced and repaired parts also expires. MODEL SERIAL No other cause not within the control of Philips Consumer Electronics Company. • reception problems caused by these modifications. • incidental...
... for commercial or institutional purposes. WHERE IS SERVICE AVAILABLE? Please keep your owner's manual before requesting service. TO GET WARRANTY SERVICE.... Philips is an authorized service center, he sells. (In U.S.A., Puerto Rico and U.S.Virgin Islands, all replaced and repaired parts also expires. MODEL SERIAL No other cause not within the control of Philips Consumer Electronics Company. • reception problems caused by these modifications. • incidental...


