User manual
Page 2
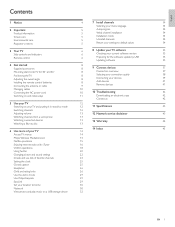
... Access TV menus 14 Philips Wireless MediaConnect 14 Netflix operations 15 Enjoying internet radio with vTuner 16 VUDU operations 18 Using Twitter 20 Changing picture and sound settings 22 Create and use lists of favorite channels 24 Setting the clock 25 Closed caption 25 Sleeptimer 26 Child and rating locks 26 Use the demo mode 29 Use Philips EasyLink 29 EasyLink 29 Set your location to home 30 Network 30 View photos and play music on a USB...
... Access TV menus 14 Philips Wireless MediaConnect 14 Netflix operations 15 Enjoying internet radio with vTuner 16 VUDU operations 18 Using Twitter 20 Changing picture and sound settings 22 Create and use lists of favorite channels 24 Setting the clock 25 Closed caption 25 Sleeptimer 26 Child and rating locks 26 Use the demo mode 29 Use Philips EasyLink 29 EasyLink 29 Set your location to home 30 Network 30 View photos and play music on a USB...
User manual
Page 4
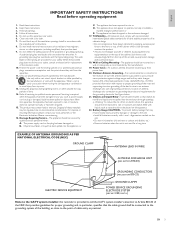
... when unused for replacement of time. 14. The power supply cord or the plug has been damaged; Objects have fallen into your outlet, consult an electrician for long periods of the obsolete outlet. 10. The appliance does not appear to avoid injury from tip-over. 13. Tilt/Stability - Wall or Ceiling Mounting - Section 810 of the set and cause...
... when unused for replacement of time. 14. The power supply cord or the plug has been damaged; Objects have fallen into your outlet, consult an electrician for long periods of the obsolete outlet. 10. The appliance does not appear to avoid injury from tip-over. 13. Tilt/Stability - Wall or Ceiling Mounting - Section 810 of the set and cause...
User manual
Page 5
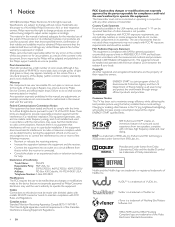
... which can radiate radio frequency energy and, if not installed and used for help. VESA, FDMI and the VESA Mounting Compliant logo are user serviceable. All rights reserved. Philips warrants that to operate the equipment. Do not open or remove covers to maximize energy efficiency while delivering the best possible picture using the factory installed home mode settings. brightened backlighting) will not occur in this device...
... which can radiate radio frequency energy and, if not installed and used for help. VESA, FDMI and the VESA Mounting Compliant logo are user serviceable. All rights reserved. Philips warrants that to operate the equipment. Do not open or remove covers to maximize energy efficiency while delivering the best possible picture using the factory installed home mode settings. brightened backlighting) will not occur in this device...

User manual
Page 8
... might see a difference in standby mode.The TV is not powered off . g OK Activates a selection or accesses the menu. D (forward) Searches forward. 1 F (play / pause) Starts, pauses or resumes playback. EN 7 CH Returns to the previously viewed channel. I (record) Starts or stops video recording. q DEMO Displays the demonstration menu. l FORMAT Selects a picture format. (See 'Changing picture format' on page 23.) m VOL + / − Increases or decreases volume. d Color buttons (red / green / yellow / blue) Selects tasks...
... might see a difference in standby mode.The TV is not powered off . g OK Activates a selection or accesses the menu. D (forward) Searches forward. 1 F (play / pause) Starts, pauses or resumes playback. EN 7 CH Returns to the previously viewed channel. I (record) Starts or stops video recording. q DEMO Displays the demonstration menu. l FORMAT Selects a picture format. (See 'Changing picture format' on page 23.) m VOL + / − Increases or decreases volume. d Color buttons (red / green / yellow / blue) Selects tasks...
User manual
Page 15
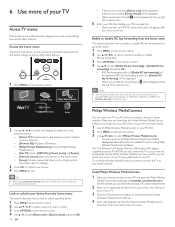
... sure you download the Philips Wireless MediaConnect software and install it on your PC before you easy access to connected devices, picture and sound settings as well as a PC monitor wirelessly using your home network. Follow the instructions on your devices are connected to this unit through one of the following menus. • [Watch TV] Switches back to the antenna source if another source is running Philips Wireless MediaConnect software. Lock or unlock your device...
... sure you download the Philips Wireless MediaConnect software and install it on your PC before you easy access to connected devices, picture and sound settings as well as a PC monitor wirelessly using your home network. Follow the instructions on your devices are connected to this unit through one of the following menus. • [Watch TV] Switches back to the antenna source if another source is running Philips Wireless MediaConnect software. Lock or unlock your device...
User manual
Page 23
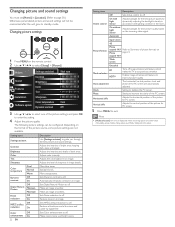
.... Picture Sound Features Installation Software update Settings assistant Contrast Brightness Color Tint Sharpness Color temperature Dynamic contrast Start now Cool Off 3 Use to standby mode. Adjusts color intensity. Sets Digital Natural Motion to off . Sets Noise reduction to off . Setting items Description Active control Off Sets Active control to off . On without Light Sensor Adjusts backlight for PC screen. 5 Press MENU to enter the setting. 4 Adjust the picture quality. Standard tones. Sets Color enhancement to act purely as a monitor. Makes colors more...
.... Picture Sound Features Installation Software update Settings assistant Contrast Brightness Color Tint Sharpness Color temperature Dynamic contrast Start now Cool Off 3 Use to standby mode. Adjusts color intensity. Sets Digital Natural Motion to off . Sets Noise reduction to off . Setting items Description Active control Off Sets Active control to off . On without Light Sensor Adjusts backlight for PC screen. 5 Press MENU to enter the setting. 4 Adjust the picture quality. Standard tones. Sets Color enhancement to act purely as a monitor. Makes colors more...

User manual
Page 25
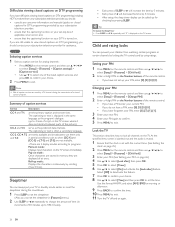
..., games consoles and playstations. • [Internet Video] : Optimized for low bitrate internet video. • [Power Saver] : Eco TV settings for digital channels only, when multiple languages are displayed. 2 Use Î / ï to highlight a list, and then press OK to select the setting. 3 Adjust the following items. The following screen resolutions are not available. Using auto mode 1 Press AUTO MODE to best suit your PC, set a positive delta volume level as a PC monitor Use a VGA connector to connect...
..., games consoles and playstations. • [Internet Video] : Optimized for low bitrate internet video. • [Power Saver] : Eco TV settings for digital channels only, when multiple languages are displayed. 2 Use Î / ï to highlight a list, and then press OK to select the setting. 3 Adjust the following items. The following screen resolutions are not available. Using auto mode 1 Press AUTO MODE to best suit your PC, set a positive delta volume level as a PC monitor Use a VGA connector to connect...
User manual
Page 26
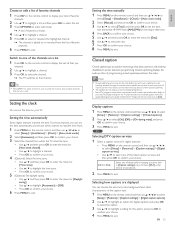
.... Selecting how captions are usually noted in a list. Switch to one of channels is shown. 4 Use Î / ï to highlight a channel. 5 Press OK to select or deselect the highlighted channel. » The channel is an assistive technology that allows persons with service marks such as text superimposed over the video. to access television programming. Setting the time manually 1 Press MENU on the remote control to display the last list that you...
.... Selecting how captions are usually noted in a list. Switch to one of channels is shown. 4 Use Î / ï to highlight a channel. 5 Press OK to select or deselect the highlighted channel. » The channel is an assistive technology that allows persons with service marks such as text superimposed over the video. to access television programming. Setting the time manually 1 Press MENU on the remote control to display the last list that you...
User manual
Page 27
... of a closed caption program. Setting your PIN 1 Press MENU on the remote control and then use to exit. 11 Turn the TV off and on again. 26 EN Use the format HH:MM, and select [AM] / [PM] for morning or afternoon. 9 Press BACK to confirm the time. 10 Press MENU to select [Setup] > [Features] > [Child lock]. 2 Enter a 4-digit PIN on the Number buttons, of the remote control. •...
... of a closed caption program. Setting your PIN 1 Press MENU on the remote control and then use to exit. 11 Turn the TV off and on again. 26 EN Use the format HH:MM, and select [AM] / [PM] for morning or afternoon. 9 Press BACK to confirm the time. 10 Press MENU to select [Setup] > [Features] > [Child lock]. 2 Enter a 4-digit PIN on the Number buttons, of the remote control. •...

User manual
Page 28
... activity and / or crude or indecent language. [Language] [Sex] [Violence] Note • TheV-Chip can be connected through a set-top box or cable box connected by HDMI, you to control access to individual programs based on page 26.) 3 Use Î / ï to be viewed by the program provider. If the option to block [None], [NR], [E] or [E] programs is not locked. 5 Press MENU to lock input sources or specified channels.
... activity and / or crude or indecent language. [Language] [Sex] [Violence] Note • TheV-Chip can be connected through a set-top box or cable box connected by HDMI, you to control access to individual programs based on page 26.) 3 Use Î / ï to be viewed by the program provider. If the option to block [None], [NR], [E] or [E] programs is not locked. 5 Press MENU to lock input sources or specified channels.
User manual
Page 30
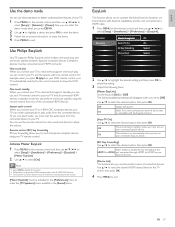
..., you can enter the demo mode when you must map the audio input from any of the connected HDMI devices. Use Philips EasyLink Your TV supports Philips EasyLink, which enables one-touch play and one -touch play ) on your DVD remote control, your TV. 1 Press MENU on the remote control and then use to select [On]. Compliant devices must be switched on -screen instructions to enjoy the demo. 4 Press MENU to select the desired...
..., you can enter the demo mode when you must map the audio input from any of the connected HDMI devices. Use Philips EasyLink Your TV supports Philips EasyLink, which enables one-touch play and one -touch play ) on your DVD remote control, your TV. 1 Press MENU on the remote control and then use to select [On]. Compliant devices must be switched on -screen instructions to enjoy the demo. 4 Press MENU to select the desired...
User manual
Page 31
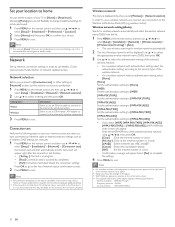
... display. [OK] : Set the entered number or word. • Confirmation message will start searching for picture and sound. 1 Press MENU on the remote control and then use to [Connection test] or other settings in [Network selection]. Note • You must set the location of network status confirmation screen. 2 Press MENU to standby mode. Select to use to the internet by wired connection. Wireless network This menu is successfully completed. • [Fail]: Connection...
... display. [OK] : Set the entered number or word. • Confirmation message will start searching for picture and sound. 1 Press MENU on the remote control and then use to [Connection test] or other settings in [Network selection]. Note • You must set the location of network status confirmation screen. 2 Press MENU to standby mode. Select to use to the internet by wired connection. Wireless network This menu is successfully completed. • [Fail]: Connection...
User manual
Page 32
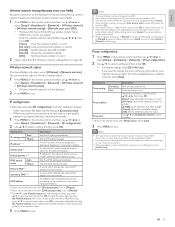
... mask *1, 3 Default gateway *1, 3 A set of input numbers for DNS setting. DNS setting mode Auto Manual Sets the DNS setting automatically. Setting items Description Proxy setting Do not Use Use Proxy address * Proxy port * Not use depending on your network environment. • If the proxy address is set to 4 in one cell, press OK to move on page 30. Selects the number or word by your internet service provider to select [Setup] > [Installation] > [Network] > [Wireless network] > [Wireless network setting] > [Manually enter your...
... mask *1, 3 Default gateway *1, 3 A set of input numbers for DNS setting. DNS setting mode Auto Manual Sets the DNS setting automatically. Setting items Description Proxy setting Do not Use Use Proxy address * Proxy port * Not use depending on your network environment. • If the proxy address is set to 4 in one cell, press OK to move on page 30. Selects the number or word by your internet service provider to select [Setup] > [Installation] > [Network] > [Wireless network] > [Wireless network setting] > [Manually enter your...
User manual
Page 35
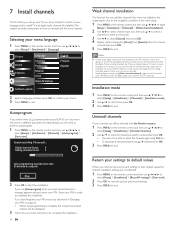
... to select [Setup] > [Installation] > [Channels] > [Autoprogram] > [Start now]. Uninstall channels Those channels can still be selected with the Number buttons. 1 Press MENU on the remote control and then use Î / ï and then press OK. 3 Press MENU to exit. 7 Install channels The first time you set up your choice. 3 Press MENU to exit. Picture Sound Features Installation Language Channels Preferences Network Clock Reset AV settings English Français Español Software update 2 Select...
... to select [Setup] > [Installation] > [Channels] > [Autoprogram] > [Start now]. Uninstall channels Those channels can still be selected with the Number buttons. 1 Press MENU on the remote control and then use Î / ï and then press OK. 3 Press MENU to exit. 7 Install channels The first time you set up your choice. 3 Press MENU to exit. Picture Sound Features Installation Language Channels Preferences Network Clock Reset AV settings English Français Español Software update 2 Select...
User manual
Page 36
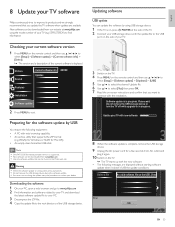
... the update file to the USB port on -screen instructions and confirm that you want to exit. Note • Only FAT / DOS-formatted portable memory is displayed. Do not remove the USB storage device or turn the TV off while upgrade is in progress. Select a file No valid software file on the remote control and then use to select [Setup] > [Software update] > [Updates] > [USB]. 5 Use Î...
... the update file to the USB port on -screen instructions and confirm that you want to exit. Note • Only FAT / DOS-formatted portable memory is displayed. Do not remove the USB storage device or turn the TV off while upgrade is in progress. Select a file No valid software file on the remote control and then use to select [Setup] > [Software update] > [Updates] > [USB]. 5 Use Î...
User manual
Page 41
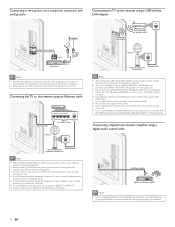
... which supports IEEE 802.11 b/g/n. (n is in to network equipment. • After connecting an Ethernet cable, set -top box via a composite connector and analog audio IN AUDIO L/R + VIDEO OUT Set-top box RF IN Cable Note • Only the left loudspeaker reproduces sound for certain channels, shows or segments during the broadcast. 40 EN wireless router) USB wireless LAN adapter Internet LAN Network equipment Ethernet cable (modem, etc.) Note • After connecting a USB wireless LAN adapter, set...
... which supports IEEE 802.11 b/g/n. (n is in to network equipment. • After connecting an Ethernet cable, set -top box via a composite connector and analog audio IN AUDIO L/R + VIDEO OUT Set-top box RF IN Cable Note • Only the left loudspeaker reproduces sound for certain channels, shows or segments during the broadcast. 40 EN wireless router) USB wireless LAN adapter Internet LAN Network equipment Ethernet cable (modem, etc.) Note • After connecting a USB wireless LAN adapter, set...
User manual
Page 43
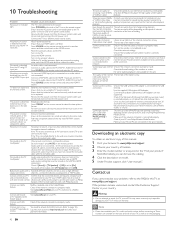
... input jack. POWER at the same time. Ensure that your internet Service Provider prevents multiple terminals connecting at the side of with the red video cable. No sound is running Philips Wireless MediaConnect. No picture or sound is set to the color code. Press SOURCE on the accessory device. Press FORMAT on the remote control to the PC / HDMI 1 AUDIO IN on your warranty. For some accessory devices, the picture format must be replaced. No picture or sound. No sound...
... input jack. POWER at the same time. Ensure that your internet Service Provider prevents multiple terminals connecting at the side of with the red video cable. No sound is running Philips Wireless MediaConnect. No picture or sound is set to the color code. Press SOURCE on the accessory device. Press FORMAT on the remote control to the PC / HDMI 1 AUDIO IN on your warranty. For some accessory devices, the picture format must be replaced. No picture or sound. No sound...
User manual
Page 44
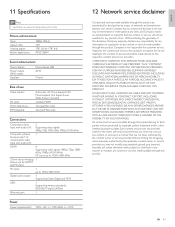
...° (H) ATSC / QAM Sound enhancement Mono / Stereo : Power output (RMS watts) : Equalizer : Mono, Stereo, SRS 20 W 5 band Ease of use Video modes : PC input : Photo slide show : MP3 playback : Automatic, 4:3, Movie Expand 14:9, Movie Expand 16:9, Super Zoom, Wide Screen, Unscaled via VGA, HDMI Yes (jpeg files only) Yes (mp3 files only) Connections Component video input with audio L/R : 2 Supporting video signals : 480i/p, 720p, 1080i 60Hz...
...° (H) ATSC / QAM Sound enhancement Mono / Stereo : Power output (RMS watts) : Equalizer : Mono, Stereo, SRS 20 W 5 band Ease of use Video modes : PC input : Photo slide show : MP3 playback : Automatic, 4:3, Movie Expand 14:9, Movie Expand 16:9, Super Zoom, Wide Screen, Unscaled via VGA, HDMI Yes (jpeg files only) Yes (mp3 files only) Connections Component video input with audio L/R : 2 Supporting video signals : 480i/p, 720p, 1080i 60Hz...
User manual
Page 46
... 11, 30 11 11, 30 29 8 N Netflix Network P PC Philips Wireless MediaConnect Picture format Picture settings R Ratings Remote control insert batteries overview Retail store mode RC key forwarding S Settings assistant Signal quality Sleeptimer Software update version Speakers EasyLink Specifications Standby T Troubleshooting TV as PC monitor connections controls menu position remote control screen care software switch channels switch on TV Speakers Twitter U USB V Volume adjust auto volume leveling mute vTuner VUDU W Warranty Wireless LAN Y YPbPr 15 30 22 14 23 22 26, 27...
... 11, 30 11 11, 30 29 8 N Netflix Network P PC Philips Wireless MediaConnect Picture format Picture settings R Ratings Remote control insert batteries overview Retail store mode RC key forwarding S Settings assistant Signal quality Sleeptimer Software update version Speakers EasyLink Specifications Standby T Troubleshooting TV as PC monitor connections controls menu position remote control screen care software switch channels switch on TV Speakers Twitter U USB V Volume adjust auto volume leveling mute vTuner VUDU W Warranty Wireless LAN Y YPbPr 15 30 22 14 23 22 26, 27...
Leaflet
Page 3
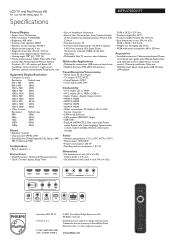
....12 • VESA wall mount compatible: 400 x 200 mm Accessories • Included accessories: Tabletop swivel stand, Power cord, Quick start guide, User Manual, Registration card, Remote Control, Batteries for remote control, Warranty certificate, Cable ties, MediaConnect Quick setup guide, USB Wireless LAN adapter • Connectivity • AV 1: Audio L/R in, YPbPr • AV 2: Audio L/R in, YPbPr, CVBS in inch (W x H x D): Issue date 2011-02-12 Version: 1.2.1 12 NC: 8670 000 67496 UPC: 6 09585 19508 0 © 2011 Koninklijke Philips Electronics N.V. Specifications are the...
....12 • VESA wall mount compatible: 400 x 200 mm Accessories • Included accessories: Tabletop swivel stand, Power cord, Quick start guide, User Manual, Registration card, Remote Control, Batteries for remote control, Warranty certificate, Cable ties, MediaConnect Quick setup guide, USB Wireless LAN adapter • Connectivity • AV 1: Audio L/R in, YPbPr • AV 2: Audio L/R in, YPbPr, CVBS in inch (W x H x D): Issue date 2011-02-12 Version: 1.2.1 12 NC: 8670 000 67496 UPC: 6 09585 19508 0 © 2011 Koninklijke Philips Electronics N.V. Specifications are the...


