User Guide
Page 1
... service personnel. Do not block any heat sources such as marked on the top of the set and cause product damage and/or personal injury. 18.Wall or Ceiling Mounting - or B. alignment as radiators, heat registers, stoves, or other . IMPORTANT SAFETY INSTRUCTIONS Read before operating equipment 1. The power supply cord or the plug has been damaged; or C. The appliance should be connected...
... service personnel. Do not block any heat sources such as marked on the top of the set and cause product damage and/or personal injury. 18.Wall or Ceiling Mounting - or B. alignment as radiators, heat registers, stoves, or other . IMPORTANT SAFETY INSTRUCTIONS Read before operating equipment 1. The power supply cord or the plug has been damaged; or C. The appliance should be connected...
User Guide
Page 3
... menu language 6 Store TV channels 6 Settings menu 7 General 7 Clock 9 Source 9 Demo 9 TV menu 10 Picture menu 10 Active Control 11 Sound 11 Ambilight 12 Features menu 13 Channels menu 13 Dual screen / PIP / Multipip 16 Connect Accessory Devices 17 Recorder (vcr-dvd+rw) 17 Recorder and other A/V devices 18 Recorder and Cable Box with output 18 Satellite Receiver / Cable Box with AV outputs 19 Recorder and Satellite Receiver / Cable Box with AV outputs 19 DVD Player or other accessory digital source devices 20 HDMI...
... menu language 6 Store TV channels 6 Settings menu 7 General 7 Clock 9 Source 9 Demo 9 TV menu 10 Picture menu 10 Active Control 11 Sound 11 Ambilight 12 Features menu 13 Channels menu 13 Dual screen / PIP / Multipip 16 Connect Accessory Devices 17 Recorder (vcr-dvd+rw) 17 Recorder and other A/V devices 18 Recorder and Cable Box with output 18 Satellite Receiver / Cable Box with AV outputs 19 Recorder and Satellite Receiver / Cable Box with AV outputs 19 DVD Player or other accessory digital source devices 20 HDMI...
User Guide
Page 4
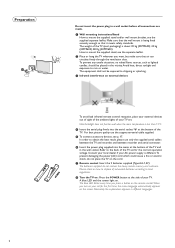
A blue LED and the screen light on the remote control. Make sure that the wall mount is about 20 kg (32PF9630); 42 kg (42PF9630); 58 Kg (50PF9630). The equipment shall not be placed in different languages. 2 Refer to the back of the TV set . The blue LED blinks every time you turn on your AC power supply is less than 15°C. ' Insert the aerial plug firmly...
A blue LED and the screen light on the remote control. Make sure that the wall mount is about 20 kg (32PF9630); 42 kg (42PF9630); 58 Kg (50PF9630). The equipment shall not be placed in different languages. 2 Refer to the back of the TV set . The blue LED blinks every time you turn on your AC power supply is less than 15°C. ' Insert the aerial plug firmly...

User Guide
Page 5
... MODE POWER Press to turn on . Set Top box). CH Channel selection To browse through the TV channels or sources stored. 0/9 Digit buttons To select a TV channel. To type the dot (.) for flicker reduction, motion compensation and resolution enhancement. The list will activate the function. CLOCK Time display, see p. 9. 3 Audio and Video equipment buttons. CC Closed Caption On/Off/On during mute (p. 8) OK Press this button to use the remote control directly in the menus. POWER DVD...
... MODE POWER Press to turn on . Set Top box). CH Channel selection To browse through the TV channels or sources stored. 0/9 Digit buttons To select a TV channel. To type the dot (.) for flicker reduction, motion compensation and resolution enhancement. The list will activate the function. CLOCK Time display, see p. 9. 3 Audio and Video equipment buttons. CC Closed Caption On/Off/On during mute (p. 8) OK Press this button to use the remote control directly in the menus. POWER DVD...

User Guide
Page 6
... button. To remove a channel or source: select the channel number you wish to remove. Press the OK button or wait for showing video images in HDMI mode press the SCREEN FORMAT button to turn on the sides of the list will be active. When in the list or press cursor up/down to switch Ambilight on the channel number or source currently viewed. To add a new channel or source to the 9 channel list: tune to the channel...
... button. To remove a channel or source: select the channel number you wish to remove. Press the OK button or wait for showing video images in HDMI mode press the SCREEN FORMAT button to turn on the sides of the list will be active. When in the list or press cursor up/down to switch Ambilight on the channel number or source currently viewed. To add a new channel or source to the 9 channel list: tune to the channel...

User Guide
Page 7
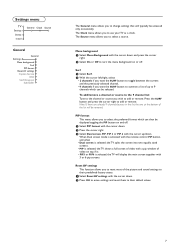
... side of your TV. Navigate to select Picture, Sound, Ambilight, Features or Channels. Press the MENU button to adjust the volume; • the - Buttons on the right side of the TV Should your remote be selected. V + button to summon the main menu without the remote control. V + button and the - TV Settings Demo Install Picture Sound Ambilight Features Channels é Use the cursor in a light grey colour and cannot be lost or broken...
... side of your TV. Navigate to select Picture, Sound, Ambilight, Features or Channels. Press the MENU button to adjust the volume; • the - Buttons on the right side of the TV Should your remote be selected. V + button to summon the main menu without the remote control. V + button and the - TV Settings Demo Install Picture Sound Ambilight Features Channels é Use the cursor in a light grey colour and cannot be lost or broken...

User Guide
Page 8
... the instructions on the remote control. Note: when you are present. Available channels: - off air: max. If requested, enter your PIN code to Stop before autoprogramming is selected, the TV will detect antenna signals and will appear that channel by using the digit buttons on screen. ' Use the cursor up/down to continue. A message appears confirming the completion together with the Install menu. Note: All channels...
... the instructions on the remote control. Note: when you are present. Available channels: - off air: max. If requested, enter your PIN code to Stop before autoprogramming is selected, the TV will detect antenna signals and will appear that channel by using the digit buttons on screen. ' Use the cursor up/down to continue. A message appears confirming the completion together with the Install menu. Note: All channels...
User Guide
Page 9
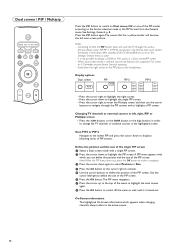
... are already 9 channels/sources in the list, the one at the bottom of the picture and sound settings to their default values. 7 PIP format This menu allows you to reset most of the list will display the main screen together with 3 or 6 pip screens. When Dual screen mode is activated with the remote control PIP button, and when • Dual screen is selected, the TV splits the screen into two equally sized screens. • PIP is selected...
... are already 9 channels/sources in the list, the one at the bottom of the picture and sound settings to their default values. 7 PIP format This menu allows you to reset most of the list will display the main screen together with 3 or 6 pip screens. When Dual screen mode is activated with the remote control PIP button, and when • Dual screen is selected, the TV splits the screen into two equally sized screens. • PIP is selected...
User Guide
Page 10
Settings General Menu background Surf PIP format Reset AV settings Caption Service OSD Set/Change pin Subwoofer 8 Caption Service (not available for PAL-N system) Closed Captioning allows you installed an external subwoofer. The captioned programs are being used by a TV channel during captioned broadcasts. " Press the cursor again and enter a new personal 4-digit PIN code. See Connect Peripheral Equipment, Connect extra subwoofer, p. 22. Refer to enter the overriding PIN-code 0-7-1-1. Not all TV programs and product commercials are...
Settings General Menu background Surf PIP format Reset AV settings Caption Service OSD Set/Change pin Subwoofer 8 Caption Service (not available for PAL-N system) Closed Captioning allows you installed an external subwoofer. The captioned programs are being used by a TV channel during captioned broadcasts. " Press the cursor again and enter a new personal 4-digit PIN code. See Connect Peripheral Equipment, Connect extra subwoofer, p. 22. Refer to enter the overriding PIN-code 0-7-1-1. Not all TV programs and product commercials are...

User Guide
Page 11
... Demo mode it is in VCR mode, see the difference in a loop. CH + and to change channels with the cursor up/down . é Select Auto demo or one time only, until activated again, and the Demo menu will automatically present all menus on screen. § Keep the AV+ button on screen. Dealer demo - Clock Settings Clock Time Day Source Source Settings AV1 AV2 HDMI Side Center input (Center In Vol.) Demo TV Settings Demo Install Auto demo ........... Digital...
... Demo mode it is in VCR mode, see the difference in a loop. CH + and to change channels with the cursor up/down . é Select Auto demo or one time only, until activated again, and the Demo menu will automatically present all menus on screen. § Keep the AV+ button on screen. Dealer demo - Clock Settings Clock Time Day Source Source Settings AV1 AV2 HDMI Side Center input (Center In Vol.) Demo TV Settings Demo Install Auto demo ........... Digital...
User Guide
Page 12
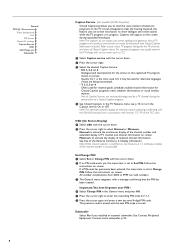
... the SCREEN FORMAT button on the screen changes. Tint Allows you cycle through the various Auto Picture modes to find the smoothness of HD sources. DNR (Digital Noise Reduction) Automatically filters out and reduces the image noise and improves picture quality when receiving weak video signals. & Press the cursor right to enter the list. é Select Off, Minimum, Medium or Maximum according to select the color...
... the SCREEN FORMAT button on the screen changes. Tint Allows you cycle through the various Auto Picture modes to find the smoothness of HD sources. DNR (Digital Noise Reduction) Automatically filters out and reduces the image noise and improves picture quality when receiving weak video signals. & Press the cursor right to enter the list. é Select Off, Minimum, Medium or Maximum according to select the color...

User Guide
Page 13
... screen is divided into two parts: in the left /right. Active Control The TV continuously measures and corrects all incoming signals in order to provide the best picture possible. & Press the ACTIVE CONTROL button on the input signal, one of the Dual screen demos or Off.When you modify a setting in the Sound menu, all menus on . Note: Turn off the Active Control menu. Note: Dependent on the remote control...
... screen is divided into two parts: in the left /right. Active Control The TV continuously measures and corrects all incoming signals in order to provide the best picture possible. & Press the ACTIVE CONTROL button on the input signal, one of the Dual screen demos or Off.When you modify a setting in the Sound menu, all menus on . Note: Turn off the Active Control menu. Note: Dependent on the remote control...

User Guide
Page 15
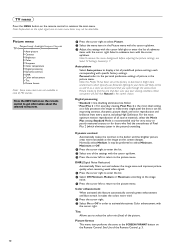
.... Channels menu TV Settings Demo Install Picture Sound Ambilight Features Channels Channel list Channel lock TV ratings lock Movie ratings lock Channel remove (Antenna attenuator) ... Features menu Features TV Closed captions Sleep Timer Off On On during mute Press the INFO button on the remote control to get information about the selected menu item. & Press the cursor right to select Channels. é Select the menu items with the cursor up/down and adjust the settings with the cursor left /right. Closed captions...
.... Channels menu TV Settings Demo Install Picture Sound Ambilight Features Channels Channel list Channel lock TV ratings lock Movie ratings lock Channel remove (Antenna attenuator) ... Features menu Features TV Closed captions Sleep Timer Off On On during mute Press the INFO button on the remote control to get information about the selected menu item. & Press the cursor right to select Channels. é Select the menu items with the cursor up/down and adjust the settings with the cursor left /right. Closed captions...
User Guide
Page 18
... the size of the PIP screen. When Dual screen mode is not possible to the active screen. 16 Define the position and the size of the single PIP screen & Select a Dual screen mode with which appears when changing channels, always refers to display a HDMI or HD source in the highlighted screen. See Settings, General, p. 8. It is selected, two picture formats are supported: Full screen or 4:3 letterbox picture format (vertical squeeze). - Press the PIP button again.The screen...
... the size of the PIP screen. When Dual screen mode is not possible to the active screen. 16 Define the position and the size of the single PIP screen & Select a Dual screen mode with which appears when changing channels, always refers to display a HDMI or HD source in the highlighted screen. See Settings, General, p. 8. It is selected, two picture formats are supported: Full screen or 4:3 letterbox picture format (vertical squeeze). - Press the PIP button again.The screen...

User Guide
Page 19
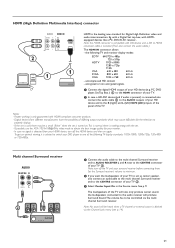
... devices) AV cables 3 to provide sound. 17 HDMI (AV3) ; AV2 AV1 R Pr/R Y/G V S-VIDEO R Pr MONITOR OUT AUDIO RECEIVER Y R CENTRE R AV3 R HDMI ANT IN 75 L Pb/B CVBS H S-VIDEO L Pb VIDEO L SUBW. Connect Accessory Devices There is a wide range of audio and video devices that can be connected to your TV.The following connection diagrams show you also connect the Video, Audio Left and Right (only for signals from the display. AV1 can...
... devices) AV cables 3 to provide sound. 17 HDMI (AV3) ; AV2 AV1 R Pr/R Y/G V S-VIDEO R Pr MONITOR OUT AUDIO RECEIVER Y R CENTRE R AV3 R HDMI ANT IN 75 L Pb/B CVBS H S-VIDEO L Pb VIDEO L SUBW. Connect Accessory Devices There is a wide range of audio and video devices that can be connected to your TV.The following connection diagrams show you also connect the Video, Audio Left and Right (only for signals from the display. AV1 can...

User Guide
Page 22
... for the component video sockets may vary, the letters B and R stand for the blue and red component signals, respectively, and Y indicates the luminance signal. Digital devices from your TV. 20 players, laser-disc players, videogame players, satellite receivers or other accessory digital source devices AV2 AV1 R Pr/R Y/G V S-VIDEO R Pr Y L Pb/B CVBS H S-VIDEO L Pb 1 3 2 DVD / Cable Box Devices with Component Video Output Connectors (YPbPr) & Connect the three separate component video cables 1 to the device having component video outputs (YPbPr), such...
... for the component video sockets may vary, the letters B and R stand for the blue and red component signals, respectively, and Y indicates the luminance signal. Digital devices from your TV. 20 players, laser-disc players, videogame players, satellite receivers or other accessory digital source devices AV2 AV1 R Pr/R Y/G V S-VIDEO R Pr Y L Pb/B CVBS H S-VIDEO L Pb 1 3 2 DVD / Cable Box Devices with Component Video Output Connectors (YPbPr) & Connect the three separate component video cables 1 to the device having component video outputs (YPbPr), such...
User Guide
Page 23
... 1024x768@60Hz video mode to the AUDIO outputs of your TV. é In case a HD-DVI device (and if audio is present) is connected also connect the audio cable 2 to obtain the best image quality for the television to properly display; - Note: turn off the TV and your HD device and to be controlled via the Channel Lock menu (see p. 14). 21 PC, DVD player, Set Top Box..) 1 to the HDMI connector...
... 1024x768@60Hz video mode to the AUDIO outputs of your TV. é In case a HD-DVI device (and if audio is present) is connected also connect the audio cable 2 to obtain the best image quality for the television to properly display; - Note: turn off the TV and your HD device and to be controlled via the Channel Lock menu (see p. 14). 21 PC, DVD player, Set Top Box..) 1 to the HDMI connector...
User Guide
Page 24
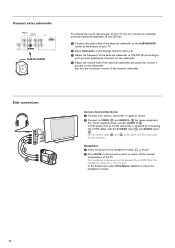
... remote control to the SUBWOOFER socket at the same time. For stereo equipment also connect AUDIO R 3. See also the instruction manual of the external subwoofer, presumed this control is obtained by connecting the S-VHS cables with the S-VIDEO input 1 and AUDIO inputs 3. Headphone & Insert the plug into the headphone socket L as shown. é Connect to adjust the headphone volume. 22 This may cause picture distortion ! Connect extra subwoofer MONITOR OUT AUDIO RECEIVER R CENTRE R AV3 R HDMI VIDEO...
... remote control to the SUBWOOFER socket at the same time. For stereo equipment also connect AUDIO R 3. See also the instruction manual of the external subwoofer, presumed this control is obtained by connecting the S-VHS cables with the S-VIDEO input 1 and AUDIO inputs 3. Headphone & Insert the plug into the headphone socket L as shown. é Connect to adjust the headphone volume. 22 This may cause picture distortion ! Connect extra subwoofer MONITOR OUT AUDIO RECEIVER R CENTRE R AV3 R HDMI VIDEO...

User Guide
Page 25
Switching channel numbers on your recorder. é Set your TV does not disturb recording ! You record the tuner channel of a rating set via MONITOR OUT. & Select the correct channel on your TV and the correct input on the remote control. Record a TV program You can record a program on your recorder from the TV tuner via the Channels menu (see p. 9) to select AV1, AV2, HDMI or Side, according to where...
Switching channel numbers on your recorder. é Set your TV does not disturb recording ! You record the tuner channel of a rating set via MONITOR OUT. & Select the correct channel on your TV and the correct input on the remote control. Record a TV program You can record a program on your recorder from the TV tuner via the Channels menu (see p. 9) to select AV1, AV2, HDMI or Side, according to where...
User Guide
Page 27
... of the screen may improve the picture. Some TEXT modes could block the screen. • Switch your HDMI-source to remote control • Check the antenna connection. • Check whether the batteries are no blocking walls or cabinets which you have the Model and Product number which would limit the air flow. Snowish picture and noise Television not responding to a correct display mode. Control of • The infrared signals of...
... of the screen may improve the picture. Some TEXT modes could block the screen. • Switch your HDMI-source to remote control • Check the antenna connection. • Check whether the batteries are no blocking walls or cabinets which you have the Model and Product number which would limit the air flow. Snowish picture and noise Television not responding to a correct display mode. Control of • The infrared signals of...


