User manual
Page 3
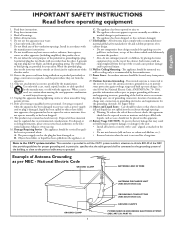
..., does a) Warning: To reduce the risk of the 18. The power supply cord or the plug has been damaged; or • Remove batteries when the unit is damaged, liquid has been spilled or objects ...POWER SERVICE GROUNDING ELECTRODE SYSTEM (NEC ART 250, PART H) English IMPORTANT SAFETY INSTRUCTIONS Read before operating equipment 1. marked change in particular, specifies that provides guidelines for long discharge unit, size of grounding connectors, location of the mast to proper grounding of antenna-dis- All televisions must comply with a cart, stand, tripod, bracket, or table...
..., does a) Warning: To reduce the risk of the 18. The power supply cord or the plug has been damaged; or • Remove batteries when the unit is damaged, liquid has been spilled or objects ...POWER SERVICE GROUNDING ELECTRODE SYSTEM (NEC ART 250, PART H) English IMPORTANT SAFETY INSTRUCTIONS Read before operating equipment 1. marked change in particular, specifies that provides guidelines for long discharge unit, size of grounding connectors, location of the mast to proper grounding of antenna-dis- All televisions must comply with a cart, stand, tripod, bracket, or table...
User manual
Page 5
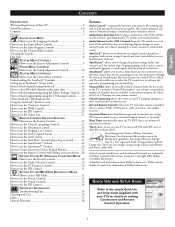
... (games), or weak signals with your TV) for details on making for various types of programming, such as VCRs, DVD players, cable converters, and satellite receivers. Onscreen Menu shows helpful messages and instructions for energy efficiency. AutoLock™ allows you to block the viewing of time that are available to you when you to add or delete channels from three factory-set controls and a personal control that...
... (games), or weak signals with your TV) for details on making for various types of programming, such as VCRs, DVD players, cable converters, and satellite receivers. Onscreen Menu shows helpful messages and instructions for energy efficiency. AutoLock™ allows you to block the viewing of time that are available to you when you to add or delete channels from three factory-set controls and a personal control that...
User manual
Page 6
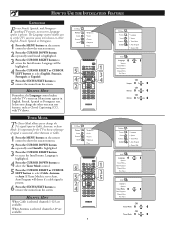
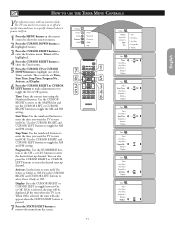
... Antenna, or Auto. HELPFUL HINT Remember, the Language control makes only the TV's onscreen Menu items appear in either Antenna or Cable. 1 Press the MENU button on the remote control to show the onscreen menu. 2 Press the CURSOR DOWN button repeatedly until Install is selected, channels 2-69 are available. TV Menu Picture Sound Features Install Brightness Color Picture Sharpness Tint 5 1 3 4 4 2 TV Menu Picture Sound Features Install Brightness Color Picture Sharpness Tint 6 1 3 5 5 2 4 6 TV Menu Picture Sound Features Install Language System Tuner Mode Auto Program...
... Antenna, or Auto. HELPFUL HINT Remember, the Language control makes only the TV's onscreen Menu items appear in either Antenna or Cable. 1 Press the MENU button on the remote control to show the onscreen menu. 2 Press the CURSOR DOWN button repeatedly until Install is selected, channels 2-69 are available. TV Menu Picture Sound Features Install Brightness Color Picture Sharpness Tint 5 1 3 4 4 2 TV Menu Picture Sound Features Install Brightness Color Picture Sharpness Tint 6 1 3 5 5 2 4 6 TV Menu Picture Sound Features Install Language System Tuner Mode Auto Program...
User manual
Page 7
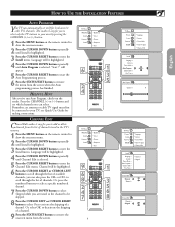
... pressing the CHANNEL (+) or (-) button. 1 Press the MENU button on the remote control to show the onscreen menu. 2 Press the CURSOR DOWN button repeatedly until Channel Edit is highlighted. 3 Press the CURSOR RIGHT button to remove the onscreen menu from the screen when the Auto programming process has finished. Press the CHANNEL (+) or (-) button and see Quick-Use Guide for local area (or cable TV) channels. Remember, an antenna or cable TV signal must...
... pressing the CHANNEL (+) or (-) button. 1 Press the MENU button on the remote control to show the onscreen menu. 2 Press the CURSOR DOWN button repeatedly until Channel Edit is highlighted. 3 Press the CURSOR RIGHT button to remove the onscreen menu from the screen when the Auto programming process has finished. Press the CHANNEL (+) or (-) button and see Quick-Use Guide for local area (or cable TV) channels. Remember, an antenna or cable TV signal must...
User manual
Page 8
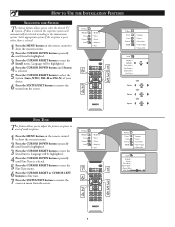
... the STATUS/EXIT button to remove the onscreen menu from the screen. HOW TO USE THE INSTALLATION FEATURES SELECTING THE SYSTEM The System feature allows you to adjust the picture reception in area of your choice. 6 Press the STATUS/EXIT button to remove the menu from the screen. TV Menu Picture Sound Features Install Brightness Color Picture Sharpness Tint 6 1 3 5 2 4 TV Menu Picture Sound Features Install Language System Tuner Mode Auto Program Channel Edit Install Language System Auto Tuner Mode Auto Program Channel Edit Fine...
... the STATUS/EXIT button to remove the onscreen menu from the screen. HOW TO USE THE INSTALLATION FEATURES SELECTING THE SYSTEM The System feature allows you to adjust the picture reception in area of your choice. 6 Press the STATUS/EXIT button to remove the menu from the screen. TV Menu Picture Sound Features Install Brightness Color Picture Sharpness Tint 6 1 3 5 2 4 TV Menu Picture Sound Features Install Language System Tuner Mode Auto Program Channel Edit Install Language System Auto Tuner Mode Auto Program Channel Edit Fine...
User manual
Page 11
... remove the menu from the screen. If On is selected, the time will be set to turn on the remote control to show the onscreen menu. 2 Press the CURSOR DOWN button to highlight Features. 3 Press the CURSOR RIGHT button to turn itself Off. Activate Display - - : - - Activate Display Once Timer Time Start Time Stop Time Program No. Activate Display On 11 PM Timer Time Start Time Stop Time Program No. Time: Enter the current time using the Numbered buttons. Stop Time: Use the numbered buttons...
... remove the menu from the screen. If On is selected, the time will be set to turn on the remote control to show the onscreen menu. 2 Press the CURSOR DOWN button to highlight Features. 3 Press the CURSOR RIGHT button to turn itself Off. Activate Display - - : - - Activate Display Once Timer Time Start Time Stop Time Program No. Activate Display On 11 PM Timer Time Start Time Stop Time Program No. Time: Enter the current time using the Numbered buttons. Stop Time: Use the numbered buttons...

User manual
Page 13
... AutoLock access code. 1 Press the MENU button on the remote control to show the onscreen menu. 2 Press the CURSOR DOWN button to highlight Features. 3 Press the CURSOR RIGHT button to enter the Features menu. 4 Press the CURSOR DOWN button to highlight the AutoLock control. 5 Press the CURSOR RIGHT button to change code. 7 Using the numbered buttons on the screen. After you to enter the AutoLock mode. "Access Code - - - -" will appear. NOTE TO PARENTS...
... AutoLock access code. 1 Press the MENU button on the remote control to show the onscreen menu. 2 Press the CURSOR DOWN button to highlight Features. 3 Press the CURSOR RIGHT button to enter the Features menu. 4 Press the CURSOR DOWN button to highlight the AutoLock control. 5 Press the CURSOR RIGHT button to change code. 7 Using the numbered buttons on the screen. After you to enter the AutoLock mode. "Access Code - - - -" will appear. NOTE TO PARENTS...
User manual
Page 14
...™ will be accessible. 7 You can choose to lock. TV Menu Picture Sound Features Install Timer AutoLock Contrast+ DNR PIP 1 3 5 11 7 10 2 4 9 8 6 8 Features Timer AutoLock Contrast+ DNR PIP Features Timer AutoLock Contrast+ DNR PIP Access Code - - - - buttons enter the channel you wish to block individual channels or all channels at the same time. To watch the channel, enter your access code or you can always get in by inputting the default code. To deactivate the...
...™ will be accessible. 7 You can choose to lock. TV Menu Picture Sound Features Install Timer AutoLock Contrast+ DNR PIP 1 3 5 11 7 10 2 4 9 8 6 8 Features Timer AutoLock Contrast+ DNR PIP Features Timer AutoLock Contrast+ DNR PIP Access Code - - - - buttons enter the channel you wish to block individual channels or all channels at the same time. To watch the channel, enter your access code or you can always get in by inputting the default code. To deactivate the...
User manual
Page 16
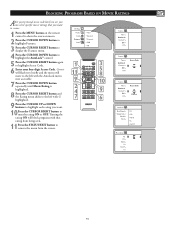
... button to highlight the AutoLock™ control. 5 Press the CURSOR RIGHT button again to highlight Access Code. 6 Enter your four-digit Access Code. Features Timer AutoLock Contrast+ DNR PIP Access Code * * * * Correct AutoLock Block Channel Change Code Clear All Block Movie Rating G PG PG-13 R NC-17 Movie Rating G On PG PG-13 R NC-17 X 16 BLOCKING PROGRAMS BASED ON MOVIE RATINGS After your personal access code has been set...
... button to highlight the AutoLock™ control. 5 Press the CURSOR RIGHT button again to highlight Access Code. 6 Enter your four-digit Access Code. Features Timer AutoLock Contrast+ DNR PIP Access Code * * * * Correct AutoLock Block Channel Change Code Clear All Block Movie Rating G PG PG-13 R NC-17 Movie Rating G On PG PG-13 R NC-17 X 16 BLOCKING PROGRAMS BASED ON MOVIE RATINGS After your personal access code has been set...
User manual
Page 25
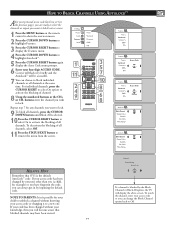
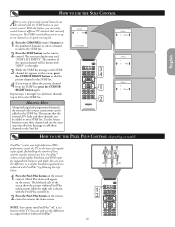
... the SURF list, press the CURSOR RIGHT button again. 1 Repeat steps 1 through 3 to add more channels (up to ten channels in its quick viewing list. Surf List Empty 2 Press the SURF button on the remote control. You can view the difference in a signal with the SURF button on the remote control to remove the demo screen. Pexel Plus Demo Pixel Plus Demo Off On 1 2 NOTE: You cannot turn Pixel Plus...
... the SURF list, press the CURSOR RIGHT button again. 1 Repeat steps 1 through 3 to add more channels (up to ten channels in its quick viewing list. Surf List Empty 2 Press the SURF button on the remote control. You can view the difference in a signal with the SURF button on the remote control to remove the demo screen. Pexel Plus Demo Pixel Plus Demo Off On 1 2 NOTE: You cannot turn Pixel Plus...
User manual
Page 26
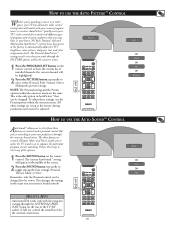
... SOUND button repeatedly to select either Personal, Rich, Natural, Soft or Multimedia picture settings. 1 NOTE: The Personal setting and the Picture 2 options within the onscreen menu. Remember, only the Personal control can be changed . HOW TO USE THE AUTO PICTURE™ CONTROL Whether you're watching a movie or a video game, your TV has automatic video control settings that will match with the programs coming through the ANTENNA/CABLE (ANT) input on the rear...
... SOUND button repeatedly to select either Personal, Rich, Natural, Soft or Multimedia picture settings. 1 NOTE: The Personal setting and the Picture 2 options within the onscreen menu. Remember, only the Personal control can be changed . HOW TO USE THE AUTO PICTURE™ CONTROL Whether you're watching a movie or a video game, your TV has automatic video control settings that will match with the programs coming through the ANTENNA/CABLE (ANT) input on the rear...

User manual
Page 27
... DVD movies. PLAY BUTTON π Press to the accessory device. HELPFUL HINT The buttons on the remote will change channels. May be used to rapidly advance a tape or DVD. May also be used for direct channel selections. In playback mode, hold the button down through chapters or titles on your accessory device. 27 PAUSE BUTTON º Press to view the picture moving rapidly in certain onscreen menu feature settings. BUTTONS...
... DVD movies. PLAY BUTTON π Press to the accessory device. HELPFUL HINT The buttons on the remote will change channels. May be used to rapidly advance a tape or DVD. May also be used for direct channel selections. In playback mode, hold the button down through chapters or titles on your accessory device. 27 PAUSE BUTTON º Press to view the picture moving rapidly in certain onscreen menu feature settings. BUTTONS...
User manual
Page 32
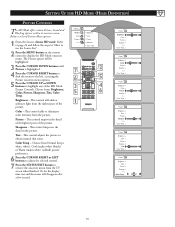
... or subtracts light from : Brightness, Color, Picture, Sharpness, Tint, Color Temp. Color - HD Menu Picture Sound Features Install Brightness Color Picture Sharpness Color Temp. 7 2 6 5 3 4 5 6 1 Picture Brightness 48 Color Picture Sharpness Tint Color Temp. Picture Brightness Color Picture Sharpness Tint Color Temp. Color Temp - Choose from the darkest part of the picture. This control adjusts the picture to display the HD Mode onscreen menu. This control improves the detail in "How to use the Source List". 2 Press the MENU button on the remote control to...
... or subtracts light from : Brightness, Color, Picture, Sharpness, Tint, Color Temp. Color - HD Menu Picture Sound Features Install Brightness Color Picture Sharpness Color Temp. 7 2 6 5 3 4 5 6 1 Picture Brightness 48 Color Picture Sharpness Tint Color Temp. Picture Brightness Color Picture Sharpness Tint Color Temp. Color Temp - Choose from the darkest part of the picture. This control adjusts the picture to display the HD Mode onscreen menu. This control improves the detail in "How to use the Source List". 2 Press the MENU button on the remote control to...
User manual
Page 35
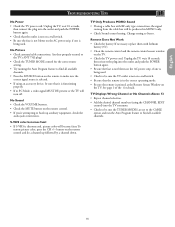
.... • Check the TV power cord. If necessary, replace them with RF only type connections, the signal coming from the cable box will become faint. button on the remote control. • If you're attempting to find all available channels. 35 English TROUBLESHOOTING TIPS No Power • Check the TV power cord. Change setting to the TV's ANT 75Ω plug? • Check the TUNER MODE control for details. See page...
.... • Check the TV power cord. If necessary, replace them with RF only type connections, the signal coming from the cable box will become faint. button on the remote control. • If you're attempting to find all available channels. 35 English TROUBLESHOOTING TIPS No Power • Check the TV power cord. Change setting to the TV's ANT 75Ω plug? • Check the TUNER MODE control for details. See page...
User manual
Page 36
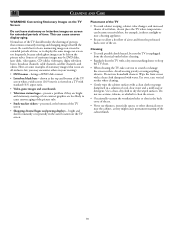
... care not to display the same images on screen too frequently, because subtle ghost images can be DVD disks, laser disks, video games, CD-i disks, videotapes, digita television boxes, broadcast channels, cable channels, satellite channels, and others in your viewing): • DVD menus - Cleaning • To avoid possible shock hazard, be sure the TV is viewed on screen for extended periods of time. Use even, easy, vertical...
... care not to display the same images on screen too frequently, because subtle ghost images can be DVD disks, laser disks, video games, CD-i disks, videotapes, digita television boxes, broadcast channels, cable channels, satellite channels, and others in your viewing): • DVD menus - Cleaning • To avoid possible shock hazard, be sure the TV is viewed on screen for extended periods of time. Use even, easy, vertical...
User manual
Page 37
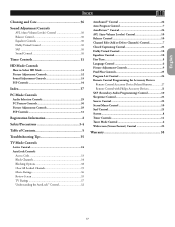
... 31 Picture Adjustment Controls 32 Sound Adjustment Controls 33 PIP Controls 34 Index 37 PC Mode Controls Audio Selection Controls 29 PC Feature Controls 30 Picture Adjustment Controls 29 PIP Controls 31 Registration Information 2 Safety/Precautions 3-4 Table of Contents 5 Troubleshooting Tips 35 TV Mode Controls Active Control 24 AutoLock Controls Access Code 13 Block Channels 14 Blocking Options 18 Clear All Locked Channels 15 Movie Ratings 16 Review Screen 19 TV Ratings 17 Understanding the AutoLock™ Control 12 AutoSound™ Control 26 Auto Program Control...
... 31 Picture Adjustment Controls 32 Sound Adjustment Controls 33 PIP Controls 34 Index 37 PC Mode Controls Audio Selection Controls 29 PC Feature Controls 30 Picture Adjustment Controls 29 PIP Controls 31 Registration Information 2 Safety/Precautions 3-4 Table of Contents 5 Troubleshooting Tips 35 TV Mode Controls Active Control 24 AutoLock Controls Access Code 13 Block Channels 14 Blocking Options 18 Clear All Locked Channels 15 Movie Ratings 16 Review Screen 19 TV Ratings 17 Understanding the AutoLock™ Control 12 AutoSound™ Control 26 Auto Program Control...
Quick Use Guide
Page 1
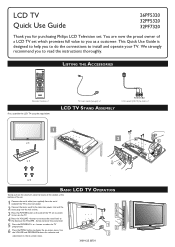
... the connections to lower the sound level. 5 Press the PROGRAM + or - button to select the TV programmes. 6 Press the MENU button to read the instructions thoroughly. LCD TV Quick Use Guide 26PF5320 32PF5320 32PF7320 Thank you for selection and adjustments in the on-screen menu. 5 6 4 1 3 2 3139 125 33731 You are now the proud owner of the TV set . Use the VOLUME and PROGRAM buttons for purchasing Philips LCD Television set to switch to turn on -screen menu. We...
... the connections to lower the sound level. 5 Press the PROGRAM + or - button to select the TV programmes. 6 Press the MENU button to read the instructions thoroughly. LCD TV Quick Use Guide 26PF5320 32PF5320 32PF7320 Thank you for selection and adjustments in the on-screen menu. 5 6 4 1 3 2 3139 125 33731 You are now the proud owner of the TV set . Use the VOLUME and PROGRAM buttons for purchasing Philips LCD Television set to switch to turn on -screen menu. We...

Quick Use Guide
Page 2
... the cable box signal. Once tuned, change channels at the cable box, not the television. Cable Box with Audio/Video Outputs Connection: 1 Cable Signal IN from Cable Company (Round 75Ω coaxial cable) 1 Cable Box (w/RF In/Outputs): This connection will supply Stereo sound to the TV. 1 Connect the open end of the round Cable Company supplied cable to the cable signal IN(put ) (TO TV) plug on the back of the Cable Box. 3 Connect the other ends to your new television. Cable Box with RF Inputs and Outputs Connection: Output Channel Switch 1 Connect...
... the cable box signal. Once tuned, change channels at the cable box, not the television. Cable Box with Audio/Video Outputs Connection: 1 Cable Signal IN from Cable Company (Round 75Ω coaxial cable) 1 Cable Box (w/RF In/Outputs): This connection will supply Stereo sound to the TV. 1 Connect the open end of the round Cable Company supplied cable to the cable signal IN(put ) (TO TV) plug on the back of the Cable Box. 3 Connect the other ends to your new television. Cable Box with RF Inputs and Outputs Connection: Output Channel Switch 1 Connect...
Quick Use Guide
Page 3
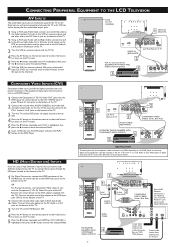
... TV. 2 Connect the red and white audio cable to RCA type Audio Cables. HDMI CABLE HD RECEIVER EQUIPPED WITH 4 COMPONENT VIDEO OUTPUTS. 3 Coxial Cable Lead-in from Cable Outlet, Cable Converter Box, or VHF/ UHF Antenna Coaxial cable Lead-in the playback of digital signal source material, such as with the TV). Y, Cr, Cb). Connect the other end of the adapter to the VGA Input jacks (CVI-2) on the DVD player or accessory digital source equipment used (for direct picture and sound connections between...
... TV. 2 Connect the red and white audio cable to RCA type Audio Cables. HDMI CABLE HD RECEIVER EQUIPPED WITH 4 COMPONENT VIDEO OUTPUTS. 3 Coxial Cable Lead-in from Cable Outlet, Cable Converter Box, or VHF/ UHF Antenna Coaxial cable Lead-in the playback of digital signal source material, such as with the TV). Y, Cr, Cb). Connect the other end of the adapter to the VGA Input jacks (CVI-2) on the DVD player or accessory digital source equipment used (for direct picture and sound connections between...

Quick Use Guide
Page 4
... AUDIO (red and white) adapter cable to enter the selected Mode. TV sound can be labeled differently. Your audio system's jack panel may be heard through the audio system. CONNECTING PERIPHERAL EQUIPMENT TO THE LCD TELEVISION PC (MONITOR) INPUTS This TV can be used in jack on the left rear of the TV. For External Audio System Connection: 1 Using an RCA type Audio Left and Right Cable, connect one end of the VGA Video cable to the Monitor (video) output...
... AUDIO (red and white) adapter cable to enter the selected Mode. TV sound can be labeled differently. Your audio system's jack panel may be heard through the audio system. CONNECTING PERIPHERAL EQUIPMENT TO THE LCD TELEVISION PC (MONITOR) INPUTS This TV can be used in jack on the left rear of the TV. For External Audio System Connection: 1 Using an RCA type Audio Left and Right Cable, connect one end of the VGA Video cable to the Monitor (video) output...


