
User Manual
Page 14
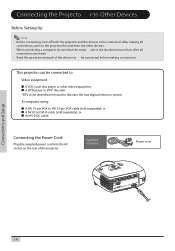
... orgolanhofmersvnppientasnacatneieldxraacbtoiieeonbptnyjwte/mhetchoetoselniesnlsvtae.emexnntptvitliocarhottianhosmensmeissnluotc.ntostvilaetnrhdweynheihlaearvereesptslouabfcfjiienccgiet the ntly lcaomople. d or wall. Connections and Setup 14 down. This projector can be connected to describe the new digital television system. Connecting the Power Cord Plug the supplied ...to be connected before making connections. After making all connections are made. • Read the operation manuals of the projector. A computer, using: A HD 15-pin VGA to HD 15-pin VGA cable (sold ...
... orgolanhofmersvnppientasnacatneieldxraacbtoiieeonbptnyjwte/mhetchoetoselniesnlsvtae.emexnntptvitliocarhottianhosmensmeissnluotc.ntostvilaetnrhdweynheihlaearvereesptslouabfcfjiienccgiet the ntly lcaomople. d or wall. Connections and Setup 14 down. This projector can be connected to describe the new digital television system. Connecting the Power Cord Plug the supplied ...to be connected before making connections. After making all connections are made. • Read the operation manuals of the projector. A computer, using: A HD 15-pin VGA to HD 15-pin VGA cable (sold ...
User Manual
Page 18
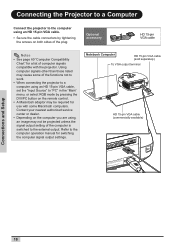
... setting of computer signals compatible with some Macintosh computers. Connections and Setup 18 Refer to the computer operation manual for use with the projector. Connecting the Projector to a Computer Connect the projector to the computer using an HD 15-pin VGA cable. • Secure the cable connectors by tightening ...the screws on both sides of the functions not to work. • When connecting the projector to a computer using an HD 15-pin VGA cable, set the "Input Source" to "PC" in the "Main" menu, or select RGB...
... setting of computer signals compatible with some Macintosh computers. Connections and Setup 18 Refer to the computer operation manual for use with the projector. Connecting the Projector to a Computer Connect the projector to the computer using an HD 15-pin VGA cable. • Secure the cable connectors by tightening ...the screws on both sides of the functions not to work. • When connecting the projector to a computer using an HD 15-pin VGA cable, set the "Input Source" to "PC" in the "Main" menu, or select RGB...
User Manual
Page 31
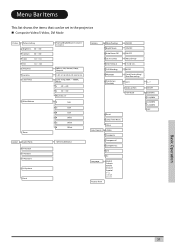
Menu Bar Items This list shows the items that can be set in the projector. Composite Video/S-Video, DVI Mode Picture Picture Setting Brightness -50 ~ +50 Contrast -50 ~ +50 Color -64 ~ +64 Tint -64 ~ +64 Sharpness G amma Color Temp White ... Options White Peaking Bright Mode Auto Power Off Source Select OSD Timeout OSD Blending PRJ Mode Deinterlace (Dvi Hide) ON/OFF ON/OFF ON/OFF Manual/Auto 5. 15. 60 secs ON/OFF Front/Front ceiling/ Rear/Rear ceiling DCTI Video on film Film Mode Reset Lamp Timer Reset Status Input Source...
Menu Bar Items This list shows the items that can be set in the projector. Composite Video/S-Video, DVI Mode Picture Picture Setting Brightness -50 ~ +50 Contrast -50 ~ +50 Color -64 ~ +64 Tint -64 ~ +64 Sharpness G amma Color Temp White ... Options White Peaking Bright Mode Auto Power Off Source Select OSD Timeout OSD Blending PRJ Mode Deinterlace (Dvi Hide) ON/OFF ON/OFF ON/OFF Manual/Auto 5. 15. 60 secs ON/OFF Front/Front ceiling/ Rear/Rear ceiling DCTI Video on film Film Mode Reset Lamp Timer Reset Status Input Source...

User Manual
Page 46
... screen, see page 33. Source Select This selects the input source automatically if no signal is set to "ON", the Auto Power Off switches the projector off . Main Menu Select "Auto Power Off" from the "Options" menu on the menu screen. For operating the menu screen, see page 33. Automatic Power... to "OFF". displays five minutes before the power turns off if an input signal is disabled when set to Use Functions 46 Source Select Auto Manual Select "source select" from the "Options" menu on the current input.
... screen, see page 33. Source Select This selects the input source automatically if no signal is set to "ON", the Auto Power Off switches the projector off . Main Menu Select "Auto Power Off" from the "Options" menu on the menu screen. For operating the menu screen, see page 33. Automatic Power... to "OFF". displays five minutes before the power turns off if an input signal is disabled when set to Use Functions 46 Source Select Auto Manual Select "source select" from the "Options" menu on the current input.

User Manual
Page 60
... 624 49.6 75 MAC 19" XGA 1024 x 768 48.4 60 3 Note • This projector may not be projected depending on the video signal when using the RBG input. Should this projector supports other signals that conform to display images from notebook computers in simultaneous (CRT/LCD) mode. ...However, this occur, turn off the LCD display on the notebook computer and output the display data in your notebook computer's operation manual. • When this projector receives 640 × 350 VESA format VGA signals, "640 × 400" appears on the screen. • When projecting video images...
... 624 49.6 75 MAC 19" XGA 1024 x 768 48.4 60 3 Note • This projector may not be projected depending on the video signal when using the RBG input. Should this projector supports other signals that conform to display images from notebook computers in simultaneous (CRT/LCD) mode. ...However, this occur, turn off the LCD display on the notebook computer and output the display data in your notebook computer's operation manual. • When this projector receives 640 × 350 VESA format VGA signals, "640 × 400" appears on the screen. • When projecting video images...


