Optoma HD7100 Support and Manuals
Get Help and Manuals for this Optoma item

View All Support Options Below
Free Optoma HD7100 manuals!
Problems with Optoma HD7100?
Ask a Question
Free Optoma HD7100 manuals!
Problems with Optoma HD7100?
Ask a Question
Optoma HD7100 Videos

Optoma HD7100 Projector 108"
Duration: 1:54
Total Views: 1,535
Duration: 1:54
Total Views: 1,535
Popular Optoma HD7100 Manual Pages
User Manual - Page 4
... 10 Remote Control 11 Using the Remote Control 12 Available Range of the Remote Control 12 Inserting the Batteries 12
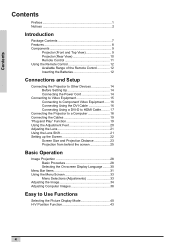
Connections and Setup
Connecting the Projector to Other Devices 14 Before Setting Up 14 Connecting the Power Cord 14
Connecting to Video Equipment 15 Connecting to Component Video Equipment ...... 16 Connecting Using the...
User Manual - Page 8
... signals. • Use of analog conversion. Home theaters using HTPC are possible with previous generation DLP™ projectors.
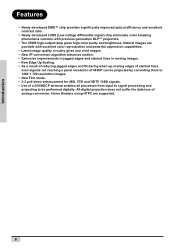
• The 250W high-output lamp gives high color purity and brightness. Introduction
Features
• Newly developed DMD™ chip provides significantly.../P can be projected by converting them to be performed digitally. Natural images are supported.
8
User Manual - Page 14
... Projecto r to Other Devices
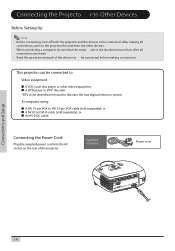
Before Setting Up
Note • Before connecting, turn on the projector first and then the other video equipment. This projector can be connected to be connected.
down. When connecting a computer, be connected before making all connections are made. • Read the operation manuals of the projector. A DVD player or DTV* decoder...
User Manual - Page 15
....ple. Connections and Setup
15 cooled
or wall....ntostilaetnrhdweynheihlaear
r
e e
pl s
a u
cing fficie
est object
the ntly
lamp.
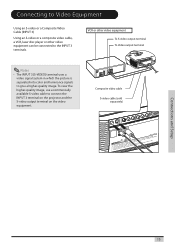
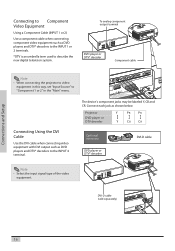
To view the higher-quality image, use a commercially available S-video cable to...in which the picture is separated into color and luminance signals to connect the INPUT 3 terminal on the projector and the S-video output terminal on the video equipment.
User Manual - Page 16
... ua fcfiincgi e est object
the ntly
lamp. Optional accessory
DVD player or DTV* decoder...Cr
Pb/Cb
Y
Pr/Cr
Pb/Cb
RS-232
Made in this way, set "Input Source" to them
ucnot i letrhwe yh
iliarotinomn esnlot.ts and n
ile...projector... to describe the new digital television system. down .
16 Connections and Setup
Connecting to Component Video Equipment
Using a Component Cable (INPUT 1 or ...
User Manual - Page 18
... et
the ntly
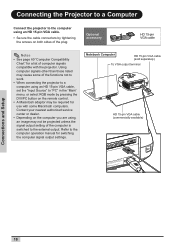
lcaomople. down . Refer to the computer operation manual for switching the computer signal output settings.
Optional accessory
HD 15-pin VGA cable
Notes • See ... use with the projector. Contact your nearest authorized service center or dealer. • Depending on the computer you are using, an image may be projected unless the signal output setting of the plug...
User Manual - Page 19
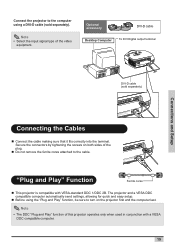
...settings, allowing for quick and easy setup.
„ Before using the "Plug and Play" function, be sure to the computer using a DVI-D cable (sold separately)
DVI
PC
Y
Pr/Cr
Pb/Cb
Y
Made in conjunction with VESA-standard DDC 1/DDC 2B. Connections and Setup
Connect the projector... ynheihlaearver eesptslouabfcfjiienccgi et
th nt
e ly
lamp. Connecting the Cables
„ Connect the...
User Manual - Page 25
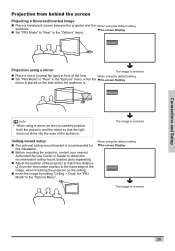
...Inverted Image
„ Place a translucent screen between the projector and the When using the default setting. Ceiling-mount setup
„ The optional ceiling-mount bracket is recommended for this installation.
„ Before mounting the projector, contact your nearest Authorized Service Center or Dealer to obtain the recommended ceiling-mount bracket (sold separately).
„ Adjust the position...
User Manual - Page 31
... film Film Mode
Reset
Lamp Timer Reset
Status
Input Source S-Video
Composite
Component 1
Component 2
DVI
Language Factory Reset
PC
English Français Italiano Deutsch Español
0~7
ON/OFF 3:2@60Hz 2:2@50Hz 2:2@50Hz 3:2@60Hz OFF
Basic Operation
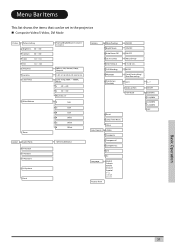
31 Menu Bar Items
This list shows the items that can be set in the projector.
User Manual - Page 48
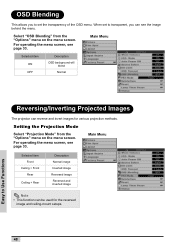
... set the transparency of the OSD menu. For operating the menu screen, see page 33.
Main Menu
Selected item Front
Ceiling + Front Rear
Ceiling + Rear
Description Normal image Inverted image Reversed image Reversed and inverted image
Note • This function can reverse and invert images for the reversed
image and ceiling-mount setups...
User Manual - Page 55

... down.
Pr/Cr Pb/Cb
Y
PC
DVI
Made in dirty or smoky locations. Clean the ventilative holes more often when the projector is used in Taiwan mp chassis cover while replacing the lamp. Cleaning the Ventilative Holes
1 Turn off with a vacuum cleaner.
• The ventilative holes should be cleaned every 100 hours of...
User Manual - Page 56
... glass particles may spread inside the lamp cage or gas contained in the bulb cracking.
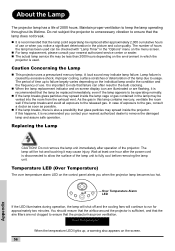
„ When the lamp replacement indicator and on the screen. 56
Appendix Caution Concerning the Lamp
„ This projector uses a pressurized mercury lamp. It is recommended that the airflow around the projector is recommended you when the projector lamp becomes too hot. Wait at least...
User Manual - Page 57
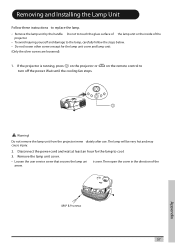
... inside of the
arrow. If the projector is running, press on the remote control to the lamp, carefully follow the steps below. • Do not loosen other screws except for the lamp to replace the lamp. • Remove the lamp unit by the handle.
Removing and Installing the Lamp Unit
Follow these instructions to cool. 3. Appendix
M4* 8.9 screws 57...
User Manual - Page 58
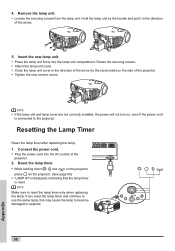
... of the projector. • Tighten the user service screw. Info • If the lamp unit and lamp cover are not correctly installed, the power will not turn on the side of the
projector. 2. If you reset the lamp timer and continue to use the same lamp, this may cause the lamp to reset the lamp timer only when replacing the lamp.
Connect...
User Manual - Page 61
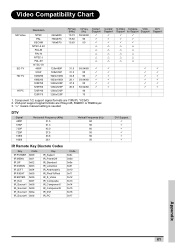
"U" means manual setting is needed
DTV
Signal 480P 576P 720P 720P 1080I 1080I
Horizontal Frequency (kHz) 31.5 31.3 45.0 37.5 33.8 28.1
Vertical Frequency (Hz) 60 50 60 50 60 50
DVI Support 3 3 3 3 3 3
IR Remote Key Discrete Codes
Key
Code
IR POWER 0x00
IR MENU 0x01
IR UP
0x02
IR DOWN 0x03
IR LEFT 0x04
IR RIGHT 0x05...
Optoma HD7100 Reviews
We have not received any reviews for Optoma yet.