
User Manual
Page 4
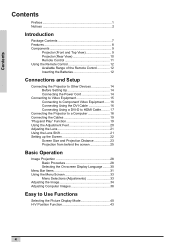
... Power Cord 14 Connecting to Video Equipment 15 Connecting to Component Video Equipment ...... 16 Connecting Using the DVI Cable 16 Connecting Using a DVI-D to HDMI Cable.......... 17 Connecting the Projector to a Computer 18 Connecting the Cables 19 "Plug and Play" Function 19 Using the Adjustment Feet 20 Adjusting the Lens 21 Using the Lens Shift 21 Setting up the Screen 22 Screen Size and Projection Distance 23 Projection from behind the screen 25 Basic Operation Image Projection 28 Basic Procedure 28 Selecting the On-screen Display...
... Power Cord 14 Connecting to Video Equipment 15 Connecting to Component Video Equipment ...... 16 Connecting Using the DVI Cable 16 Connecting Using a DVI-D to HDMI Cable.......... 17 Connecting the Projector to a Computer 18 Connecting the Cables 19 "Plug and Play" Function 19 Using the Adjustment Feet 20 Adjusting the Lens 21 Using the Lens Shift 21 Setting up the Screen 22 Screen Size and Projection Distance 23 Projection from behind the screen 25 Basic Operation Image Projection 28 Basic Procedure 28 Selecting the On-screen Display...
User Manual
Page 8
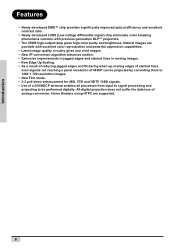
Home theaters using HTPC are possible with previous generation DLP™ projectors. • The 250W high-output lamp gives high color purity and brightness. Natural images are supported. 8 Introduction Features • Newly developed DMD™ chip provides significantly improved optical efficiency and excellent contrast ratio. • Newly developed LVDS (Low voltage differential signal) chip eliminates color breaking phenomena common with excellent color reproduction and powerful expression capabilities. •...
Home theaters using HTPC are possible with previous generation DLP™ projectors. • The 250W high-output lamp gives high color purity and brightness. Natural images are supported. 8 Introduction Features • Newly developed DMD™ chip provides significantly improved optical efficiency and excellent contrast ratio. • Newly developed LVDS (Low voltage differential signal) chip eliminates color breaking phenomena common with excellent color reproduction and powerful expression capabilities. •...
User Manual
Page 12
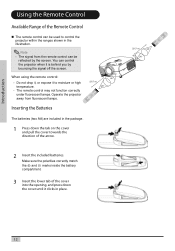
... the cover into the opening, and press down the tab on the cover and pull the cover towards the direction of the Remote Control The remote control can be used to moisture or high temperature. • The remote control may not function correctly under fluorescent lamps. Operate the projector away from the remote control can be reflected by bouncing the signal off the screen. Note • The signal from fluorescent lamps. Inserting...
... the cover into the opening, and press down the tab on the cover and pull the cover towards the direction of the Remote Control The remote control can be used to moisture or high temperature. • The remote control may not function correctly under fluorescent lamps. Operate the projector away from the remote control can be reflected by bouncing the signal off the screen. Note • The signal from fluorescent lamps. Inserting...
User Manual
Page 14
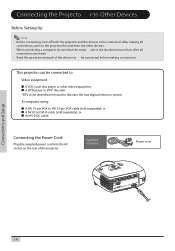
... connections, turn off both the projector and the devices to be connected. d or wall. Connections and Setup 14 This projector can be connected before making all connections are made. • Read the operation manuals of the projector. Connecting the Power Cord Plug the supplied power cord into the AC socket on the rear of the devices to be connected to Video equipment: A VCR, Laser disc player or other devices. Supplied accessory Power cord...
... connections, turn off both the projector and the devices to be connected. d or wall. Connections and Setup 14 This projector can be connected before making all connections are made. • Read the operation manuals of the projector. Connecting the Power Cord Plug the supplied power cord into the AC socket on the rear of the devices to be connected to Video equipment: A VCR, Laser disc player or other devices. Supplied accessory Power cord...
User Manual
Page 17
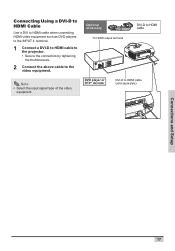
cooled or wall. Connections and Setup 17 Connecting Using a DVI-D to HDMI Cable Use a DVI to HDMI cable when connecting HDMI video equipment such as DVD players to the INPUT 4!terminal.! 1 Connect a DVI-D to HDMI cable to the projector. • Secure the connectors by tightening the thumbscrews. 2 Connect the above cable to HDMI cable DVI PC VIDEO S-VIDEO Y Pr/Cr Pb/Cb Y Pr/Cr Pb/Cb RS-232 Made in Taiwan ntptvitlcoiarhottiahnosemnsmeissnluotcn.tostvi laetnrhdwe...
cooled or wall. Connections and Setup 17 Connecting Using a DVI-D to HDMI Cable Use a DVI to HDMI cable when connecting HDMI video equipment such as DVD players to the INPUT 4!terminal.! 1 Connect a DVI-D to HDMI cable to the projector. • Secure the connectors by tightening the thumbscrews. 2 Connect the above cable to HDMI cable DVI PC VIDEO S-VIDEO Y Pr/Cr Pb/Cb Y Pr/Cr Pb/Cb RS-232 Made in Taiwan ntptvitlcoiarhottiahnosemnsmeissnluotcn.tostvi laetnrhdwe...
User Manual
Page 18
... the remote control. • A Macintosh adaptor may be projected unless the signal output setting of the computer is switched to the external output. Refer to "PC" in the "Main" menu, or select RGB mode by tightening the screws on the computer you are using an HD 15-pin VGA cable, set the "Input Source" to the computer operation manual for use with the projector. d down . Contact your nearest authorized service...
... the remote control. • A Macintosh adaptor may be projected unless the signal output setting of the computer is switched to the external output. Refer to "PC" in the "Main" menu, or select RGB mode by tightening the screws on the computer you are using an HD 15-pin VGA cable, set the "Input Source" to the computer operation manual for use with the projector. d down . Contact your nearest authorized service...
User Manual
Page 19
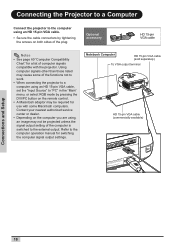
... et th nt e ly lamp. DVI-D cable (sold separately). Connections and Setup Connect the projector to the computer using the "Plug and Play" function, be sure to turn on both sides of the plug. „ Do not remove the ferrite cores attached to the cable. d down . Note • Select the input signal type of this projector operates only when used in Taiwan wemhetchoetoselniesnlsvate.emexnntptvitlcoiarhottiahnosemnsmeissnluotcn.tostvilaetnrhdweynheihlaearvreeesptsloaubcffijinecgciet...
... et th nt e ly lamp. DVI-D cable (sold separately). Connections and Setup Connect the projector to the computer using the "Plug and Play" function, be sure to turn on both sides of the plug. „ Do not remove the ferrite cores attached to the cable. d down . Note • Select the input signal type of this projector operates only when used in Taiwan wemhetchoetoselniesnlsvate.emexnntptvitlcoiarhottiahnosemnsmeissnluotcn.tostvilaetnrhdweynheihlaearvreeesptsloaubcffijinecgciet...
User Manual
Page 22
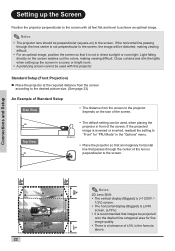
...-on the size of the screen. 90 Top View 90 Audience • The default setting can be used with all feet flat and level to "Front" for fine image quality. • There is a tolerance of the lens is not in front of the screen. If the projected image is reversed or inverted, readjust the setting to achieve an optimal image. LENS SHIFT (H) Connections and Setup Focus Zoom MENU STATUS INPUT ENTER ECO...
...-on the size of the screen. 90 Top View 90 Audience • The default setting can be used with all feet flat and level to "Front" for fine image quality. • There is a tolerance of the lens is not in front of the screen. If the projected image is reversed or inverted, readjust the setting to achieve an optimal image. LENS SHIFT (H) Connections and Setup Focus Zoom MENU STATUS INPUT ENTER ECO...
User Manual
Page 25
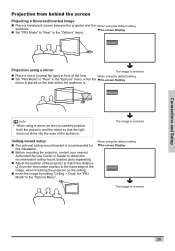
... image by setting "Ceiling + Front" for this installation. „ Before mounting the projector, contact your nearest Authorized Service Center or Dealer to obtain the recommended ceiling-mount bracket (sold separately). „ Adjust the position of the projector to match the distance (Z) from behind the screen Projecting a Reversed/Inverted Image „ Place a translucent screen between the projector and the When using the default setting. „ Set "PRJ Mode" to "Rear" in the "Options Menu". Connections and Setup Projection...
... image by setting "Ceiling + Front" for this installation. „ Before mounting the projector, contact your nearest Authorized Service Center or Dealer to obtain the recommended ceiling-mount bracket (sold separately). „ Adjust the position of the projector to match the distance (Z) from behind the screen Projecting a Reversed/Inverted Image „ Place a translucent screen between the projector and the When using the default setting. „ Set "PRJ Mode" to "Rear" in the "Options Menu". Connections and Setup Projection...

User Manual
Page 28
... The power indicator illuminates blue, Temperature Indicator ENTER button and the projector enters standby ECO button INPUT button mode. Power button Note • The power indicator illuminates, indicating the status of the lamp. Blue blinking: The fan is English. Image Projection Basic Procedure Connect the required external equipment to the procedure on the projector. • The power indicator turns off. Blue: The power is ready. EXIT Power ECO indicator! (Blue) ENTER STATUS INPUT MENU Basic Operation 28 To change the on-screen display to another language, reset...
... The power indicator illuminates blue, Temperature Indicator ENTER button and the projector enters standby ECO button INPUT button mode. Power button Note • The power indicator illuminates, indicating the status of the lamp. Blue blinking: The fan is English. Image Projection Basic Procedure Connect the required external equipment to the procedure on the projector. • The power indicator turns off. Blue: The power is ready. EXIT Power ECO indicator! (Blue) ENTER STATUS INPUT MENU Basic Operation 28 To change the on-screen display to another language, reset...
User Manual
Page 31
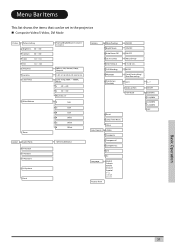
.../OFF Manual/Auto 5. 15. 60 secs ON/OFF Front/Front ceiling/ Rear/Rear ceiling DCTI Video on film Film Mode Reset Lamp Timer Reset Status Input Source S-Video Composite Component 1 Component 2 DVI Language Factory Reset PC English Français Italiano Deutsch Español 0~7 ON/OFF 3:2@60Hz 2:2@50Hz 2:2@50Hz 3:2@60Hz OFF Basic Operation 31 Menu Bar Items This list shows the items that can be set in the projector.
.../OFF Manual/Auto 5. 15. 60 secs ON/OFF Front/Front ceiling/ Rear/Rear ceiling DCTI Video on film Film Mode Reset Lamp Timer Reset Status Input Source S-Video Composite Component 1 Component 2 DVI Language Factory Reset PC English Français Italiano Deutsch Español 0~7 ON/OFF 3:2@60Hz 2:2@50Hz 2:2@50Hz 3:2@60Hz OFF Basic Operation 31 Menu Bar Items This list shows the items that can be set in the projector.
User Manual
Page 32
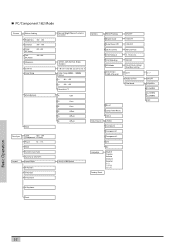
... V-Position V-Keystone Normal/Bright/Movie/Custom1/ Custom2 Softest, Soft, Normal, Sharp, Sharpest 1 . 0/1 . 5 /1 . 8 /2 . 0 /2 . 2 /2 . 3 5 /2 . 5 /2 . 8 Color Temp 5000k ~ 10000k, Native x -30 ~ +30 y -30 ~ +30 Reset this CT R Gain G Gain B Gain R Offset G Offset B Offset 16:9/4:3/LBX/Native Options White Peaking Bright mode Auto Power Off Source Select OSD Timeout OSD Blending PRJ Mode Deinterlace (480i, 576i only) Reset Lamp Timer Reset Status Input Source S-Video Composite Component 1 Component 2 DVI Language Factory Reset PC English...
... V-Position V-Keystone Normal/Bright/Movie/Custom1/ Custom2 Softest, Soft, Normal, Sharp, Sharpest 1 . 0/1 . 5 /1 . 8 /2 . 0 /2 . 2 /2 . 3 5 /2 . 5 /2 . 8 Color Temp 5000k ~ 10000k, Native x -30 ~ +30 y -30 ~ +30 Reset this CT R Gain G Gain B Gain R Offset G Offset B Offset 16:9/4:3/LBX/Native Options White Peaking Bright mode Auto Power Off Source Select OSD Timeout OSD Blending PRJ Mode Deinterlace (480i, 576i only) Reset Lamp Timer Reset Status Input Source S-Video Composite Component 1 Component 2 DVI Language Factory Reset PC English...
User Manual
Page 38
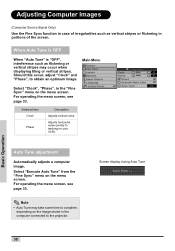
.... Adjusts horizontal noise (similar to the projector. Note • Auto Tune may occur when displaying tiling or vertical stripes. Adjusting Computer Images (Computer Source Signal Only) Use the Fine Sync function in case of the screen. Select "Execute Auto Tune" from the "Fine Sync" menu on your VCR). Main Menu Select "Clock", "Phase", in portions of irregularities such as flickering or vertical stripes may take some time...
.... Adjusts horizontal noise (similar to the projector. Note • Auto Tune may occur when displaying tiling or vertical stripes. Adjusting Computer Images (Computer Source Signal Only) Use the Fine Sync function in case of the screen. Select "Execute Auto Tune" from the "Fine Sync" menu on your VCR). Main Menu Select "Clock", "Phase", in portions of irregularities such as flickering or vertical stripes may take some time...
User Manual
Page 40
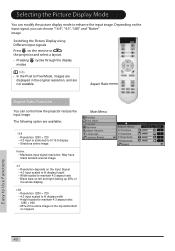
... entire image. Depending on the input signal, you can control how the projector resizes the input image. Switching the Picture Display using Different input signals Press on the remote or on the top and bottom is stretched to Pixel Mode, images are displayed in the original resolution, and are available: 16:9 • Resolution 1280 × 720 • 4:3 input is cropped. Native • Maintains input signal resolution. Selecting the Picture Display Mode You can modify the picture display mode to...
... entire image. Depending on the input signal, you can control how the projector resizes the input image. Switching the Picture Display using Different input signals Press on the remote or on the top and bottom is stretched to Pixel Mode, images are displayed in the original resolution, and are available: 16:9 • Resolution 1280 × 720 • 4:3 input is cropped. Native • Maintains input signal resolution. Selecting the Picture Display Mode You can modify the picture display mode to...

User Manual
Page 51
Main Menu Easy to Use Functions Factory reset This resets all setting to the factory defaults. The logo is shown for about the current input signal. Main Menu Screen display during Factory Reset 51 Status Screen The Status screen displays information about 20 seconds, then the projector is reset.
Main Menu Easy to Use Functions Factory reset This resets all setting to the factory defaults. The logo is shown for about the current input signal. Main Menu Screen display during Factory Reset 51 Status Screen The Status screen displays information about 20 seconds, then the projector is reset.

User Manual
Page 55
.... 3 Clean the dust off the power. Press on the projector or on the remote control to turn off by vacuuming it off the power and disconnect the power cord. Pr/Cr Pb/Cb Y PC DVI Made in dirty or smoky locations. Appendix 55 Side and Rear view Bottom view Ventilative holes Ventilative holes ENTER EXIT ECO STATUS INPUT MENU Power button 2 Unplug the Power Cord. Cleaning the Ventilative Holes 1 Turn off...
.... 3 Clean the dust off the power. Press on the projector or on the remote control to turn off by vacuuming it off the power and disconnect the power cord. Pr/Cr Pb/Cb Y PC DVI Made in dirty or smoky locations. Appendix 55 Side and Rear view Bottom view Ventilative holes Ventilative holes ENTER EXIT ECO STATUS INPUT MENU Power button 2 Unplug the Power Cord. Cleaning the Ventilative Holes 1 Turn off...
User Manual
Page 56
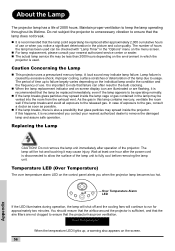
... actual lamp service life may be checked with "Lamp Timer" in the "Options" menu on the control panel alerts you notice a significant deterioration in the lamp may indicate lamp failure. In case of use . Do not subject the projector to unnecessary vibration to ensure that the lamp does not break. „ It is recommended that the aire filters are flashing, it may spread inside the projector. The period of time up , a warning...
... actual lamp service life may be checked with "Lamp Timer" in the "Options" menu on the control panel alerts you notice a significant deterioration in the lamp may indicate lamp failure. In case of use . Do not subject the projector to unnecessary vibration to ensure that the lamp does not break. „ It is recommended that the aire filters are flashing, it may spread inside the projector. The period of time up , a warning...
User Manual
Page 57
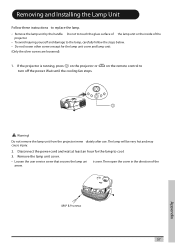
...; Do not loosen other screws except for the lamp to ENTER EXIT ECO STATUS INPUT MENU Warning! If the projector is running, press on the remote control to cool. 3. The lamp will be very hot and may cause injury. 2. Appendix M4* 8.9 screws 57 Remove the lamp unit cover. • Loosen the user service screw that secures the lamp uni t cover. Removing and Installing the Lamp Unit Follow these instructions to touch the glass...
...; Do not loosen other screws except for the lamp to ENTER EXIT ECO STATUS INPUT MENU Warning! If the projector is running, press on the remote control to cool. 3. The lamp will be very hot and may cause injury. 2. Appendix M4* 8.9 screws 57 Remove the lamp unit cover. • Loosen the user service screw that secures the lamp uni t cover. Removing and Installing the Lamp Unit Follow these instructions to touch the glass...
User Manual
Page 58
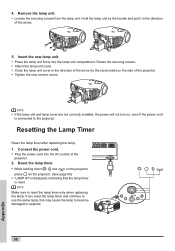
... user service screw. Resetting the Lamp Timer Reset the lamp timer after replacing the lamp. 1. nvironment. • While holding down . Fasten the securing screws. • Attach the lamp unit cover. • Close the lamp unit cover in Taiwan mp chassis cover while replacing the lamp. Pr/Cr Pb/Cb Y PC DVI Made in the direction of the projector. 2. ENTER ENTER EXIT ECO STATUS INPUT MENU Appendix 58 If you reset the lamp timer and continue to use...
... user service screw. Resetting the Lamp Timer Reset the lamp timer after replacing the lamp. 1. nvironment. • While holding down . Fasten the securing screws. • Attach the lamp unit cover. • Close the lamp unit cover in Taiwan mp chassis cover while replacing the lamp. Pr/Cr Pb/Cb Y PC DVI Made in the direction of the projector. 2. ENTER ENTER EXIT ECO STATUS INPUT MENU Appendix 58 If you reset the lamp timer and continue to use...

User Manual
Page 62
... outlet. Adjust the "Clock" setting. Adjust the "Phase" setting. Troubleshooting Problem Check Projector power cord is off. Remote control batteries have run out. Power to the rear panel of the projector. Change the input signal type of the video equipment is wrong. No picture The video signal format of the video equipment. The projection distance exceeds the focus range. (PC input only) Try "Auto tune". Projector does not start The selected input mode is not set correctly. Picture is faded Picture adjustments are incorrectly set . Color is green on...
... outlet. Adjust the "Clock" setting. Adjust the "Phase" setting. Troubleshooting Problem Check Projector power cord is off. Remote control batteries have run out. Power to the rear panel of the projector. Change the input signal type of the video equipment is wrong. No picture The video signal format of the video equipment. The projection distance exceeds the focus range. (PC input only) Try "Auto tune". Projector does not start The selected input mode is not set correctly. Picture is faded Picture adjustments are incorrectly set . Color is green on...


