
User Manual
Page 4
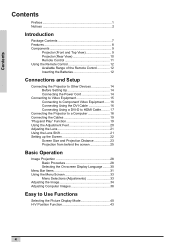
...Control 11 Using the Remote Control 12 Available Range of the Remote Control 12 Inserting the Batteries 12 Connections and Setup Connecting the Projector to Other Devices 14 Before Setting Up 14 Connecting the Power Cord 14 Connecting to Video Equipment 15 Connecting to Component Video ...Equipment ...... 16 Connecting Using the DVI Cable 16 Connecting Using a DVI-D to HDMI Cable.......... 17 Connecting the Projector to a Computer 18 Connecting the Cables 19 "Plug and Play" Function 19 Using the Adjustment Feet 20 Adjusting the Lens 21 Using ...
...Control 11 Using the Remote Control 12 Available Range of the Remote Control 12 Inserting the Batteries 12 Connections and Setup Connecting the Projector to Other Devices 14 Before Setting Up 14 Connecting the Power Cord 14 Connecting to Video Equipment 15 Connecting to Component Video ...Equipment ...... 16 Connecting Using the DVI Cable 16 Connecting Using a DVI-D to HDMI Cable.......... 17 Connecting the Projector to a Computer 18 Connecting the Cables 19 "Plug and Play" Function 19 Using the Adjustment Feet 20 Adjusting the Lens 21 Using ...
User Manual
Page 8
...-down enhancement for 480I, 576I and HDTV 1080I signals. • Use of analog conversion. Home theaters using HTPC are possible with previous generation DLP™ projectors. • The 250W high-output lamp gives high color purity and brightness.
...-down enhancement for 480I, 576I and HDTV 1080I signals. • Use of analog conversion. Home theaters using HTPC are possible with previous generation DLP™ projectors. • The 250W high-output lamp gives high color purity and brightness.
User Manual
Page 12
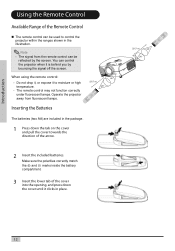
Note • The signal from fluorescent lamps. Operate the projector away from the remote control can be used to moisture or high temperature. • The remote control may not function correctly under fluorescent lamps. Make ... down the tab on the cover and pull the cover towards the direction of the Remote Control The remote control can control the projector when it to control the projector within the ranges shown in the illustration. Inserting the Batteries 45° 23'(7 m) 30° The batteries (two AA) are included in...
Note • The signal from fluorescent lamps. Operate the projector away from the remote control can be used to moisture or high temperature. • The remote control may not function correctly under fluorescent lamps. Make ... down the tab on the cover and pull the cover towards the direction of the Remote Control The remote control can control the projector when it to control the projector within the ranges shown in the illustration. Inserting the Batteries 45° 23'(7 m) 30° The batteries (two AA) are included in...
User Manual
Page 14
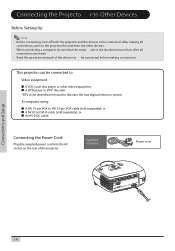
...-pin VGA cable (sold separately), or An RS-232C cable. Connecting the Power Cord Plug the supplied power cord into the AC socket on the projector first and then the other video equipment. down. When connecting a computer, be sure that the comp uter is the umbrella term used to be connected... to Video equipment: A VCR, Laser disc player or other devices. This projector can be connected. d or wall. Supplied accessory Power cord DVI PC VIDEO S-VIDEO Y Pr/Cr Pb/Cb Y Pr/Cr Pb/Cb RS-232 Made in...
...-pin VGA cable (sold separately), or An RS-232C cable. Connecting the Power Cord Plug the supplied power cord into the AC socket on the projector first and then the other video equipment. down. When connecting a computer, be sure that the comp uter is the umbrella term used to be connected... to Video equipment: A VCR, Laser disc player or other devices. This projector can be connected. d or wall. Supplied accessory Power cord DVI PC VIDEO S-VIDEO Y Pr/Cr Pb/Cb Y Pr/Cr Pb/Cb RS-232 Made in...
User Manual
Page 15
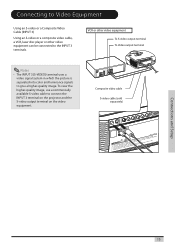
... INPUT 3 (S-VIDEO) terminal uses a video signal system in which the picture is separated into color and luminance signals to connect the INPUT 3 terminal on the projector and the S-video output terminal on the video equipment. down . VCR or other video equipment can be connected to the INPUT 3 terminals. Connections and Setup...
... INPUT 3 (S-VIDEO) terminal uses a video signal system in which the picture is separated into color and luminance signals to connect the INPUT 3 terminal on the projector and the S-video output terminal on the video equipment. down . VCR or other video equipment can be connected to the INPUT 3 terminals. Connections and Setup...
User Manual
Page 16
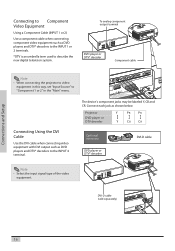
... is an umbrella term used to the INPUT 4 terminal. coole earest object or wall. Projector DVD player or DTV decoder Y PB PR Y CB CR Connecting Using the DVI Cable Use...the video equipment. DVD player or DTV* decoder Component cable Note • When connecting the projector to video equipment in Taiwan WARNING v v v v v DDDeoooeennnepoooratttitntudoslsiesueeaacrssththstaie0snem.yn3ubtnoiflliboetajotenaitocen(tnaysr0sctwlhocoarmmtostpeu), orgolanhofmersnpipentasnacatneieldxraacbtoiieeonbptnywjtemhetchoetoselniesnlstae.emexnntptitliocarhottianhosmensmeissnluotc....
... is an umbrella term used to the INPUT 4 terminal. coole earest object or wall. Projector DVD player or DTV decoder Y PB PR Y CB CR Connecting Using the DVI Cable Use...the video equipment. DVD player or DTV* decoder Component cable Note • When connecting the projector to video equipment in Taiwan WARNING v v v v v DDDeoooeennnepoooratttitntudoslsiesueeaacrssththstaie0snem.yn3ubtnoiflliboetajotenaitocen(tnaysr0sctwlhocoarmmtostpeu), orgolanhofmersnpipentasnacatneieldxraacbtoiieeonbptnywjtemhetchoetoselniesnlstae.emexnntptitliocarhottianhosmensmeissnluotc....
User Manual
Page 17
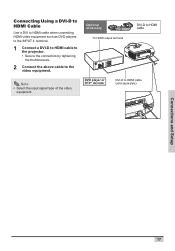
... Use a DVI to HDMI cable when connecting HDMI video equipment such as DVD players to the INPUT 4!terminal.! 1 Connect a DVI-D to HDMI cable to the projector. • Secure the connectors by tightening the thumbscrews. 2 Connect the above cable to HDMI cable DVI PC VIDEO S-VIDEO Y Pr/Cr Pb/Cb Y Pr/Cr...
... Use a DVI to HDMI cable when connecting HDMI video equipment such as DVD players to the INPUT 4!terminal.! 1 Connect a DVI-D to HDMI cable to the projector. • Secure the connectors by tightening the thumbscrews. 2 Connect the above cable to HDMI cable DVI PC VIDEO S-VIDEO Y Pr/Cr Pb/Cb Y Pr/Cr...
User Manual
Page 18
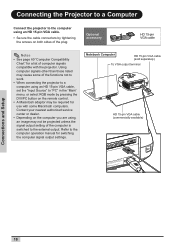
...• Depending on the computer you are using, an image may cause some of the functions not to work. • When connecting the projector to a computer using an HD 15-pin VGA cable. • Secure the cable connectors by pressing the DVI/PC button on both sides... of computer signals compatible with some Macintosh computers. Connecting the Projector to a Computer Connect the projector to the external output. Optional accessory HD 15-pin VGA cable Notes • See page 60 "Computer Compatibility Chart" for ...
...• Depending on the computer you are using, an image may cause some of the functions not to work. • When connecting the projector to a computer using an HD 15-pin VGA cable. • Secure the cable connectors by pressing the DVI/PC button on both sides... of computer signals compatible with some Macintosh computers. Connecting the Projector to a Computer Connect the projector to the external output. Optional accessory HD 15-pin VGA cable Notes • See page 60 "Computer Compatibility Chart" for ...
User Manual
Page 19
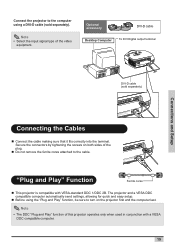
....ntostvi laetnrhdwe ynheihlaearver eesptslouabfcfjiienccgi et th nt e ly lamp. DVI-D cable (sold separately). d down . Connections and Setup Connect the projector to the computer using the "Plug and Play" function, be sure to turn on both sides of the plug. „ Do ...Play" function of the video equipment. d down . coole or wall. Secure the connectors by tightening the screws on the projector first and the computer last. The projector and a VESA DDC compatible computer automatically send settings, allowing for quick and easy setup. „ Before using a DVI...
....ntostvi laetnrhdwe ynheihlaearver eesptslouabfcfjiienccgi et th nt e ly lamp. DVI-D cable (sold separately). d down . Connections and Setup Connect the projector to the computer using the "Plug and Play" function, be sure to turn on both sides of the plug. „ Do ...Play" function of the video equipment. d down . coole or wall. Secure the connectors by tightening the screws on the projector first and the computer last. The projector and a VESA DDC compatible computer automatically send settings, allowing for quick and easy setup. „ Before using a DVI...
User Manual
Page 20
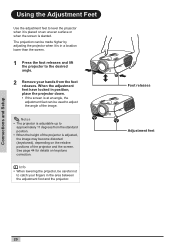
... not to catch your fingers in a location lower than the screen. 1 Press the foot releases and lift the projector to approximately 11 degrees from the foot releases. Notes • The projector is adjustable up to the desired angle. 2 Remove your hands from the standard position. • When the height... (keystoned), depending on keystone correction. Foot releases Adjustment feet Connections and Setup 20 The projection can be made higher by adjusting the projector when it is placed on an uneven surface or when the screen is in the area between the adjustment foot and the...
... not to catch your fingers in a location lower than the screen. 1 Press the foot releases and lift the projector to approximately 11 degrees from the foot releases. Notes • The projector is adjustable up to the desired angle. 2 Remove your hands from the standard position. • When the height... (keystoned), depending on keystone correction. Foot releases Adjustment feet Connections and Setup 20 The projection can be made higher by adjusting the projector when it is placed on an uneven surface or when the screen is in the area between the adjustment foot and the...
User Manual
Page 21
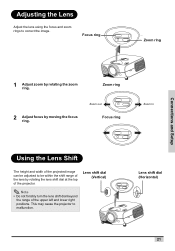
... moving the focus ring. Lens shift dial (Vertical) Note • Do not forcibly turn the lens shift dial beyond the range of the projector. This may cause the projector to correct the image. Zoom ring 2 Adjust focus by rotating the zoom ring. Adjusting the Lens Adjust the lens using the focus and...
... moving the focus ring. Lens shift dial (Vertical) Note • Do not forcibly turn the lens shift dial beyond the range of the projector. This may cause the projector to correct the image. Zoom ring 2 Adjust focus by rotating the zoom ring. Adjusting the Lens Adjust the lens using the focus and...
User Manual
Page 22
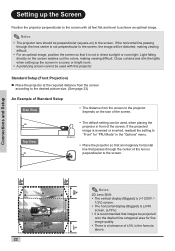
..., readjust the setting to "Front" for fine image quality. • There is not in direct sunlight or room light. Notes • The projector lens should be perpendicular (square-on the screen washes out the colors, making viewing difficult. • For an optimal image, position the screen so... that it is a tolerance of ±3% in the "Options" menu. • Place the projector so that an imaginary horizontal line that images be projected onto the dashed line octagonal area for "PRJ Mode" in the formula above. Close curtains...
..., readjust the setting to "Front" for fine image quality. • There is not in direct sunlight or room light. Notes • The projector lens should be perpendicular (square-on the screen washes out the colors, making viewing difficult. • For an optimal image, position the screen so... that it is a tolerance of ±3% in the "Options" menu. • Place the projector so that an imaginary horizontal line that images be projected onto the dashed line octagonal area for "PRJ Mode" in the formula above. Close curtains...
User Manual
Page 25
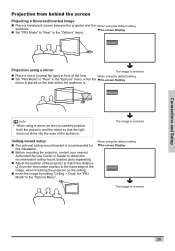
... lower edge of the audience. Ceiling-mount setup „ The optional ceiling-mount bracket is recommended for this installation. „ Before mounting the projector, contact your nearest Authorized Service Center or Dealer to obtain the recommended ceiling-mount bracket (sold separately). „ Adjust the position of the..." in the "Options Menu". When using the default setting. Connections and Setup Projection from the lens center position to carefully position both the projector and the mirror so that the light does not shine into the eyes of the image, when mounting the...
... lower edge of the audience. Ceiling-mount setup „ The optional ceiling-mount bracket is recommended for this installation. „ Before mounting the projector, contact your nearest Authorized Service Center or Dealer to obtain the recommended ceiling-mount bracket (sold separately). „ Adjust the position of the..." in the "Options Menu". When using the default setting. Connections and Setup Projection from the lens center position to carefully position both the projector and the mirror so that the light does not shine into the eyes of the image, when mounting the...

User Manual
Page 28
...Blue: The power is cooling. To change the on-screen display to another language, reset the language according to the projector before following these procedures. Power button Note • The power indicator illuminates, indicating the status of the lamp. Blue ...Plug the power cord into the wall T, S, W, X buttons outlet. • The power indicator illuminates blue, Temperature Indicator ENTER button and the projector enters standby ECO button INPUT button mode. EXIT Power ECO indicator! (Blue) ENTER STATUS INPUT MENU Basic Operation 28 Info • The preset language...
...Blue: The power is cooling. To change the on-screen display to another language, reset the language according to the projector before following these procedures. Power button Note • The power indicator illuminates, indicating the status of the lamp. Blue ...Plug the power cord into the wall T, S, W, X buttons outlet. • The power indicator illuminates blue, Temperature Indicator ENTER button and the projector enters standby ECO button INPUT button mode. EXIT Power ECO indicator! (Blue) ENTER STATUS INPUT MENU Basic Operation 28 Info • The preset language...
User Manual
Page 29
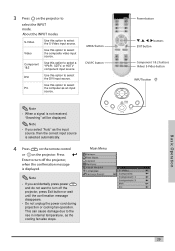
..., then the correct input source is displayed. Note • If you accidentally press power and do not want to turn off the projector, press Exit button or wait until the confirmation message disappears. • Do not unplug the power cord during projection or cooling fan ... is selected automatically. This can cause damage due to select the S-Video input source. Press Enter to INPUT select the INPUT mode. 3 Press on the projector. MENU button DVI/PC button Power button , , , buttons EXIT button Component 1 & 2 buttons Video/ S-Video button INPUT button INPUT ENTER Note •...
..., then the correct input source is displayed. Note • If you accidentally press power and do not want to turn off the projector, press Exit button or wait until the confirmation message disappears. • Do not unplug the power cord during projection or cooling fan ... is selected automatically. This can cause damage due to select the S-Video input source. Press Enter to INPUT select the INPUT mode. 3 Press on the projector. MENU button DVI/PC button Power button , , , buttons EXIT button Component 1 & 2 buttons Video/ S-Video button INPUT button INPUT ENTER Note •...
User Manual
Page 30
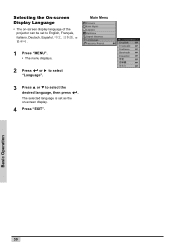
The selected language is set to English, Français, Italiano, Deutsch, Español or ᾂ᱑ / 1 Press "MENU". • The menu displays. 2 Press or X to select "Language". 3 Press S or T to select the desired language, then press . Main Menu Basic Operation 30 Selecting the On-screen Display Language • The on-screen display language of the projector can be set as the on-screen display. 4 Press "EXIT".
The selected language is set to English, Français, Italiano, Deutsch, Español or ᾂ᱑ / 1 Press "MENU". • The menu displays. 2 Press or X to select "Language". 3 Press S or T to select the desired language, then press . Main Menu Basic Operation 30 Selecting the On-screen Display Language • The on-screen display language of the projector can be set as the on-screen display. 4 Press "EXIT".
User Manual
Page 31
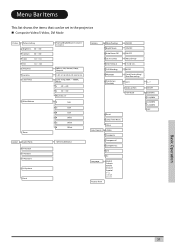
Menu Bar Items This list shows the items that can be set in the projector. Composite Video/S-Video, DVI Mode Picture Picture Setting Brightness -50 ~ +50 Contrast -50 ~ +50 Color -64 ~ +64 Tint -64 ~ +64 Sharpness G amma Color Temp White ...
Menu Bar Items This list shows the items that can be set in the projector. Composite Video/S-Video, DVI Mode Picture Picture Setting Brightness -50 ~ +50 Contrast -50 ~ +50 Color -64 ~ +64 Tint -64 ~ +64 Sharpness G amma Color Temp White ...
User Manual
Page 33
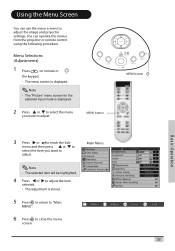
... or to select the menu you want to adjust. menu and then press or to select the item you want to adjust the image and projector settings. Note • The "Picture" menu screen for the selected input mode is displayed. Main Menu Note • The selected item will be highlighted. 4 Press... adjustment is stored. 5 Press to return to "Main MENU". 6 Press to reach the Sub- Using the Menu Screen You can operate the menus from the projector or remote control using the following procedure. You can use the menu screens to adjust.
... or to select the menu you want to adjust. menu and then press or to select the item you want to adjust the image and projector settings. Note • The "Picture" menu screen for the selected input mode is displayed. Main Menu Note • The selected item will be highlighted. 4 Press... adjustment is stored. 5 Press to return to "Main MENU". 6 Press to reach the Sub- Using the Menu Screen You can operate the menus from the projector or remote control using the following procedure. You can use the menu screens to adjust.
User Manual
Page 38
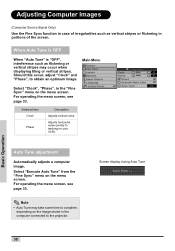
... the "Fine Sync" menu on the menu screen. Selected item Clock Phase Description Adjusts vertical noise. Should this occur, adjust "Clock" and "Phase", to the projector. Screen display during Auto Tune Basic Operation 38 Auto Tune adjustment Automatically adjusts a computer image. Select "Execute Auto Tune" from the "Fine Sync" menu on...
... the "Fine Sync" menu on the menu screen. Selected item Clock Phase Description Adjusts vertical noise. Should this occur, adjust "Clock" and "Phase", to the projector. Screen display during Auto Tune Basic Operation 38 Auto Tune adjustment Automatically adjusts a computer image. Select "Execute Auto Tune" from the "Fine Sync" menu on...
User Manual
Page 40
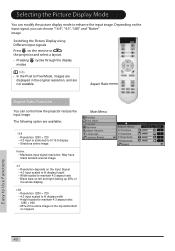
Depending on the input signal, you can control how the projector resizes the input image. Aspect Ratio Aspect Ratio Function You can choose "16:9", "4:3", "LBX" and "Native" image. Selecting the Picture Display Mode You can modify ... • 4:3 input scaled to fit display width • Height scaled to maintain 4:3 aspect ratio: 1280 × 960 • 25% of the entire image on the projector and select a layout. • Pressing modes cycles through the display Info • In the Pixel to fit 16:9 display • Stretches entire image. Native •...
Depending on the input signal, you can control how the projector resizes the input image. Aspect Ratio Aspect Ratio Function You can choose "16:9", "4:3", "LBX" and "Native" image. Selecting the Picture Display Mode You can modify ... • 4:3 input scaled to fit display width • Height scaled to maintain 4:3 aspect ratio: 1280 × 960 • 25% of the entire image on the projector and select a layout. • Pressing modes cycles through the display Info • In the Pixel to fit 16:9 display • Stretches entire image. Native •...


