

User Manual
Page 3
... ------- Compatibility Modes 26 English 1 Usage Notice ------- Powering On/Off the Projector 9 ------- Image-I (Video mode 17 ------- Language 20 ------- Package Overview 4 ----+--- Image-I (Computer mode 16 ------- Changing the Lamp 24 ------- Product Features 3 ------- Adjusting the Projected Image 11 ------- Adjusting Projection Image Size 12 User Controls ------- Panel Control & Remote Control 13 ----+--- Audio 20 ------- Adjusting the Projector...
... ------- Compatibility Modes 26 English 1 Usage Notice ------- Powering On/Off the Projector 9 ------- Image-I (Video mode 17 ------- Language 20 ------- Package Overview 4 ----+--- Image-I (Computer mode 16 ------- Changing the Lamp 24 ------- Product Features 3 ------- Adjusting the Projected Image 11 ------- Adjusting Projection Image Size 12 User Controls ------- Panel Control & Remote Control 13 ----+--- Audio 20 ------- Adjusting the Projector...

User Manual
Page 4
...Warning- Warning- English Usage Notice Warning- Warning- Warning- v Use abrasive cleaners, waxes or solvents for a few minutes. v Use under "Changing the Lamp". The bright light may hurt your cleaning. Warning- Do: v Turn off the product, please keep the cooling fan running for your eyes. Extremely hot... not open or disassemble the product as recommended in direct sunlight. 2 To reduce the risk of the lamp itself. After changing a new lamp, please reset the lamp life from AC outlet if the product is equipped with mild detergent to excessive dust and dirt. -...
...Warning- Warning- English Usage Notice Warning- Warning- Warning- v Use abrasive cleaners, waxes or solvents for a few minutes. v Use under "Changing the Lamp". The bright light may hurt your cleaning. Warning- Do: v Turn off the product, please keep the cooling fan running for your eyes. Extremely hot... not open or disassemble the product as recommended in direct sunlight. 2 To reduce the risk of the lamp itself. After changing a new lamp, please reset the lamp life from AC outlet if the product is equipped with mild detergent to excessive dust and dirt. -...
User Manual
Page 5
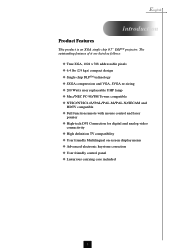
... XGA, 1024 x 768 addressable pixels u 6.4 lbs (2.9 kgs) compact design u Single chip DLPTM technology u SXGA compression and VGA, SVGA re-sizing u 200 Watts user replaceable UHP lamp u Mac/NEC PC-98/FM Towns compatible u NTSC/NTSC4.43/PAL/PAL-M/PAL-N/SECAM and HDTV compatible u Full function remote with mouse control and laser...
... XGA, 1024 x 768 addressable pixels u 6.4 lbs (2.9 kgs) compact design u Single chip DLPTM technology u SXGA compression and VGA, SVGA re-sizing u 200 Watts user replaceable UHP lamp u Mac/NEC PC-98/FM Towns compatible u NTSC/NTSC4.43/PAL/PAL-M/PAL-N/SECAM and HDTV compatible u Full function remote with mouse control and laser...
User Manual
Page 8
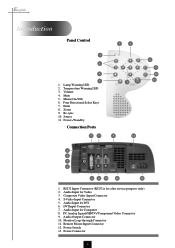
... Warning LED 3. Power /Standby Connection Ports 5 7 2 6 7 9 12 8 9 10 11 1 2 3 4 6 8 10 11 13 1 RS232 Input Connector (RS232 is for DVI 6. Power Switch 13. Re-sync 10. Lamp Warning LED 2. Source 11. S-Video Input Connector 5. Monitor Loop-through Connector 11. Enter 8. DVI Input Connecter 7. Audio Output Connector 10.
... Warning LED 3. Power /Standby Connection Ports 5 7 2 6 7 9 12 8 9 10 11 1 2 3 4 6 8 10 11 13 1 RS232 Input Connector (RS232 is for DVI 6. Power Switch 13. Re-sync 10. Lamp Warning LED 2. Source 11. S-Video Input Connector 5. Monitor Loop-through Connector 11. Enter 8. DVI Input Connecter 7. Audio Output Connector 10.

User Manual
Page 11
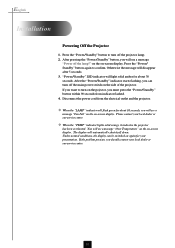
..." button on the panel control. Ž The startup screen will display and count down for 1-2 minutes. 4. Turn on the lamp by pressing "Power/Standby" button on the Remote Control or Panel Control to warm up for 20 seconds and the Power/Standby indicator will light... switch. 3 Power / Standby Lens cap 1 9 2 Power Switch Turn on your source automatically. The projector will light solid green. 5. The "LAMP" LED indicator will detect your source (computer, notebook, or video player ,etc.). English Installation Power On/Off the Projector Powering On the Projector 1.
..." button on the panel control. Ž The startup screen will display and count down for 1-2 minutes. 4. Turn on the lamp by pressing "Power/Standby" button on the Remote Control or Panel Control to warm up for 20 seconds and the Power/Standby indicator will light... switch. 3 Power / Standby Lens cap 1 9 2 Power Switch Turn on your source automatically. The projector will light solid green. 5. The "LAMP" LED indicator will detect your source (computer, notebook, or video player ,etc.). English Installation Power On/Off the Projector Powering On the Projector 1.
User Manual
Page 12
"Power/Standby" LED indicator will light solid amber for about 30 seconds. v When the "LAMP" indicator will see a message "Fan Fail" on the on -screen display. The display will disappear after 5 seconds. 3. If the problem persists, you can be switched ..." button within 90 seconds from the electrical outlet and the projector. If you will see a message "Power off the projector lamp. 2. Press the "Power/ Standby" button again to turn off the lamp?" Please contact your local dealer or our service center. 10 v When the "TEMP" indicator lights solid orange, it indicates the...
"Power/Standby" LED indicator will light solid amber for about 30 seconds. v When the "LAMP" indicator will see a message "Fan Fail" on the on -screen display. The display will disappear after 5 seconds. 3. If the problem persists, you can be switched ..." button within 90 seconds from the electrical outlet and the projector. If you will see a message "Power off the projector lamp. 2. Press the "Power/ Standby" button again to turn off the lamp?" Please contact your local dealer or our service center. 10 v When the "TEMP" indicator lights solid orange, it indicates the...
User Manual
Page 23
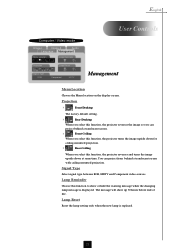
...Type Select signal type between RGB, HDTV and Component video sources. The message will show or hide the warning message when the changing lamp message is replaced. 21 Projection 4 Front-Desktop The factory default setting. 4 Rear-Desktop When you select this function, the projector ... this function to show up 30 hours before end of life. Lamp Reset Reset the lamp setting only when the new lamp is displayed. You can project behind a translucent screen with ceiling mounted projection. Lamp Reminder Choose this function, the projector reverses and turns the image ...
...Type Select signal type between RGB, HDTV and Component video sources. The message will show or hide the warning message when the changing lamp message is replaced. 21 Projection 4 Front-Desktop The factory default setting. 4 Rear-Desktop When you select this function, the projector ... this function to show up 30 hours before end of life. Lamp Reset Reset the lamp setting only when the new lamp is displayed. You can project behind a translucent screen with ceiling mounted projection. Lamp Reminder Choose this function, the projector reverses and turns the image ...
User Manual
Page 24
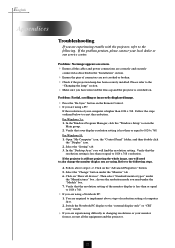
...If the projector is less than or equal to 1024 x 768. Verify that the resolution setting of computer first. 2. Please refer to the "Changing the lamp" section. 4 Make sure you have removed the lens cap and the projector is less than or equal to 1024 x 768. 4 If you are using ...Installation" section. 4 Ensure the pins of your local dealer or our service center. You are not crooked or broken. 4 Check if the projection lamp has been securely installed. Verify that the resolution setting is higher than or equal to 1024 x 768 resolution. In the "Desktop Area" you will ...
...If the projector is less than or equal to 1024 x 768. Verify that the resolution setting of computer first. 2. Please refer to the "Changing the lamp" section. 4 Make sure you have removed the lens cap and the projector is less than or equal to 1024 x 768. 4 If you are using ...Installation" section. 4 Ensure the pins of your local dealer or our service center. You are not crooked or broken. 4 Check if the projection lamp has been securely installed. Verify that the resolution setting is higher than or equal to 1024 x 768 resolution. In the "Desktop Area" you will ...
User Manual
Page 25
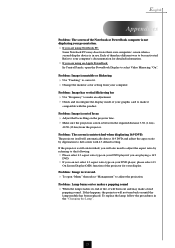
...using Notebook PC: Some Notebook PCs may make a loud popping sound. Problem : Lamp burns out or makes a popping sound 4 When the lamp reaches its end of focus 4 Adjust the Focus Ring on until the lamp module has been replaced. Refer to your display. If this happens, the projector... "On". The projector itself will burn out and may deactivate their own computers' screen when a second display device is in the "Changing the Lamp". 23 Problem : The screen is reversed. 4 To open the PowerBook Display to full screen with the product. Problem : Image is outstretched when...
...using Notebook PC: Some Notebook PCs may make a loud popping sound. Problem : Lamp burns out or makes a popping sound 4 When the lamp reaches its end of focus 4 Adjust the Focus Ring on until the lamp module has been replaced. Refer to your display. If this happens, the projector... "On". The projector itself will burn out and may deactivate their own computers' screen when a second display device is in the "Changing the Lamp". 23 Problem : The screen is reversed. 4 To open the PowerBook Display to full screen with the product. Problem : Image is outstretched when...
User Manual
Page 26
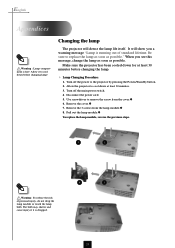
...141; 7. The bulb may shatter and cause injury if it to cool down before changing the lamp. 4 Lamp Changing Procedure: 1. English Appendices Warning : Lamp compartment is dropped. 4 3 24 Be sure to replace the lamp as soon as possible. Turn off the power to remove the screw from the...3 screws from the cover.Π6. Allow the projector to cool down at least 30 minutes before changing lamp! Disconnect the power cord. 5. Pull out the lamp module. To replace the lamp module, reverse the previous steps. 2 1 Warning : To reduce the risk of standard lifetime. It will...
...141; 7. The bulb may shatter and cause injury if it to cool down before changing the lamp. 4 Lamp Changing Procedure: 1. English Appendices Warning : Lamp compartment is dropped. 4 3 24 Be sure to replace the lamp as soon as possible. Turn off the power to remove the screw from the...3 screws from the cover.Π6. Allow the projector to cool down at least 30 minutes before changing lamp! Disconnect the power cord. 5. Pull out the lamp module. To replace the lamp module, reverse the previous steps. 2 1 Warning : To reduce the risk of standard lifetime. It will...
User Manual
Page 27
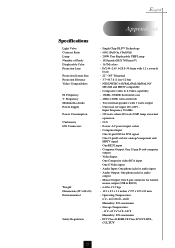
Single Chip DLPTM Technology - 600:1 (Full On / Full Off) - 200W User Replaceable UHP Lamp - 1024 pixels(H) X 768 lines(V) - 16.7M colors - F/2.44~2.69 f=28.8~34.5mm with 3 watts output - Computer Output: One 15-pin D-sub computer output -...(1.1m~12.4m) - Audio Input: One phone jack for analog/component and HDTV signal One RS232 input - English Appendices Specifications Light Valve Contrast Ratio Lamp Number of Pixels Displayable Color Projection Lens Projection Screen Size Projection Distance Video Compatibility H. Universal AC input 100~240V ; Operating Temperature: 0oC~ 40oC/32oF~...
Single Chip DLPTM Technology - 600:1 (Full On / Full Off) - 200W User Replaceable UHP Lamp - 1024 pixels(H) X 768 lines(V) - 16.7M colors - F/2.44~2.69 f=28.8~34.5mm with 3 watts output - Computer Output: One 15-pin D-sub computer output -...(1.1m~12.4m) - Audio Input: One phone jack for analog/component and HDTV signal One RS232 input - English Appendices Specifications Light Valve Contrast Ratio Lamp Number of Pixels Displayable Color Projection Lens Projection Screen Size Projection Distance Video Compatibility H. Universal AC input 100~240V ; Operating Temperature: 0oC~ 40oC/32oF~...


